Subaru Legacy (2005 year). Manual - part 513
 

  Index      Subaru     Subaru Legacy - service repair manual 2005 year


Search            


Content   ..  511  512  513  514   ..


Subaru Legacy (2005 year). Manual - part 513


4AT-33

AUTOMATIC TRANSMISSION

Differential Gear Oil

3. Differential Gear Oil

A: INSPECTION

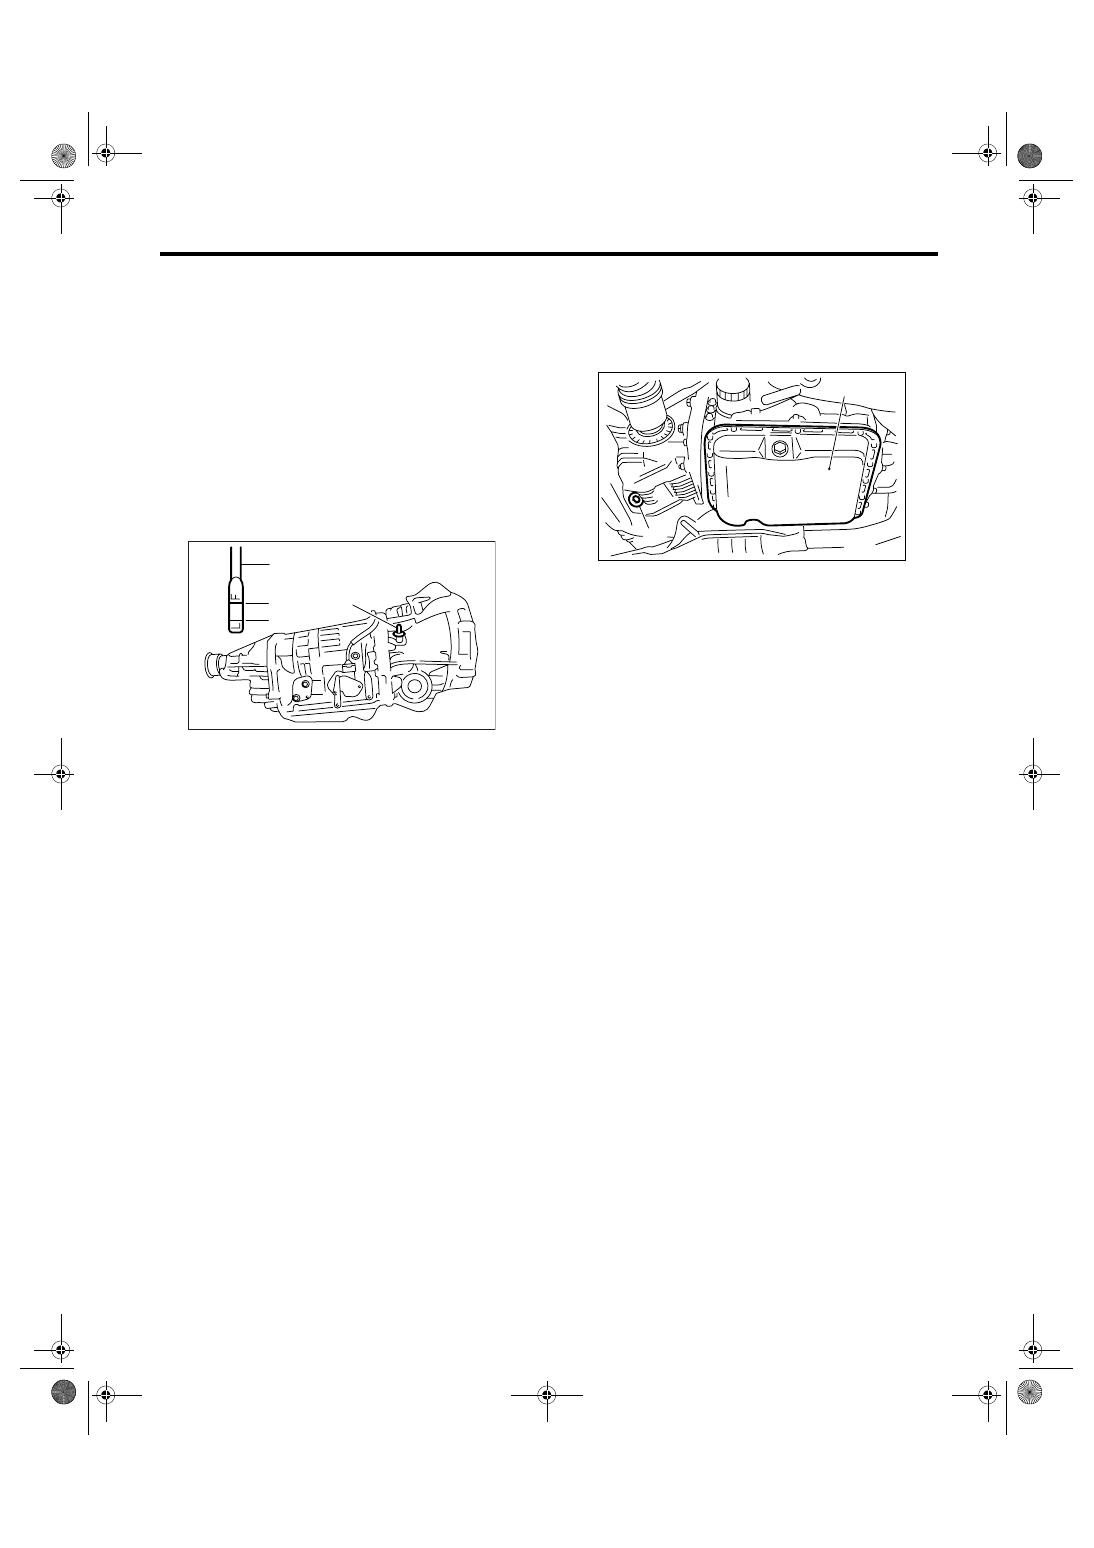
1) Park the vehicle on a level surface.
2) Remove the oil level gauge and wipe it clean.
3) Reinsert the level gauge all the way. Be sure that
the level gauge is correctly inserted and in the
proper orientation.
4) Remove the level gauge again and note the
reading. If the differential gear oil level is below “L”
line, add oil to bring the level up to “F” line.

NOTE:
To prevent overfilling the differential gear oil, do not
fill oil above the “F” line.

B: REPLACEMENT

1) Lift up the vehicle.
2) Remove the differential gear oil drain plug using
TORX

®

 BIT T70, and drain the differential gear oil

completely.

CAUTION:
• Directly after the vehicle has been running,
differential gear oil is hot. Be careful not to burn
yourself.
• Be careful not to spill the differential gear oil
on exhaust pipe to prevent it from emitting
smoke or fire. When the differential gear oil is
spilled on exhaust pipe, wipe it away complete-
ly.
3) Tighten the differential gear oil drain plug using
TORX

®

 BIT T70.

NOTE:
Use a new gasket.

Tightening torque:

Aluminum gasket

44 N

m (4.5 kgf-m, 32.5 ft-lb)

Copper gasket:

70 N

m (7.1 kgf-m, 51.6 ft-lb)

4) Lower the vehicle.
5) Pour gear oil through the gauge hole.

Recommended gear oil:

<Ref. to 4AT-3, RECOMMENDED GEAR OIL, 
SPECIFICATION, General Description.>

Gear oil capacity:

1.1 — 1.3 

2 (1.2 — 1.4 US qt, 1.0 — 1.1 Imp qt)

6) Check the level of differential gear oil.
<Ref. to 4AT-33, INSPECTION, Differential Gear
Oil.>

(A) Oil level gauge

(B) Upper level

(C) Lower level

PI-00183

(B)

(C)

(A)

(A)

(A) Oil pan

(B) Differential gear oil drain plug

AT-02204

(B)

(A)

4AT-34

AUTOMATIC TRANSMISSION

Road Test

4. Road Test

A: INSPECTION

1. GENERAL PRECAUTION

Road tests should be conducted to properly diag-
nose the condition of automatic transmission.

NOTE:
When performing the test, do not exceed posted
speed limit.

2. D RANGE SHIFT FUNCTION

Check shifting between 1st 

←→ 2nd ←→ 3rd ←→

4th while driving on normal city streets.

3. D RANGE SHIFT SHOCK

Check the shock level when shifting up during nor-
mal driving.

4. KICK-DOWN FUNCTION

Check kick-down for each gear. Also check the
kick-down shock level.

5. ENGINE BRAKE OPERATION

• Check the 3rd gear engine brake when shifting
down from 4th to 3rd range while driving in 4th gear
of manual mode [50 — 60 km/h (31 — 37 MPH)].
• Check the 2nd gear engine brake when shifting
down from 3rd to 2nd range while driving in 3rd
gear of manual mode [40 — 50 km/h (25 — 31
MPH)].
• Check the 1st gear engine brake when shifting
down from 2nd to 1st range while driving in 2nd
gear of manual mode [20 — 30 km/h (12 — 19
MPH)].

6. LOCK-UP FUNCTION

• Check that rpm does not change sharply when
the axle pedal is lightly depressed while driving on
flat roads at normal speed in “D” range.
• Check slip lock-up with following procedure.
Subaru Select Monitor is needed for checking.
Before start checking, check that no DTC is dis-
played using Subaru Select Monitor. When DTC is
displayed, perform the collective action with DTC
and check that no more DTC is displayed, and then
start the checking.
1) Perform the check on flat and straight road or
free roller.

NOTE:
• Slip lock-up does not operate when vehicle is lift-
ed up, because of no surface resistance.
• When checking on the free roller, it is easier to
check with the foot brake lightly depressed, since
the surface resistance will also be deficient.
2) Connect the Subaru Select Monitor.

3) Check the ATF temperature using Subaru Select
Monitor.

NOTE:
• ATF temperature is between 50 — 100

°C (122

— 212

°F).

• When the temperature is low, warm-up the ATF
by running the vehicle or etc.
4) Start the engine, so that the lock-up duty can be
read on data display of Subaru Select Monitor.
5) Drive the vehicle at a constant speed of 35 — 40
km/h (22 — 25 MPH).
6) Read the lock-up duty while vehicle is running.

Specification:

25 — 45%

NOTE:
The value may be lower on the free roller.
• Slip lock-up control is not operating when the
lock-up duty is less than 5%, or when the lock-up
duty goes down immediately after starts rising. On
these cases, improper ATF or deterioration of ATF
may be the cause. Check the amount of ATF or re-
place them, and then recheck it.

7. P RANGE OPERATION

Stop the vehicle on an uphill grade of 5% or more
and shift to “P” range. Check that the vehicle does
not move when the parking brake is released.

8. NOISE AND VIBRATION

Check for noise and vibration while driving and dur-
ing shifting.

9. CLIMBING CONTROL FUNCTION

• Check that the gear remains in 3rd when going
up a grade.
• Check that the gear remains in 3rd when apply-
ing the brakes while going down a grade.

10.TRANSFER CLUTCH

Check tight corner braking when the vehicle started
with steering fully turned.

11.OIL LEAKAGE

After the driving test, inspect for oil leaks.

4AT-35

AUTOMATIC TRANSMISSION

Stall Test

5. Stall Test 

A: INSPECTION

NOTE:
The stall test is of extreme importance in diagnos-
ing the condition of automatic transmission and en-
gine. It should be conducted to measure the engine
stall speeds in “R” and “2nd of manual mode”.
Purposes of the stall test:
• To check the operation of automatic transmis-
sion clutch.
• To check the operation of torque converter
clutch.
• To check engine performance.
1) Check that the throttle valve opens fully.
2) Check that the engine oil level is correct.
3) Check that the coolant level is correct.
4) Check that the ATF level is correct.
5) Check that the differential gear oil level is cor-
rect.
6) Increase ATF temperature to 70 — 80

°C (158 —

176

°F) by idling the engine for approximately 30

minutes (with select lever set to “N” or “P”).
7) Place the wheel chocks at the front and rear of
all wheels and engage the parking brake.
8) Move the manual linkage to ensure it operates
properly, and then set to the 2nd on manual mode.

9) While depressing the brake pedal strongly, de-
press the accelerator pedal gradually.
10) When the engine speed is stabilized, quickly
record that speed and release the accelerator ped-
al.
11) Shift the select lever to “N” range, and cool
down the engine by idling it for more than one
minute.
12) f the stall speed in the 2nd of manual mode is
higher than specifications, low clutch slipping and
2-4 brake slipping may occur. To identify it, conduct
the same test as above in “R” range.
13) Perform the stall tests with the select lever in
“D” range.

NOTE:
• Do not perform the stall test for more than five
seconds at a time (from closed throttle, fully open
throttle to stall speed reading). Failure to follow this
instruction causes the engine oil and ATF to deteri-
orate and the clutch and brake to be adversely af-
fected.
• Be sure to cool down the engine for at least one
minute with the select lever set in “P” or “N” range
and with the idle speed lower than 1,200 rpm after
performing stall test.
• If the stall speed is higher than the specified
range, attempt to finish the stall test in as short a
time as possible, in order to prevent the automatic
transmission from sustaining damage.

Stall speed (at sea level):

2.0 L model

2,000 — 2,500 rpm

2.5 L model

2,300 — 2,800 rpm

AT-02205

Stall speed (at sea level)

Range

Cause

Less than specification

2nd gear of manual 

mode, R

• Throttle valve not fully open
• Erroneous engine operation
• Torque converter clutch’s one-way clutch slipping

More than specification

D

• Line pressure is too low
• Low clutch slipping
• One-way clutch malfunctioning

R

• Line pressure is too low
• Reverse clutch slipping
• Low & reverse brake slipping

2nd gear of manual 

mode

• Line pressure is too low
• Low clutch slipping
• 2-4 brake slipping

4AT-36

AUTOMATIC TRANSMISSION

Time Lag Test

6. Time Lag Test 

A: INSPECTION

NOTE:
When the select lever is shifted while the engine is
idling, there will be a certain time elapse or lag be-
fore the shock can be felt. This is used for checking
the condition of the low clutch, reverse clutch, low &
reverse brake and one-way clutch.
• Perform the test at normal operation fluid tem-
perature 70 — 80

°C (158 — 176°F).

• Be sure to allow a one minute interval between
tests.
• Make three measurements and take the average
value.
1) Fully apply the parking brake.
2) Start the engine.
Check the idle speed (A/C OFF).
3) Shift the select lever from “N” to “D” range.
Using a stop watch, measure the time which takes
from shifting the lever until the shock is felt.

Time lag

Specification: 1.2 seconds or less

If “N” 

→ “D” time lag is longer than specified:

• Line pressure too low
• Low clutch worn
• One-way clutch not operating properly
• D-ring for wear
4) In the same manner, measure the time lag for
“N” 

→ “R”.

Time lag

Specification: 1.5 seconds or less

If “N” 

→ “R” time lag is longer than specified:

• Line pressure too low
• Reverse clutch worn
• Low & reverse brake worn
• D-ring for wear


Content   ..  511  512  513  514   ..