Subaru Legacy (2005 year). Manual - part 150
 

  Index      Subaru     Subaru Legacy - service repair manual 2005 year


Search            


Content   ..  148  149  150  151   ..


Subaru Legacy (2005 year). Manual - part 150


EN(H4SO 2.0)(diag)-189

ENGINE (DIAGNOSTICS)

Diagnostic Procedure with Diagnostic Trouble Code (DTC)

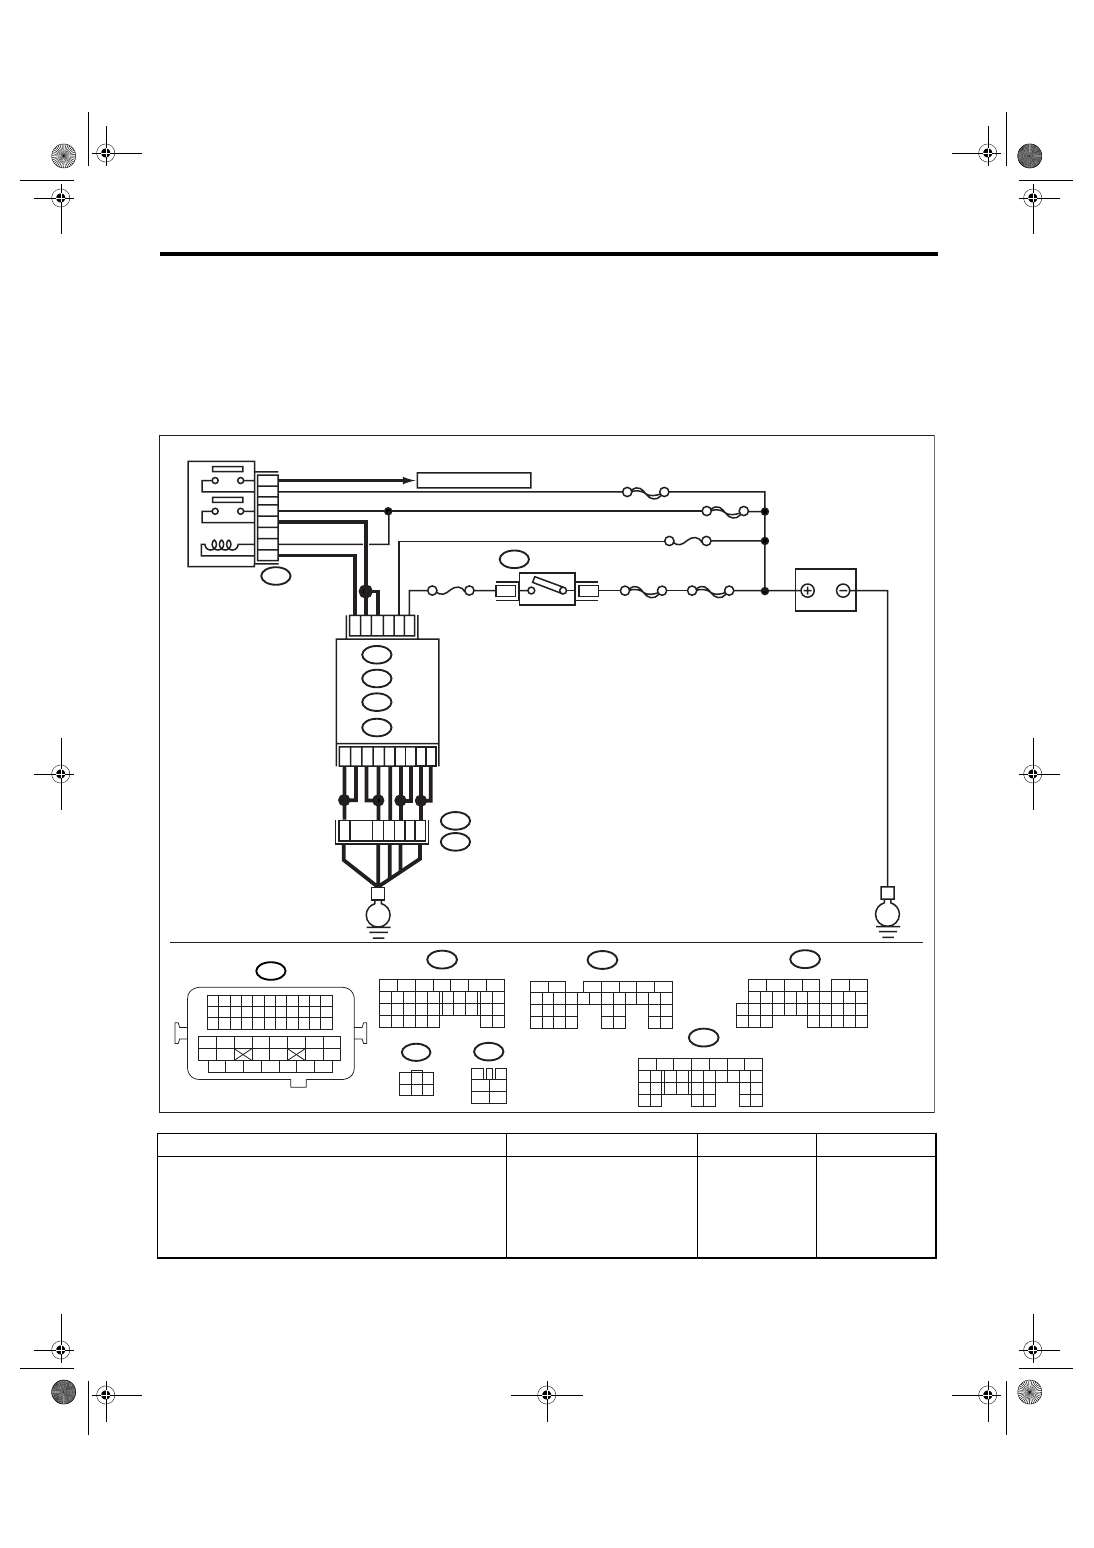
BO:DTC P1560 BACK-UP VOLTAGE CIRCUIT MALFUNCTION

DTC DETECTING CONDITION:
Immediately at fault recognition

CAUTION:
After repair or replacement of faulty parts, perform Clear Memory Mode <Ref. to EN(H4SO 2.0)(diag)-
38, OPERATION, Clear Memory Mode.> 
and Inspection Mode <Ref. to EN(H4SO 2.0)(diag)-32, PRO-
CEDURE, Inspection Mode.>.
WIRING DIAGRAM:

Step

Check

Yes

No

1

CHECK INPUT SIGNAL OF ECM.
1) Turn the ignition switch to OFF.
2) Measure the voltage between ECM and 
chassis ground.

Connector & terminal

(B136) No. 7 (+) — Chassis ground (

):

Is the voltage more than 10 V? Repair the poor 

contact in ECM 
connector.

Go to step 2.

EN-03507

BATTERY

IGNITION
SWITCH

MAIN RELAY

SBF-6

MAIN SBF

SBF-7

B72

C4

C3

B14

B5

C6

B6

C1

C2

A7

C5

C7

B13

No.12

B47

E2

B21

2

1

4

6

5

3

ECM

E

E

3

6

B134

B135

A:

D: B137

B:

D1

52

37

36

34

3

4

1

2

5

6

B47

No.13

A2

35

B134

5

6

7

8

2

1

9

4

3

10

24

22 23

25

11 12 13 14 15

26 27

28

16 17

18 19 20 21

33 34

29

32

30 31

B135

5

6

7

8

2

1

9

4

3

10

24

22 23

25

11 12 13 14 15

26 27

28

16 17 18 19

20 21

29 30 31

32 33

34 35

B137

5

6

7

8

2

1

9

4

3

10

22 23

11 12 13 14 15

24 25

26

16 17

18 19 20 21

27

28 29

30 31

B21

1 2 3 4

12 13 14 15

5 6 7 8

16 17 18 19

9 10 11

20 21 22

23 24 25 26 27 28 29 30 31 32 33

35

34

37

36

39

38

41

40

43

42

44

45

47

46

49

48

51

50

53

52

54

B72

1

3

4 5 6

2

A:

B:

D:

B136

C:

B136

5

6

7 8

2

1

9

4

3

10

24

22 23

25

11 12 13 14 15

26 27

28

16

17 18 19 20 21

33 34

29

32

30

31

35

C:

SBF-5

TO OXYGEN SENSOR

EN(H4SO 2.0)(diag)-190

ENGINE (DIAGNOSTICS)

Diagnostic Procedure with Diagnostic Trouble Code (DTC)

BP:DTC P2100 THROTTLE ACTUATOR CONTROL MOTOR CIRCUIT/OPEN

NOTE:
For the diagnostic procedure, refer to DTC P2101. <Ref. to EN(H4SO 2.0)(diag)-190, DTC P2101 THROT-
TLE ACTUATOR CONTROL MOTOR CIRCUIT RANGE/PERFORMANCE, Diagnostic Procedure with Di-
agnostic Trouble Code (DTC).>

BQ:DTC P2101 THROTTLE ACTUATOR CONTROL MOTOR CIRCUIT RANGE/

PERFORMANCE

DTC DETECTING CONDITION:
Immediately at fault recognition
TROUBLE SYMPTOM:
• Erroneous idling
• Poor driving performance
• Engine stalls.

CAUTION:
After repair or replacement of faulty parts, perform Clear Memory Mode <Ref. to EN(H4SO 2.0)(diag)-
38, OPERATION, Clear Memory Mode.> 
and Inspection Mode <Ref. to EN(H4SO 2.0)(diag)-32, PRO-
CEDURE, Inspection Mode.>.

2

CHECK HARNESS BETWEEN ECM AND 
MAIN FUSE BOX CONNECTOR.
1) Disconnect the connector from ECM.
2) Measure the resistance of harness 
between ECM and chassis ground.

Connector & terminal

(B136) No. 7 — Chassis ground:

Is the resistance less than 10 
Ω?

Repair the ground 
short circuit of har-
ness between 
ECM connector 
and battery termi-
nal.

Go to step 3.

3

CHECK FUSE No. 13.

Is the fuse blown out?

Replace the fuse.

Repair the har-
ness and connec-
tor.

NOTE:
In this case, repair
the following item:
• Open circuit of 
harness between 
ECM and battery
• Poor contact in 
ECM connector
• Poor contact in 
battery terminal

Step

Check

Yes

No

EN(H4SO 2.0)(diag)-191

ENGINE (DIAGNOSTICS)

Diagnostic Procedure with Diagnostic Trouble Code (DTC)

WIRING DIAGRAM:

EN-03508

SBF-7

B134

A:

B137

B136

D:

B362

E1

B20

C:

E

E

E

D6

D9

38

39

20

19

16

15

E2

B21

E78

2

5

D4

D5

D2

C17

C6

A2

C2

C5

C1

C30

36

35

37

D24

D23

ECM

5

7

8

6

B362

B20

B21

E78

1 2

7 8

3
4

5
6

1 2 3 4 5 6 7 8 9 10 11

12 13 14 15 16 17 18 19 20 21 22
23 24 25

34 35

36 37 38 39 40 41

48 49

50 51 52 53 54

42 43

44 45

46 47

26 27 28 29 30 31 32 33

1 2 3 4
5 6 7 8

1

2

7

8 9

5

6

3

4

10 11 12

19 20 21

29

30 31

13 14 15 16 17

27

28

18

22 23

24 25

26

1

2

8 9

5

6

3

4

10 11 12

19 20 21

29 30

31

13 14 15 16

17

27

28

18

22 23 24 25 26

7

32 33 34 35

B136

C:

B137

D:

BATTERY

MAIN RELAY

ELECTRONIC
THROTTLE 
CONTROL RELAY

ELECTRONIC
THROTTLE CONTROL

D7

D1

D3

C18

B134

5

6

7

8

2

1

9

4

3

10

24

22 23

25

11 12 13 14 15

26 27

28

16 17

18 19 20 21

33 34

29

32

30 31

A:

1

3

4 5 6

2

B83

:LHD

B138 :RHD

B83

:LHD

B138 :RHD

B83

B138

*

1

: TERMINAL No.
  RANDOM ARRANGEMENT
  AMONG 3,4,7, AND 8

*

2

: TERMINAL No.
  RANDOM ARRANGEMENT
  AMONG 1,2,5, AND 6

*

3

LHD : 4
RHD : 6

*

4

LHD : 6
RHD : 4

*

5

LHD : 3
RHD : 1

*

6

LHD : 1
RHD : 3

*

1

*

1

*

3

*

4

*

5

*

6

*

2

*

2

1 2 3 4
5 6 7 8
9 10 11 12

14

13

15 16

EN(H4SO 2.0)(diag)-192

ENGINE (DIAGNOSTICS)

Diagnostic Procedure with Diagnostic Trouble Code (DTC)

Step

Check

Yes

No

1

CHECK ELECTRONIC THROTTLE CON-
TROL RELAY.
1) Turn the ignition switch to OFF.
2) Remove the electronic throttle control relay.
3) Connect the battery to electronic throttle 
control relay terminals No. 5 and No. 6.
4) Measure the resistance between electronic 
throttle control relay terminals.

Terminals

No. 7 — No. 8:

Is the resistance less than 1 
Ω?

Go to step 2.

Replace the elec-
tronic throttle con-
trol relay.

2

CHECK POWER SUPPLY OF ELECTRONIC 
THROTTLE CONTROL RELAY.
1) Turn the ignition switch to ON.
2) Measure the voltage between electronic 
throttle control relay connector and chassis 
ground.

Connector & terminal

(B362) No. 8 (+) — Chassis ground (

):

(B362) No. 5 (+) — Chassis ground (

):

Is the voltage more than 10 V? Go to step 3.

Repair the open or 
ground short cir-
cuit of power sup-
ply circuit.

3

CHECK HARNESS BETWEEN ECM AND 
ELECTRONIC THROTTLE CONTROL RE-
LAY.
1) Turn the ignition switch to OFF.
2) Disconnect the connector from ECM.
3) Turn the ignition switch to ON.
4) Measure the voltage between electronic 
throttle control relay connector and chassis 
ground.

Connector & terminal

(B362) No. 6 (+) — Chassis ground (

):

Is the voltage more than 10 V? Repair the power 

supply short cir-
cuit of harness 
between ECM and 
electronic throttle 
control.

Go to step 4.

4

CHECK HARNESS BETWEEN ECM AND 
ELECTRONIC THROTTLE CONTROL RE-
LAY.
1) Turn the ignition switch to OFF.
2) Measure the resistance between electronic 
throttle control relay connector and chassis 
ground.

Connector & terminal

(B362) No. 6 — Chassis ground:
(B362) No. 7 — Chassis ground:

Is the resistance more than 1 
M

Ω?

Go to step 5.

Repair the ground 
short circuit of har-
ness between 
ECM and elec-
tronic throttle con-
trol relay.

5

CHECK HARNESS BETWEEN ECM AND 
ELECTRONIC THROTTLE CONTROL RE-
LAY.
Measure the resistance between ECM connec-
tor and electronic throttle control relay connec-
tor.

Connector & terminal

(B137) No. 9 — (B362) No. 6:
(B137) No. 6 — (B362) No. 7:
(B137) No. 7 — (B362) No. 7:

Is the resistance less than 1 
Ω?

Go to step 6.

Repair the open 
circuit of harness 
between ECM and 
electronic throttle 
control relay.

6

CHECK SENSOR OUTPUT.
1) Connect all the connectors.
2) Turn the ignition switch to ON.
3) Measure the voltage between ECM con-
nector terminals.

Connector & terminal

(B137) No. 24 (+) — (B136) No. 18 (

):

Is the voltage more than 0.3 V? Go to step 7.

Go to step 9.


Content   ..  148  149  150  151   ..