SsangYong Korando II (1996-2006 year). Manual - part 250
 

  Index      SsangYong     SsangYong Korando II - service repair manual 1996-2006 year


Search            


Content   ..  248  249  250  251   ..


SsangYong Korando II (1996-2006 year). Manual - part 250


ABS AND TCS 4F-15

SSANGYONG MY2002

DIAGNOSIS

KAA4F110

DIAGNOSTIC CIRCUIT CHECK

The Diagnostic Circuit Check is an organized approach
to identifying a problem created by an antilock brake
system (ABS) malfunction. If must be the starting point
for any ABS complaint diagnosis because it directs
the service technician to the next logical step in
diagnosing the complaint.

Diagnostic Process

Perform the following steps in order when servicing
the ABS/TCS system. Failure to do so may result in
the loss of important diagnostic data and may lead to
difficulties and time-consuming diagnosis procedures.

1. Perform the tests of the table below.

2. Perform a road test if directed by the table.

Test drive the vehicle while using the snapshot
feature of the scan tool.

Perform normal acceleration, stopping, and
turning maneuvers.

If this does not reproduce the malfunction,
perform an ABS stop or TCS maneuver on a low
friction surface such as gravel.

3. Clear the diagnostic trouble codes (DTCs) after

all system malfunctions have been corrected.

SSANGYONG MY2002

4F-16 ABS AND TCS

1. Install the scan tool.
2. Turn ignition switch to ON.
3. Select the Data List mode.
Is the scan tool receiving data from the electronic
brake control module (EBCM)?
Check the display.
Are there any current DTCs displayed?

1. Turn the ignition to LOCK for 10 seconds.
2. Turn the ignition to ON and observe the ABS

indicator.

Does the indicator light for 2 seconds and then go off?
Check the ABS indicator.
Did the ABS indicator turn on and stay on?

Check whether the vehicle is equipped with traction
control.
Is the vehicle equipped with traction control?
1. Turn the ignition to LOCK for 10 seconds.
2. Turn the ignition to ON and observe the TCS

indicator.

Does the indicator light for 2 seconds and then go off?
1. Turn the ignition to LOCK.
2. Disconnect the EBCM harness connector.
3. Turn the ignition to ON.
4. Use a digital voltmeter (DVM) to measure the

voltage from ground to terminal 1 and 50 of the
EBCM harness connector.

Is the voltage equal to the specified value?
1. Turn the ignition to LOCK.
2. Use a DVM to measure the resistance from the EBCM

harness connector, terminals 28 and 29 to ground.

Is the resistance equal to the specified value?
Repair the open in the circuit that failed.
Is the repair complete?
Use a DVM to measure the resistance between
terminal 46 of the EBCM harness connector and
terminal 8 of the data link connector (DLC).
Is the resistance below the specified value?
Replace the ABS unit.
Is the repair complete?
Repair the open or high resistance in circuit BrG
between terminal 11 of the EBCM harness connector
and terminal 13 of the DLC.
Is the repair complete?
Perform the road test described above.
Are any DTCs set?

Step

1

2

3

4

5

6

7

8

9

10

11

12

13

Diagnostic Circuit Check

Action

Yes

Go to Step 2

Refer to the

applicable DTC

table

Go to Step 5

Go to “ABS

Indicator Lamp

Illuminated

Constantly”

Go to Step 6

Go to Step 13

Go to Step 8

Go to Step 10

System OK

Go to Step 11

System OK

Go to Step 1

Go to the table

for the DTC

No

Go to Step 7

Go to Step 3

Go to Step 4

Go to

“ABS Indicator

Lamp Inopera-

tive

Go to Step 13

Go to “Traction
Control System

Indicator Lamp

Inoperative”

Go to “Power

Supply to

Control Mod-

ule, No DTCs

Stored

Go to Step 9

-

Go to Step 12

-

-

System OK

Value(s)

-

-

-

-

-

-

11 - 14 v

 0 

-

-

-

-

ABS AND TCS 4F-17

SSANGYONG MY2002

BLANK

SSANGYONG MY2002

4F-18 ABS AND TCS

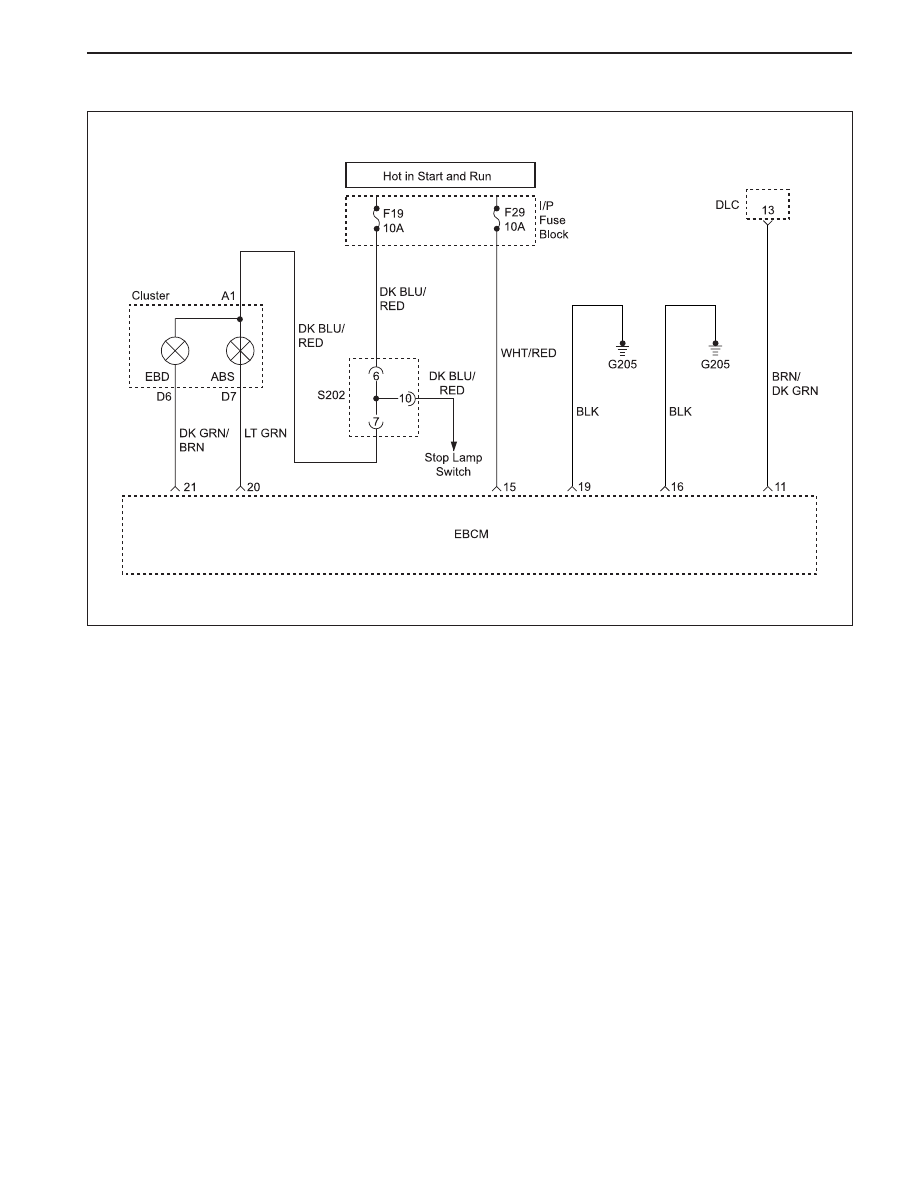
ABS INDICATOR LAMP INOPERATIVE

KAA4F120

Circuit Description

Battery voltage is supplied to the ABS warning lamp
with the ignition switch in the ON or START positions.
The warning lamp can be activated only by the ABS
control module internally supplying ground to terminal
20 or by the shorting bar in the ABS module connector
if the connector is disconnected from the module.

Diagnosis

This procedure checks for a problem in the wiring, a
faulty ground, a voltage supply problem, a burned out
indicator lamp, or a contact problem in a connector.

Cause(s)

A fuse has blown.

The indicator lamp has burned out.

There is a corroded or broken connector terminal.

There is a faulty ground connection.

There is a broken wire in a wiring harness.

The EBCM is faulty.

Test Description

The number(s) below refer to step(s) on the diagnostic
table.

1. This test checks for any DTCs that may cause

the ABS indicator lamp to be inoperative.

2. This test verifies an inoperative lamp condition.

3. This test checks for voltage on the lamp circuit.

4. This begins a series of tests of the circuit from

the indicator lamp to the EBCM and ground.

19. This begins a series of tests of the voltage supply

circuits that power the indicator lamp.


Content   ..  248  249  250  251   ..