SsangYong Musso. Manual - part 532


  Index      SsangYong     SsangYong Musso - service repair manual


Search            


Content   ..  530  531  532  533   ..


SsangYong Musso. Manual - part 532


7B/C-8  MANUAL & SEMIAUTO-HVAC

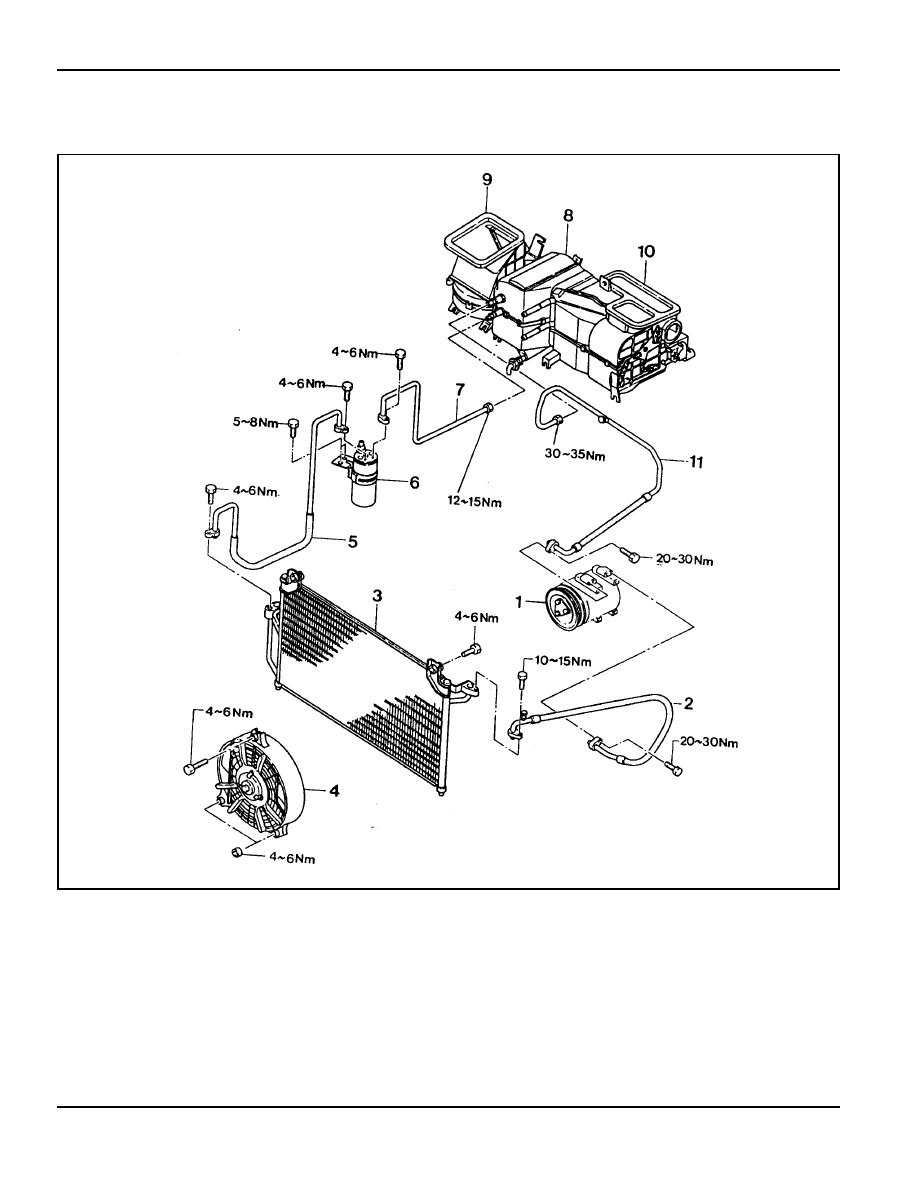
AIR CONDITIONER SYSTEM

DIESEL ENGINE

1 Compressor
2 High Pressure Hose
3 Condenser Fan
4 Condenser
5 Liquid Pipe (A)
6 Receiver Drier
7 Liquid (B)
8 Evaporator Assembly
9 Low Pressure Hose

10 Water Inlet Hose

11 Water Outlet Hose

12 Control Assembly
13 Heater Unit Amplifier
14 Mix Actuator Assembly
15 Blower Unit
16 Heater Unit
17 Mode Actuator Assembly

MANUAL & SEMIAUTO-HVAC  7B/C-9

GASOLINE  ENGINE

1 Compressor
2 High Pressure Hose
3 Condenser
4 Main Condenser Fan
5 Sub Condenser Fan
6 Condenser Fan Resistor
7 Liquid Pipe(A)
8 Receiver Dryer
9 Liquid Pipe(B)

10 Grommet

11 Evaporator Assembly

12 Control Assembly
13 Heater Unit Amp
14 Mix Actuator
15 Blower Unit
16 Heater Unit
17 Mode Actuator Assembly
18 Water Inlet Hose
19 Water Outlet Hose

7B/C-10  MANUAL & SEMIAUTO-HVAC

REFRIGERANT CHARGING

Installation of Manifold Gauge

1. Close both high/low pressure hand valve of gauge before

installation of gauge to the charging valve.

2. Connect the low pressure hose of the gauge to the low

pressure charging valve and the high pressure hose of the
gauge to high pressure charging valve.  Tighten the hose
nuts by hand.

Discharging of Refrigerant

1. Connect the manifold gauge to the charging valve.

2. Place the free end of center hose in a shop towel.

3. Slowly open the high pressure hand valve and discharge

refrigerant.

Notice

If refrigerant is allowed to escape too fast, compressor oil
will be drawn out of the system.

MAINTENANCE  AND REPAIR

MANUAL & SEMIAUTO-HVAC  7B/C-11

Evacuating Refrigeration System

1. Connect the manifold gauge to the charging valves.

2. Connect the center hose of the gauge to the vacuum pump.

3. Run the vacuum pump and open both high and low pressure

hand valves.

4. Run the vacuum pump 15-20 minutes.

5. Check that both high and low pressure gauge reading is

more than (-) 750mmHg of vacuum and close both valves.

Check for Refrigerant Leaks

1. Connect the center hose of the gauge to the refrigerant

tank.

2. Open the high pressure valve of the gauge to charge with

refrigerant gas.

3. Charge until the low pressure gauge reads 1.0kg/cm and

close the valve.

4. Using a gas leak detector, check the system for leaks.

5. If a leak is found, replace a O-ring or repair the faulty

connection

2

6. Stop the vacuum pump and wait about 5 minutes.

7. After 5 minutes, check that low pressure gauge reading is

changed or not.

8. If low pressure gauge reading is changed, check the system

for leaks and repair as necessary and repeat steps from
‘ 1 ’   t o   ‘ 7 ’ .

9. If there are no changes in low pressure gauge reading,

disconnect the vacuum pump.

4. After the high pressure gauge reading drops below 3.5kg/

cm2 , slowly open the low pressure valve.

5. When both high and low pressure gauges reading drops to

0 kg/cm, discharging is completed.


Content   ..  530  531  532  533   ..