Smart fortwo (2016). Service Manual - part 4


  Index      Smart     Smart fortwo (2016). Service Manual


Search            copyright infringement  


Content      ..     2      3      4      5     ..


Smart fortwo (2016). Service Manual - part 4


Folding back

G

WARNING

If the seat backrest is not engaged, it may

fold forwards, e.g. during braking or in the

event of an accident.

R

As a result, a backrest which is not

engaged would press you into the seat

belt. The seat belt can no longer offer the

intended level of protection and can even

cause injuries.

R

The backrest cannot restrain objects or

loads in the trunk.

There is an increased risk of injury.
Before every journey, make sure that the

backrest is engaged as described.

Variant 1:

X

Turn handwheel : back until the desired

seat backrest position is achieved

Variant 2:

X

Pull release lever :.

The backrest is released.

X

Fold the backrest backwards.

X

Ensure that the seat backrest is engaged

again.

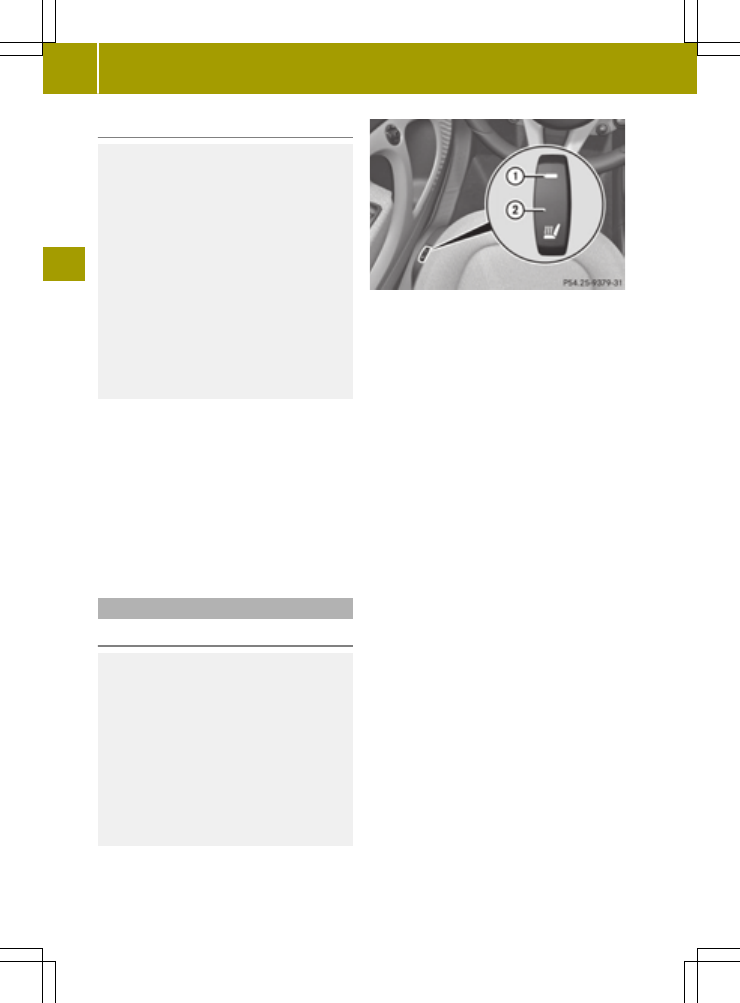
Switching the seat heating on/off

Activating/deactivating

G

WARNING

Repeatedly switching on the seat heating

can cause the seat cushion and backrest

pads to become very hot. The health of per-

sons with limited temperature sensitivity

or a limited ability to react to excessively

high temperatures may be affected or they

may even suffer burn-like injuries. There

is a risk of injury.
Therefore, do not switch the seat heating on

repeatedly.

X

Turn the SmartKey to position in the igni-

tion lock (

Y

page 87).

X

To switch on: press button ;.

Indicator lamp : in the button lights up.

X

To switch off: press button ;.

Indicator lamp : in the button goes out.

i

If the battery voltage is too low, the seat

heating may switch off.

The seat heating switches off automati-

cally after about 10 minutes.

64

Seats

>>

Seats,

steering

wheel

and

mirrors.

-------------------------------------------------------------------------------------------------------------------------------------------------------------

Problems with the seat heating

Problem

Possible causes/consequences and Solutions

The seat heating has

switched off prema-

turely or cannot be

switched on.

The on-board voltage is too low because too many electrical con-

sumers are switched on.

X

Switch off electrical consumers that you do not need, such as the

rear window defroster or interior lighting.

Once the battery is sufficiently charged, the seat heating will

switch back on automatically.

Steering wheel
Important safety notes

G

WARNING

You could lose control of your vehicle if you

do the following while driving:

R

adjust the driver's seat, steering wheel

or mirrors

R

fasten the seat belt

There is a risk of an accident.
Adjust the driver's seat, steering wheel or

mirrors and fasten your seat belt before

starting the engine.

G

WARNING

Children could injure themselves if they

adjust the steering wheel. There is a risk of

injury.
When leaving the vehicle, always take the

SmartKey with you and lock the vehicle.

Never leave children unsupervised in the

vehicle.

Adjusting the steering wheel

G

WARNING

If the steering wheel is unlocked while the

vehicle is in motion, it could change posi-

tion unexpectedly. This could cause you to

lose control of the vehicle. There is a risk

of an accident.

Before starting off, make sure the steering

wheel is locked. Never unlock the steering

wheel while the vehicle is in motion.

:

Release lever

;

To adjust the steering wheel height

X

Push release lever : down completely.

The steering column is unlocked.

X

Set desired steering wheel height ;.

X

Push release lever : up completely.

The steering column is locked.

X

Check if the steering column is locked. To

do so, try and push the steering wheel up or

down.

Steering wheel

65

>>

Seats,

steering

wheel

and

mirrors

.

Z

-------------------------------------------------------------------------------------------------------------------------------------------------------------

Mirrors
Rear-view mirror

X

Anti-glare mode: pivot anti-glare

switch : forwards or back.

Exterior mirrors

Important safety notes

G

WARNING

You could lose control of your vehicle if you

do the following while driving:

R

adjust the driver's seat, steering wheel

or mirrors

R

fasten the seat belt

There is a risk of an accident.
Adjust the driver's seat, steering wheel or

mirrors and fasten your seat belt before

starting the engine.

G

WARNING

The exterior mirrors reduce the size of the

image. Visible objects are actually closer

than they appear. This means that you could

misjudge the distance from road users

traveling behind, e.g. when changing lane.

There is a risk of an accident.
For this reason, always make sure of the

actual distance from the road users trav-

eling behind by glancing over your shoul-

der.

Adjusting the exterior mirrors manually

X

To adjust the mirror: move lever : to the

right or left, up or down.

Adjusting the exterior mirrors electri-

cally

X

Turn the SmartKey to position or in the

ignition (

Y

page 87).

X

To select an exterior mirror: turn control

= to position 1 for the left exterior mir-

ror or to position 2 for the right exterior

mirror.

X

To adjust the mirror: move control = to the

right or left, up or down.

The exterior mirrors can be heated by switch-

ing on the rear window heating (

Y

page 82).

Exterior mirror pushed out of position

If an exterior mirror has been pushed for-

wards or backwards out of position, push the

exterior mirror into the correct position

manually.

66

Mirrors

>>

Seats,

steering

wheel

and

mirrors.

-------------------------------------------------------------------------------------------------------------------------------------------------------------

Useful information

i

This Operator's Manual describes all

models and all standard and optional

equipment of your vehicle available at the

time of publication of the Operator's Man-

ual. Country-specific differences are pos-

sible. Bear in mind that your vehicle may

not feature all functions described here.

This also applies to safety-relevant sys-

tems and functions.

i

Read the information on qualified spe-

cialist workshops: (

Y

page 20).

Exterior lighting
General notes

For reasons of safety, smart recommends that

you drive with the lights switched on even

during the daytime. In some countries, oper-

ation of the headlamps varies due to legal

requirements and self-imposed obligations.

Exterior lighting settings

Operation

:

Combination switch control

;

Marking

3$

Lights off

4 T

standing lamp, parking lamp,

license plate lighting

5 K

High-beam headlamps

6 Ã

Automatic headlamp mode, control-

led by the light sensor

7 L

Low-beam headlamps

D

Marking

E

Combination switch middle ring

Ì N

Front fog lamps

Í R

Rear fog lamp

If you hear a warning tone when you leave the

vehicle, the lights may still be switched on.

X

Turn combination switch control : until

àor $ is at marking ;.

When in the Ã position the exterior light-

ing switches off automatically if you:

R

switch off the engine

R

open the driver's door

R

lock the vehicle

R

do not switch on the high-beam headlamps

Automatic headlamp mode

àis the favored light switch setting. The

light setting is automatically selected

according to the brightness of the ambient

light (exception: poor visibility due to

weather conditions such as fog, snow or

spray):

R

With the engine running: depending on the

ambient light conditions, the daytime

driving lights or the parking and low-beam

headlamps are switched on or off automat-

ically

X

To switch on automatic headlamp mode: turn

combination switch control : until Ã

is at marking ;.

G

WARNING

When the light switch is set to Ã, the

low-beam headlamps may not be switched on

automatically if there is fog, snow or other

causes of poor visibility due to the weather

Exterior lighting

67

>>

Lights

and

windshield

wipers.

Z

-------------------------------------------------------------------------------------------------------------------------------------------------------------

conditions such as spray. There is a risk of

an accident.
In such situations, turn the light switch to

L.

The automatic headlamp feature is only an

aid. The driver is responsible for the vehi-

cle's lighting at all times.

Low-beam headlamps

X

To switch on: turn combination switch con-

trol : until L is at marking ;.

The L indicator lamp in the instrument

cluster lights up.

Parking lamps

X

To switch on: turn combination switch con-

trol : until T is at marking ;.

Canada only: the standing lamps are only

switched on when the engine is switched off.

When the engine is running, the low-beam

headlamps are switched on.

Front fog lamps

Only vehicles with front foglamps have the

"Foglamps" function.

X

To switch on: make sure that the standing

lamps or low-beam headlamps are switched

on.

X

Turn combination switch middle ring E

until marking D is at N.

The N indicator lamp in the instrument

cluster lights up.

After releasing, the middle ring returns

automatically back to the neutral position.

X

To switch off: turn combination switch

middle ring E until marking D is at

N.

The N indicator lamp in the instrument

cluster goes out.

After releasing, the middle ring returns

automatically back to the neutral position.

i

If you switch off the engine (only in the

àposition) or turn off the lights, the

foglamps are also switched off.

Rear fog lamp

X

To switch on: make sure that the fog lamps

or low-beam headlamps are switched on.

X

Turn combination switch middle ring E

until marking D is at R.

The R indicator lamp in the instrument

cluster lights up.

After releasing, the middle ring returns

automatically back to the neutral position.

X

To switch off: turn combination switch

middle ring E until marking D is at

R.

The R indicator lamp in the instrument

cluster goes out.

After releasing, the middle ring returns

automatically back to the neutral position.

i

If you switch off the engine (only in the

àposition) or turn off the lights, the

rear foglamps are also switched off.

Switching on the turn signals

X

Start the engine.

X

To indicate briefly: press the combination

switch briefly to the pressure point in the

direction of arrow : (right turn signal)

or ; (left turn signal).

The corresponding turn signal flashes

three times.

X

To indicate: press the combination switch

beyond the pressure point in the direction

of arrow : (right turn signal) or ; (left

turn signal).

68

Exterior lighting

>>

Lights

and

windshield

wipers.

-------------------------------------------------------------------------------------------------------------------------------------------------------------

Switching on the high-beam headlamps

and headlamp flasher

High-beam headlamps

X

To switch on: start the engine.

X

Turn the combination switch control until

K or Ã (if available) is at the mark-

ing.

X

Press the combination switch beyond the

pressure point in the direction of

arrow :.

The K indicator lamp in the instrument

cluster lights up.

X

To deactivate: move combination switch :

back to its normal position.

The K indicator lamp in the instrument

cluster goes out.

High-beam flasher

X

To switch on: pull the combination switch

in the direction of arrow ;.

Hazard warning lamps

The hazard warning lamps automatically

switch on if:

R

an air bag is deployed

R

the vehicle decelerates rapidly from a

speed of above 45 mph (70 km/h) and comes to

a standstill

X

To switch on the hazard warning lamps:

press button :.

All turn signals flash. If you now switch on

a turn signal using the combination switch,

only the turn signal lamp on the corre-

sponding side of the vehicle will flash.

X

To switch off the hazard warning lamps:

press button :.

The hazard warning lamps switch off automat-

ically if the vehicle reaches a speed of above

6 mph (10 km/h) again after a full brake appli-

cation.

i

The hazard warning lamps still operate if

the ignition is switched off.

Headlamps fogged up on the inside

Certain climatic and physical conditions

may cause moisture to form in the headlamp.

This moisture does not affect the function-

ality of the headlamp.

Interior lighting
Overview

:

Interior lighting

;

Switches the left-hand reading lamp

on/off

=

Depending on the position of the switch:

Interior lighting switched on

Automatic interior lighting control on

Interior lighting

69

>>

Lights

and

windshield

wipers.

Z

-------------------------------------------------------------------------------------------------------------------------------------------------------------

Interior lighting switched off

?

Switches the right-hand reading lamp on/

off

The interior lighting is switched on when a

door is open: if the corresponding door is

closed correctly the interior lighting goes

out.

Interior lighting control

If the doors are unlocked with the remote con-

trol, the interval timer for the interior

lighting is triggered. The interval timer

restarts when a door is opened.

The front interior lighting and the luggage

compartment light go out gradually.

The interior lighting interval timer is

switched off:

R

if a door remains open, the interior light-

ing switches off after 15 minutes without

dimming

R

if all doors (with additional locking mech-

anism) are closed, the interior lighting

switches off after 15 seconds

R

if all doors (without locking mechanism)

are closed, the interior lighting switches

off after 3 to 4 minutes

R

as soon as the engine is started and for as

long as the engine is running

Replacing bulbs
Important safety notes

G

WARNING

Bulbs, lamps and connectors can get very

hot when operating. If you change a bulb,

you could burn yourself on these compo-

nents. There is a risk of injury.
Allow these components to cool down before

changing a bulb.

Do not use a bulb that has been dropped or if

its glass tube has been scratched.

The bulb may explode if:

R

you touch it

R

it is hot

R

you drop it

R

you scratch it

Only operate bulbs in enclosed lamps

designed for that purpose. Only fit spare

bulbs of the same type and the specified volt-

age.

Marks on the glass tube reduce the service

life of the bulbs. Do not touch the glass tube

with your bare hands. If necessary, clean the

glass tube when cold with alcohol or spirit

and rub it off with a lint-free cloth.

Protect bulbs from moisture during opera-

tion. Do not allow bulbs to come into contact

with liquids.

Replace only the bulbs listed (

Y

page 70).

If you require assistance replacing bulbs,

consult a qualified specialist workshop.

If the new bulb still does not light up, consult

a qualified specialist workshop.

The daytime driving lights and part of the

rear light clusters of your vehicle are equip-

ped with LED light bulbs. Do not replace these

bulbs yourself. Contact a qualified special-

ist workshop which has the necessary spe-

cialist knowledge and tools to carry out the

work required.

Headlamps and lamps are an important aspect

of vehicle safety. You must therefore make

sure that these function correctly at all

times. Have the headlamp setting checked

regularly.

Overview: changing bulbs/bulb types

You can replace the following bulbs. The bulb

type can be found in the legend.

:

Low-beam/high-beam headlamps: HB2

;

Turn signal lamp: PY 21 W

=

Foglamps: H16

70

Replacing bulbs

>>

Lights

and

windshield

wipers.

-------------------------------------------------------------------------------------------------------------------------------------------------------------

Tail lamp

:

Tail lamp/brake lamp/side marker lamp:

P 21 5 W

;

Rear fog lamp: P 21 W

=

Backup lamp: W 16 W

?

Turn signal lamp: PY 21 W

Tail lamps (vehicles with partial LEDs)

:

Turn signal lamp: PY 21 W

;

Backup lamp: W 16 W

:

License plate lighting: W 5 W

:

Side turn signal lamps: WY 5 W

:

Interior lighting: W 5 W

Changing the front bulbs

Important safety notes

G

WARNING

The radiator fan may continue to run after

the engine has been switched off or start

without warning. There is a risk of injury.
If you need to operate in the front area:

R

switch off the ignition

R

take off jewelry and watches

R

never reach into the fan rotation area

R

keep clothing and hair, for example, away

from the fan.

Replacing bulbs

71

>>

Lights

and

windshield

wipers.

Z

-------------------------------------------------------------------------------------------------------------------------------------------------------------

Turn signal

X

To remove the cover in the front wheel

arch: switch off the lighting system.

X

Turn the front wheels inwards.

X

Press spring clip : down.

X

Slide cover ; back and remove it.

X

Turn bulb holder : anti-clockwise and

remove.

X

Take the bulb out of bulb holder :.

X

Insert the new bulb into bulb holder :.

X

Insert bulb holder : and turn it clockwise

until it engages.

X

To fit the cover in the front wheel arch:

insert cover ; again and lock in place.

Low-beam/high-beam headlamps

X

Switch off the lights.

X

Open the service cover (

Y

page 151).

X

Remove cover :.

X

Pull out the connector.

X

Simultaneously press retainer ; forward

and to the right and then remove the lamp.

X

Insert the new bulb and engage it in place.

X

Insert the connector.

X

Position cover : and press into place.

Front fog lamps

Due to their location, have the bulbs in the

front fog lamps changed at a qualified spe-

cialist workshop.

X

Switch off the lights.

X

Remove the two screws : at the bottom of

the front wheel arch using a suitable tool.

X

Bend back the cover using your hand.

X

Turn the bulb holder anti-clockwise and

remove it.

X

Take the bulb out of the bulb holder.

X

Insert the new bulb into the bulb holder.

X

Insert the bulb holder and turn it clockwise

until it engages.

72

Replacing bulbs

>>

Lights

and

windshield

wipers.

-------------------------------------------------------------------------------------------------------------------------------------------------------------

X

Bend the cover back into position.

X

Tighten the two screws : again.

Side turn signal lamps

X

Insert a flat tool into recess : and lever

side turn signal lamp ; forwards and out.

X

Remove the bulb holder from side turn sig-

nal lamp ; by turning it a quarter turn

anti-clockwise.

X

Pull the bulb out of the bulb holder.

X

Insert the new bulb into the bulb holder.

X

Insert the bulb holder into side turn signal

lamp ; and turn it a quarter turn clock-

wise.

X

Insert side turn signal lamp ;.

Changing the rear bulbs

Tail lamp

X

Switch off the lights.

X

To remove: open the upper and lower tail-

gate (

Y

page 57).

X

Remove two screws : on the tail lamp using

a suitable slotted screwdriver.

X

Carefully take out the lamp.

X

To release the connector: insert a suitable

slotted screwdriver under the plastic

hanger, lift a small plastic piece upwards

and remove the connector.

Bulb holder

:

Tail lamp/brake lamp/side marker lamps

(only vehicles without partial LEDs)

;

Turn signal

=

Backup lamp

?

Rear foglamp (vehicles without partial

LEDs)

X

Unclip four bulb holder tabs A and care-

fully remove the bulb holder.

X

Pull out the corresponding bulb.

X

Insert the new bulb.

X

Re-install bulb holder.

Four bulb holder tabs A must audibly

engage.

X

Insert the connector.

X

Insert the lamp again.

X

Tighten the two screws : on the tail lamp

again.

Replacing bulbs

73

>>

Lights

and

windshield

wipers.

Z

-------------------------------------------------------------------------------------------------------------------------------------------------------------

License plate lamp

X

To remove: release catch : of the lamp lens

using a suitable tool.

X

Remove the lamp lens.

X

Take bulb : out of the bulb holder.

X

Insert the new bulb into the bulb holder.

X

Re-insert the lamp lens into the license

plate lamp.

Replacing the interior lighting

X

Remove lamp lens : with a flat tool, e.g. a

screwdriver.

X

Take the bulb to be replaced out of the bulb

holder.

X

Insert the new bulb into the bulb holder.

X

Insert lamp lens :.

Windshield wipers
Switching the windshield wipers

on/off

!

Do not operate the windshield wipers

when the windshield is dry, as this could

damage the wiper blades. Moreover, dust

that has collected on the windshield can

scratch the glass if wiping takes place

when the windshield is dry.

If it is necessary to switch on the wind-

shield wipers in dry weather conditions,

always use washer fluid when operating the

windshield wipers.

!

Make sure that the front windshield wip-

ers are free of ice. The wiper motor could

otherwise overheat.

!

If the windshield wipers leave smears on

the windshield after the vehicle has been

washed in an automatic car wash, wax or

other residues may be the reason for this.

Clean the windshield using washer fluid

after washing the vehicle in an automatic

car wash.

!

Vehicles with a rain sensor: if the wind-

shield becomes dirty in dry weather con-

ditions, the windshield wipers may be

activated inadvertently. This could then

damage the windshield wiper blades or

scratch the windshield.

For this reason, you should always switch

off the windshield wipers in dry weather.

74

Windshield wipers

>>

Lights

and

windshield

wipers.

-------------------------------------------------------------------------------------------------------------------------------------------------------------

Combination switch

:

Control for wiping frequency and sensi-

tivity of the rain sensor

2

Windshield wipers off

3

àAutomatic wipe (rain sensor)

4

Continuous wipe, slow

5

Continuous wipe, fast

B

î Wipes with washer fluid

X

To switch on: turn the key to position or 2

in the ignition lock (

Y

page 87).

X

Press the combination switch to the ©

position or 1.

or

X

Start the engine (

Y

page 87).

X

Press the combination switch down or up to

the corresponding position.

X

To wipe with washer fluid î: pull the

combination switch towards the steering

wheel.

X

To switch off: press the combination switch

to position 0.

Position changes to position when the

engine is stopped.

In position or in the © position, the

windshield wipers stop automatically when

the engine is stopped and the driver's door is

opened.

Vehicles with a rain sensor: in position Ã

the windshield wipers stop automatically

when the engine is stopped.

The windshield will no longer be wiped prop-

erly if the wiper blades are worn. This could

prevent you from observing the traffic con-

ditions.

Intermittent wipe

Vehicles with a rain sensor: the appropriate

wiping frequency is automatically set

according to the intensity of the rain. With

intermittent wiping you can also adjust the

sensitivity of the rain sensor using con-

trol :. When the sensitivity is set to high,

the windshield wiper wipes more frequently.

X

To switch on: start the engine (

Y

page 87).

X

Press the combination switch to the Ã

position.

The windshield wipers sweep once.

Switching the rear window wiper on/off

Combination switch

:

Control

2

$ Rear window wiper off

3

è Rear window wiper on

4

ô Wiping with washer fluid

X

Turn the key to position in the ignition

lock or start the engine (

Y

page 87).

X

Turn control : on the combination switch

to the corresponding position.

Replacing the wiper blades

Important safety notes

G

WARNING

If the windshield wipers begin to move

while you are changing the wiper blades,

you could be trapped by the wiper arm.

There is a risk of injury.

Windshield wipers

75

>>

Lights

and

windshield

wipers.

Z

-------------------------------------------------------------------------------------------------------------------------------------------------------------

Always switch off the windshield wipers

and ignition before changing the wiper

blades.

!

To avoid damaging the wiper blades, make

sure that you touch only the wiper arm of the

wiper.

!

Never open the service cover/tailgate if a

windshield wiper arm has been folded away

from the windshield/rear window.

Never fold a windshield wiper arm without

a wiper blade back onto the windshield/

rear window.

Hold the windshield wiper arm firmly when

you change the wiper blade. If you release

the wiper arm without a wiper blade and it

falls onto the windshield/rear window, the

windshield/rear window may be damaged by

the force of the impact.

smart recommends that you have the wiper

blades changed at a qualified specialist

workshop.

Changing the windshield wiper blades

Removing the wiper blades

X

Turn the key to position or in the igni-

tion lock (

Y

page 87).

X

Press the combination switch to the 5

position (

Y

page 74).

The wiper arms move slowly upwards.

X

When the wiper arms are vertical in rela-

tion to the service cover, turn the key to

position and remove it from the ignition

lock.

X

Fold the wiper arm away from the wind-

shield.

X

Press the two release clips ; on mount-

ing ? in the direction of arrow = and pull

away from the wiper arm.

X

Slide wiper blade : in the direction of

arrow A until the wiper blade securing

hook is revealed.

X

Remove wiper blade :.

Installing the wiper blades

X

Slide new wiper blade : in the direction

of arrow ? onto mounting = of wiper

arm ;.

Wiper blade : engages.

X

Make sure that wiper blade : is seated

correctly.

X

Fold wiper arm ; back onto the wind-

shield.

Replacing the rear window wiper blade

Removing a wiper blade

X

Remove the SmartKey from the ignition

lock.

X

Fold wiper arm : away from the rear win-

dow until it engages.

76

Windshield wipers

>>

Lights

and

windshield

wipers.

-------------------------------------------------------------------------------------------------------------------------------------------------------------

X

Pull wiper blade ; in the direction of the

arrow until it is released from the retainer

on the wiper arm.

X

Remove wiper blade ;.

Installing a wiper blade

X

Push new wiper blade ; onto wiper arm :

until you feel it engage.

X

Turn wiper blade ; parallel to wiper

arm :.

X

Make sure that wiper blade ; is seated

correctly.

X

Fold wiper arm : back onto the rear win-

dow.

Windshield wipers

77

>>

Lights

and

windshield

wipers.

Z

-------------------------------------------------------------------------------------------------------------------------------------------------------------

Problems with the windshield wipers

Problem

Possible causes/consequences and Solutions

The windshield wipers

do not stop or continue

wiping with the same

speed regardless of a

change in position.

The combination switch or rain sensor is malfunctioning.

X

Stop the vehicle, paying attention to traffic conditions as you

do so and switch off the engine.

X

For safety reasons, you should remove the key from the ignition

lock and open the driver's door.

X

Turn the key to position in the ignition lock. Then try to start

the engine again.

X

Have the windshield wipers checked at a qualified specialist

workshop.

The windshield wipers

are jammed.

Leaves or snow, for example, may be obstructing the windshield

wiper movement. The wiper motor has been deactivated.

X

Stop the vehicle, paying attention to traffic conditions as you

do so and switch off the engine.

X

For safety reasons, you should remove the Smart Key from the

ignition lock.

X

Remove the cause of the obstruction.

X

Switch the windshield wipers on again after 30 seconds.

The windshield wiper

has stopped in the mid-

dle of the windshield.

The windshield wiper drive has stopped for safety reasons.

X

Have the windshield wipers checked at a qualified specialist

workshop.

The windshield wipers

fail completely.

The windshield wiper drive is malfunctioning.

X

Select another wiper speed on the combination switch.

X

Have the windshield wipers checked at a qualified specialist

workshop.

78

Windshield wipers

>>

Lights

and

windshield

wipers.

-------------------------------------------------------------------------------------------------------------------------------------------------------------

Useful information

i

This Operator's Manual describes all

models and all standard and optional

equipment of your vehicle available at the

time of publication of the Operator's Man-

ual. Country-specific differences are pos-

sible. Bear in mind that your vehicle may

not feature all functions described here.

This also applies to safety-relevant sys-

tems and functions.

i

Read the information on qualified spe-

cialist workshops: (

Y

page 20).

Overview of climate control systems
General notes

Observe the settings recommended on the fol-

lowing pages. The windows could otherwise

fog up.

To prevent the windows from fogging up:

R

switch off climate control only briefly

R

switch on air-recirculation mode only

briefly

R

switch on the cooling with air dehumidi-

fication function

R

switch on the defrost windshield function

briefly, if required

Automatic climate control regulates the tem-

perature and the humidity of the vehicle

interior. It also filters undesirable substan-

ces out of the air.

Automatic climate control is only available

when the engine is running. Optimum opera-

tion is only achieved with the side windows

closed.

i

When the weather is warm, ventilate the

vehicle for a brief period. This will speed

up the cooling process, and the desired

vehicle interior temperature will be

reached more quickly.

i

The integrated filter filters out most

particles of dust and pollen. It also

reduces odors. A clogged filter reduces the

amount of air supplied to the vehicle inte-

rior. For this reason, you should always

observe the interval for replacing the fil-

ter, which is specified in the Maintenance

Booklet. As it depends on environmental

conditions, e.g. heavy air pollution, the

interval may be shorter than stated in the

Maintenance Booklet.

Overview of climate control systems

79

>>

Climate

control.

-------------------------------------------------------------------------------------------------------------------------------------------------------------


Content      ..     2      3      4      5     ..