Skoda Kodiaq (2021 year). Manual in english - page 11
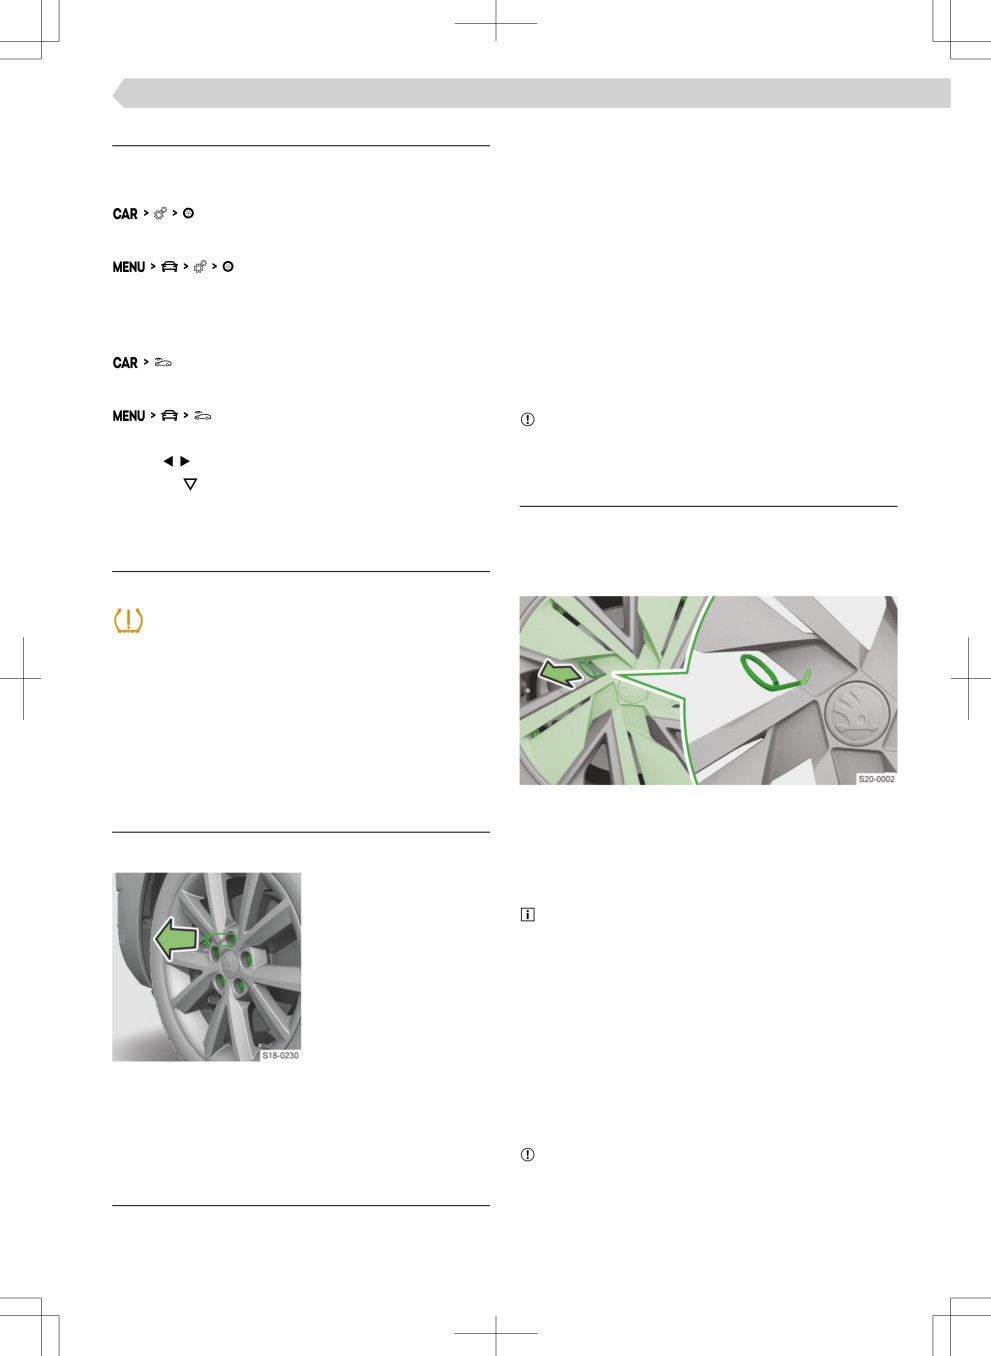
Wheels › Wheel bolt cover caps 217
Settings
Disconnecting
›
Hang the clamps for removing the wheel trims at
Tyre type
the edge of one of the openings in the trim.
Select the tyre type in the following menu.
› Push the wheel wrench through the clamp, support
on the tyre and pull off the wheel trim.
Or:
Installing
› Press the wheel trim onto the wheel rim at the
designated valve opening.
Vehicle loading condition
When using an anti-theft wheel bolt, it must be lo-
› In the following menu, select the menu item for
cated at the location indicated on the bezel.
displaying the vehicle condition.
Press the trim, starting at the valve, into the rim on
›
both sides until it engages around the entire cir-
Or:
cumference.
NOTICE
› Using the functional surfaces choose the menu
▶ Use hand pressure, do not hit the wheel cover.
item . Tyre pressure monitor .
› Tap the functional area and select the vehicle
Removing and installing the Aero trim
load condition.
Applies to factory built or original accessory trims
from ŠKODA.
Troubleshooting
Removal
Functional restriction / system fault
Ĕashes
› Stop the engine and start again.
› If the indicator light Ĕashes again after the engine
starts, there is a problem with the system.
› Continue driving, exercising appropriate caution,
and seek the help of a specialist garage.
Wheel bolt cover caps
›
Hook the bracket as close to the centre as possible
Remove cover caps and install
to remove the wheel covers at the edge of the
panel.
Disconnecting
› Pull off the centre of the wheel cover by loosening
› Push the pull-off clamp
it and pulling off the trim.
onto the cover cap up
To facilitate removal, it is possible to insert the
to the stop.
wheel wrench through the bracket loop and pull on
› Remove the cover cap.
the two key ends.
Installing
›
When using an anti-theft wheel bolt, it must be lo-
cated at the location indicated on the bezel.
› Position the panel on the wheel rim and push in the
individual spokes of the panel one after the other
Installing
until they are fully engaged.
› Push the cover cap onto the wheel bolt to the stop.
› Press in the centre of the wheel cover until it en-
gages completely.
NOTICE
Full wheel frame
▶ Use hand pressure, do not hit the wheel cover.
Removing and installing the trim
Applies to factory built or original accessory trims
from ŠKODA.
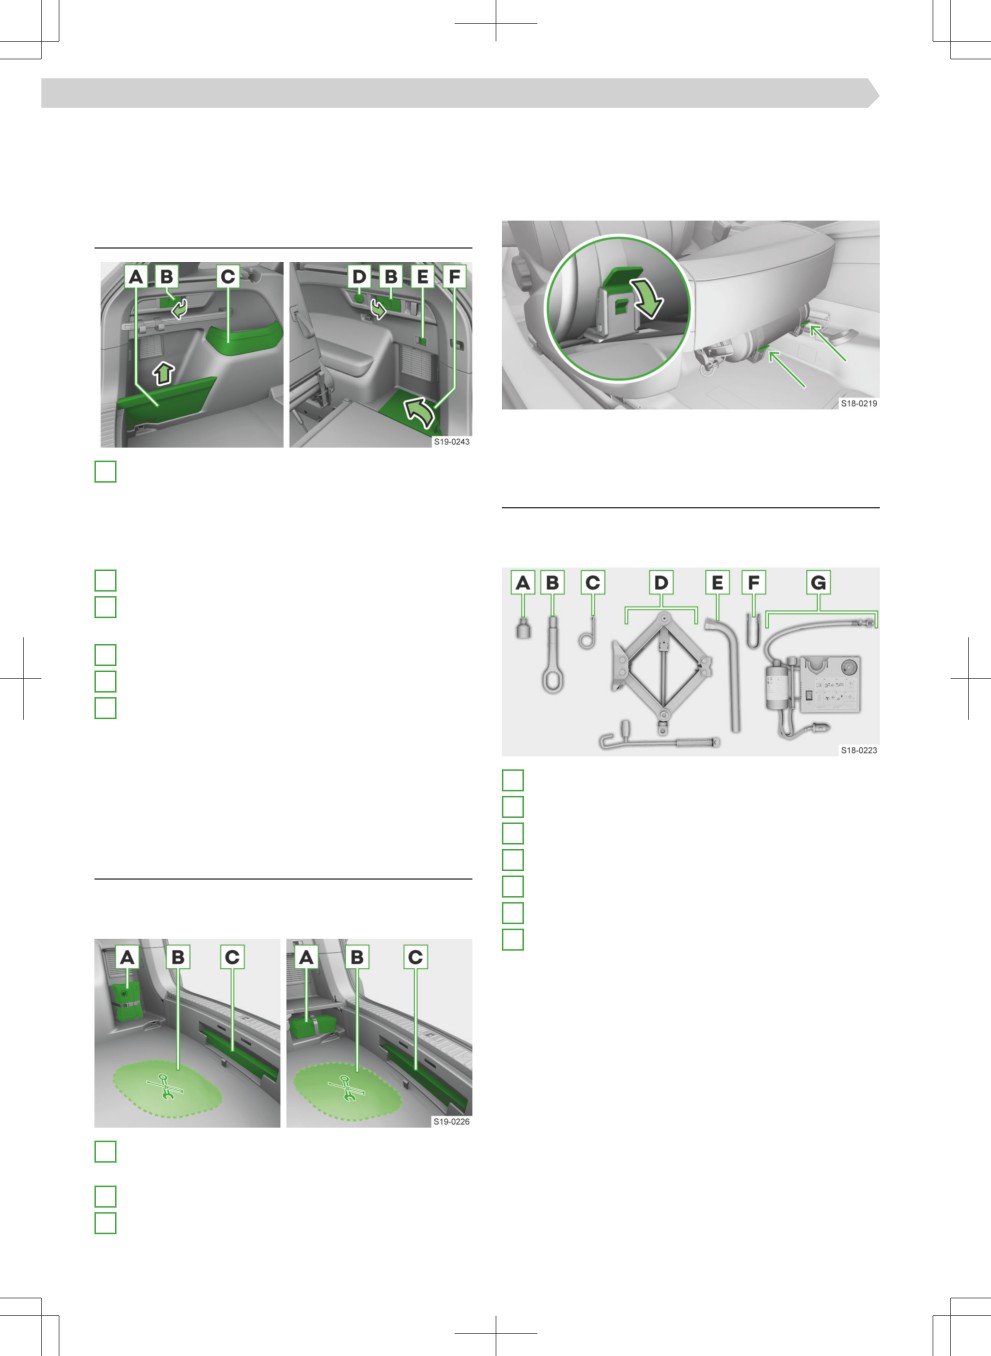
218 Storage space and interior equipment › Equipment in the boot
Storage compartment for the reĔective vest
Storage space and interior
The storage compartment for the reĔetive vest is in
equipment
the storage compartment of the front door.
Equipment in the boot
Fire extinguisher under the passenger seat
Overview
Tool kit
A
Applicable to the five-seater variant of the vehi-
cle.
Overview
Removable partition of the storage compart-
ment
Depending on the equipment, not all of the following
components may be included in the tool kit.
Max. load 2.5 kg
B
Lever for folding forward the rear seat backrests
C
Fixed storage compartment
Max. load 1.5 kg
D
12-Volt-power socket
E
Trailer hitch switch
F
Applicable to the seven-seater variant of the ve-
hicle.
Side compartment
› Pull at the loop to open.
A
Attachment for the anti-theft wheel bolts
B
Towing lug
Emergency equipment
C
Bracket for removing the full wheel covers
D
Jack with sign and crank
Overview
E
Wheel wrench
Emergency equipment in the luggage compart-
F
Removal clip for the wheel bolt cover caps
ment
G
Breakdown set
The declaration of conformity is enclosed with the
jack or the logbook folder.
A
Positioning of the first aid kit (depending on
equipment)
B
Tool kit
C
Placing of the warning triangle
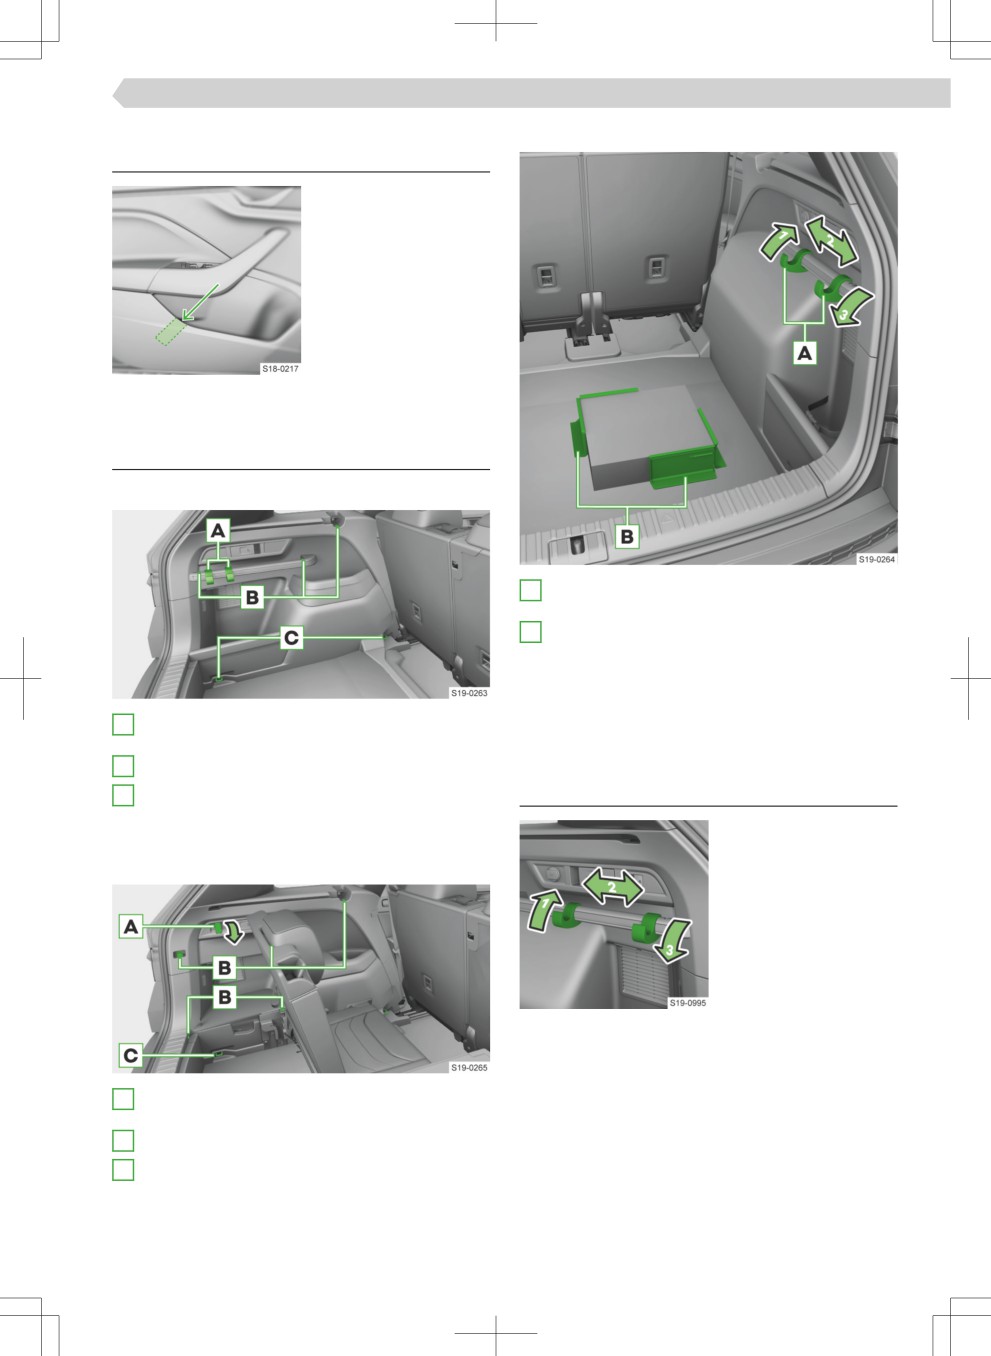
Storage space and interior equipment › Storage compartment for the reĔetive vest 219
Storage compartment for the reĔective
Other fasteners
vest
Fasteners in the boot
Overview
Five-seater variant of the vehicle
A
Sliding bag hooks
Max. load 7.5 kg
B
Cargo elements
Max. load 8 kg
A storage compartment for the cargo elements
is located under the Ĕoor covering in the boot.
A
Bag hooks
› Fold up the cargo element and fasten it to the
Ĕoor covering in the boot.
Max. load 7.5 kg
B
Hook for securing the fastening nets
C
Lashing eyes for securing the load and the fas-
Bag hooks in the boot
tening nets
Max. load 350 kg
Seven-seater variant of the vehicle
The maximum load for the hook is 7.5 kg.
A
Bag hooks
Max. load 7.5 kg
B
Hook for securing the fastening nets
C
Lashing eye for securing the load and the fasten-
ing nets
Max. load 350 kg
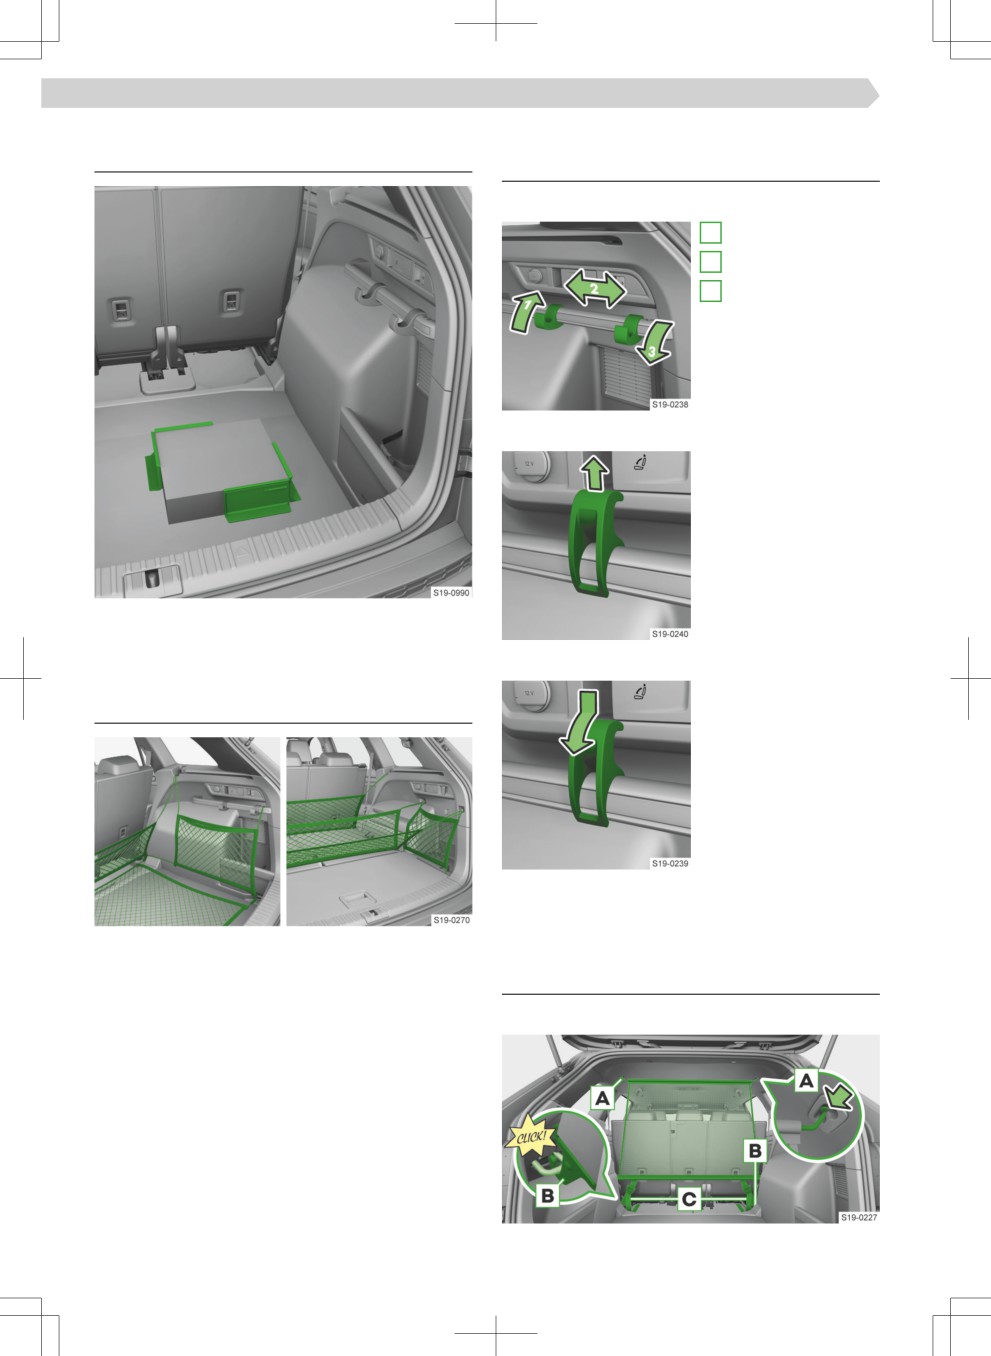
220 Storage space and interior equipment › Cargo elements in the luggage compartment
Cargo elements in the luggage
Sliding hooks
compartment
Settings
Moving
1
Loosening
2
Moving
3
Applying
Removal
› Move the hook into the
front area of the fixiģ
strip and remove it.
The maximum load for the Cargoelements is 8 kg.
Inserting hook
Fastening nets
› Press the hook against
Overview
the front part of the
fixiģ strip and fold it
down to the stop.
The maximum load for the hook is 7.5 kg.
The maximum load of the respective fastening nets
Net partition
is 1.5 kg.
Attach the net partition
Attach at the back
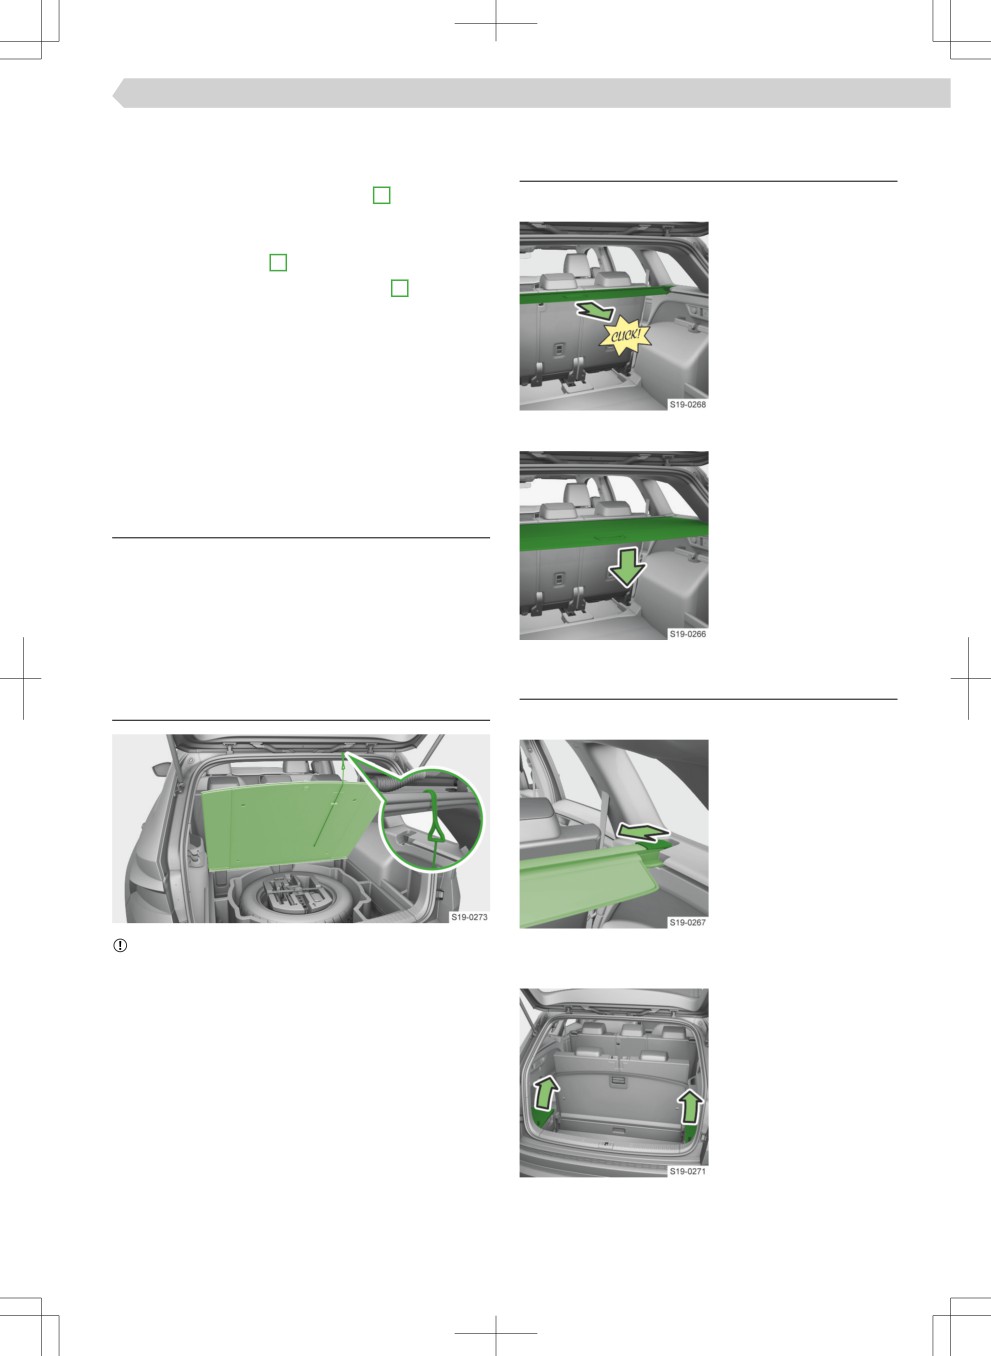
Storage space and interior equipment › Double-sided Ĕoor covering 221
› Before installing the net partition behind the sec-
Roll-up luggage compartment cover
ond row of seats, fold forward the third row of
seats.
Operation
› Insert the crossbar into the mount A on one side
Extending
and push it forwards.
› Pull out the cover on
› Fix the bar in the same way on the other side.
the handle until it clicks
› Snap the carabiners B into the lashing eyes.
into place.
› Pull the straps firmlû at the free ends C .
Fasten in the front
The procedure is analogous to the process behind.
The lashing eyes for the carabiner are located under
the central body pillars.
Loosening
Loosening takes place in the reverse order to fixiģ.
Retracting
› Press the cover in the
handle area.
Double-sided Ĕoor covering
The cover rolls up.
Overview
It is possible that the
cover rolls more slowly
Depending on the equipment, the vehicle may be
during winter weather
equipped with a double-sided Ĕoor covering in the
conditions.
luggage compartment. One side is made of fabric,
the other side is washable.
Floor covering in the boot
Removing and inserting
Folding up and folding down
Take out and insert the roll-up cover
› Press the end of the
crossbar and take out
or insert the cover.
NOTICE
Stowing the cover under the variable loading Ĕoor
Before closing the boot lid, remove the hook from
Applicable to the seven-seater variant of the vehicle.
the frame.
› Open the side pockets.
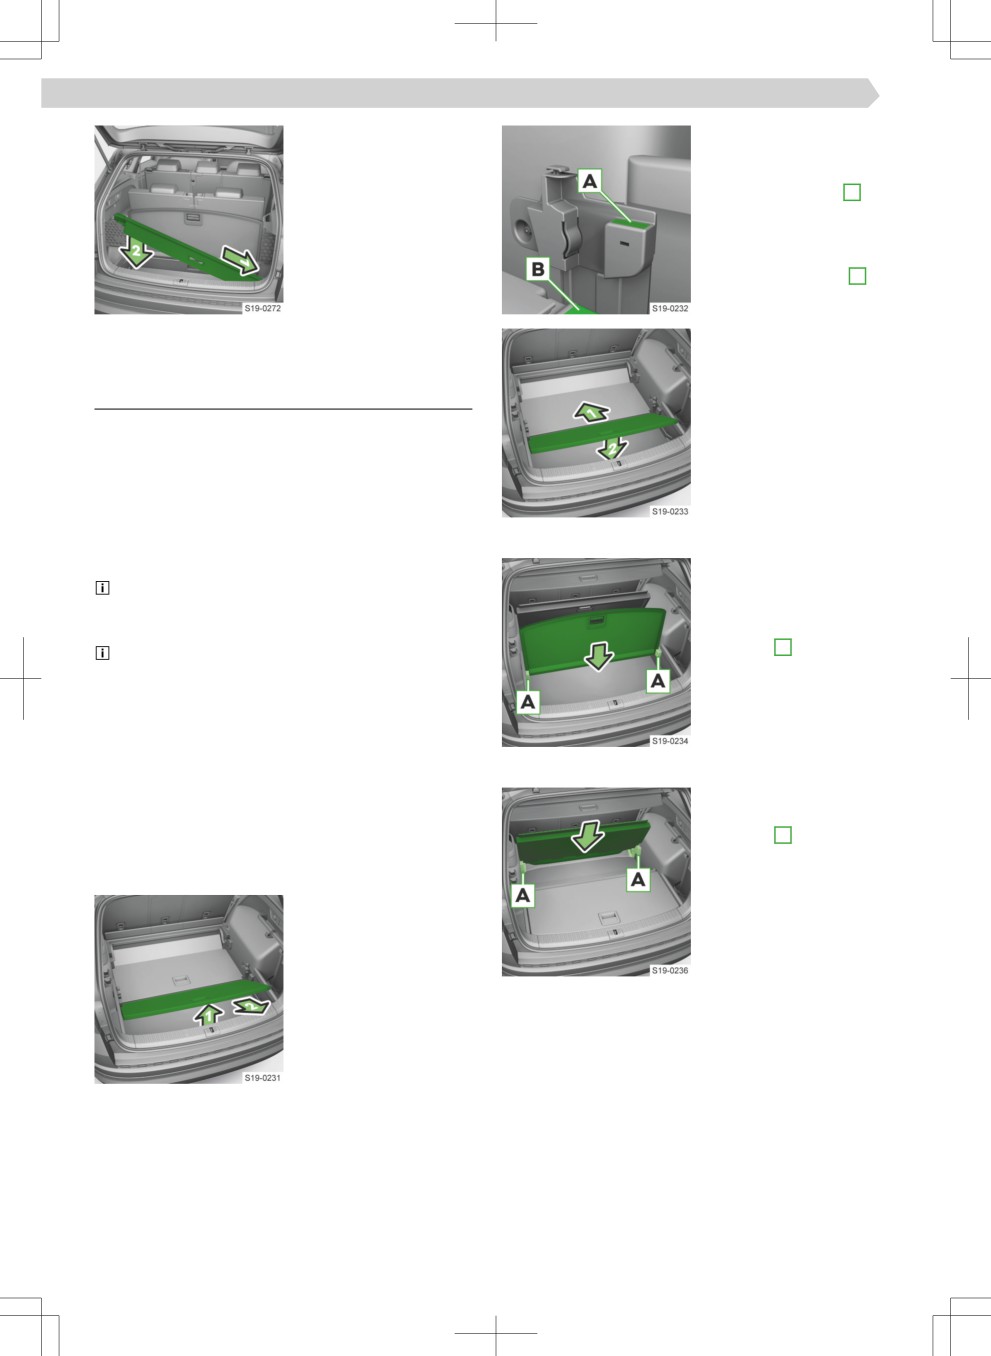
222 Storage space and interior equipment › Variable loading Ĕoor in the boot
› Insert the cover into
› To set in the upper po-
the recesses of the
sition, position the vari-
side panel.
able loading Ĕoor in the
› Close the side pockets.
front area on area A .
› Restore the original
› To set in the lower po-
position of the variable
sition, position the vari-
loading Ĕoor.
able loading Ĕoor in the
front area in space B .
› Press the variable load-
ing Ĕoor forward and
Variable loading Ĕoor in the boot
hang up.
Setting the position
The maximum load of the rear plate in the upper po-
sition is 25 kg. The maximum load of both plates in
the upper position is 75 kg in total.
Five-seater version of the vehicle - the variable load-
ing Ĕoor consists of two parts.
Seven-seater verison of the vehicle - the variable
Dividing the boot
loading Ĕoor consists of one part.
› Lift the rear plate of
For vehicles with a two-part variable loading
the variable loading
Ĕoor, one side of the rear panel may be made of fab-
Ĕoor.
ric and the other side may be washable.
› Push the plate into the
grooves A .
In vehicles with an emergency wheel or vehicle
12-Volt battery under the Ĕoor covering in the lug-
gage compartment, the variable loading Ĕoor cannot
be adjusted to the lower position.
For vehicles with an emergency wheel under the
Ĕoor covering in the luggage compartment, the max-
imum load on the Ĕoor covering is 5 kg.
Fold the front plate up and back
Set the variable loading Ĕoor to the upper or lower
› Lift the plate. The plate
position
is inserted into the
The front and rear plates of the variable load Ĕoor
grooves A .
can be adjusted to the upper or lower position. The
› Folding it back takes
handling of the two panels is identical.
place in reverse order.
› Lift the variable load
Ĕoor and pull it to-
wards you.
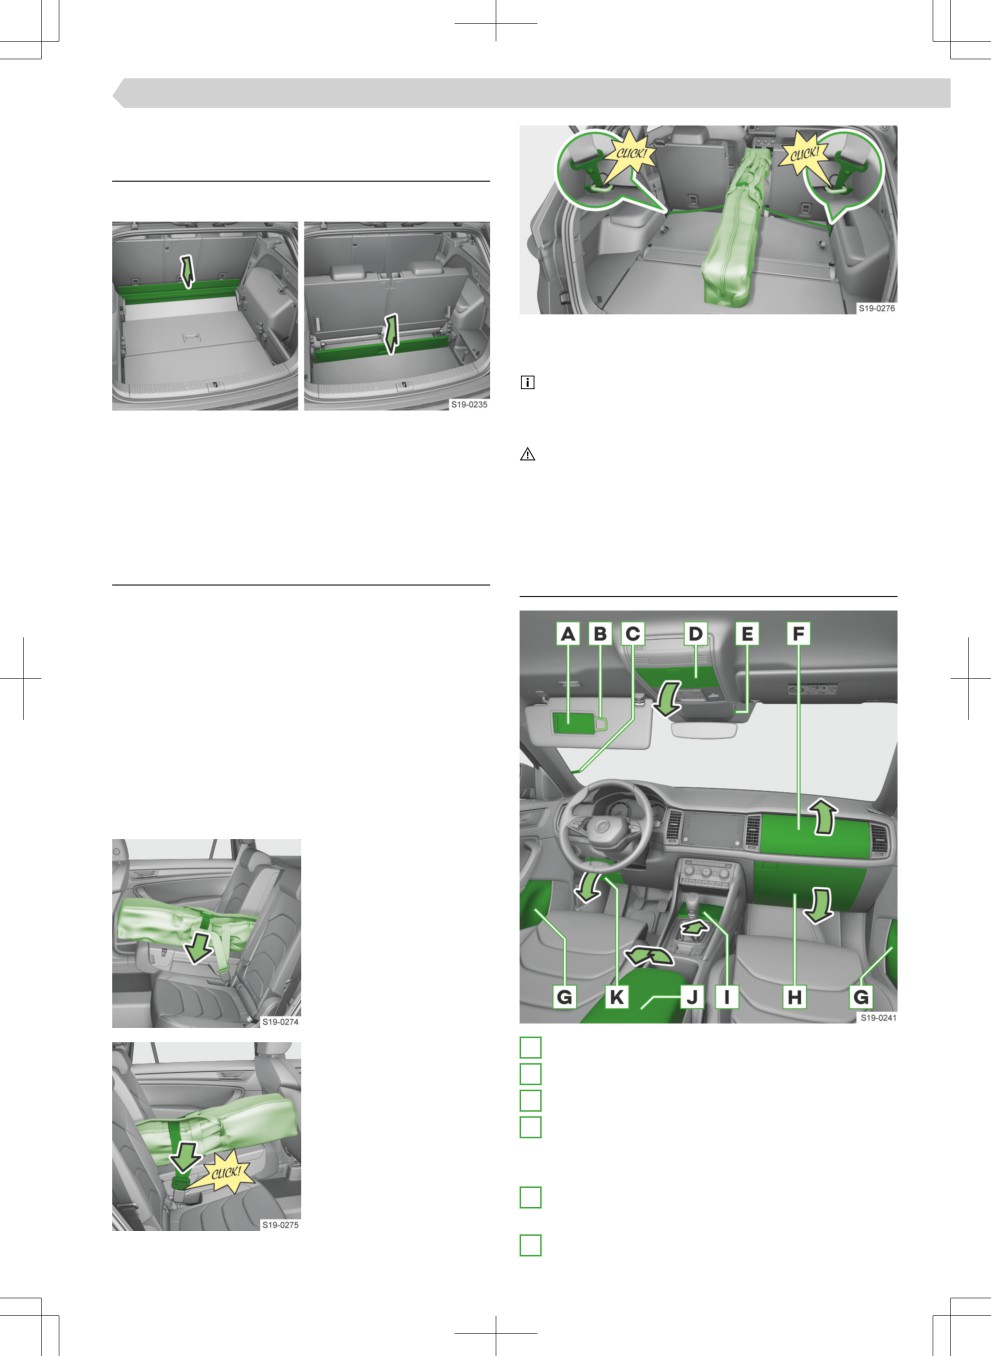
Storage space and interior equipment › Partition in the boot 223
Partition in the boot
Removing and inserting
Remove the partition
› The carabiners on the two sides latch into the lash-
ing eyes.
The seat backs of the second row of seats can be
folded forward for better access to the eyelets.
Vehicle version: Five-seater/seven-seater
› Tighten the straps.
The partition prevents the cargo from slipping.
WARNING
The maximum weight of the transported skis is
› Remove the partition upwards.
10 kg.
Through-loading bag
Interior equipment front
Insert and lock
Overview
In the bag, a max. of 2 pairs of skis with poles can be
transported.
› Fold the middle seat backrest forward. If necessa-
ry, fold down the third row of seats.
› Push the skis and poles with the tips backwards in-
to the bag and secure the bag.
The loading bag can be shortened in relation to the
length of the ski by means of the bands attached
inside the bag.
› Place the empty bag in the opening in such a way
that the end of the bag with the zip is in the boot.
› Tighten the drawstring
around the skis on the
base of the binding.
› Insert the lock tongue
A
Make up mirror
into the belt buckle of
B
Ticket holder
the middle seat.
C
Car park ticket holder
D
Glasses compartment
Max. load 0.25 kg
› To open, press the button.
E
USB connection
The USB connection is for charging only.
F
Upper storage compartment
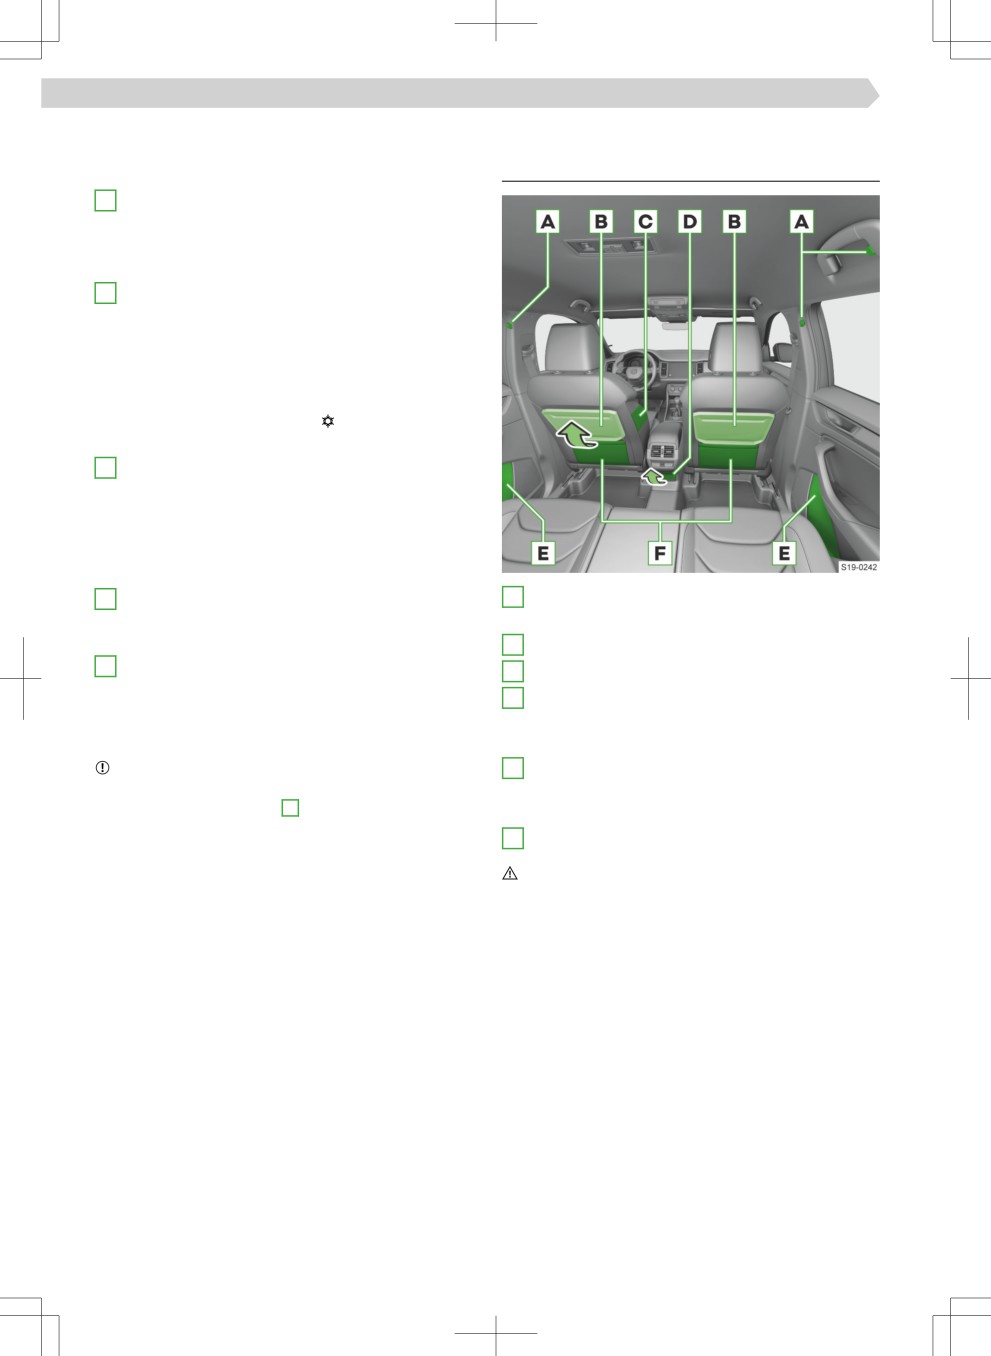
224 Storage space and interior equipment › Interior equipment rear
Max. load 1.5 kg
Interior equipment rear
› To open, press the left button on the lid of the
lower storage compartment.
Overview
G
Storage tray
▶ Bottle holder with a capacity of max. 1.5 l
▶ Storage compartment for the waste container
▶ Storage compartment for the reĔetive vest
H
Storage compartment below with air outlet noz-
zle
In the compartment, there is a card holder, a pen
holder and a storage compartment for coins.
Max. load 3 kg
› To open, press the right button.
› Turn the knob to position to open the air
outlet nozzle.
I
Storage tray
In the compartment is a 12-volt power outlet
and a USB connection.
The USB connections can be used for charging
and for data transfer.
› Pull the strip to open the compartment.
J
Openable and adjustable armrest with storage
A
Coat hook
compartment
Max. load 2 kg
› To open the compartment, lift the armrest.
B
Folding table
K
Storage tray
C
Storage pocket
Max. load 0.5 kg
D
Depending upon vehicle equipment:
A card holder is located in the compartment.
▶ 12 volt socket
› Pull on the handle to open.
▶ 230 volt socket
NOTICE
E
Storage tray
▶ Do not leave any heat-sensitive objects in the
▶ Bottle holder with a capacity of max. 1.5 l
spectacle compartment D.
▶ Storage compartment for the reĔetive vest
F
Storage pocket
WARNING
▶ Only hang light clothing on the hooks. Do not leave
heavy and sharp objects in the pockets of the
clothing.
▶ Do not use hangers to hang clothes.
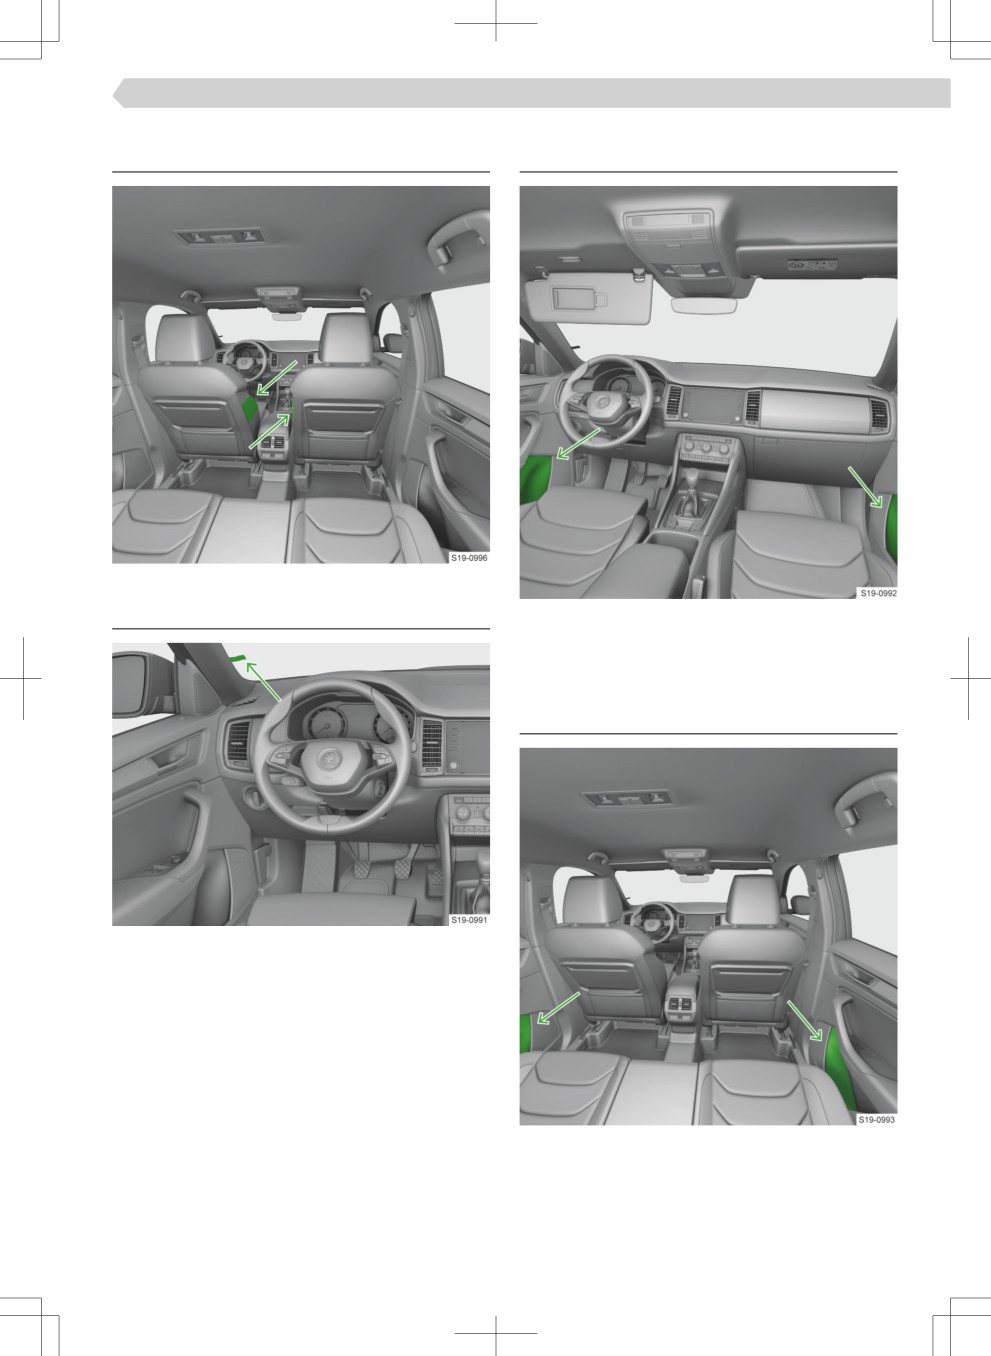
Storage space and interior equipment › Storage pockets on the inner sides of the front seats 225
Storage pockets on the inner sides of the
Bottle tray in the storage compartment
front seats
of the front door
Car park ticket holder
The tray is suitable for bottles with a max. size of 1.5
l.
Bottle tray in the storage compartment
of the rear door
The tray is suitable for bottles with a max. size of 1.5
l.
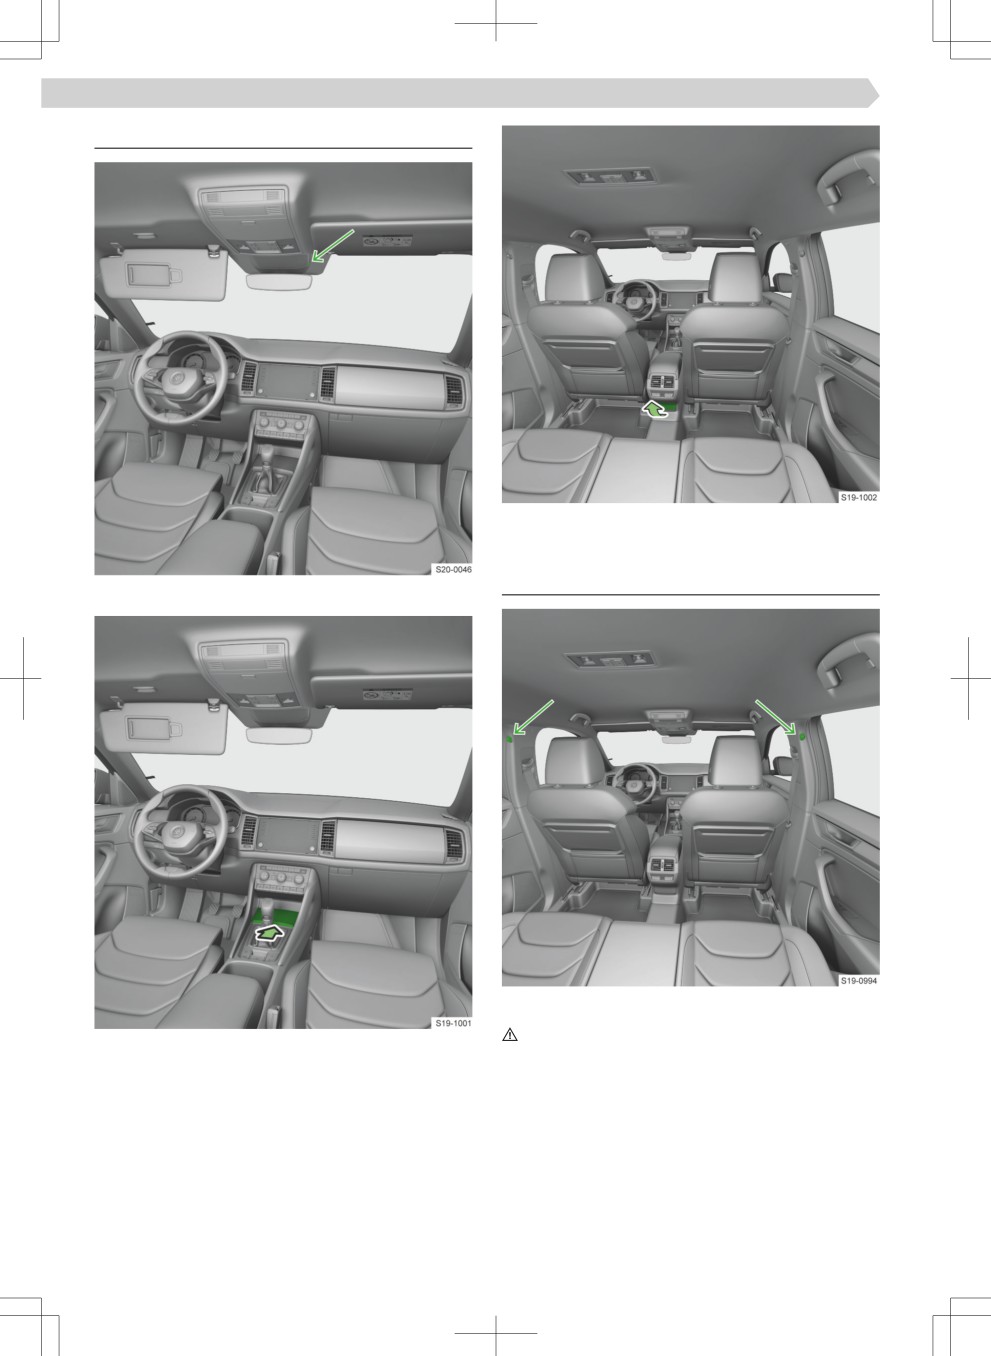
226 Storage space and interior equipment › USB-connections
USB-connections
The USB connections are for charging only.
Hook on the centre body pillar
The USB connection is for charging only.
The maximum load for the hook is 2 kg.
WARNING
The USB connections can be used for charging and
▶ Only hang light clothing on the hooks. Do not leave
for data transfer.
heavy and sharp objects in the pockets of the
clothing.
▶ Do not use hangers to hang clothes.
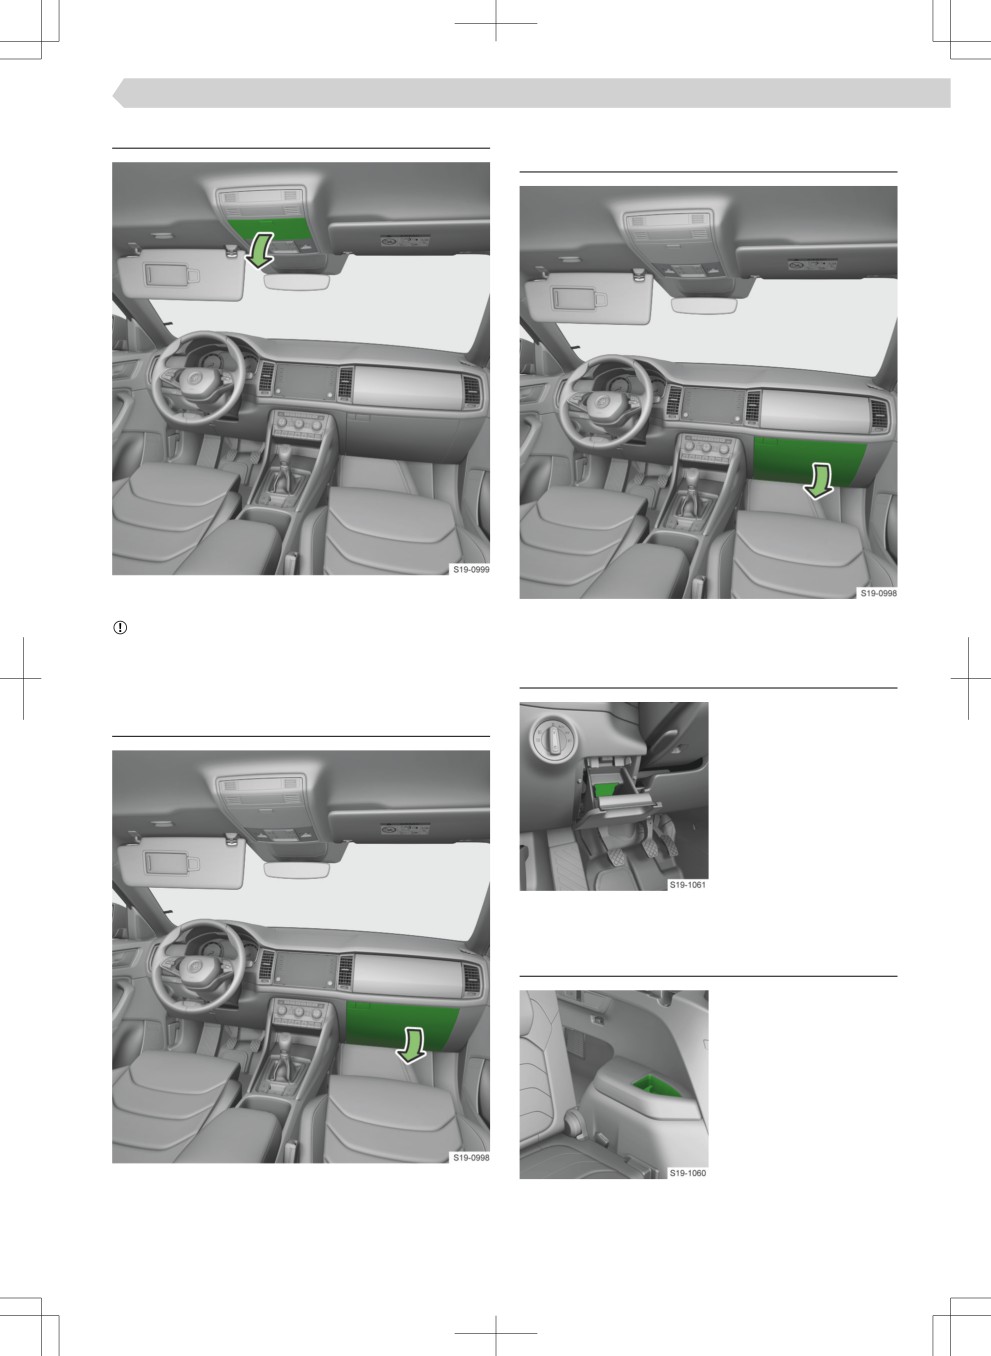
Storage space and interior equipment › Glasses compartment 227
Glasses compartment
Storage compartment for cards, coins
and SD card
The maximum load for the compartment is 0.25 kg.
NOTICE
▶ Do not leave heat-sensitive objects behind in the
Storage compartment for cards in the
glasses compartment.
storage area on the driver's side
Pen holder
Third row of seats - drinks and telephone
holder
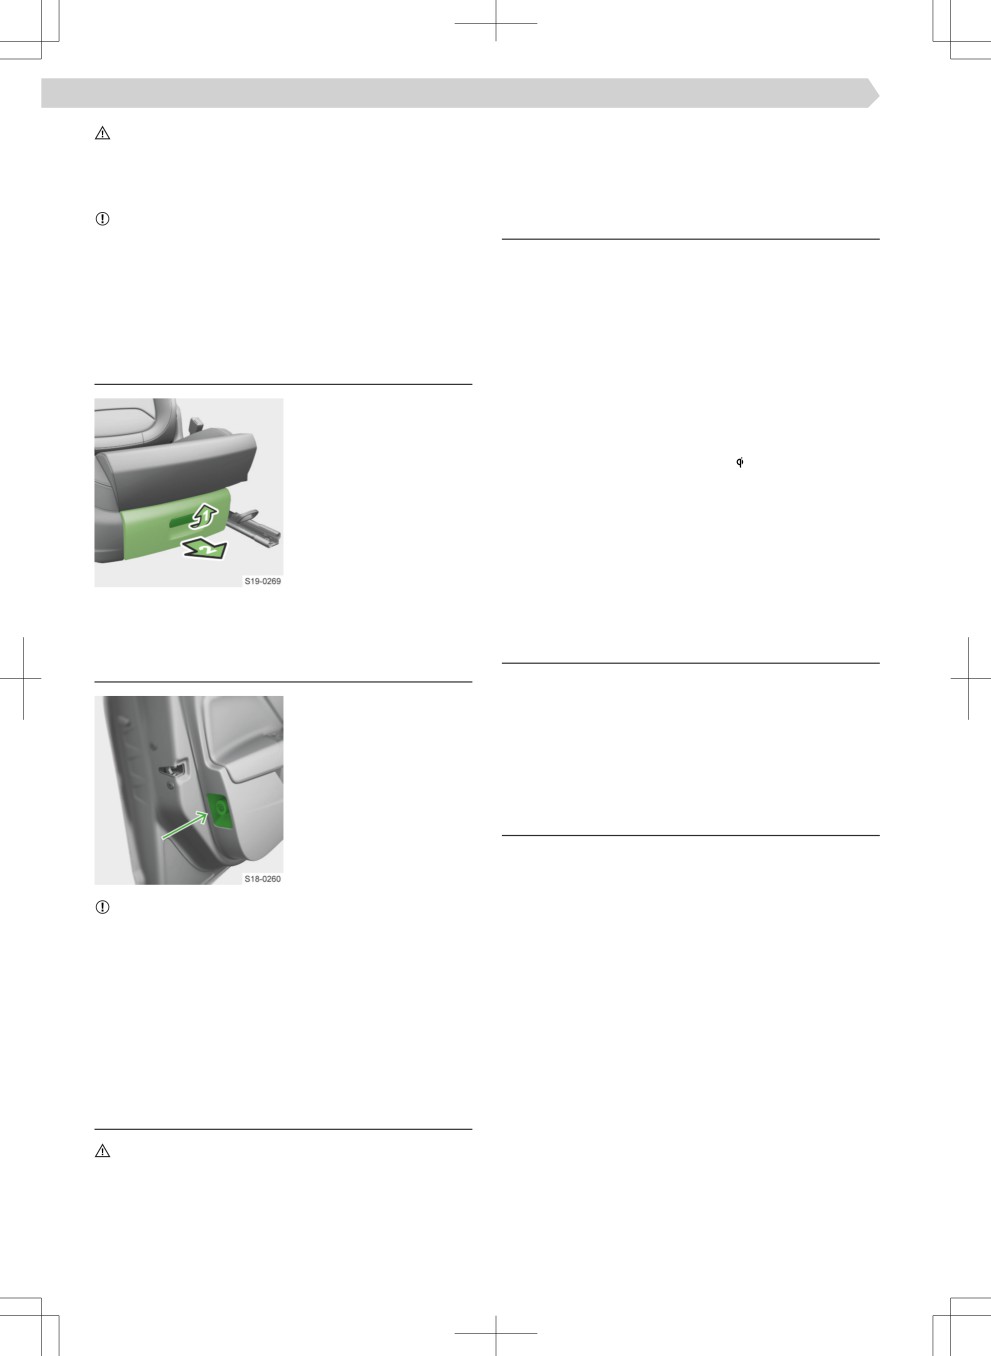
228 Storage space and interior equipment › Storage compartment under the front seat
CAUTION
storage compartment, which has become hot, re-
Risk of scalding!
move the phone and let it cool down in the storage
▶ Never put hot beverage containers in the drinks
compartment!
holder.
NOTICE
Functionality
Danger of damage to the electrical system and the
panels from spilled drinks.
Phonebox functions
▶ Wireless charging of phones.
▶ AmplifiatioÄ of the telephone signal (only valid for
Storage compartment under the front
some countries).
seat
The Phonebox is located in the storage compartment
Opening the storage compartment
in the centre console at the front.
Insert a telephone with a maximum size of 160x80
The maximum permissi-
mm into the storage compartment.
ble load for the storage
compartment is 1.5 kg.
Charging Indicator
When the phone is charging, the in the status bar in
the infotainment screen will light up.
Recommendations for optimal function
▶ The phone is positioned with the screen facing up.
▶ Insert the phone without the protective case.
▶ Position the phone centrally on the phone symbol
on the pad.
Storage compartment for an umbrella
Operating conditions
Overview
Conditions for wireless charging
✓ The ignition is switched on.
✓ The phone supports the Qi standard.
✓ There is no object between the pad and the
phone.
Troubleshooting
A message has been displayed on the Infotainment
screen indicating that the mobile phone cannot be
charged.
NOTICE
Risk of damage to the bodywork and the interior
▶ Check that there is no object between the support
and the phone to be charged. If this is the case, re-
trim of the vehicle!
▶ In the storage compartment, only insert the um-
move the phone and the item. Place the phone
brella from the ŠKODA original accessories.
centrally on the phone symbol on the pad again.
▶ Always push the umbrella into the storage com-
▶ Check that the position of the phone to be charged
partment as far as it will go.
has not changed. If this is the case, remove the
phone and put it back in the centre of the phone
symbol on the pad.
Phonebox
What you should be mindful of
CAUTION
Risk of burns during charging.
▶ The phone may get warm, remove it carefully from
the storage compartment.
▶ Do not leave any metal objects in the compartment
under the phone. If there is a metallic object in the
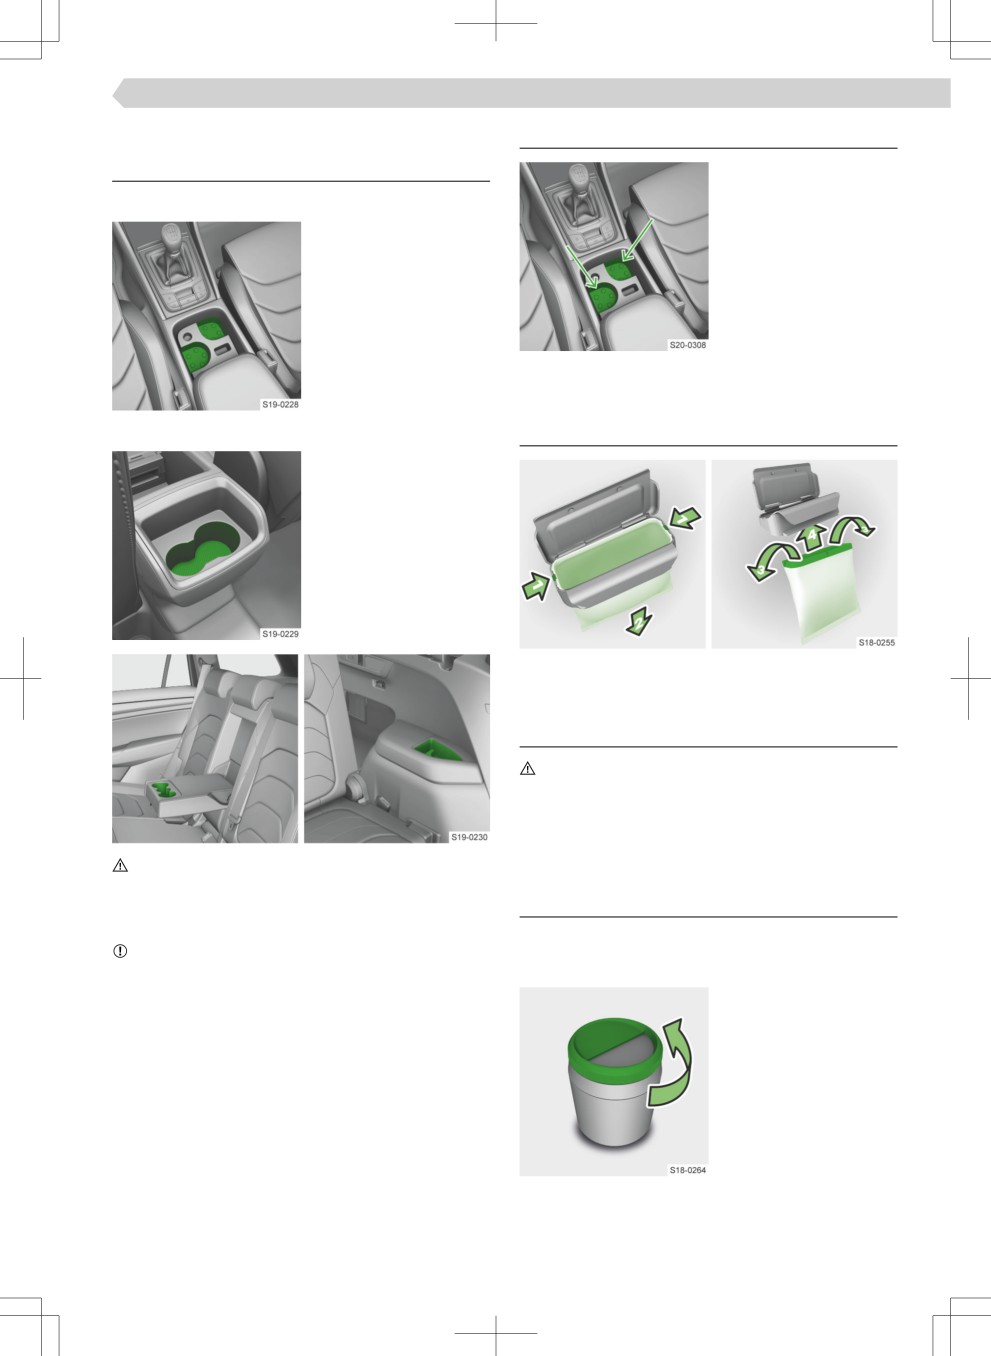
Storage space and interior equipment › Cup holder 229
Cup holder
Cup holder Easy Open
Overview
A bottle can be opened
with one hand in the
Cup holder at the front
holder.
A bottle can be opened
with one hand in the
holder.
› Press the bottle into
the holder and un-
screw the cap.
Waste container
Rear cup holder
Replace bags
Ashtray and cigarette lighter
What you should be mindful of
CAUTION
Risk of burning or fire!
▶ Do not use the ashtray for storing hot or burning
objects.
▶ Handle the lighter carefully.
CAUTION
Risk of scalding!
▶ Never put hot beverage containers in the drinks
Operation
holder.
The ashtray is inserted in the cup holder.
NOTICE
Danger of damage to the electrical system and the
Open the ashtray
panels from spilled drinks.
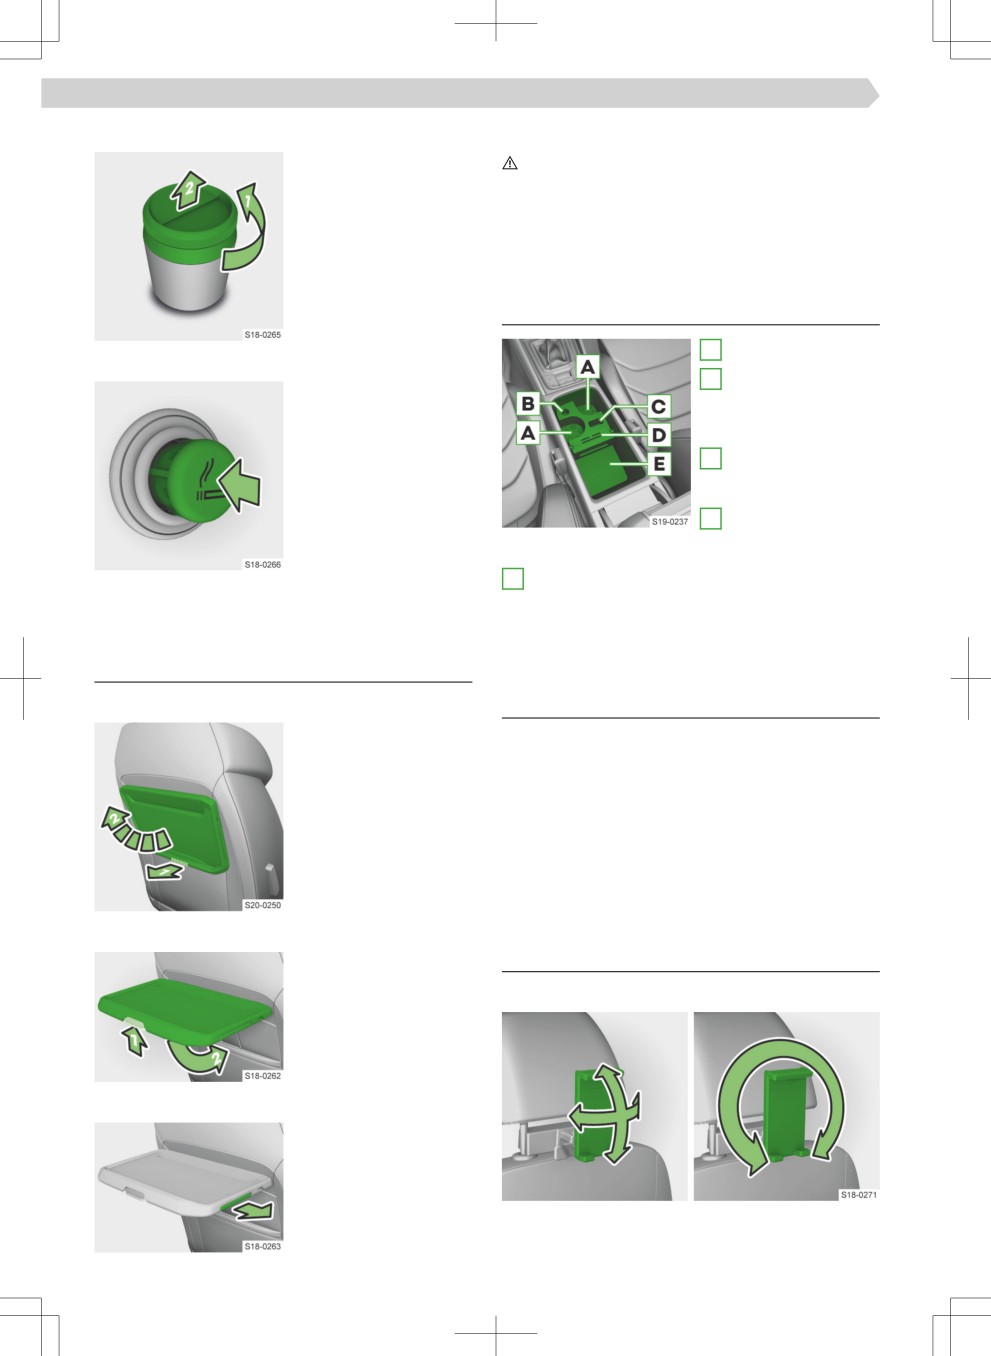
230 Storage space and interior equipment › Folding table
Remove the lid
The maximum load for the table is 8.5 kg.
CAUTION
Risk of injury!
▶ While driving, the table must be in the folded-
down position.
Multifunction holder
Overview
A
Cup holder
Cigarette lighter
B
Storage compart-
› Push in the lighter.
ment for storing the
› Wait until the glowing
cover of the 12-volt
lighter pops back out.
power outlet
› Remove the lighter and
C
Storage compart-
use.
ment for the vehicle
› Push the lighter back
key
in.
D
Storage compart-
The socket of the ciga-
ment for coins and
rette lighter serves as a
card
12-Volt socket.
E
Storage tray
The multifunction holder can be removed or rotated.
Folding table
Operation
Ceiling
Fold up the table
Removing and inserting
› Press the safety button
The blanket is in a bag that can be attached to one of
and fold the table up to
the following locations:
the desired position.
▶ On the guide rods of the front headrests
▶ In the storage pockets on the backs of the front
seats
▶ On the operating lever for adjusting the second
seat row in the longitudinal direction
Tablet holder
Unfold the table
› Press the safety button
Settings
and unfold the table.
Tilt and turn
Slide out the cup holder
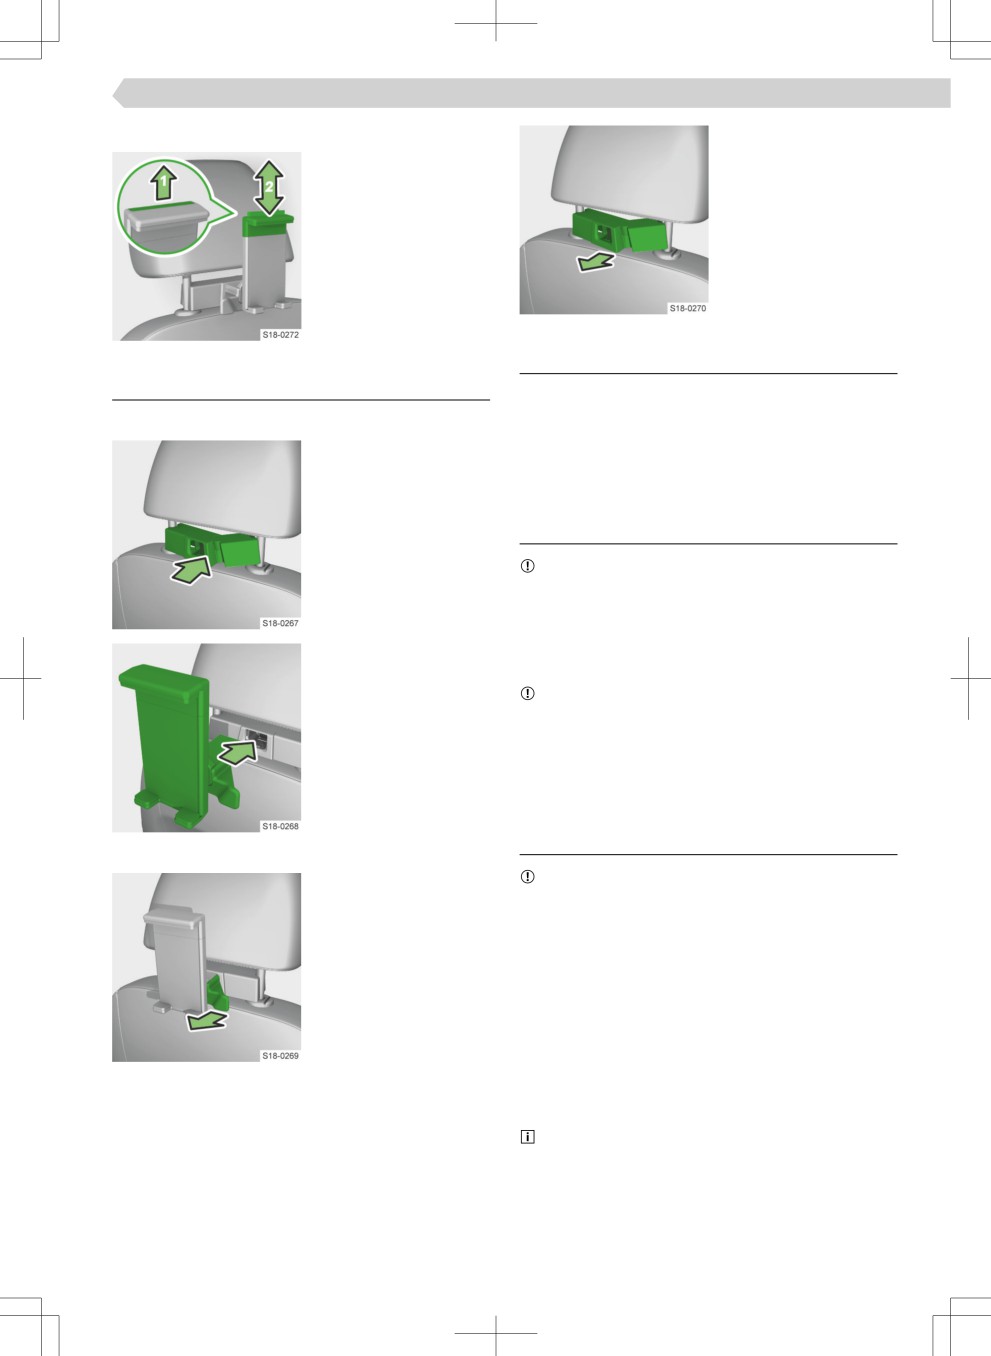
Storage space and interior equipment › 12-Volt power socket 231
Adjust size
› Press on the adapter
and remove it.
› Pull out the locking tab
and move the upper
part of the holder to
the desired position.
Set the minimum size of
the empty holder to
avoid noise while driving.
Technical data
Removal and Insertion
The holder is for fixiģ a tablet with a height of min.
11.5 cm and max. 19.5 cm.
Fasten behind the headrests
The maximum load for the holder is 0.75 kg.
› Place the open adapter
on the front guide rods
of the headrest and
12-Volt power socket
clip in carefully.
Operating conditions
NOTICE
Risk of damage to the electrical system of the vehi-
cle!
▶ Use the sockets only for the connection of ap-
proved electrical accessories with a total power
› Clip in the holder in the
consumption of up to 120 watts.
adapter.
NOTICE
Danger of damage to the connected consumers!
▶ Switch off the consumers before switching the ig-
nition on or off and before starting the engine.
230-Volt power socket
Functionality
Removal
NOTICE
› Press the safety button
and unfold the holder.
Danger of damage to the connected consumers!
▶ Do not connect a light with ĔuoreseÄt lamp to the
socket.
▶ Switch off the consumers before switching the ig-
nition on or off and before starting the engine.
Status display
▶ Lit up in green - the socket is switched on.
▶ Blinking green - the socket is still switched on for
about 10 minutes after the engine has been
switched off, if a consumer was connected before
the engine was switched off.
The socket has a child safety lock. When insert-
ing the plug, the fuse is unlocked and the socket is
switched on.
232 Storage space and interior equipment › 230 volt socket and USB connections
Operating conditions
Roof rack and hitch
✓ Running engine
Roof rack
On vehicles with the START-STOP system, the
socket also works in STOP mode.
Technical data
The maximum weight of the load incl. roof rack is
75 kg.
Troubleshooting
The indicator light Ĕashes red
The socket is turned off e.g. for the following rea-
Swivelling hitch
sons:
What you should be mindful of
▶ Excessive current
▶ Low state of charge of the 12-volt vehicle battery
Applies to natural gas vehicles.
▶ Overheating of the socket
WARNING
An improperly installed or unsuitable tow hitch can
› If the reasons given above no longer exist and the
damage the natural gas reservoir of the vehicle in an
socket is not switched on automatically, discon-
accident and thus deepen the consequences of the
nect the connected load from the socket and re-
accident or cause fatal injuries.
connect after a short time.
▶ Due to the speifi structure of the vehicles with
natural gas reservoirs, we recommend using only
230 volt socket and USB connections
the original ŠKODA tow hitch. With these accesso-
ries, ŠKODA stands for safety, reliability and suita-
bility for this vehicle type.
▶ We recommend that all related assembly work be
carried out by ŠKODA service partners.
WARNING
Risk of an accident!
▶ Do not manipulate the switch for swinging the tow
bar in and out while a trailer or another accessory
is coupled to the tow bar. The tow bar could be un-
locked.
CAUTION
Risk of injury!
▶ Handle the trailer coupling carefully.
▶ When swinging out the tow bar, do not stand in
the middle area of the rear bumper.
NOTICE
Risk of damage to the trailer coupling!
▶ When not using the towing device, swing the tow
bar under the bumper.
The USB connections are for charging only.
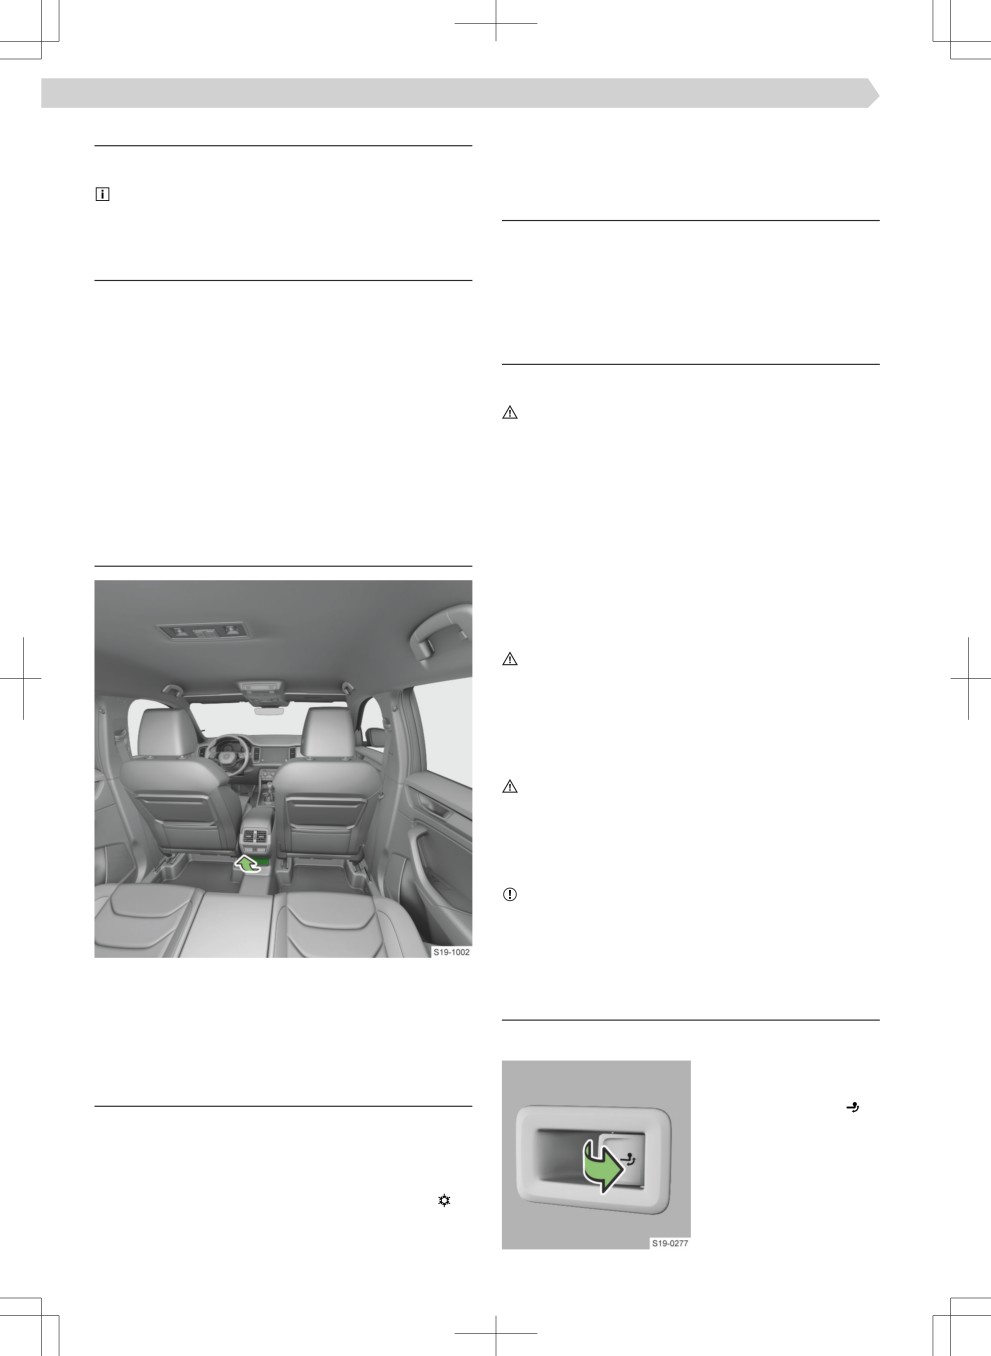
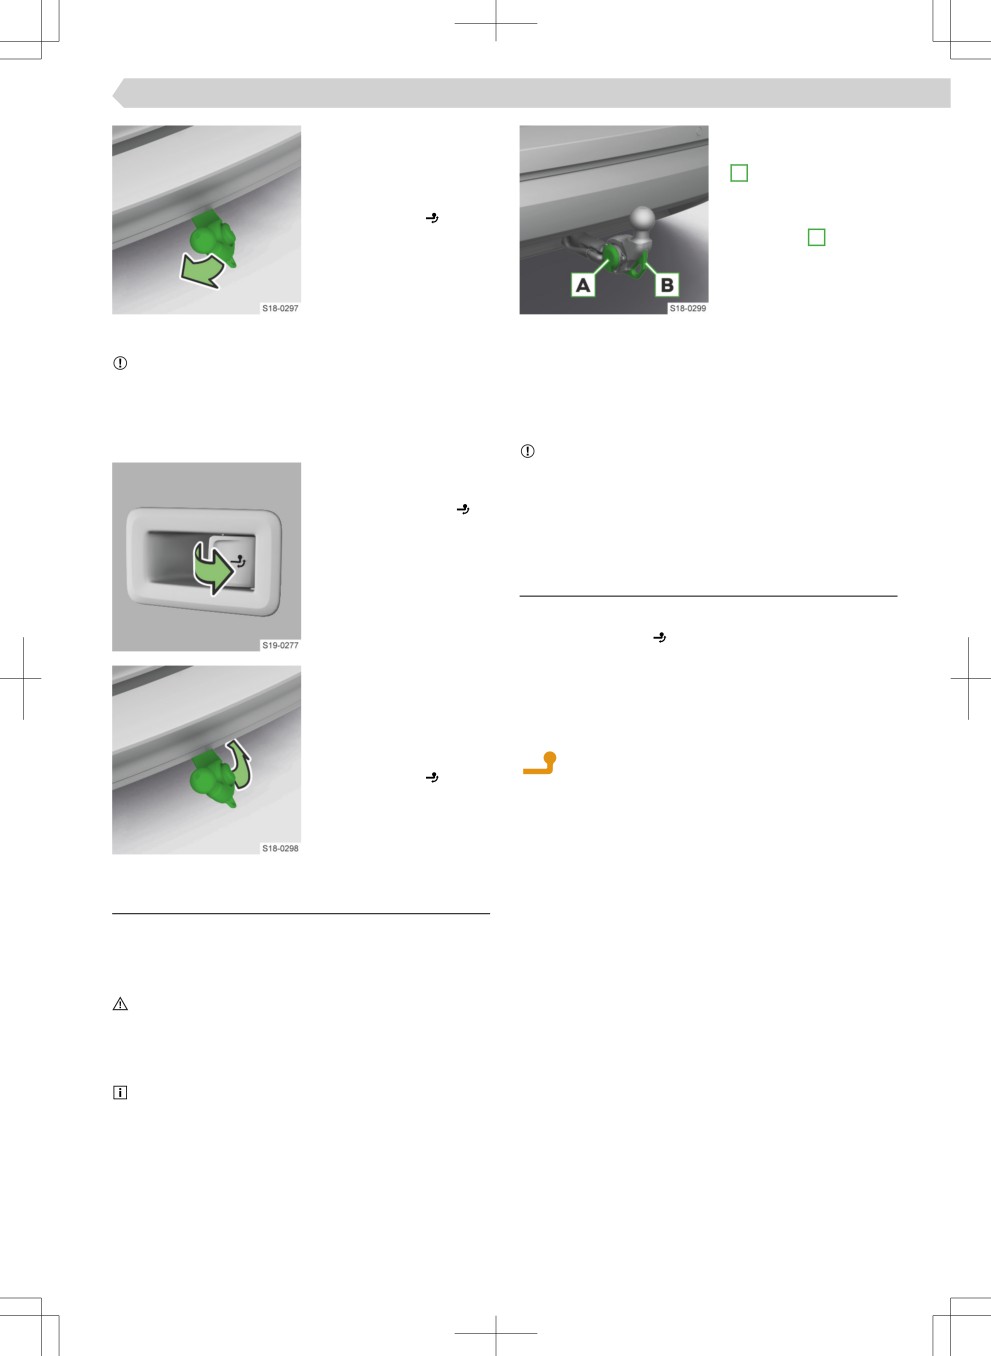
Tow bar: swivel out/in
Storage compartment with air outlet
Swing out the tow bar
nozzle
› Pull on the switch. The
tow bar swings out.
Overview
The indicator light
In the compartment, there is a card holder and a pen
inside the switch illu-
holder.
minates.
The maximum load for the compartment is 3 kg.
› Turn the knob in the compartment to position to
open the air outlet nozzle.
Roof rack and hitch › Swivelling hitch 233
› Press the tow bar until
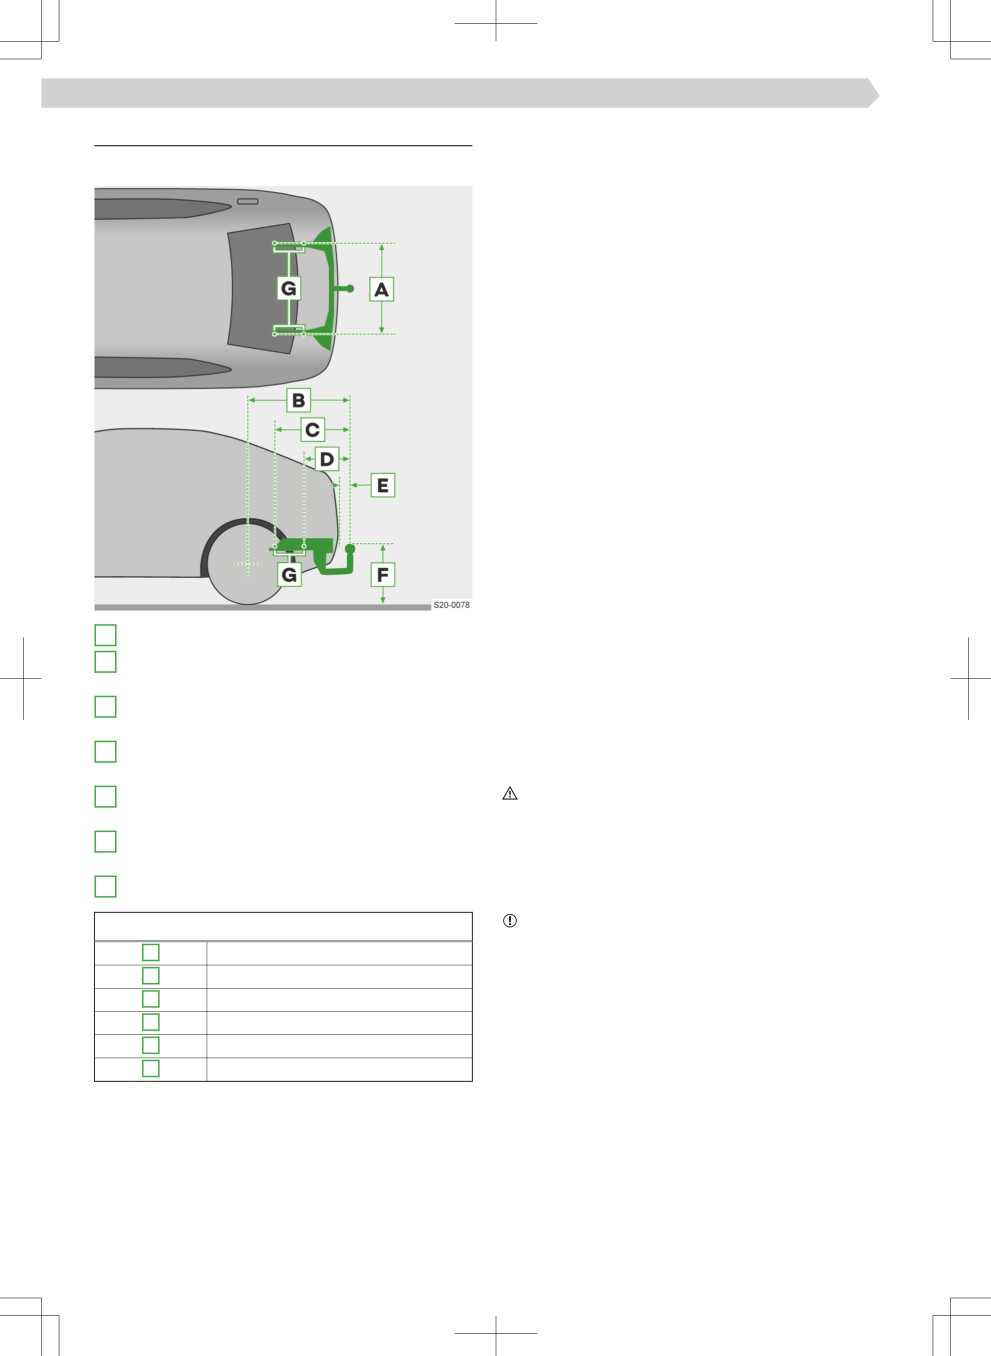
› Plug the electrical trail-
it audibly clicks into
er plug into the socket
place.
A.
Check latchings: the
› Hook the tear-off rope
indicator light within
of the trailer onto the
the switch lights up.
safety eye B . The
tear-off rope must sag
against the vehicle in
all trailer positions.
Swivel tow bar
Uncoupling
Uncoupling takes place in reverse order.
NOTICE
▶ No trailer or any other accessory can be connected
Power supply of the trailer power network
to the tow bar.
In the electrical connection between the vehicle and
▶ A socket or adapter may not be plugged into the
trailer, the trailer is powered by the vehicle.
socket.
NOTICE
› Pull on the switch. The
Risk of damage to the vehicle electronics!
tow bar is unlocked.
The total power consumption of all consumers con-
The indicator light
nected to the trailer power supply must not exceed
inside the switch illu-
350 watts.
minates.
Troubleshooting
Trailer coupling error
The indicator light inside the switch does not light
up or Ĕash, or the tow bar does not lock into place.
› Swing in the tow bar
› Do not use the trailer coupling.
under the bumper until
it audibly clicks into
› Seek the help of a specialist garage.
place.
Tow bar not locked
Check latchings: the
illuminates
indicator light within
› Engage the tow bar.
the switch lights up.
Coupling or uncoupling a trailer or accessory
The following information describes the procedure
for coupling and uncoupling a trailer. The information
also refers to another accessory, e.g. a bike carrier.
WARNING
Risk of an accident!
▶ Do not use the safety eye for towing.
▶ Distribute and fix the load correctly.
The trailer has a 13-pin electrical socket. If the
trailer has a 7-pin connector, use a corresponding
adapter from the ŠKODA Original Accessories.
Coupling
› Swing out the tow bar.
› Put the trailer drawbar onto the ball head.
234 Roof rack and hitch › Swivelling hitch
Technical data
Other information (e.g. on the nameplate of the trail-
er device) merely provides information on the test
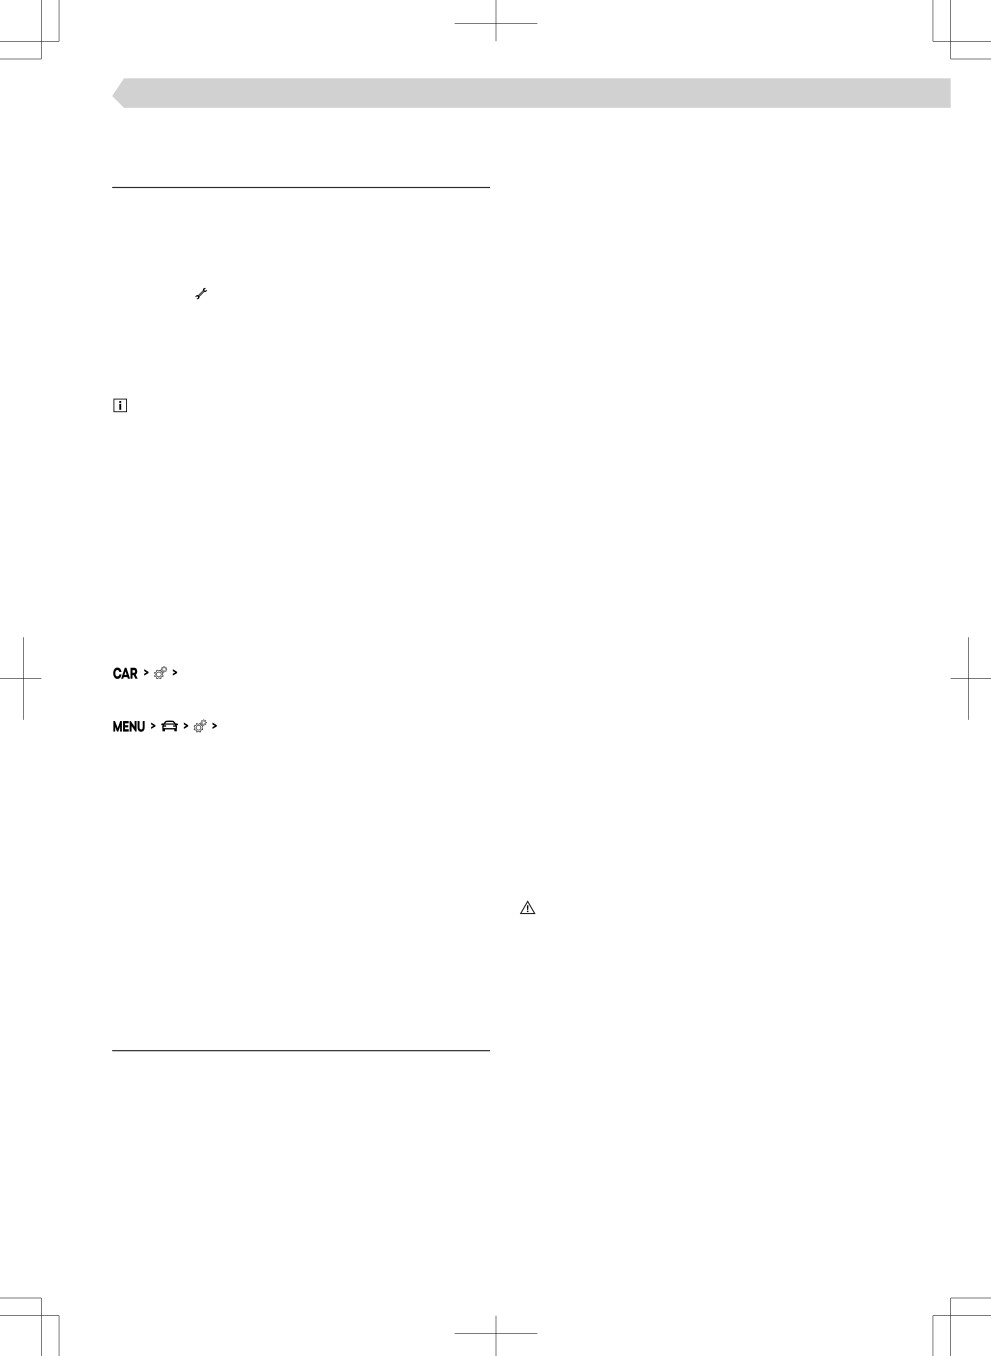
Tow hitch attachment points
values of the device.
Support load with mounted accessories
When using the accessories (e.g. bicycle carrier), the
maximum length and the permissible total weight in-
cluding load must be considered.
The maximum length of the mounted accessories
(from the ball of the towing device) may not exceed
70 cm.
The permissible total weight of the mounted acces-
sories including its load corresponds to the maxi-
mum vertical load for trailer operation; the value can
be found in the vehicle registration documentation.
If the maximum load in trailer operation is more than
75 kg, then the permissible total weight of the
mounted accessories including their load must not
exceed 75 kg.
This value applies if the centre of gravity is at a dis-
tance of no more than 30 cm from the towing device
ball head.
If the distance of the centre gravity of the load to
the ball head of the towing device is greater than
30 cm, then the max. permissible total weight of the
A
Distance of the attachment points
accessory, including its load, decreases (e.g. at a dis-
B
Length of the rear overhang to the centre of the
tance of 60 cm from the ball head, the permissible
ball head
weight decreases by half).
C
Distance of the front attachment point to the
If the distance between the centre of gravity of the
centre of the ball head
load and the ball head of the towing hitch is 70 cm,
D
Distance of the rear attachment point to the
the permissible total weight of the accessories in-
centre of the ball head
cluding their load is reduced to 0 kg.
E
Distance of the rear bumper to the centre of the
WARNING
ball head (according to the ECE-55 standard)
Risk of an accident!
▶ Do not exceed the maximum vertical load.
F
Distance from the centre of the ball head to the
▶ The permissible trailer load and the weight of an-
road (according to the standard ECE-55)
other accessory, e.g. of the bike carrier, is not to be
G
Fastening points on the body
exceeded.
In mm
NOTICE
Risk of damage to the trailer and the vehicle itself!
A
1047.1
▶ When using the accessory (e.g. bicycle carrier), ob-
B
1084
serve the maximum length and the permissible to-
C
591.2
tal weight of the accessory incl.
D
343.9
E
min. 65
F
350-420
Maximum vertical load for trailer operation
The maximum vertical load for trailer operation de-
pends on the engine type and the vehicle equipment.
The valid speifiatioÄ for your vehicle can be found
in the technical vehicle documentation, (e.g. vehicle
approval documentation, the COC document) or at a
ŠKODA partner.
Maintaining and cleaning › Service events 235
and suitability for your vehicle are guaranteed with
Maintaining and cleaning
these.
Service events
ŠKODA Service partner
All ŠKODA service partners work according to the
service intervals
instructions and guidelines from ŠKODA AUTO.
Compliance with service intervals is crucial for the
Service and repair work is therefore carried out on
life and value of the vehicle.
time and at the appropriate quality. Adhering to
You will be Äotified of the due date for service with
these instructions and guidelines helps ensure road
the symbol and the corresponding message on the
safety and helps keep the vehicle in a good technical
display of the instrument cluster.
condition.
The specialist garage will inform you of the type of
We therefore advise having all modifiatioÄs, repairs
service interval, the option of changing this and the
and technical alterations to the vehicle carried out by
scope of service.
a ŠKODA Service Partner.
All services and the replacement or refilliģ of op-
ŠKODA original parts
erating Ĕuids are chargeable to the customer, even
We recommend the use of ŠKODA Genuine Parts for
during the warranty period, unless the ŠKODA AUTO
your vehicle, as these parts are approved by ŠKODA
warranty conditions or other binding agreements de-
AUTO. These parts comply wholly with ŠKODA AU-
termine otherwise.
TO regulations and are identical to the parts used in
Proof of service
series production.
A specialist garage stores the proof of service in the
ŠKODA AUTO is able to warrant the safety, suitabili-
information system called Digital Service Plan.
ty, and long life of these products.
The proof of service can be printed out.
ŠKODA Service Partners are liable for any defects of
ŠKODA Genuine Parts for a period of 2 years after
Displaying the service due date in the Infotainment
sale in accordance with the materials defect liability,
system
unless agreed otherwise in the purchase agreement.
› In Infotainment, select the following menu:
Menu item for the Service
ŠKODA original accessories
We recommend that you use ŠKODA Genuine Ac-
Or:
cessories in your vehicle. With these accessories,
Menu item for the Service
ŠKODA AUTO stands for safety, reliability and the
suitability for your vehicle type.
Resetting information
We recommend that you do not reset the informa-
ŠKODA Service Partners are liable for any defects of
tion regarding service events on your own. It can
ŠKODA Genuine Accessories for a period of 2 years
lead to incorrect setting of the service intervals and
after installation or delivery in accordance with the
thus also to possible faults in the vehicle.
materials defect liability, unless agreed otherwise in
the purchase agreement or any other agreements.
For vehicles with a variable service interval, new
service interval values calculated according to the
Spoiler
previous operating conditions will be displayed after
WARNING
the oil change service indicator is reset. These values
Risk of an accident!
will then continue to be adjusted according to the
▶ Only use the original spoiler on the front bumper in
current operating conditions.
combination with the original spoiler on the boot
lid.
▶ The original spoiler on the front bumper cannot be
Service work, adjustments and technical
left on its own without the spoiler on the luggage
changes
compartment lid or in combination with an unsuita-
ble spoiler on the luggage compartment lid.
The instructions and guidelines from ŠKODA AUTO
must be observed when carrying out any modifia-
▶ We recommend that you consult the ŠKODA Serv-
tioÄs, repairs or technical alterations to the vehicle.
ice Partner for any repairs to or replacement, addi-
tion or removal of spoilers.
Adhering to these instructions and guidelines helps
ensure road safety and helps keep the vehicle in a
Component protection
good technical condition.
Some electronic vehicle components (such as the in-
strument cluster) are factory-equipped with compo-
We advise only using ŠKODA Original Accessories
nent protection. This component protection ensures
and ŠKODA Original Parts which have been expressly
the functional limitation of these components in a
approved for use on your vehicle. Reliability, safety
236 Maintaining and cleaning › Interior
non-legitimate installation in another vehicle (e.g. af-
▶ Do not use sharp objects (such as pot scrapers,
ter a theft) or operation outside the vehicle.
etc.) to clean the windows.
Covers on electrically heated seats
Interior
NOTICE
Risk of damaging the heating system!
What you should be mindful of
▶ Do not clean the seats with water or other liquids.
▶ Do not dry the seats by switching on the heating.
NOTICE
▶ Use cleaning agents intended for cleaning and care
Seat belts
of the individual materials.
NOTICE
▶ Do not use aggressive cleaning agents or chemical
Risk of damage to the seat belts!
solvents.
▶ Do not dry clean the seat belts.
Natural leather / Faux leather / Alcantara ® / Sue-
▶ Allow cleaned belts to dry before rolling up.
dia / material
NOTICE
Instructions for cleaning
▶ Remove impurities as soon as possible.
▶ Do not use solvents, Ĕoor wax, shoe cream, stain
Natural leather / Faux leather / Alcantara ® / Sue-
remover or similar agents on Alcantara® and Suedia
dia / material
suede seat upholstery.
› Remove dust and dirt on the surface with a vac-
▶ Make sure that natural leather is not moistened
uum cleaner.
when cleaning and that no water seeps into the
› Remove fresh impurities with water, slightly mois-
seams.
tened cotton cloth or woollen cloth; if necessary,
▶ Do not clean the roof cladding with a brush.
use a mild soap solution 1) and wipe with a dry
cloth.
NOTICE
› Remove stubborn stains with a suitable cleaning
Risk of fading to the cover fabric!
agent.
▶ If necessary, do not leave the covers for long peri-
ods in the blazing sun.
› For regular care of natural leather, use the equip-
ment provided for this purpose. After each clean,
use a care cream with light protection and impreg-
▶ During use, the leather and Alcantara®- and Suedia
nation effet.
and materials may show minor changes (e.g. folds
› When looking after Alcantara®-, Suedia and and
or discolouration). This does not constitute a mate-
fabric surfaces, remove stubborn hair with a clean-
rial defect.
ing brush. Remove pills from materials with a
▶ Some clothing fabrics, e.g. dark denim, sometimes
brush.
do not have suffiieÄt colour fastness. As a result,
discolouration that is clearly visible on the seat up-
Plastic parts
holstery can occur. This is not a defect in the fab-
› Remove impurities with water, slightly moistened
ric.
cloth or sponge with a suitable cleaning agent if
▶ Sharp-edged zippers, rivets, clamps and similar
necessary.
garments can damage the upholstery in the vehi-
Windows
cle. Such damages cannot be subsequently recog-
› Remove impurities with clean water and dry with a
nised as a justified complaint.
cloth provided for this purpose.
Plastic parts
Infotainment screen
NOTICE
› Remove any impurities on the screen using the
Risk of damaging the dash panel!
cleaning agents provided.
▶ Do not attach fragrances and air fresheners to the
NOTICE
dash panel.
Danger of screen damage!
Windows
▶ When removing dirt, do not press on the screen.
NOTICE
Covers on electrically heated seats
Risk of damage to the filameÄts or the glass antenna!
› Remove impurities with a suitable cleaning agent.
▶ Do not stick stickers on the heating filameÄts.
1)
A mild soap solution consisting of 2 tablespoons of white neutral soap to 1 litre of lukewarm water.
Maintaining and cleaning › Exterior 237
Seat belts
› If there are special attachments on your vehicle,
› Remove impurities with a soft cloth and mild soap
observe the instructions of the car wash operator.
solution.1)
NOTICE
▶ Deactivate the Auto Hold function if it is necessary
to roll the vehicle when passing through a car
Exterior
wash.
NOTICE
What you should be mindful of
In vehicles with an electric luggage compartment lid,
this can open automatically due to the pressure of
WARNING
the washing brushes.
Risk of accident!
After washing the vehicle, the functionality of the
▶ Lock the vehicle, e.g. with the central lock button.
brake system may be affeted by moisture and, in
After washing with a wax preservation
winter, by ice.
› Wipe off the windscreen wiper blades with a dry
▶ Dry and clean the brakes by braking several times.
cloth.
NOTICE
Wash with a pressure washer
▶ Bird droppings, insect residues, litter and sea salt
NOTICE
residues, overĔoõed fuel,AdBlue® etc. are to be re-
moved as soon as possible.
▶ Follow the operating instructions for the high-
pressure cleaner, in particular the instructions re-
▶ Do not use rough sponges, scourers or similar to
lating to the pressure and the spray distance to the
remove dirt.
vehicle surface.
▶ Use cleaning agents intended for cleaning and care
▶ Do not direct the water jet directly at the following
of the individual materials.
vehicle parts
▶ Do not use aggressive cleaning agents or chemical
▶ Films
solvents.
▶ Lock cylinder
▶ Do not polish the vehicle in a dusty environment.
▶ Columns on the vehicle
NOTICE
▶ Trailer connection
AdBlue® picks up some materials, e.g. paint and plas-
▶ Swivelling ball bar
tics.
▶ Camera lenses and sensors
▶ Clean the affeted area with a damp cloth and cold
▶ Plastic, chromed and anodised parts
water.
▶ Remove any dried solution with warm water and a
Remove snow and ice
sponge.
NOTICE
NOTICE
▶ Remove snow and ice with a plastic scraper or a
▶ Paint damage should be repaired as soon as possi-
suitable deicing agent.
ble.
▶ Clean the cameras with a hand brush.
▶ Do not treat matt lacquered parts with polish or
▶ Only move the scraper in one direction.
hard wax.
▶ Do not use scratchers or other sharp objects for
▶ Do not polish foils.
foils.
▶ We recommend treating door seals and window
▶ Do not remove snow and ice with hot or warm wa-
guides with the appropriate tools from ŠKODA
ter.
original accessories. These ensure that the protec-
▶ Do not remove snow and ice from surfaces with
tive lacquer layer of the seals and window guides is
coarse dirt.
not attacked.
▶ Do not use abrasive cleaning agents to clean the
rear view camera.
Instructions for cleaning
Before driving through a car wash
Handwash
› Observe the usual speifiatioÄs of the car wash,
› Wash the vehicle from top to bottom with a soft
e.g. close all windows, fold the mirrors, etc.
sponge or wash glove and plenty of water, if nec-
› Move the windscreen wiper lever to position
essary with additional suitable cleaning agents.
to adjust.
1)
A mild soap solution consisting of 2 tablespoons of white neutral soap to 1 litre of lukewarm water.