Seat Mii (2019 year). Manual in english - page 7
Introduction
Overview of the unit
You&Mii Music
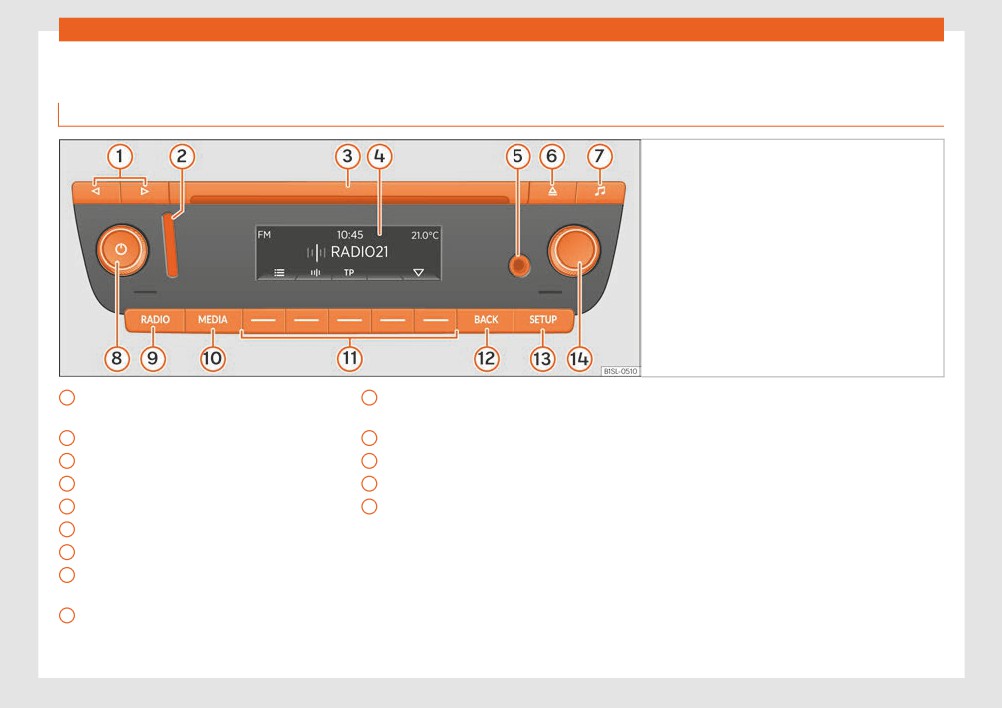
Fig. 143 Overview of the controls
1
Arrow buttons (radio/media mode)
10
Media mode (audio sources)
››› page 139, ››› page 141
››› page 141
2
Slot for SD cards ››› page 142
11
Function buttons ››› page 137
3
CD slot
12
Go back to the previous menu
4
Screen
13
Settings menu
5
AUX-IN multimedia socket ››› page 144
14
Settings button (search and selection)
6
Eject the CD
››› page 137
7
Sound settings
8
Volume. Off and on ››› page 137,
››› page 138
9
Radio mode (change of band frequency)
››› page 139
135
Infotainment System
You&Mii Colour Connection
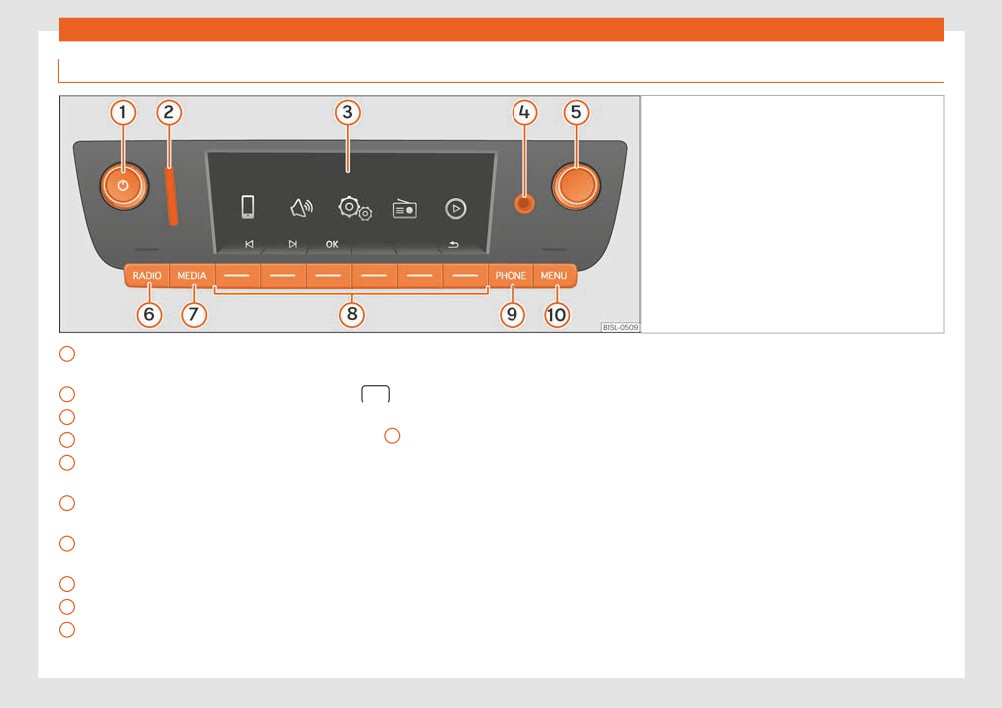
Fig. 144 Overview of the controls
1
Volume. Off and on ››› page 137,
Main menus
››› page 137
● To access the main menu, press button
2
Slot for SD cards ››› page 142
.
3
Screen
● To select a function, rotate the setting But-
4
AUX-IN multimedia socket ››› page 144
ton 5 until it is highlighted and press the but-
ton.
5
Settings button (search and selection)
››› page 137
6
Radio mode (change of band frequency)
››› page 139
7
Media mode (audio sources)
››› page 141
8
Function buttons ››› page 137
9
Telephone mode ››› page 145
10
Selecting the main menu ››› page 136
136
Introduction
General operating informa-
Thumbwheels, equipment and
Switching on and off
function buttons
tion
● To manually switch the system on and off,
Overview
briefly press the rotary knob .
Additional instructions
● Rotary/push knobs.
When the unit is switched on the system
Depending on the vehicle, notifications of the
● Equipment buttons named (physical but-
starts up. The last active audio source will be
factory-fitted driving assistance systems are
tons).
played with the volume set, as long this does
shown on the display. The notifications close
not exceed the maximum, predefined
● Function buttons (virtual buttons).
“switch-on” volume ( Volume ).
automatically when they are no longer use-
ful.
Rotary/push knobs
Depending on the equipment and country,
when switching off the engine or removing
All notifications are only displayed after com-
The left-hand rotary knob is known as vol-
the key from the ignition, the system switches
pletely rebooting the radio system.
ume control or the on/off button.
off automatically. If the system is switched on
The right-hand rotary knob is known as the
again without switching on the ignition, it will
Note
settings button.
switch off automatically after approximately
● Pushing the buttons gently is enough to
30 minutes (switch-off delay).
use the equipment.
Equipment buttons and function buttons
● Due to country-specific legislation, cer-
Power management
The named buttons of the equipment are
tain functions may not be available when
known as “equipment buttons” and are
If the charge of the battery goes below the
the vehicle is travelling above a certain
shown with a button symbol inside a rectan-
minimum onboard charge with the ignition
speed.
gle, for instance, equipment button .
switched off and the system active, an audi-
● Using a mobile telephone inside the vehi-
ble warning will be emitted and the LOW BAT-
cle may provoke noise in the speakers.
Unnamed equipment buttons are located be-
TERY message will be displayed. If this hap-
low the screen. These equipment buttons are
● On some vehicles with ParkPilot, the vol-
pens, you should turn off the equipment.
known as “function buttons” as their purpose
ume of the active audio source is automati-
cally lowered when reverse gear is selec-
depends on the active function mode.
Anti-theft password
ted.
The function assigned to a function button is
The anti-theft password of the system is stor-
explained on the bottom of the display,
ed in the system after entering it for the first
above the corresponding button.
time (radio comfort password). If you have to
enter the anti-theft password manually, for
»
137
Infotainment System
instance, because the system has been in-
Note
stalled in a different vehicle, please go to a
If the base volume has been considerably
SEAT authorised service.
increased to play a certain audio source,
If only the battery was disconnected, switch
lower the volume again before switching to
on the ignition before turning the system on
another audio source.
again.
Change base volume
Function
Operation
Turn volume
Turn the volume control clock-
up.
wise.
Turn volume
Turn the volume control anti-
down.
clockwise.
Changes in base volume are indicated by a
“volume bar” on the screen, which is dis-
played briefly.
It is possible to preset certain volume settings
and adjustments.
Mute system sound
● Turn the volume control anti-clockwise
until it displays .
● OR: press the volume switch briefly to
mute or unmute the system.
While the sound of the system is muted
(MUTE), the playback Media source stops.
138
Audio Mode
RADIO main menu
equipment button gain to display more
Audio Mode
functions for the radio receiver.
Radio Mode
The following options are available:
● Search next station.
Introduction
● Access a previously saved station.
● Switching the TP function on and off
The radio system is supplied in different ver-
sions depending on the country and the fea-
● Save current station ››› page 140.
tures of the vehicle. Some systems also have
The current station is shown in the middle of
a DAB radio receiver. The general dashboard
the screen. If the station allows for RDS and
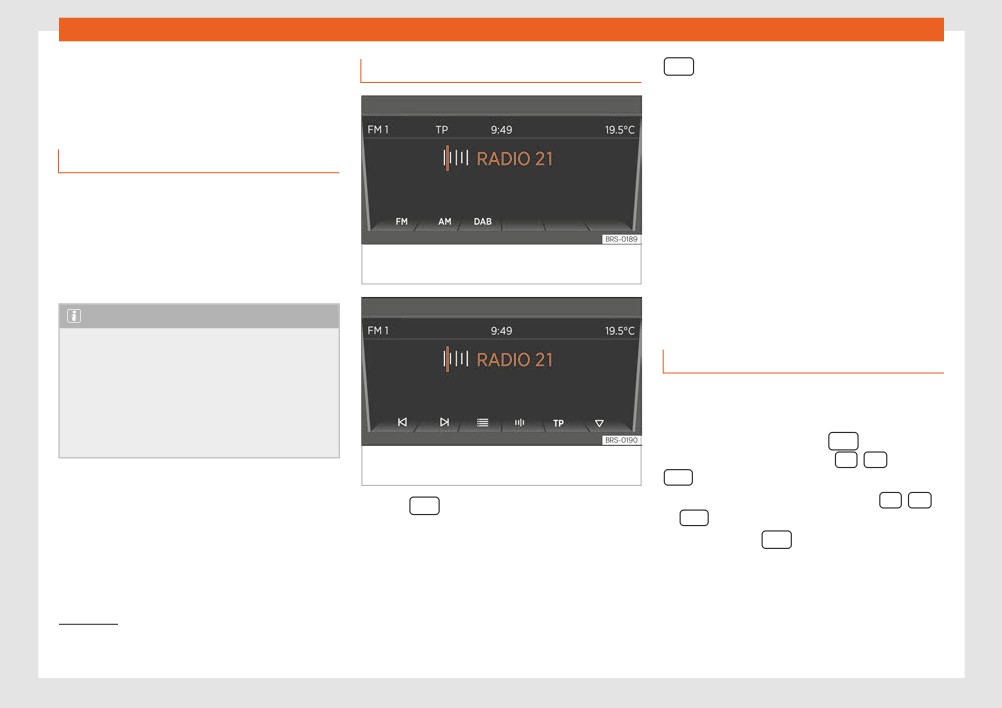
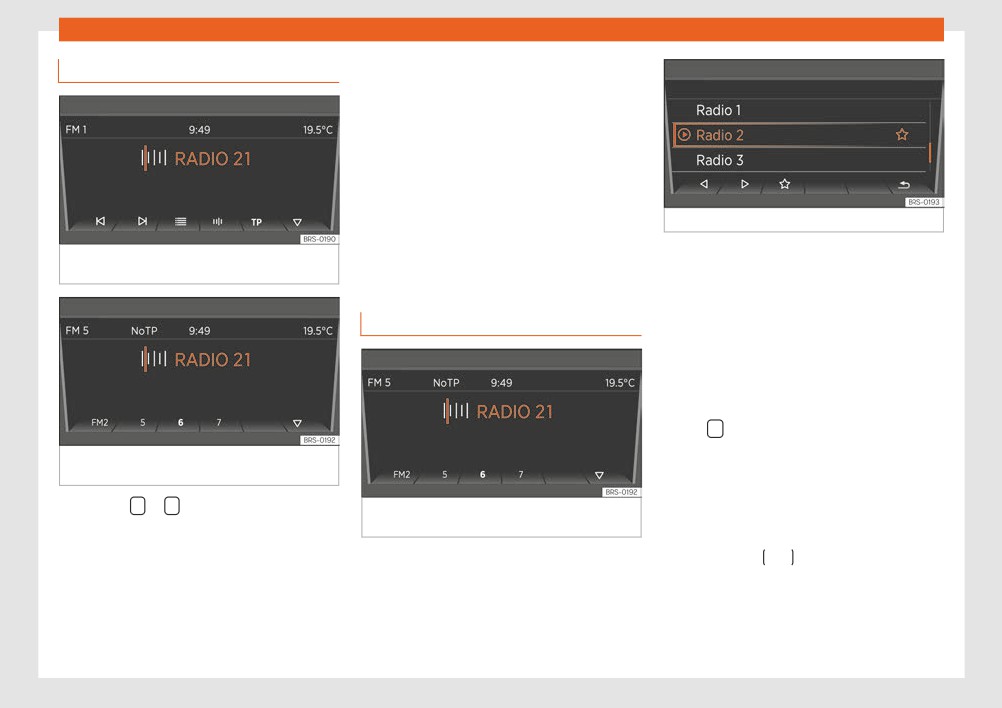
Fig. 145
RADIO Main Menu: select frequency
contains the possible versions of the system
the connection is good, instead of the fre-
band.
››› page 135.
quency, the name of the station will be
shown, e.g. RADIO 21.
Note
● Bear in mind that being in underground
parking lots, in tunnels, in areas with tall
Change frequency band
buildings or mountains can interfere with
radio signals.
The frequency band selected (FM, AM1) or
● Foil or metal-coated stickers attached to
DAB1)) is shown on the top left.
the windows may affect reception on vehi-
cles with a window aerial.
● In Radio mode, press the equipment
Fig. 146
RADIO main menu: Indication of pre-
button briefly to display the FM , AM1) and
set buttons.
DAB1) function buttons ››› Fig. 145.
● Press one of the function buttons FM , AM
● Press so start the Radio mode.
or DAB to change the frequency band.
After switching the Radio mode, the available
● OR: Press the equipment button a few
frequency bands (FM, AM1) and DAB1)) will be
times to cycle through the different lower
shown on the bottom of the display. Press the
function buttons.
1) This depends on the country and unit in ques-
tion.
139
Infotainment System
Changing station
Manually tuning station frequency
● To select the desired frequency band
››› page 139.
● Press the function button of the frequency
band .
● Rotate the setting switch until the desired
frequency is shown on the display
(e.g. 89.9 MHz).
Fig. 150 Additional radio functions.
● OR: Press one of the double-arrow buttons
››› Fig. 150 until the frequency is shown on
Stations that are already saved are overwrit-
Fig. 147 Go to the next available station with
the arrow buttons.
the screen.
ten if another station is stored in the same
preset button.
Saving stations in preset buttons
Assigning different preset buttons manual-
ly
● Select the frequency band ››› page 139.
● Select station ››› page 140.
● Change to preset buttons. To do this, press
button ››› Fig. 151
Fig. 148 Changing the stations with the arrow
● Press and hold the desired preset button
buttons is only possible for saved stations.
until an audible signal is heard.
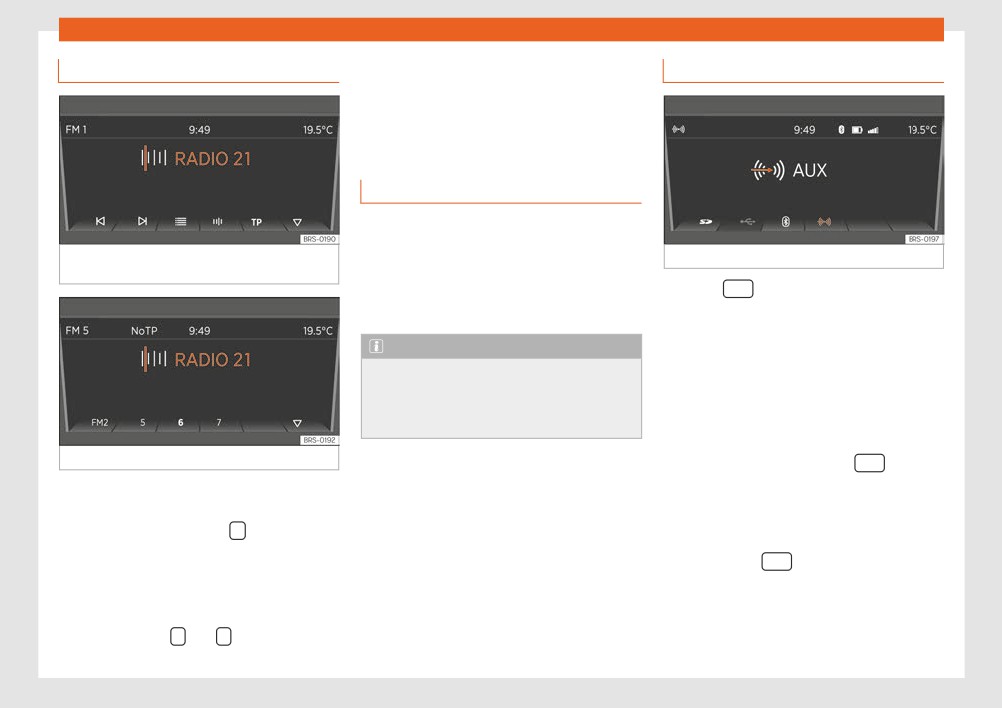
● The current station (RADIO 21) will be saved
● Press the or arrow button on the sys-
Fig. 149 Station on the FM frequency band
in this preset button.
tem or the display.
stored in preset button 6.
You can update the station list by pressing
Based on the mode selected for the search
and holding the equipment button or
engine (Button keys:) you can cycle
using the function button ››› Fig. 150.
through either available or saved stations.
140
Audio Mode
Choosing stored stations
The stored stations can only be played if they
Select a Media source
can be received at the current location.
Media Mode
Introduction
“Media sources” are audio sources contain-
ing audio files on various different data stor-
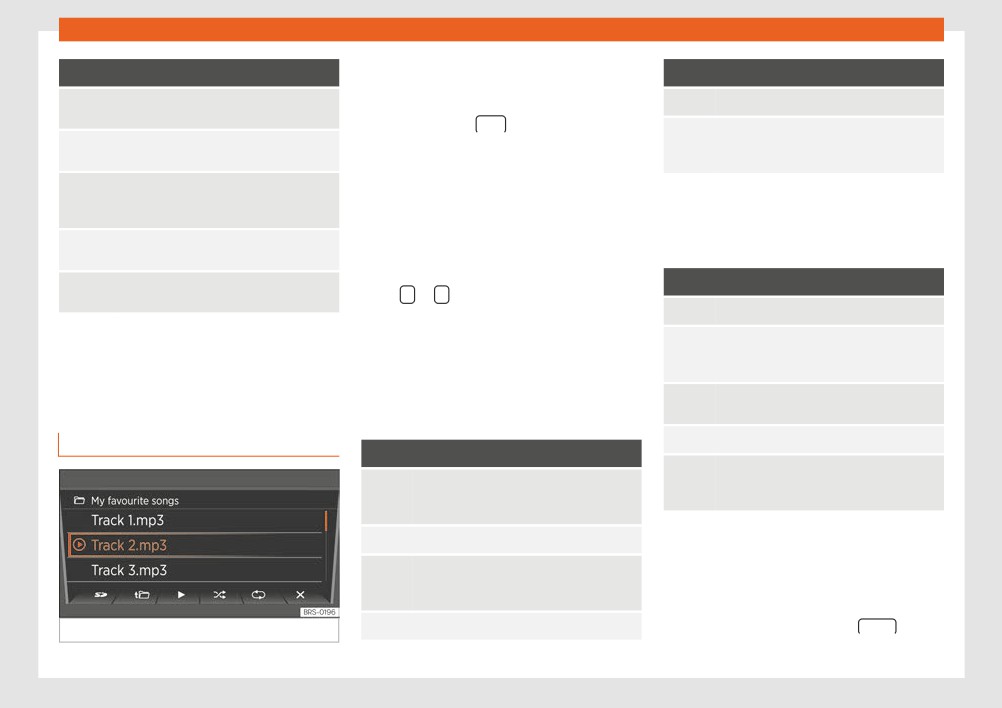
Fig. 151 Radio mode notification: change of
age devices (e.g. CD, external MP3 players).
Fig. 153 Select a Media source
station using the arrow buttons.
These audio files can be played with their
corresponding applications or the radio's au-
Press the equipment button to switch to
dio inputs.
the Media mode.
When switching to the Media mode, the bot-
Note
tom of the screen shows the available Media
● Do not use memory card adapters.
sources for a few seconds. The Media source
that is currently playing is highlighted.
● SEAT assumes no liability for any deterio-
ration or loss of files on data storage devi-
ces.
Open the Media selection menu manually
and select a Media source
Fig. 152 Saved stations.
● In the Media mode, press the equip-
ment button to display the Media selection
● Select the frequency band on which the
menu again.
station is saved.
● Enable the Media source you want by
● Press the function button, .
pressing the corresponding function button.
● Press the preset button in which the station
● OR: Press the equipment button again
is saved briefly.
to cycle through the available Media sources. »
Depending on the settings, you can cycle
through the stations of a frequency band with
the arrow buttons and (Arrow but-
tons:).
141
Infotainment System
● Insert the SD card first with the cut corner
Function button: Media source
Function button: Meaninga)
facing up and the title on the left in the slot for
SD cards.
Random play.
SD card in the slot for SD cards
››› page 142.
● Press the button .
To repeat a folder or track. The symbol
Audio or MP3 CD in the internal CD play-
*
indicates that the current track is on re-
er.
Playback continues with the last Media
peat.
source selected. To play the SD card press .
USB data storage in the USB socket
a) Valid for Media sources: SD card, USB socket and
››› page 143. You can see the location of
In the folder view, browse with the function
Bluetooth audio
the connection in ››› page 120.
button and the settings button. Press to
In the list of playlists (button ) the following
access a higher golder level and rotate the
Smartphone paired through Bluetooth
options are available:
*
settings switch to select the desired folder.
››› page 143
To switch to the previous or next track, press
Function button: Meaning
AUX-nal audio source connected to the
either or .
IN multimedia socket ››› page 144.
To change the main folder of the SD card.
Hold one of the arrow buttons to fast-forward
When a Media source that has already been
or rewind the track.
To access a higher folder level. In the folder
played is selected again, playback is re-
list, you can select a different audio source
sumed from the point at which it ended (ex-
During playback, the following function but-
with ››› page 141.
cept for: AUX ››› page 144).
tons are available on the bottom of the
screen. Active function buttons are highligh-
Play. It can also be pressed to stop the
playback.
ted.
SD card playback
Random play.
Function button: Meaninga)
To repeat a folder or track. The symbol
Playlist notification. Here you can also se-
indicates that the current track is on re-
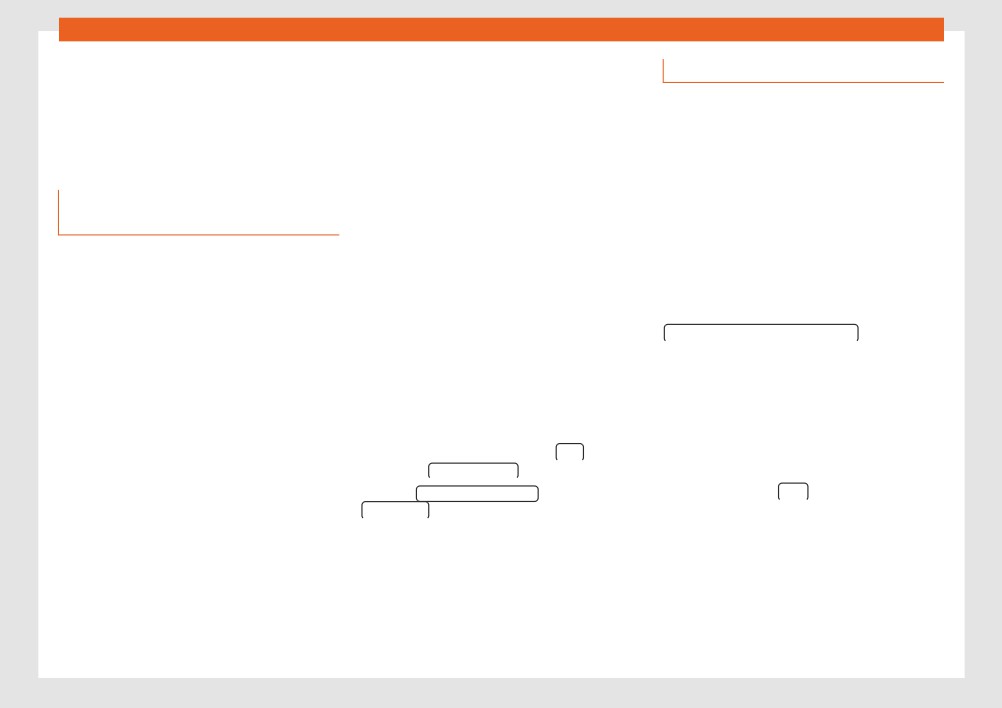
lect a track directly with the settings but-
peat.
ton ››› Fig. 154.
Ejecting the SD card
Previous track or rewind.
Connected data storage devices must be
Play. It can also be pressed to stop the
prepared before their disconnection in order
playback. In this case, the symbol
changes to
to remove them without damaging it.
Fig. 154 SD card playback: List of tracks.
Next title or fast-forward
● Press the Infotainment button MENU and
then press System settings.
142
Audio Mode
● Select Remove source safely and then
Instructions and restrictions
Playback over Bluetooth®*
SD Card. After correctly ejecting the data
The number of USB ports and their com-
storage device from the system, the function
Connection of a safe audio source through
patibility with Apple™ devices as well as with
button becomes inactive (grey colour).
Bluetooth
other media players depends on the features.
● Now you can remove the SD card.
Bluetooth® Audio mode allows you to listen to
The USB port supplies the usual USB volt-
audio files being played on a Bluetooth® au-
age of 5 volts for a USB connection.
dio source (e.g., a mobile telephone) connec-
External data storage device in the
Due to the large number of different data
ted via Bluetooth® (audio playback by Blue-
storage devices and various iPod™ and
tooth®) over the vehicle speakers.
USB socket
iPhone™ generations available, it is not possi-
ble to guarantee fault-free operation of all
Requirements
Depending on the country and device, there
functions described here.
might be one or several USB ports in the
● The Bluetooth® audio source must support
vehicle.
Take into account all other instructions and
the A2DP Bluetooth® profile.
limitations regarding requirements for media
The location of the USB ports depends on
● In the Bluetooth Settings menu the
sources.
the vehicle in question.
BT Audio (A2DP/AVRCP) function must be on.
Audio files on an external data storage device
Disconnecting
Starting Bluetooth® audio transmission
connected to the USB port can be played
Connected data storage devices must be
and controlled via the Infotainment system.
● Activate Bluetooth® visibility on the external
prepared before their disconnection in order
Bluetooth® audio source (e.g., mobile tele-
Where this manual refers to external data
to remove them.
phone).
storage devices, this means USB mass stor-
age devices containing supported audio files,
● Press the Infotainment button and
● Lower the base volume on the Infotainment
such as MP3 players, iPods™ and USB sticks.
then press System settings .
system.
● Select Remove source safely and then
● Press the button .
Only compatible audio files are displayed.
Other files are ignored.
SD Card . After correctly ejecting the data
● Press the function button to select Blue-
storage device from the system, the function
tooth® as a media source.
The rest of operations to use the external da-
button becomes inactive (grey colour).
● Start searching for the desired Bluetooth
®
ta device storage (changing tracks, selecting
● Now the data storage device can be dis-
device.
tracks and enabling playback modes) are
connected.
carried out similarly to other audio sources
● Please refer to the instructions on the
(e.g. “Playback from SD card” ››› page 142.
screen of the Infotainment system and on the
Bluetooth® audio source regarding the rest of
the procedure.
»
143
Infotainment System
You may still need to manually start playback
the electronic Instructions Manual of the
● Start playback on the external audio
on the Bluetooth® source. When playback on
manufacturer.
source.
the Bluetooth® audio source is stopped, the
● In the Media mode, press the equip-
● Only use compatible Bluetooth® devices.
Infotainment system remains in Bluetooth®
You can request information about compat-
ment button to display the Media source se-
Audio mode.
ible Bluetooth® products at a SEAT Author-
lection menu again ››› page 141.
ised Service or online.
● Press the function button.
Controlling playback
The extent to which the Bluetooth® audio
The output volume of a connected external
source can be controlled via the Infotainment
audio source should be adjusted to the vol-
External audio source connected to
system depends on the connected Blue-
ume of the other audio sources.
the AUX-IN multimedia socket
tooth® audio source.
Adjusting the playback volume
With media players that support the AVRCP
Depending on the version of the vehicle, there
Bluetooth® profile, playback on the Blue-
is an AUX-IN connection on the front of the ra-
If you need to increase the playback volume
tooth® audio source can be automatically
dio ››› page 135, in the glove compartment
for the external audio source, first lower the
started or stopped when the unit is switched
on the passenger side, on the centre console
base volume on the radio system.
to Bluetooth® Audio mode or to a different au-
or on the armrest between the front seats.
If the sound from the external audio source is
dio source. In addition, it is possible to view or
The AUX-IN multimedia connection can only
too low, increase the output volume on the
change the track via the Infotainment system.
be used with a 3.5 mm jack.
external audio source, if possible. If this is not
enough, adjust the input volume in the sys-
WARNING
A connected external audio source is played
tem settings to Level 2 or Level 3.
over the vehicle speakers and cannot be
Do not perform the pairing and connection
controlled via the radio system controls.
If the sound from the connected external au-
process while driving. This may cause an
dio source is too loud or distorted, lower the
accident!
The AUX-IN multimedia connection must be
output volume on the external audio source,
activated in the system settings so it can be
if possible. If this is not enough, change the
Note
displayed on the Media selection menu
input volume to Level 2 or Level 1.
››› page 141.
● Due to the large number of possible Blue-
tooth® audio sources, it is not possible to
Note
Connecting an external audio source to
guarantee fault-free operation of all de-
● When the playback from the external au-
the AUX-IN multimedia socket
scribed functions for all these sources.
dio source ends or the connection to the
● To operate the media and phone with the
● Lower the base volume on radio.
AUX-IN socket is interrupted, the radio goes
Bluetooth® device connected, please read
● Connect the external audio source to the
back to the AUX menu.
AUX-IN multimedia socket.
144
Audio Mode
● Interference noise may be heard if the ex-
Changing the volume
ible Bluetooth® products at a SEAT Author-
ternal audio source is powered from the 12-
Media and phone call playback from a con-
ised Service or online.
volt power socket of the vehicle.
nected mobile phone will be conducted
● Please read and observe the manufac-
through the speaker of the vehicle.
turer's instruction manual for the external
Functions of the phone
If voice control is enabled on the mobile
audio source.
phone connected, voice communication will
also take place through the vehicle speaker.
The playback volume can be modified with
Phone management*
the volume control .
Moreover, the volume of navigation an-
Connection and operation
nouncements can be adjusted in the Sound
settings menu.
Requirements for phone management:
Your mobile phone is connected to the Info-
If the volume of the system is muted (notifica-
tainment System through Bluetooth®.
tion: ), media sources that are playing on
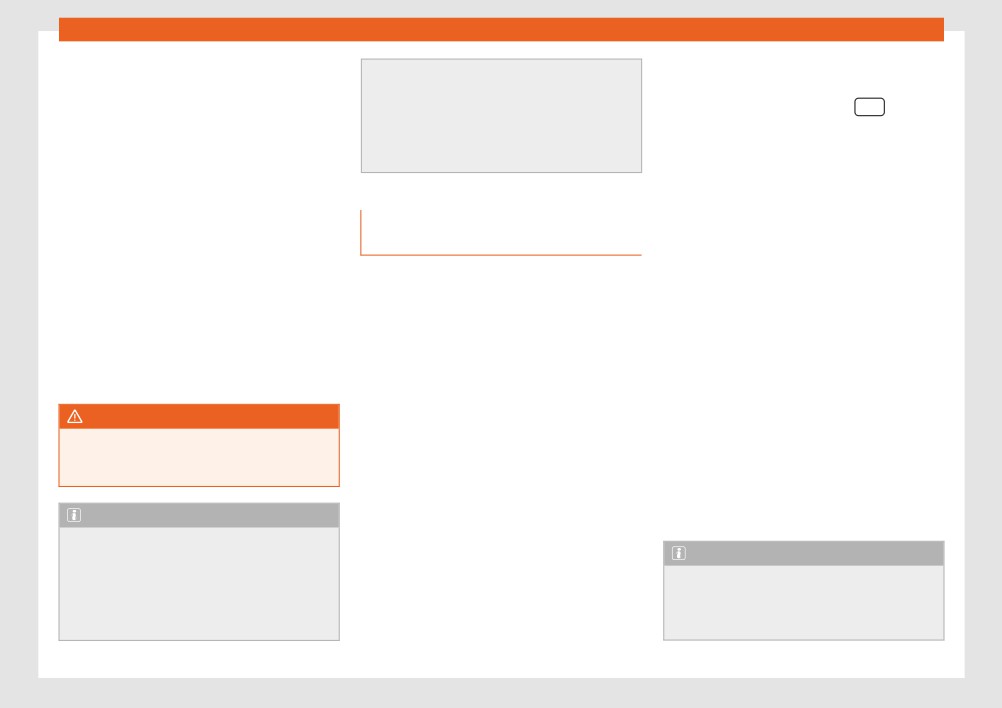
Fig. 155
Phone disconnected.
the connected Smartphone are also interrup-
Connection between the mobile phone
ted.
and the Infotainment System
WARNING
● Please observe the information on the
page 143, Playback over Bluetooth®*.
General, mandatory, legal and country-
specific instructions and laws for the use of
● Press the button .
mobile phones inside the vehicle must al-
● On the Bluetooth® menu of your mobile
ways be considered.
phone, search the name displayed on screen.
● If necessary, take into account the
Note
Fig. 156 Dial a number with the menu button.
››› page 143 notifications.
● To operate the media and phone with
● To complete the pairing process, respond
your mobile phone plugged in, please read
After correctly connecting the phone, you
cam manage the call functions of your
to the requests of both devices.
the electronic Instructions Manual of the
manufacturer.
paired mobile phone through the Infotain-
ment System ››› Fig. 155.
»
● Only use compatible Bluetooth® devices.
You can request information about compat-
145
Infotainment System
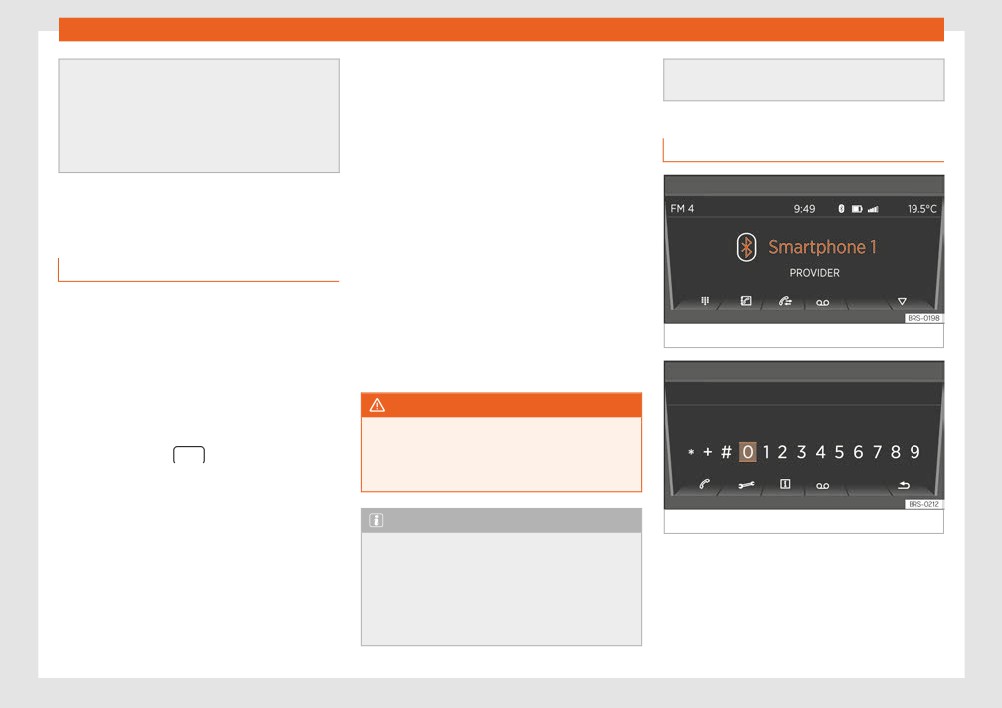
Dial number:
Call log:
Favourites
Press the ››› Fig. 155 function button to dis-
Press the ››› Fig. 155 function button to dis-
play the dial screen ››› Fig. 156. Here you can
play call log. All the calls from your mobile
choose a number with the right switch and
phone will be shown here once you have
confirm it by pressing. If the number is cor-
confirmed the transfer of your contacts from
rect, the call can be started through the
your phone.
speaker ››› Fig. 156.
● All: shows all calls in chronological order.
Moreover, the following options are available
● : only shows missed calls.
here:
● : only shows received calls.
● : calls the emergency number1).
● : only shows outgoing calls.
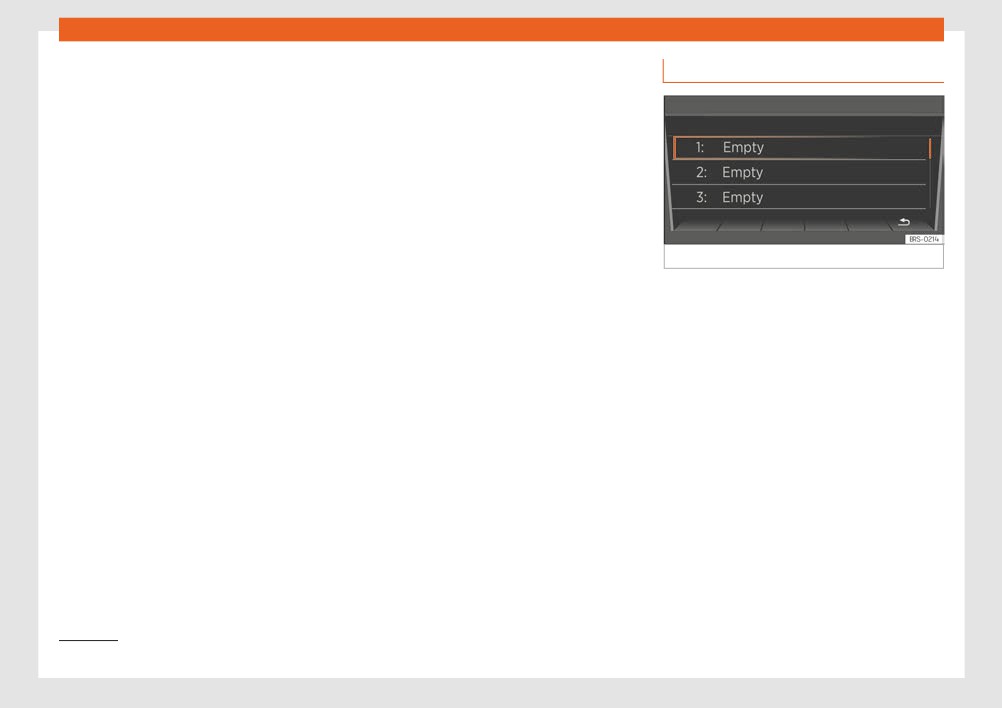
Fig. 157 Fast-dial
● : connects to a SEAT fault service1).
The function button bookmarks an entry.
Fast-dial:
● : connects to the SEAT information hot-
line1).
Press the ››› Fig. 155 function button to
Voice mail:
open the fast-dial list ››› Fig. 157. Select an
● : starts call to your voice mail. For this
Press the ››› Fig. 155 function button to
empty slot of your fast-dial list to access the
purpose, your mailbox number will be reques-
access your voice mail inbox. For this pur-
phonebook, where you can choose a contact
ted the first time you select it.
pose, your mailbox number will be requested
as a fast-dial number. Select a used slot to di-
the first time you select it.
al its corresponding phone number.
Phonebook:
Press the ››› Fig. 155 function button to
Emergency call:1)
display the phonebook. The phonebook con-
Press the ››› Fig. 155 function button to
tains all the contacts of your mobile phone,
make an emergency call.
which you can select one by one with the
right switch and establish a connection by
pressing it, or either access a list with availa-
ble numbers first. For this purpose, during the
first connection, you have to confirm the
transfer of your mobile phone contacts. With
the star key you can save a contact as a fast-
dial number.
1) Not available in all countries.
146
Audio Mode
Phone calls
● Press the function button to mute the mi-
Note
crophone.
● A device connected through Bluetooth®,
● Press to end the call.
if it supports this profile, will always be
used for calls and audio through Blue-
tooth®.
Settings of a connected phone
● To operate the media and phone with
your mobile phone plugged in, please read
Use the equipment button to access the
the electronic Instructions Manual of the
phone's settings: The following options are
manufacturer.
available:
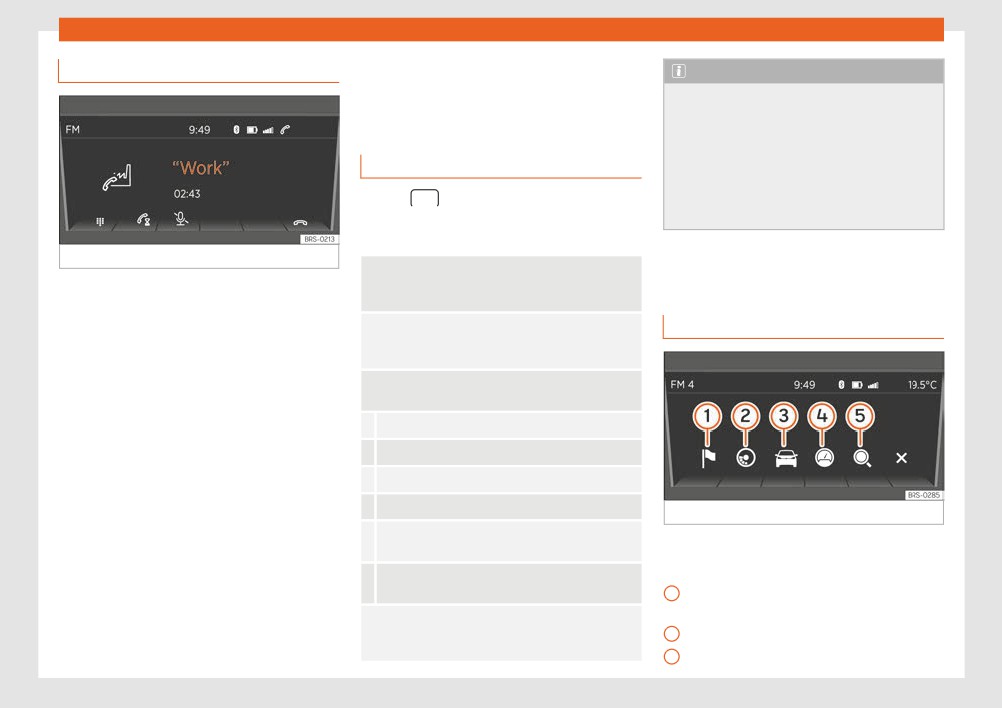
Fig. 158 Ongoing call.
Hands-free: If there is an ongoing call, you can
continue the call on the mobile phone or transfer it
Drive Mii App*
Incoming call:
back to the Infotainment System.
If you receive a call, you have three options:
Phone selection: Cycle through the phones rec-
Introduction
● accepting the call with the function but-
ognised by the Infotainment System or search for
new devices.
ton.
● muting the ringtone with the function
User profile: Change the settings of the phone
button.
currently connected:
● rejecting the call with the function but-
Manage your fast-dial numbers (e.g. delete one).
ton.
Set or change voice mail numbers.
Active call:
Sort your phonebook.
If you accept the incoming call, you have the
Download your contacts again.
Fig. 159 Application connection main menu.
following options during the call ››› Fig. 158:
Activate/deactivate mobile phone notifications
● Press the function key to emit DTMF
when turning off the engine.
The connected smartphone offers the follow-
tones (e.g. to operate an answering ma-
ing options:
Select a ringtone (only if the phone is not emitting
chine).
any sounds).
1
Navigation over the smartphone with
● Press the function button to pause the
navigation announcements on the radio.
Bluetooth®: Here you can change the connection
phone call.
settings of the telephone. For instance, you can de-
2
ECOTRAINER display.
lete known devices.
3
Driving data notifications.
»
147
Infotainment System
4
Notifications from the odometer, etc.
Connection between smartphone and ra-
The volume of the traffic announcement can
dio
be modified with the volume control .
5
Search in all fields.
● Press the button to open the main
You can also adjust the volume of the naviga-
You can also use the telephone function of
menu.
tion announcements on the Sound settings
your connected smartphone over the radio
● Afterwards, select and enable the Connec-
menu.
using the right switch.
tion of the application function with
When the volume of the system is muted (no-
the settings button.
Note
tification: ), playback of multimedia sour-
ces played on the connected smartphone is
To operate the telephone and multimedia
Once the connection is established, you can
also interrupted.
aspects and for navigation with the con-
manage radio music playback with the
nected smartphone, read the instructions
smartphone. You can start the navigation on
manual of the manufacturer.
Note
the smartphone and listen to the navigation
announcements on the audio system of the
● For more information about the installa-
vehicle.
tion and use of the application, see the in-
formation provided with the vehicle.
Connection and operation
Instructions for navigation
● To operate the media and phone and to
Requirement: Your smartphone is connected
navigate with your Smartphone plugged in,
Acoustic navigation announcements will be
to the radio through USB ››› page 143 and the
please read the electronic Instructions
played on the speakers of the vehicle. Re-
SEAT application to connect the smartphone
Manual of the manufacturer.
garding this, take into account the instruc-
to the radio is installed on your smartphone1).
tions in Adjusting the volume ››› page 148.
● A device connected through Bluetooth®,
if it supports this profile, will always be
Place the smartphone in its socket and turn it
You can manage this from the connected
used for calls and audio through Blue-
on. Removal and installation of the equip-
smartphone ››› page 148.
tooth®. and connection for applications.
ment and the socket are described in
● Only use compatible Bluetooth® devices.
››› page 121.
Changing the volume
You can request information about compat-
Multimedia playback, navigation announce-
ible Bluetooth® products at a SEAT Author-
ments and phone calls emitted by the con-
ised Service or online.
nected smartphone will be played on the
speakers of the vehicle.
1) For more information about the application re-
garding installation and use, take into account
the information provided with the vehicle.
148
Start and driving
Pushing or towing
WARNING
Driving
For technical reasons, the vehicle must not
While the engine is running or starting it
be push- or tow-started. Jump starting is
could help reduce the risk of serious injury.
Start and driving
preferable.
● Never start or leave the engine running in
poorly ventilated or closed spaces. Ex-
Key not authorised for the vehicle
haust gas contains carbon monoxide, a
Stopping and starting the
If a key which is not authorised for this vehicle
toxic, colourless and odourless gas. Car-
engine
bon monoxide can cause people to lose
is inserted in the ignition lock, it can be re-
moved as follows:
consciousness. It can also cause death.
Switching on the ignition and start-
● Never leave the vehicle unattended if the
● Automatic transmission: the key cannot be
ing the engine
engine is running. The vehicle could move
removed from the ignition lock. Press and re-
off suddenly or something unexpected
lease the selector lever locking button. Key
could happen resulting in damage and se-
can be removed from the vehicle.
rious injury.
● Manual transmission: Remove the key from
● Never use start boosters. Cold start
the ignition.
sprays could explode or increase the en-
gine speed unexpectedly.
WARNING
Switching off the engine while driving
WARNING
makes stopping the vehicle difficult. As a
The components of the exhaust system
consequence you may lose control of the
reach very high temperatures. This could
vehicle and there is a risk of serious acci-
cause a fire and considerable damage.
dent.
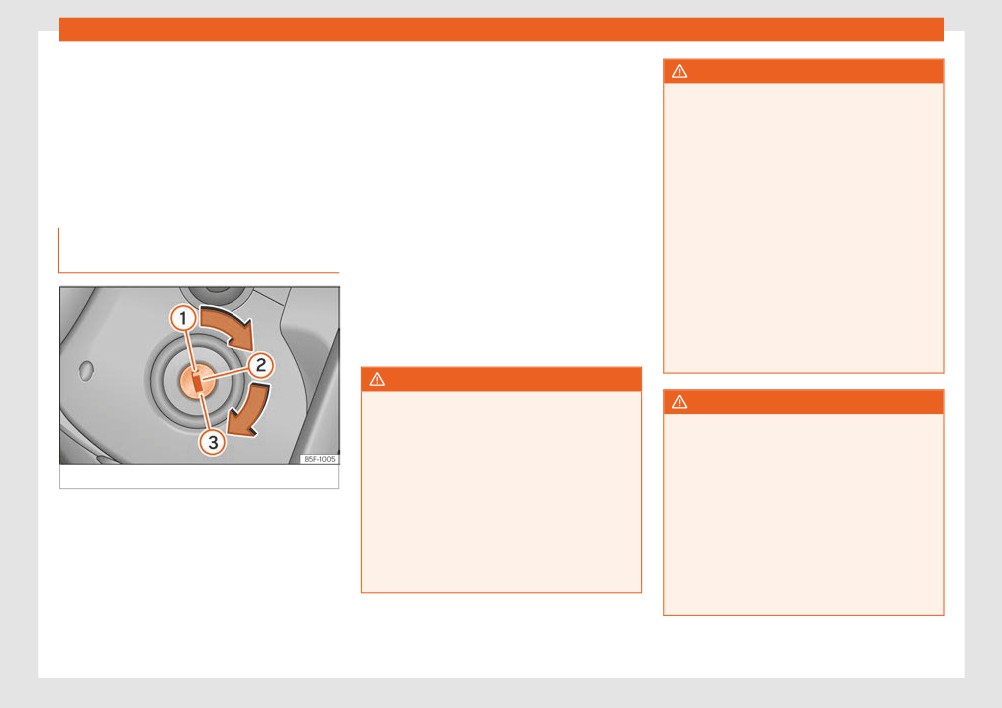
Fig. 160 Vehicle key positions
● Always park your vehicle so that no part
● The assisted braking and steering sys-
of the exhaust system can come in contact
Read the additional information carefully
tems, the airbag system, seat belts and
with flammable materials (such as wood,
››› page 22
certain safety equipment are only active
leaves, spilled fuel, dried grass, etc.).
while the engine is running.
● Never apply additional underseal or anti-
Immobiliser display
● The engine should only be switched off
corrosion coatings to the exhaust pipes,
when the vehicle is at a standstill.
When an invalid key is used or in the event of
catalytic converter or the heat shields on
a system fault, is displayed on the instru-
the exhaust system.
»
ment panel. The engine cannot be started.
149
Driving
WARNING
● When the engine is cold, avoid high revs
● Natural gas engines always start up with
and heavy acceleration and do not make
petrol, as a certain operating temperature
Unsuitable or careless use of the vehicle
the engine work hard.
is required for running with gas. Once the
key could result in serious injury.
required operating temperature is reached,
● Do not push or tow start the engine. Un-
● Always take all the keys with you when-
the engine will change to operate with nat-
burnt fuel could damage the catalytic con-
ever you leave the vehicle. If not, the en-
ural gas.
verter.
gine could accidentally be started and
electrical equipment such as the windows
could accidentally be operated resulting in
For the sake of the environment
serious injury.
Stopping the engine
Do not warm the engine at idle speed; start
● Never leave children or disabled people
driving immediately if the visibility is OK.
Switching off the engine
alone in the car. Passengers could be trap-
This helps the engine reach operating tem-
ped in the car in an emergency and not be
perature faster and reduces emissions.
- Stop the vehicle ›››
able to get themselves to safety. For exam-
– Turn the ignition key to position
1
ple, depending on the time of the year,
temperatures inside a locked and closed
Note
››› Fig. 160.
vehicle can be extremely high or extremely
● If the key is left in the ignition lock with
low resulting in serious injuries and illness
Engaging the steering wheel lock
the engine off for long periods, the vehicle
or even death, particularly for young chil-
battery will run flat.
In vehicles with automatic gearbox, the igni-
dren.
● For automatic gearbox vehicles, the key
tion key can only be removed when the se-
● Never remove the key from the ignition if
can only be removed from the ignition lock
lector lever is in position N1).
the vehicle is in motion. The steering may
if the gear selector lever is in position P. If
- Remove the key from the ignition in posi-
lock and it will not be possible to turn the
applicable, press and release the locking
tion
1
››› Fig. 160 ›››
steering wheel.
button of the selection lever.
● Electrical devices with a high power con-
– Turn the steering wheel until you hear it en-
CAUTION
sumption are switched off temporarily
gage.
when the engine starts.
● An attempt to start the engine while driv-
Possible vehicle theft is prevented with the
ing or starting the engine immediately after
● When the engine is started cold, there
steering lock engaged.
turning it off can cause damage to the en-
may be strong vibrations for a few mo-
gine or starter motor.
ments for technical reasons. This is quite
normal, and no cause for concern.
1) Depending upon country.
150
Start and driving
WARNING
Electronic immobiliser
Braking and parking
Never switch off the engine while the vehi-
The gear lock prevents the engine from being
cle is moving. You may lose control of the
Introduction
started with an unauthorised key and the ve-
vehicle and there is a risk of serious acci-
hicle being moved.
dent.
WARNING
● The airbags and belt tensioners do not
The vehicle key has a built-in chip. It automat-
Driving with worn brake pads or a faulty
work when the ignition is switched off.
ically deactivates the electronic immobiliser
brake system may lead to serious accident.
when the key is inserted into the ignition lock.
● The brake servo does not work with the
● If you believe the brake pads to be worn
engine off. To stop, the brake pedal must be
The electronic immobilizer will be activated
or the brake system to be faulty, immedi-
pressed with more force.
again automatically as soon as you remove
ately refer to a specialised workshop to
● As the power steering does not work if the
the key from the ignition lock.
check the brake pads and replace the worn
engine is not running, you will need more
ones.
For this reason, the vehicle can only be used
strength to steer than normally.
with a genuine SEAT key with the correct
● If the key is removed from the ignition, the
code. Coded keys can be obtained from
WARNING
steering may lock and it will not be possible
SEAT dealerships ››› page 92.
to steer the vehicle.
Careless parking can cause serious injury.
If an unauthorised key is used, the following
● Never remove the key from the ignition if
signal appears on the instrument panel dis-
the vehicle is in motion. The steering lock
CAUTION
play . The vehicle cannot be started in this
may engage and lock the steering wheel
If the engine has been driven at high speed
case
making the vehicle impossible to control.
for a prolonged period of time, it may over-
● Always park your vehicle so that no part
heat when turned off. To avoid engine dam-
Note
of the exhaust system can come in contact
age, allow the engine to run for approxi-
The correct operation of the vehicle is only
with flammable materials (such as wood,
mately 2 minutes in neutral before switch-
guaranteed when original SEAT keys are
leaves, dried grass, spilled fuel, etc.).
ing it off.
used.
● Always apply the handbrake when you
leave your vehicle and when you park.
Note
● Never leave children or disabled people
After stopping the engine, the engine com-
alone in the vehicle. They could release the
partment fan may continue running for a
electronic parking brake, activate the se-
few minutes, even when the ignition has
lector lever or gear stick and start the vehi-
been switched off or the key removed. The
cle moving. This could result in a serious
radiator fan is automatically switched off.
accident.
»
151
Driving
● Always take all the keys with you when-
Control and warning lamps
WARNING
ever you leave the vehicle. The engine
Driving with brakes in bad condition could
could accidentally be started and electri-
It lights up ›››
result in a serious accident.
cal equipment such as the windows could
accidentally be operated resulting in seri-
Handbrake applied ››› page 153.
● If the brake warning lamp does not
ous injury.
turn off or if it lights up when driving, the
brake fluid level in the reservoir is too low or
● Never leave children or disabled people
It lights up ›››
there is a fault in the brake system. Obtain
alone in the car. They could be trapped in
Fault in the brake system
professional assistance immediately
the car in an emergency and will not be
Do not drive on!
››› page 200, Checking the brake fluid level.
able to get themselves to safety. For exam-
Seek professional advice ››› page 154.
● If the brake warning lamp lights up to-
ple, depending on the time of the year,
temperatures inside a locked and closed
Brake fluid level inadequate.
gether with the ABS warning lamp , the
vehicle can be extremely high or extremely
Do not drive on!
ABS regulation could be malfunctioning. As
low resulting in serious injuries and illness
Check brake fluid level ››› page 201.
a result, the rear wheels can lock relatively
or even death, particularly for young chil-
easily when braking. If the rear wheels lock
Together with the ABS control lamp : ABS and EBV
this could result in loss of vehicle control! If
dren.
do not function.
possible, reduce your speed and drive
Do not drive on!
carefully to a specialised workshop close
CAUTION
Seek professional advice ››› page 154.
by to check the brake system. During the
● Special care should be taken when park-
following journey, avoid sudden braking
Several warning and control lamps light up
ing in areas with high kerbs or fixed barri-
and manoeuvres.
for a few seconds when the ignition is switch-
ers. Objects protruding from the ground
ed on, signalling that the function is being
may damage the bumper or other parts of
CAUTION
verified. They will switch off after a few sec-
the vehicle during manoeuvres. To avoid
onds.
Failure to heed the warning lamps when
damage, stop before the wheels touch the
barrier or kerb.
they appear may result in faults in the vehi-
WARNING
cle.
● Special attention is required when driving
through entrances, over ramps, kerbs or
If the warning lamps are ignored, the vehi-
other objects. The vehicle underbody,
cle may stall in traffic, or may cause acci-
bumpers, mudguards and running gear,
dents and severe injuries.
and the engine and exhaust system could
● Never ignore the warning lamps.
be damaged as you drive over these ob-
● Stop the vehicle safely as soon as possi-
jects.
ble.
152
Start and driving
Handbrake
● Never use the handbrake to brake the ve-
● Apply the handbrake firmly ››› page 153.
hicle except in an emergency. The braking
● For an automatic gearbox, move the selec-
distance is considerably longer, because
tor lever to position N.
braking is only applied to the rear wheels.
● Switch off the engine and release the brake
Always use the foot brake.
pedal.
● Never drive with the handbrake gently
● Remove the key from the ignition.
applied. This can overheat the brake, af-
fecting the brakes system. This also causes
● If necessary, turn the steering wheel slightly
premature wear on the rear brake pads.
to lock the steering.
● Never accelerate from the engine com-
● With a manual gearbox, engage 1st gear on
partment with the engine running and a
flat ground and slopes, or even reverse gear
gear engaged. The vehicle could move,
on hills, and release the clutch pedal.
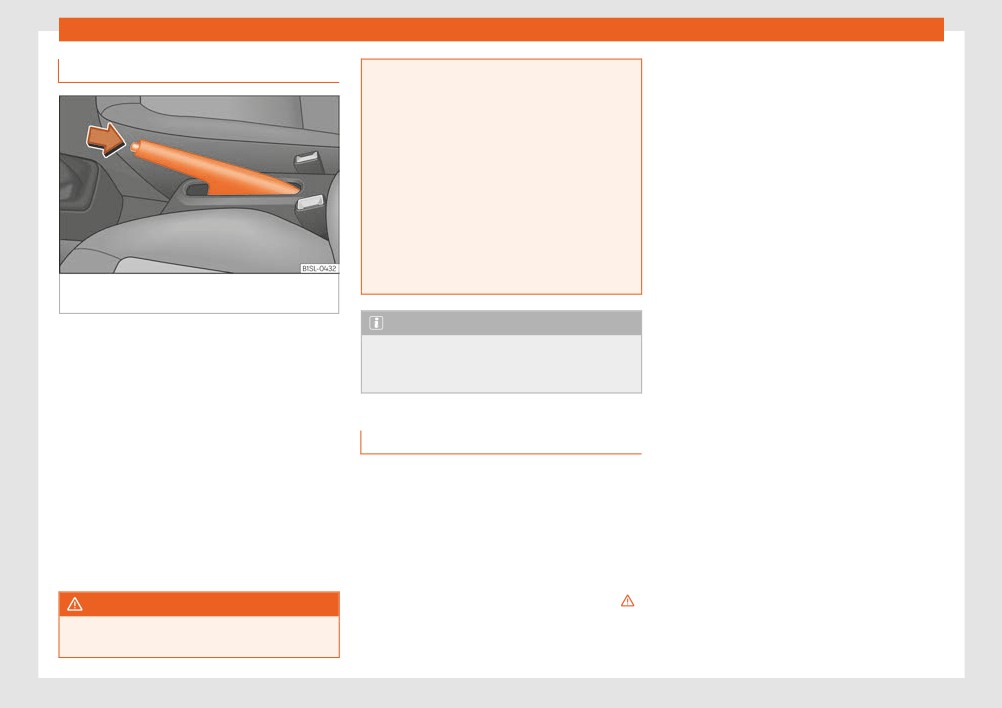
Fig. 161 Between the front seats: parking
even if the handbrake is applied.
● Ensure that all passengers leave the vehi-
brake.
cle, especially children.
Note
Using the handbrake
● When leaving the vehicle, take all keys with
If the vehicle moves at a speed superior to
you.
● Pull firmly in an upwards direction on the
6 km/h (4 mph) with the handbrake ap-
handbrake lever while pressing the button.
● Lock the vehicle.
plied, an audible warning is sounded.
● The handbrake is applied when the control
Additional information for steep slopes
lamp lights up on the instrument panel
and hills
››› page 152 when the ignition is switched on.
Parking
Before switching off the engine, rotate the
Releasing the handbrake
steering wheel so that if the vehicle should
When parking your vehicle, all legal require-
move, it will be held by the kerb.
● Pull gently in an upwards direction on the
ments should be observed.
handbrake lever and press the lock button
● On slopes, turn the front wheels so that
››› Fig. 161 (arrow).
To park the vehicle
they are against the edge of the kerb.
● Move the handbrake lever downwards
Complete operations only in the sequence
● Uphill, turn the wheels towards the centre of
keeping the lock button pressed.
given.
the road.
»
WARNING
● Park the vehicle on a suitable surface ›››
The incorrect use of the handbrake may re-
● Press and hold the brake pedal until the ve-
sult in a serious accident.
hicle comes to a standstill.
153
Driving
WARNING
on the brake pedal. While running in, the full
are not used, there may be corrosion on the
braking distance or emergency braking
brake discs and a build up of dirt on the
The components of the exhaust system
distance is larger then when the brake pads
brake pads. If the brakes are not used fre-
reach very high temperatures. This could
have been run in. While running in, avoid full
quently, or if rust has formed on the discs,
cause a fire and considerable damage.
power braking or situations requiring braking
SEAT recommends cleaning the pads and
● Always park your vehicle so that no part
performance. For example, in heavy traffic.
discs by braking firmly a few times at a mod-
of the exhaust system can come in contact
erately high speed. Only do this without en-
with flammable materials (such as wood,
The rate of wear of the brake pads de-
dangering vehicles behind you or any other
leaves,dried grass, or spilled fuel).
pends to a great extent on the conditions in
road users ›››
which the vehicle is used and the way the ve-
hicle is driven. If the vehicle is used frequently
CAUTION
Faults in the brake system
in city traffic or for short trips or driven sport
● Special care should be taken when park-
style, visit a specialised workshop regularly,
During braking, if you notice that the vehicle
ing in areas with high kerbs or fixed barri-
more frequently than advised in the Mainte-
does not react as usual (that the braking dis-
ers. Objects protruding from the ground
nance Programme, to have the brake pads
tance has increased suddenly) it may be
may damage the bumper or other parts of
checked.
possible that there is a fault in the braking
the vehicle during manoeuvres. To avoid
system. This is indicated by the warning lamp
damage, stop before the wheels touch the
If you drive with wet brakes, for example, af-
. Take the vehicle to a specialised work-
barrier or kerb.
ter crossing areas of water, in heavy rainfall
shop immediately and have the fault re-
● Special attention is required when driving
or even after washing the car, the effect of
paired. Drive at a moderate speed and be
through entrances, over ramps, kerbs or
the brakes is lessened as the brake discs are
prepared to use more pressure on the brake
other objects. The vehicle underbody,
wet or even frozen (in winter). At higher speed,
pedal, and allow for longer stopping distan-
bumpers, mudguards and running gear,
“dry” the brakes as quickly as possible by
ces.
and the engine and exhaust system could
braking gently several times. Only do this
be damaged as you drive over these ob-
without endangering vehicles behind you or
Brake servo
jects.
any other road users ›››
The brake servo only operates when the en-
A layer of salt on the discs and brake pads
gine is running and the pressure applied by
will reduce the effectiveness of the brakes
the driver on the brake pedal increases.
Information on the brakes
and increase braking distance. If you drive for
a prolonged period on salted roads without
If the brake servo does not operate or the ve-
For the first 200 to 300 km, the new brake
braking then brake carefully several times to
hicle must be towed, then the brake pedal will
pads have not yet reached their maximum
eliminate the layer of salt on the brakes ›››
have to be pressed with more force given that
braking capacity, and need to be “run in” first
the braking distance will be increased when
If the vehicle remains parked for considerable
››› . The slightly reduced braking effect can
the brake servo does not operate ›››
lengths of time, is used little, or if the brakes
be compensated for by increasing pressure
154
Start and driving
WARNING
WARNING
● Reduce speed or change down a gear
when faced with steep and long slopes.
New brake pads do not brake to full effi-
Wet, frozen or salt-covered brakes take
This allows you to use the engine braking
ciency.
longer to engage and this increases brak-
effect and to reduce the strain on the brake
● For the first 320 km, new brake pads have
ing distances.
system. Otherwise, the brakes may over-
not yet reached their maximum braking ca-
● Test the brakes carefully.
heat and fail. Only use the brakes to reduce
pacity, and need to be “run in” first. For this,
● Dry the brakes, free them of ice and salt
speed or to stop.
to compensate for reduced braking effi-
by braking gently several times, when visi-
ciency the brake pedal will have to be
bility, weather, and road and traffic condi-
pressed with more force.
Note
tions permit.
● To avoid losing control of the vehicle and
Make use, when having the front brake
causing serious accidents, always take
pads checked, and have the rear pads
WARNING
great care when driving with new brake
checked also. The thickness of the brake
pads.
Driving without the brake servo may signifi-
pads should be checked visually and regu-
cantly increase the braking distance and
larly, by looking through the openings in
● When running in new brake pads, always
result in a severe accident.
the wheel rims or from underneath the ve-
respect the safety distances between you
hicle. If necessary, remove the wheels to
and other vehicles and do not cause situa-
● Never allow the vehicle to move forwards
check them thoroughly. SEAT recommends
tions requiring extreme braking perform-
when the engine is switched off.
taking your car in for technical service.
ance.
● If the brake servo does not operate or the
vehicle must be towed, then the brake ped-
WARNING
al will have to be pressed with more force
given that the braking distance will be in-
When brakes overheat, braking is less effi-
creased when the brake servo does not op-
cient and braking distances increase.
erate.
● When driving on slopes, brakes can be
overloaded and overheat quickly.
CAUTION
● Reduce speed or change down a gear
● Never make the brakes “slip” by pressing
when faced with steep and long slopes.
the pedal gently, if it is not really necessa-
This allows you to use the engine braking
ry to brake. Continuously pressing on the
effect and to reduce the strain on the brake
brake pedal will heat the brakes. This could
system.
significantly reduce braking power, in-
● Non-standard or damaged front spoilers
crease braking distance or even result in
could restrict the airflow to the brakes and
the total failure of the brake system.
cause them to overheat.
155