Renault Alaskan (2018 year). Manual in english - page 9
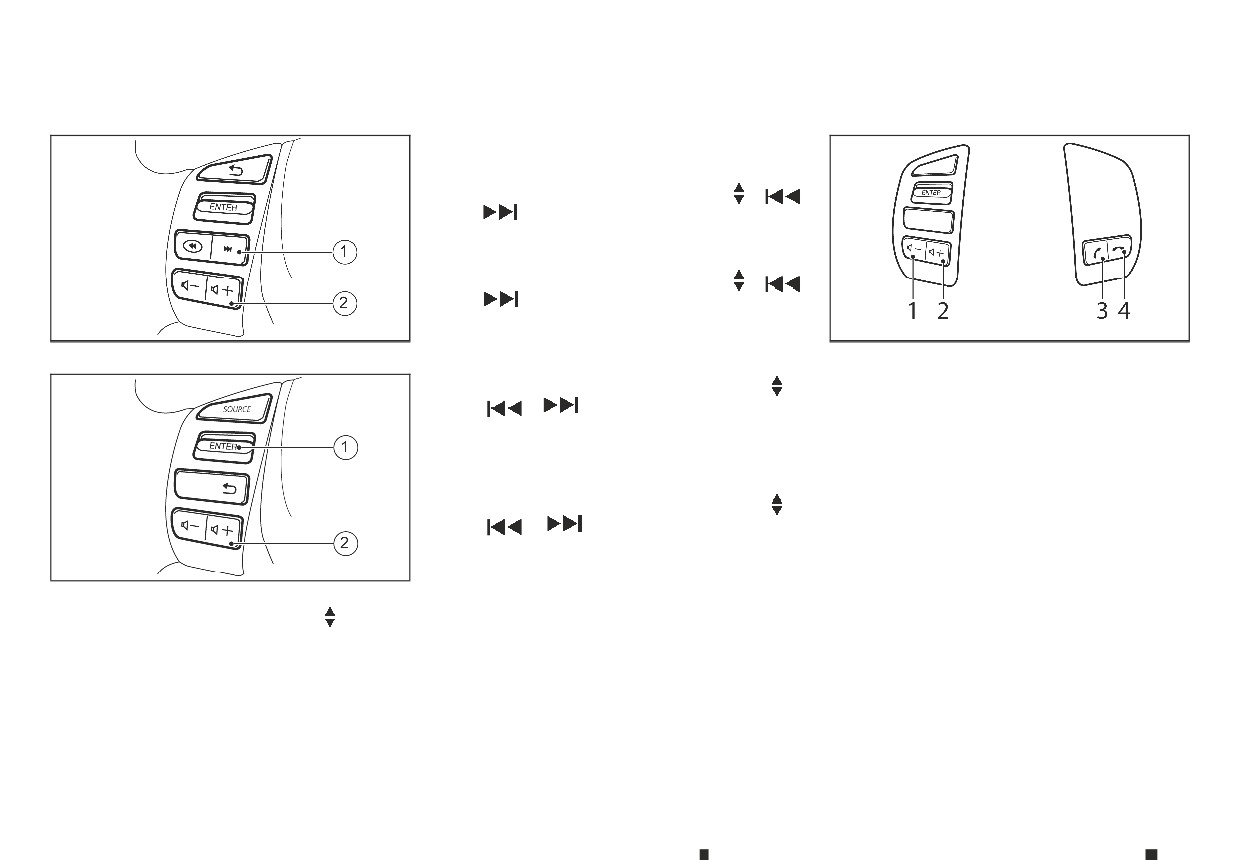
STEERING WHEEL SWITCH FOR AUDIO CONTROL (where fitted)
AUDIO CONTROL
Tuning/track select switch
PHONE CONTROL BUTTONS
Push the switch to select a channel, or track.
•
Preset station change (radio mode)
Push the up/down scrolling button (
,
or
) for less than 1.5 seconds to select one
of the preset radio stations.
•
Seek tuning (radio mode) — where fitted
Push the up/down scrolling button (
,
or
) for more than 1.5 seconds to seek for
the next or previous radio station.
NAA1533
NIC3126
•
Track up/down (CD, iPod, USB memory or Blue-
Type A
tooth audio* mode) — *: where fitted
➀ Volume down button
- Push the up/down scrolling button (
,
or
) for less than 1.5 seconds to se-
➁ Volume up button
lect the next track or to return to the begin-
➂ Phone accept button
ning of the present track. Push (up/down)
➃ Phone decline button
several times to skip through or skip back
the tracks.
Steering wheel phone control buttons
- Push the up/down scrolling button (
,
The hands-free mode can be operated using the
or
) for more than 1.5 seconds to
controls on the steering wheel.
select the next folder or the previous folder.
Volume control buttons:
NIC3125
Volume control buttons
The volume control buttons allow you to adjust the
Type B
Push the volume control button (+ or −) to increase
volume of the speakers by pushing the <+> or <−>
or decrease the volume.
buttons ➀ and ➁.
➀ Tuning buttons (Type A)/ Tuning
switch
(Type B)
➁ Volume buttons
4-54
Display screen, heater and air conditioner, and audio system

BLUETOOTH® HANDS-FREE PHONE SYSTEM (without navigation
system and colour display)
Phone buttons:
BLUETOOTH® MOBILE PHONE
When a call is active, the audio system, microphone
The <
> or <
(located in the ceiling in front of the rear view mir-
> buttons ➂ and ➃ allow you
FEATURE
to:
ror), and steering wheel switches enable hands-free
communication.
•
Accept an incoming call by pressing the <
>
WARNING
button.
If the audio system is in use at the time, the radio,
Whilst driving, using the mobile phone is
CD, iPod, USB audio, Bluetooth audio or AUX source
•
Reject an incoming call by pressing the <
>
extremely dangerous because it significantly im-
mode will be muted and will stay muted until the
button during the incoming call.
pairs your concentration and diminishes your re-
active call has ended.
•
End an active call by pushing the <
> button
action capabilities to sudden changes on the
The Bluetooth® system may not be able to connect
once.
road, and it may lead to a fatal accident. This ap-
with your mobile phone for the following reasons:
plies to all phone call situations such as when re-
•
Redial the last outgoing call by pressing
the
ceiving an incoming call, during a phone conver-
• The mobile phone is too far away from the ve-
<
> button for more than 2 seconds.
sation, when calling through the phone book
hicle.
search, etc.
• The Bluetooth® mode on your mobile phone has
CAUTION
not been activated.
Certain country jurisdictions prohibit the use of
• Your mobile phone has not been paired with the
the mobile phone in the car without hands-free
Bluetooth® system of the audio unit.
support.
• The mobile phone does not support Bluetooth®
This chapter provides information about the hands-
technology (BT Core v2.0).
free phone system using a Bluetooth® connection.
NOTE
Bluetooth® is a wireless radio communication stan-
dard. This system offers a hands-free facility for your
• For models with Audio with Navigation system
mobile telephone to enhance driving comfort.
In order to use your mobile phone with the Blue-
• For details, see your mobile phone's Owner's
Manual.
tooth® of the audio system, the mobile phone must
first be setup. For details, see
“BLUETOOTH®
• For assistance with your mobile phone inte-
settings” later in this section. Once it has been setup,
gration, please visit your local approved
the hands-free mode is automatically activated on
dealer.
the registered mobile phone (via Bluetooth®) when
it comes into range.
A notification message appears on the audio dis-
play when the phone is connected, when an incom-
ing call is being received, as well as when a call is ini-
tiated.
Display screen, heater and air conditioner, and audio system
4-55
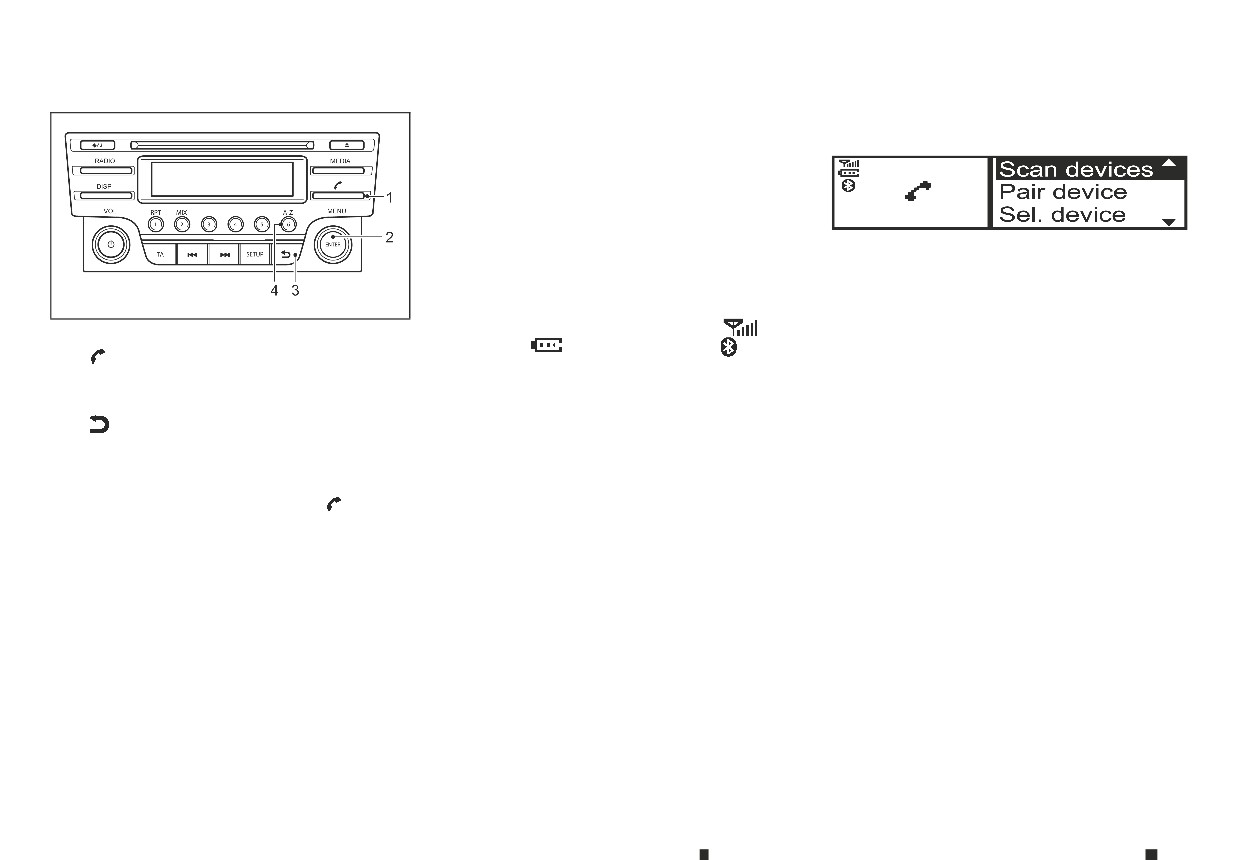
Up to 5 different Bluetooth devices can be con-
To set up the Bluetooth system with a device the
nected. However, only one device can be used at a
following items are available:
time. If 5 different Bluetooth registered devices are
registered, a new device can only replace one of the
5 existing paired devices. Use [Del. device] key to de-
lete one of the existing paired devices. For details,
see “[Del. device]” later in this section.
When successfully paired a notification message will
•
[Scan devices]
be displayed, then the audio system display will re-
Shows all available visible Bluetooth devices and
turn to the current audio source display. During con-
initializes Bluetooth connection from the audio
NAA1582
nection the following status icons will be displayed
unit.
(top left of the display): Signal strength (
), Bat-
•
[Pair device]
tery status* (
) and Bluetooth “ON” (
).
➀ Phone button
*: If the low battery message comes on, the Blue-
Initializes Bluetooth connection from the mobile
➁ <MENU> or <ENTER> button (rotate and push
tooth® device must be recharged soon.
device.
to select)
The pairing procedure and operation may vary ac-
•
[Sel. device]
➂
(Back) button
cording to device type and compatibility. See the
Paired Bluetooth devices are listed and can be
Bluetooth® owner’s manual for further details.
➃ Phone book quick search button A-Z
selected for connection.
NOTE
[Del. device]
BLUETOOTH® settings
•
Enter the phone setup menu via the
(phone)
• For device details, see your audio/mobile
A registered Bluetooth device can be deleted.
button, select the [Bluetooth] key, and then check if
[Bluetooth]
•
the bluetooth is set to on (default setting is on, push
• For assistance with the Bluetooth® audio/mo-
If this setting is turned off, the connection be-
the <ENTER> button if not).
bile phone integration, please visit your local
tween the Bluetooth devices and the in-vehicle
To setup the Bluetooth system to pair (connect or
approved dealer.
Bluetooth module will be cancelled.
register) your preferred mobile phone, follow the fol-
• A maximum of 5 Bluetooth devices can be
lowing procedure.
paired with the system.
To pair a device, use the [Scan device] key or the
[Pair device] key.
4-56
Display screen, heater and air conditioner, and audio system

[Scan devices]:
[Pair device]:
[Sel. device]:
1)
Press the
button. Select [Scan device]
•
Turn the audio unit Bluetooth on. See [Bluetooth]
The paired device list shows which Bluetooth® au-
The audio unit searches bluetooth devices and
description.
dio or mobile phone devices have been paired or
shows all visible devices.
registered with the Bluetooth® audio system. If the
•
Use the audio unit to pair:
list contains devices then select the appropriate de-
Pressing the
button cancels the search.
Press the
button. Select the [Pair device]
vice to connect to the Bluetooth® audio system.
key. The Audio unit will wait for a connection re-
2)
Select the device to be paired.
quest from the mobile device.
The following symbols (where fitted) indicate the
Use the <MENU> dial and press to select.
The pairing procedure depends on the
capability of the registered device:
3)
The pairing procedure depends on the device to
Bluetooth device:
•
: Mobile phone integration
be connected:
1) Device without PIN code:
•
: Audio streaming (A2DP - Advanced Audio
1) Device without PIN code:
The Bluetooth connection will be automati-
Distribution Profile)
The Bluetooth connection will be automati-
cally connected without any further input.
cally connected without any further input.
[Del. device]:
2) Device with PIN code:
A registered device can be removed from the Blue-
2) Device with PIN code:
Two different ways of pairing are possible de-
tooth audio system. Select a registered device then
Two different ways of pairing are possible de-
pending on the device, see under [Scan de-
press <ENTER> to confirm the deletion.
pending on the device:
vice] for a description.
[Bluetooth]:
- Type A:
•
Use the Bluetooth® audio/mobile phone device
The message [To pair] [Enter Pin] 0000
If Bluetooth® has been switched off a notification
to pair:
and a count down timer will be displayed.
message [ON/OFF] appears when you select [Blue-
Confirm the PIN code on the device.
1) Switch ON the Bluetooth® devices search
tooth] from the phone menu (press
). To switch
The Bluetooth connection will be made.
mode on the mobile device.
the Bluetooth® signal on, press <ENTER> and a fol-
If the search mode finds the audio unit it will
low up screen will appear. Then select [ON] and
If the count down timer reaches 0 the at-
be shown on the device display.
press <ENTER> to display the Bluetooth® settings
tempt to pair the devices will be cancelled.
2) Select the audio unit shown as [My Car].
menu screen.
- Type B:
The message [Pairing request] [Confirm
3) Enter the number code shown on the rel-
HANDS-FREE TELEPHONE
evant device with the device's own keypad,
password] together with a 6 digit code
CONTROL
and press the confirmation key on the device
will be displayed. The unique and identi-
itself.
The hands-free mode can be operated using the
cal code should be displayed on the de-
Refer to the relevant Bluetooth® device own-
telephone
button on the audio system, or the
vice. If the code is identical confirm on the
er’s manual for further details.
and (where fitted) on the steering wheel.
device.
The Bluetooth connection will be made.
Display screen, heater and air conditioner, and audio system
4-57
• [#123]
Making a call from the phone book:
Use this item to enter numbers during a call. For
Once the Bluetooth® connection has been made,
example, if directed by an automated phone sys-
between the registered mobile phone and the au-
tem to dial an extension number the system will
dio system, phone book data will be transferred au-
send the tone associated with the selected
tomatically to the audio system. The transfer may
number.
take a while before completion.
2. Put a call on hold:
NOTE
Rotate the <MENU> dial until
is highlighted,
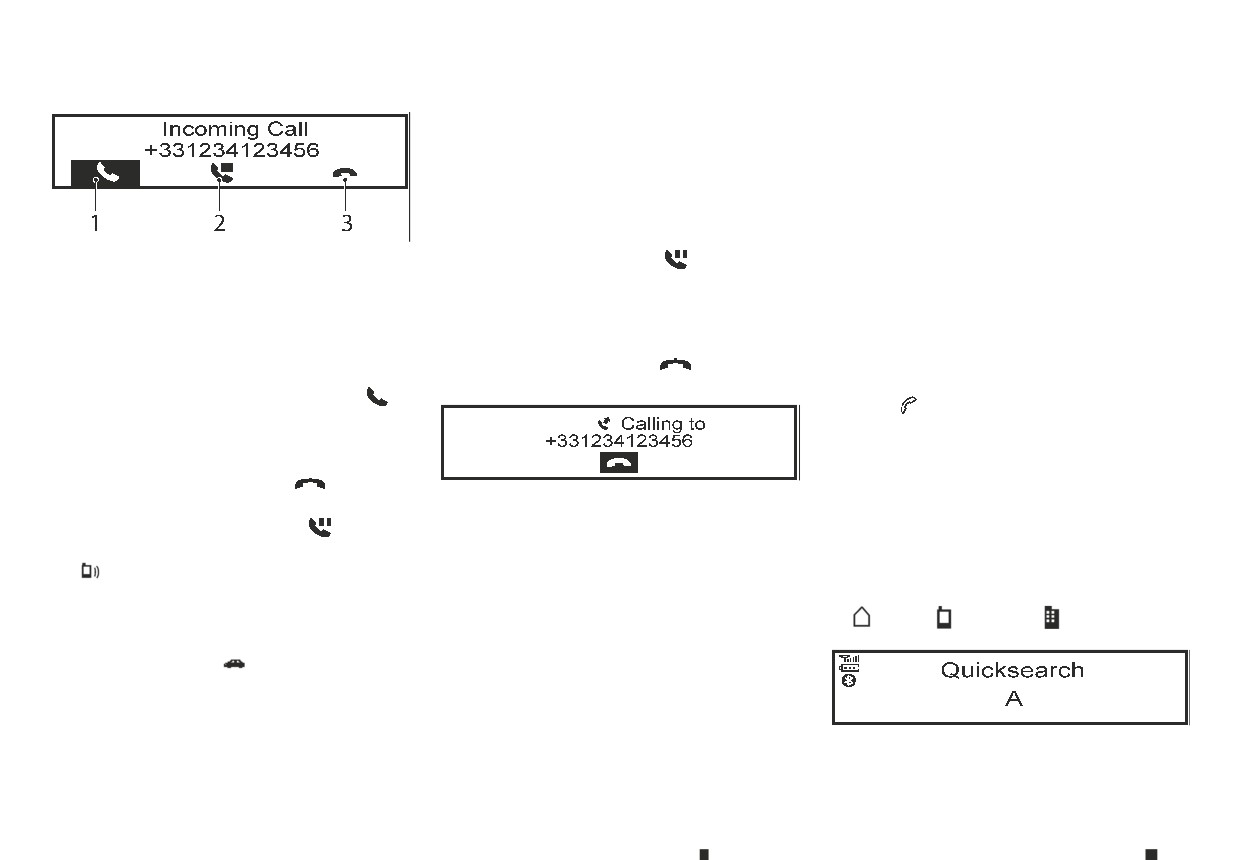
Receiving a call
Phone book data will be erased when:
press
<ENTER>. The call is on hold. Pressing
When receiving an incoming call, the display will
<ENTER> accepts the call, rotate the <MENU> dial
• Switching to another registered mobile
show the caller's phone number (or a notification
phone.
clockwise and press <ENTER> to reject.
message that the caller's phone number cannot be
3. Rejecting a call:
• Mobile phone is disconnected.
shown) and three operation icons.
Rotate the <MENU> dial until
is highlighted,
•
The registered mobile phone is deleted from
1. Answering and during a call:
press <ENTER>. The call is rejected.
the audio system.
Answer the call by pressing <ENTER> (the
is
1.
Press <
>.
highlighted).
2.
Turn the <MENU> dial and scroll down to [Phone
By pressing <ENTER>, you can select the following
Book] then press <ENTER>.
options:
3.
Scroll down through the list, select the appropri-
• Ending the call by selecting
and press
ate contact name
(highlighted), and press
<ENTER>.
Initiating a call
<ENTER>.
• Put the call on hold by selecting
and press
A call can be initiated using one of the following
4.
A following screen will show the number to be
<ENTER>.
methods:
dialled. If correct, press <ENTER> again to dial the
• [
]
- Making a call from the phone book
number.
Use this item (the transfer handset command)
- Manually dialling a phone number
If the contact has more numbers assigned for
to transfer the call from the audio system to your
(home),
(mobile), or
(office), scroll, and
mobile phone.
- Redialling
select the appropriate number to dial.
To transfer the call back to hands-free via the
- Using call history (Call List menu)
audio system select [
].
• Dialled
• Received
• Missed
4-58
Display screen, heater and air conditioner, and audio system
Alternatively, the quick search mode can be used as
3. Turn the <MENU> dial to scroll along, and select
1. Press
, and select [Call List].
follows:
each number of the phone number. Once high-
2. Turn the <MENU> dial to scroll to an item, and
lighted, press <ENTER> after each number selec-
1.
While in the phonebook screen press <A-Z/➅>.
press <ENTER> to select it.
tion.
2.
Turn the <MENU> dial for the first alphabetic or
3. Scroll to the preferred phone number then press
To delete the last number entered scroll to the
numerical letter of the contact name. Once high-
<ENTER>, or press
to dial the number.
["] (Backspace) symbol, and once highlighted
lighted, press <ENTER> to select the letter.
press <ENTER>. The last number will be deleted.
3.
The display will show the corresponding contact
Pressing <ENTER> repeatedly will delete each
name(s). Where necessary, use the <MENU> dial
subsequent number.
again to scroll further for the appropriate con-
4. After entering the last number, scroll to the
tact name to call.
symbol, and press <ENTER> to dial the num-
4.
A following screen will show the number to be
ber.
dialled. If correct, press <ENTER> again to dial the
number.
Redial:
Second incoming call
To redial or call the last number dialled, press
Whenever there is a second incoming call is shown
for more than 2 seconds.
in the display. By selecting the
icon the call is
accepted and the current call is put on hold.
Selecting
by rotating <MENU> and pressing
<ENTER> rejects the second incoming call. When
this is done during the conversation it ends the call.
Selecting the
key using the <MENU> dial and
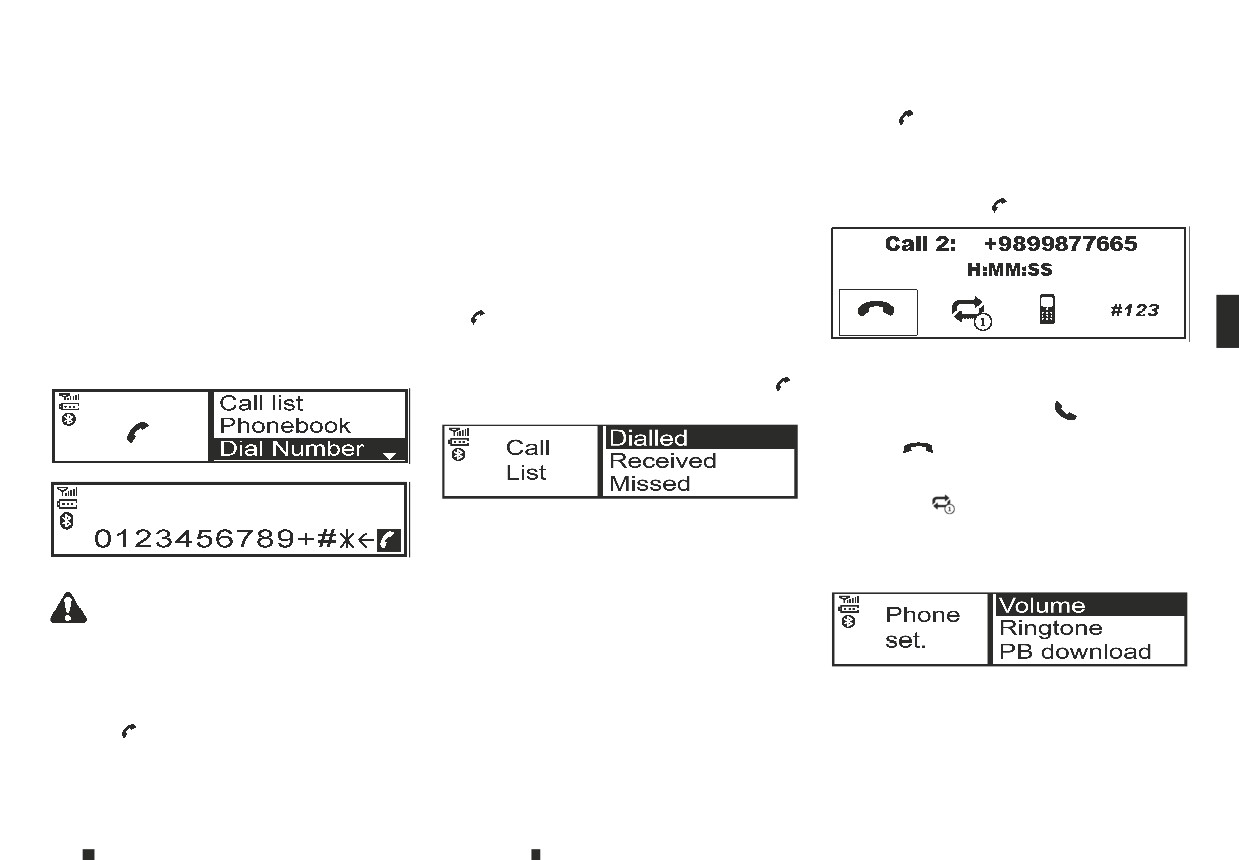
Using call history (Call List menu):
pressing <ENTER> switches between the phone
A number from the dialled, received, or missed call
conversations.
lists can also be used to make a call.
(For the other selections, see Making a call from the
Manually dialling a phone number:
phone book earlier)
• [Dialled]
Use the dialled call mode to make a call which is
WARNING
based on the list of outgoing (dialled) calls.
Park the vehicle in a safe location, and apply the
parking brake before making a call.
• [Received]
Use the received call mode to make a call which
To dial a phone number manually use the audio sys-
is based on the list of received calls.
tem display (virtual keyboard pad) as follows:
• [Missed]
1. Press
, and turn the <MENU> dial to high-
light [Dial Number].
Use the missed call mode to make a call which is
based on the list of missed calls.
2. Press <ENTER> to select [Dial Number].
Display screen, heater and air conditioner, and audio system
4-59
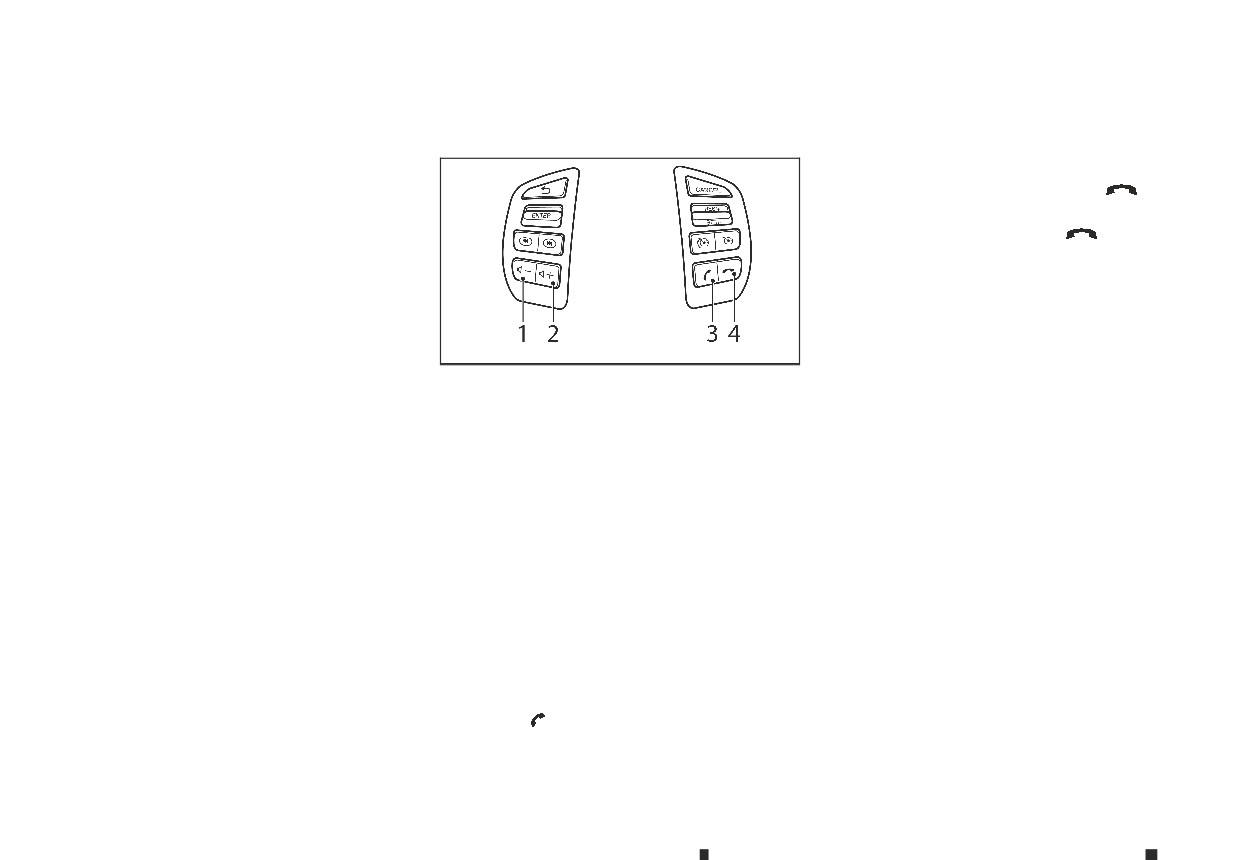
General settings
STEERING WHEEL SWITCHES
• Redial the last outgoing call by pressing the but-
ton for more than 2 seconds.
From the phone menu select [Settings]
(where fitted)
Volume settings and manually downloading the
Phone END button
phonebook can be done using this menu.
•
Reject an incoming call by pressing
during
Menu operation:
an incoming call.
Press <ENTER> to select, rotate the <MENU> dial to
increase or decrease the volume.
•
End an active call by pressing
once.
Press <ENTER> to confirm.
Menu items:
•
[Volume]
-
[Ring]
Set the phone ringing volume
NAA1436
-
[Call]
Set the volume of the conversation during a
call.
➀ Volume down button
•
[Ringtone]
➁ Volume up button
-
[Car]
➂ Phone button
Choose the in car ringtone.
➃ Phone end/reject button
-
[Phone]
The hands-free mode can be operated using the
Choose the phone ringtone.
steering wheel switches.
•
[PB download]
Volume down button
Download the phonebook of the mobile device
Press the volume down button to decrease the vol-
to the audio unit manually.
ume of the speakers.
Volume up button
Press the volume up button to increase the volume
of the speakers.
Phone button
The phone
button allows you to:
• Accept an incoming call by pressing once.
4-60
Display screen, heater and air conditioner, and audio system

BLUETOOTH® HANDS-FREE PHONE SYSTEM (with navigation
system)
•
Set up the wireless connection between a mo-
• Some mobile phones or other devices may
WARNING
bile phone and the in-vehicle phone module be-
cause interference or a buzzing noise to come
• Use a phone after stopping your vehicle in a
fore using the Bluetooth® Hands-Free Phone
from the audio system speakers. Storing the de-
safe location. If you have to use a phone while
System.
vice in a different location may reduce or elimi-
driving, exercise extreme caution at all times
nate the noise.
•
Some Bluetooth® enabled mobile phones may
so full attention may be given to vehicle op-
not be recognised by the in-vehicle phone mod-
• Refer to the mobile phone owner’s manual re-
eration.
ule.
garding the telephone charges, mobile phone
• If you are unable to devote full attention to
You will not be able to use a hands-free phone
antenna and body, etc.
•
vehicle operation while talking on the phone,
under the following conditions:
• The signal strength display on the monitor will
pull off the road to a safe location and stop
not coincide with the signal strength display of
- Your vehicle is outside of the mobile service
your vehicle.
some mobile phones.
area.
CAUTION
- Your vehicle is in an area where it is difficult
REGULATORY INFORMATION
To avoid discharging the vehicle battery, use a
to receive mobile signal; such as in a tunnel,
phone after starting the engine.
Bluetooth® trademark
in an underground parking garage, near a tall
Your vehicle is equipped with the Bluetooth® Hands-
building or in a mountainous area.
Bluetooth® is a trademark
owned by Bluetooth SIG, Inc.
Free Phone System. If you have a compatible Blue-
- Your mobile phone is locked to prevent it
and licensed to Robert Bosch
tooth® enabled mobile phone, you can set up the
from being dialled.
m
GmbH.
wireless connection between your mobile phone
•
When the radio wave condition is not ideal or
and the in-vehicle phone module. With Bluetooth®
ambient sound is too loud, it may be difficult to
EU RED Directive 2014/53/EU
wireless technology, you can make or receive a
hear the other person’s voice during a call.
Hereby, Robert Bosch Car Multimedia GmbH
hands-free telephone call with your mobile phone
in the vehicle.
•
Immediately after the ignition switch is placed
declares that the radio equipment type
in the ON position, it may be impossible to re-
LCN2K70A00/LCN2K70A10 is in compliance with Di-
Once your mobile phone is connected to the in-ve-
ceive a call for a short period of time.
rective 2014/53/EU. The full text of the EU declara-
hicle phone module, no other phone connecting
tion of conformity is available at the following inter-
procedure is required. Your phone is automatically
•
Do not place the mobile phone in an area sur-
net address: http://cert.bosch-carmultimedia.net
reconnected with the in-vehicle phone module
rounded by metal or far away from the in-ve-
when the ignition switch is placed in the ON posi-
hicle phone module to prevent tone quality deg-
Any change of the radio equipment or usage with
tion with the connected mobile phone turned on
radation and wireless connection disruption.
other accessories, components or software as
and carried in the vehicle.
specified will make a re-assessment according com-
•
While a mobile phone is connected through the
pliance to the legal approval necessary.
You can register up to 5 different Bluetooth® mobile
Bluetooth® wireless connection, the battery
phones to the in-vehicle phone module. However,
power of the mobile phone may discharge
you can talk on only one mobile phone at a time.
quicker than usual. The Bluetooth® Hands-Free
Phone System cannot charge mobile phones.
Before using the Bluetooth® Hands-Free Phone Sys-
tem, refer to the following notes.
Display screen, heater and air conditioner, and audio system
4-61
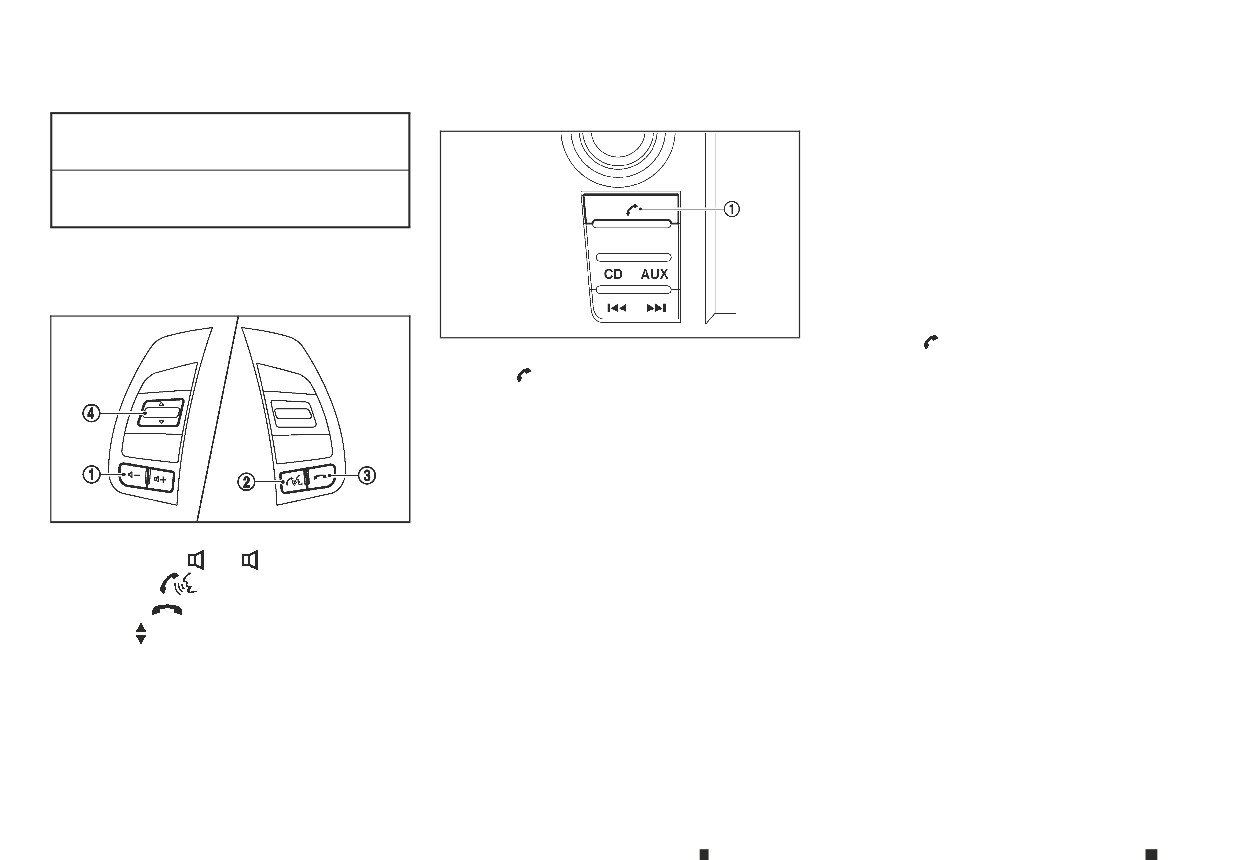
Control panel:
1. If the PIN is displayed on your Bluetooth® device,
Radiated
Hints/Restric-
select [Yes] to complete the pairing process.
Frequency Band
Power
tion
(EIRP)
2. If the PIN is not displayed on your Bluetooth® de-
vice, select [No] and complete the pairing pro-
2400 MHz - 2480
BluetoothInternalnot
cess according to the instructions in the Blue-
MHz
<10 mWaccessibleby
user
For more information, see the Bluetooth® device’s
CONTROL BUTTONS AND
MICROPHONE
PHONEBOOK
Steering wheel switch:
To access the vehicle phonebook:
JVH1083XZ
1. Push the
button on the control panel.
2. Select the “Contacts” key.
1. Phone
button
3. Choose the desired entry from the displayed list.
Microphone:
4. The number of the entry will be displayed on the
Microphone is located near the map lights.
screen. Touch the number to initiate dialling.
PAIRING PROCEDURE
NOTE
NOTE
To scroll quickly through the list, touch the “A-Z”
JVH0853XZ
The connecting procedure must be performed
key in the upper right corner of the screen. Turn
when the vehicle is stationary. If the vehicle starts
the ENTER/Scroll dial to choose a letter or num-
moving during the procedure, the procedure will
ber and then push the ENTER/Scroll dial. The list
1.
Volume control
+/
− switch
be cancelled.
will move to the first entry that begins with that
2.
Phone send
button
number or letter.
1. Push the <SETUP> button on the control panel.
3.
Phone end
button
2. Touch the [Telephone & Bluetooth] key.
4.
Tuning
switch
3. Touch the [Pair New Device] key.
If no device has been paired yet all other options
will be unavailable.
4. Initiate the pairing process from the handset. The
system will display the message asking if PIN is
displayed on your Bluetooth® device.
4-62
Display screen, heater and air conditioner, and audio system
MAKING A CALL
DURING A CALL
• [Select Paired Device]
To make a call, follow the procedure below:
While a call is active, the following options are avail-
Select to choose a Bluetooth® device from a list
able on the screen:
of those devices paired to the Bluetooth® Hands-
1. Push the
on the control panel. The “Phone”
Free Phone System.
screen will appear on the display.
• “Handset”
• [Delete Paired Device]
2. Select one of the following options to make a
Select this option to switch control of the phone
call:
call over to the handset.
Select to delete a Bluetooth® device from a list
of those devices connected/paired to the Blue-
• “Contacts”: Select the name from an entry
• “Mute Mic.”
tooth® Hands-Free Phone System.
stored in the vehicle phonebook.
Select this option to mute the microphone. Se-
• [Bluetooth]
• “Call Lists”: Select the name from the incom-
lect again to reactivate the microphone.
ing, outgoing or missed.
Select to toggle Bluetooth® ON or OFF.
• “
” icon
• “Redial”: Dial the last outgoing call from the
Select to end the phone call.
TELEPHONE SETUP
vehicle.
To access the phone settings screen:
ENDING A CALL
• “
”: Input the phone number manually us-
1. Push the <SETUP> button.
ing a keypad displayed on the screen. For in-
To end a phone call, select the [
] icon on the
formation on how to use the touch screen,
screen or push the <
> button on the steering
2. Touch the [Telephone & Bluetooth] key.
see “How to use touch screen display” in this
wheel.
3. Touch the [Telephone Setup] key.
section.
BLUETOOTH® SETTINGS
Available setting items:
RECEIVING A CALL
To access the Bluetooth® settings screen:
• [Sort Phonebook By]*
When a call is placed to the connected phone, the
Select [First Name] or [Last Name] to choose how
1. Push the <SETUP> button.
display will change to phone mode.
phonebook entries are alphabetically displayed
2. Touch the [Telephone & Bluetooth] key.
To accept the incoming call, take one of the follow-
on the screen.
Available setting items:
ing actions.
• [Phonebook]*
• Push the
button on the steering wheel.
• [Telephone Setup]
Select [Phone] to use the handset’s phonebook.
See “Telephone setup” later in this section for
Select [SIM] to use the phonebook on the SIM
• Touch the “
” icon on the screen.
details.
card. Select [Both] to use both sources.
To reject the incoming call, take one of the following
actions.
• [Pair New Device]
• [Download Phonebook Now]
Select to pair a new Bluetooth® device to the
Select to download the phonebook to the ve-
• Push the
button on the steering wheel.
Bluetooth® Hands-Free Phone System.
hicle from the chosen source.
• Touch the red phone “
” icon on the screen.
Display screen, heater and air conditioner, and audio system
4-63
• [Phone Notifications for]
Select
[Driver] to have phone notifications
shown in the vehicle information display. Select
[Both] to have phone notifications shown in
both the vehicle information display and the dis-
play.
*: These items are only available after the phone-
book has been downloaded.
4-64
Display screen, heater and air conditioner, and audio system
5 Starting and driving
Running-in schedule
5-2
Starting engine (models without Remote Control
Before starting engine
5-2
Key system)
5-12
Precautions when starting and driving
5-2
Starting engine (models with Remote Control Key
Exhaust gas (carbon monoxide)
5-3
system)
5-13
AdBlue® Selective Catalytic Reduction (SCR)
Driving the vehicle
5-13
system (where fitted for diesel engine model)
5-3
Driving with Automatic Transmission (AT)
5-13
Diesel Particulate Filter (DPF) (where fitted)
5-5
Driving with Manual Transmission (MT)
5-16
Automatic regeneration
5-6
Stop/Start System (where fitted)
5-17
On-road and off-road driving precautions
5-6
Stop/Start System display
5-18
Driving safety precautions
5-6
Stop/Start OFF switch
5-20
Turbocharger system
5-8
Four-Wheel Drive (4WD) (where fitted)
5-20
Care when driving
5-8
Part time 4WD system
5-21
Engine cold start period
5-8
4WD mode switch operation
5-24
Loading luggage
5-8
4WD mode indicator
5-24
Driving in wet conditions
5-8
4WD warning
5-25
Driving in winter conditions
5-8
Tyre recommendation for 4WD
5-25
Ignition switch (models without Remote Control
Rear differential locking system (where fitted)
5-26
Key system)
5-8
Electronic Stability Programme (ESP) system
Manual Transmission (MT)
5-8
(where fitted)
5-27
Automatic Transmission (AT)
5-9
Electronic Stability Programme (ESP) OFF
Key positions
5-9
switch
5-28
Steering lock
5-9
Active Emergency Braking system (where fitted)
5-29
Push-button ignition switch (models with Remote
System operation
5-29
Control Key system)
5-10
Hill descent control system (where fitted)
5-31
Precautions on push-button ignition switch
Hill descent control switch
5-32
operation
5-10
Hill start assist system (where fitted)
5-32
Remote Control Key system
5-10
Cruise control (where fitted)
5-33
Automatic Transmission (AT)
5-10
Precautions on cruise control
5-33
Steering lock
5-11
Cruise control operations
5-34
Ignition switch positions
5-11
Speed limiter (where fitted)
5-35
Remote Control Key battery discharge
5-12
Speed limiter operations
5-36
ECO drive report
5-37
Parking
5-38
Power steering system
5-42
Parking sensor (sonar) system (where fitted)
5-39
Brake system
5-42
Parking sensor (sonar) system OFF switch
5-40
Brake precautions
5-42
Parking sensor (sonar) system settings
5-40
Anti-lock Braking System (ABS)
5-43
Trailer towing
5-41
Cold weather driving
5-44
Operating precautions
5-41
Battery
5-44
Tyre pressure
5-41
Engine coolant
5-44
Safety chains
5-41
Tyre equipment
5-44
Trailer brakes
5-41
Special winter equipment
5-45
Trailer detection (where fitted)
5-41
Parking brake
5-45
Vehicle security
5-42
Corrosion protection
5-45
RUNNING-IN SCHEDULE
BEFORE STARTING ENGINE
PRECAUTIONS WHEN STARTING
AND DRIVING
During the first 1,600 km (1,000 miles), follow these
recommendations to obtain maximum engine per-
WARNING
WARNING
formance and ensure the future reliability and
The driving characteristics of your vehicle will
• Never leave children or adults who would nor-
economy of your new vehicle. Failure to follow these
change remarkably by any additional load and its
mally require the support of others alone in
recommendations may result in shortened engine
distribution, as well as by adding optional equip-
your vehicle. Pets should not be left alone ei-
life and reduced engine performance.
ment (trailer coupling, roof rail, etc.). Your driving
ther. They could unknowingly activate
Do not drive at a constant speed, either fast or
style and speed must be adjusted according to
switches or controls, or move the vehicle, and
•
slow, for long periods of time.
the circumstances. Especially when carrying
inadvertently become involved in a serious ac-
heavy loads, your speed must be reduced
cident and injure themselves. On hot, sunny
•
Do not run the engine over 4,000 rpm.
adequately.
days, temperatures in a closed vehicle could
•
Do not accelerate at full throttle in any gear.
quickly become high enough to cause severe
•
Make sure the area around the vehicle is clear.
Do not start quickly.
or possibly fatal illness to people or animals.
•
•
Check fluid levels such as engine oil, coolant,
•
Do not brake hard as much as possible.
brake (and clutch) fluid, window washer fluid as
• Properly secure all cargo to help prevent it
from sliding or shifting. Do not place cargo
•
Do not tow a trailer for at least the first 800 km
frequently as possible, at least whenever you re-
higher than the seatbacks. In a sudden stop or
(500 miles).
fuel.
collision, unsecured cargo could cause
•
Visually inspect tyres for their appearance and
personal injury.
condition. Measure and check the tyre pressure
for proper inflation.
NOTE
•
Check that all windows and lights are clean.
During the first few months after purchasing a
new vehicle, if you smell strong odours of Volatile
•
Adjust the seat and head restraint positions.
Organic Compounds (VOCs) inside the vehicle,
•
Adjust the inside and outside rearview mirror
ventilate the passenger compartment thor-
positions.
oughly. Open all the windows before entering or
•
Fasten your seat belt and ask all passengers to
while in the vehicle. In addition, when the tem-
do the same.
perature in the passenger compartment rises, or
when the vehicle is parked in direct sunlight for a
•
Check that all doors are closed.
period of time, turn off the air recirculation mode
•
Check the operation of the warning lights when
of the air conditioner and/or open the windows
the ignition switch is placed in the “ON” position.
to allow sufficient fresh air into the passenger
•
Maintenance items in the “8. Maintenance and
compartment.
do-it-yourself ” section should be checked peri-
odically.
5-2
Starting and driving
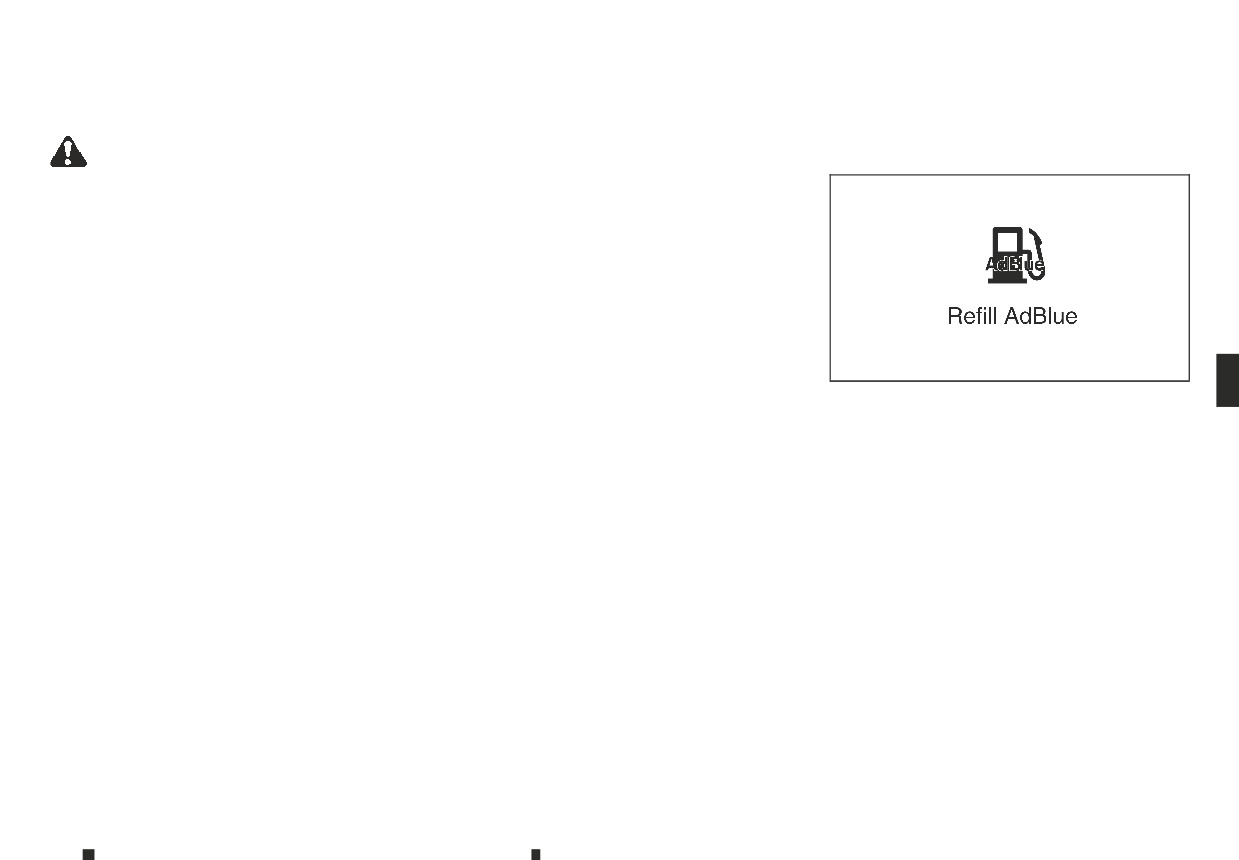
EXHAUST GAS (carbon monoxide)
- You notice a change in the sound of the ex-
(where fitted for diesel engine model)” in the
haust system.
“8. Maintenance and do-it-yourself” section.
WARNING
- You have had an accident involving dam-
Condition A
age to the exhaust system, underbody, or
•
Do not breathe exhaust gas; it contains colour-
rear of the vehicle.
less and odourless carbon monoxide. Carbon
monoxide is dangerous. It can cause uncon-
AdBlue® SELECTIVE CATALYTIC
sciousness or death.
REDUCTION (SCR) SYSTEM (where
•
If you suspect that exhaust fumes are enter-
fitted for diesel engine model)
ing the vehicle, drive with all windows fully
AdBlue® or Diesel Exhaust Fluid (DEF), is a non-toxic
open, and have the vehicle inspected immedi-
solution of 32.5% urea in de-ionized water. This fluid
ately.
is sprayed into the exhaust system of diesel vehicles
•
Do not run the engine in closed spaces such as
to cause a chemical reaction that breaks down po-
a garage.
tentially dangerous NOx (nitrogen oxides) emissions
JVM0543XZ
•
Do not park the vehicle with the engine run-
into harmless nitrogen and water. This system is
ning for an extended period of time.
called Selective Catalytic Reduction (SCR). AdBlue®
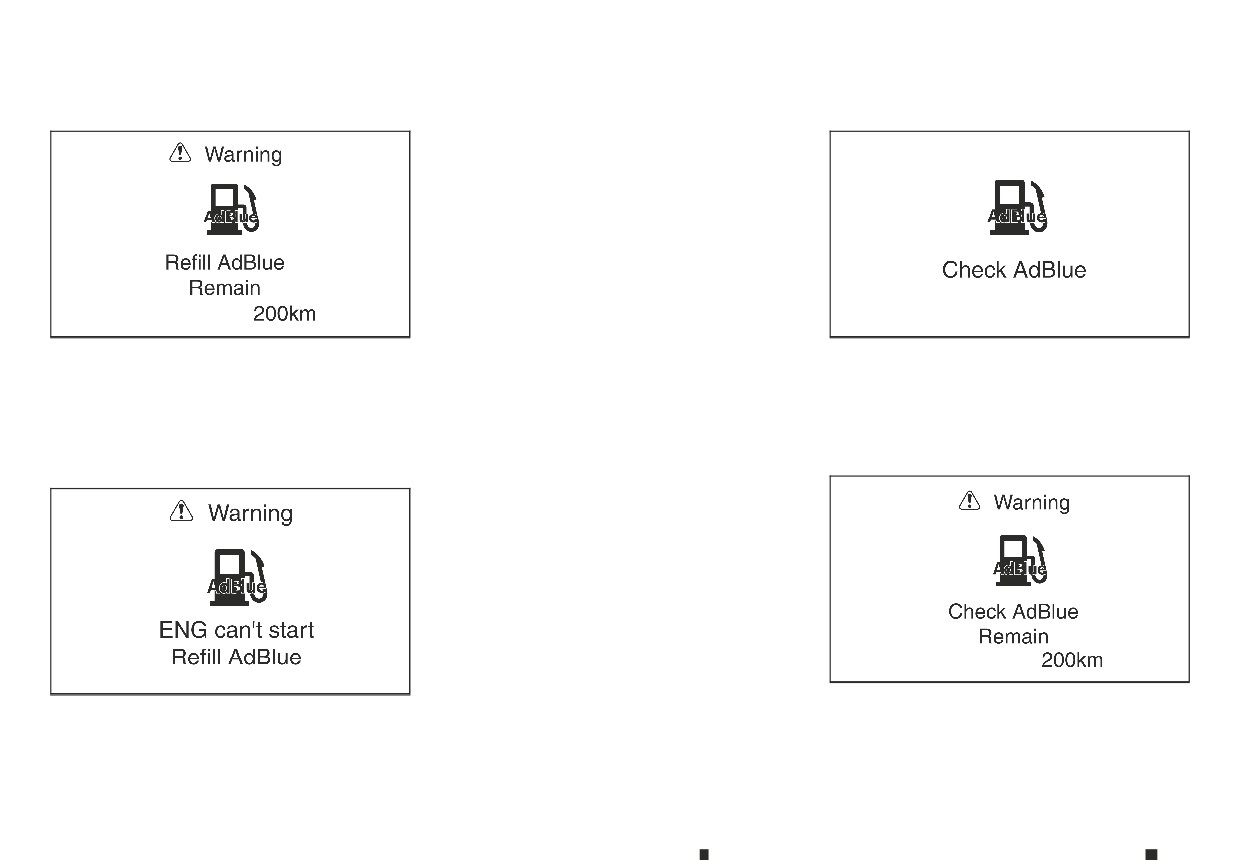
This warning appears when the AdBlue® level in the
fluid is not a fuel additive and is never mixed with
•
If electrical wiring or other cable connections
tank is getting low. The message will be displayed
diesel fuel. It is always stored in a separate tank on
must pass to a trailer through the seal of the
each time the engine starts when there is estimated
the vehicle.
body, follow the manufacturer’s recommen-
to be between 2400 and 1000 km (1491 and 621
dations to prevent carbon monoxide entry
AdBlue® will begin to freeze below -11°C (12°F). If you
miles) left before the AdBlue® tank is empty. The
into the vehicle.
often drive in areas where the temperature is below
message can be cleared from the display until the
-11°C (12°F), the AdBlue® tank should always be filled
next time the engine is started.
•
If a special body or other equipment is added
with AdBlue® at the beginning of the cold season to
for recreational or other usage, follow the
Refill the AdBlue® tank as soon as possible.
ensure enough defrosting capacity with heating.
manufacturer’s recommendation to prevent
carbon monoxide entry into the vehicle. (Some
AdBlue® warning display
recreational vehicle appliances such as stoves,
If the AdBlue® level in the tank is low or there is a
refrigerators, heaters, etc. may also generate
malfunction in the AdBlue® SCR system, a warning
carbon monoxide.)
message will appear in the vehicle information dis-
•
The exhaust system and body should be in-
play.
spected by a qualified mechanic whenever:
Refill AdBlue®:
- Your vehicle is raised while being serviced.
For information on refilling the AdBlue® tank see
- You suspect that exhaust fumes are enter-
“AdBlue® filler lid and cap” in the “3. Pre-driving
ing into the passenger compartment.
checks and adjustments” section and “AdBlue® tank
Starting and driving
5-3
Condition B
• If this warning appears while the engine is
Condition A
stopped, the engine cannot be started. Contact
an approved dealer or qualified workshop.
• If this warning appears while the engine is run-
ning, the vehicle can still be driven to the nearest
approved dealer or qualified workshop.
• If the ignition switch is turned off while this warn-
ing appears, the engine can be restarted within
3 minutes. Stop the vehicle in a safe place and
contact an approved dealer or qualified work-
shop.
JVM0544XZ
JVM0546XZ
Refill the AdBlue® tank as soon as possible.
After the AdBlue® tank is refilled, place the ignition
This warning provides you with an estimation of the
This warning appears if there is a malfunction in the
switch in the ON position and check that the warn-
distance (0 to 1000 km (0 to 621 miles)) that can be
AdBlue® SCR system.
ing has turned off. Place the ignition switch in the
driven before the AdBlue® tank level is empty. This
OFF position once and then start the engine.
Have the system checked by an approved dealer or
message will be displayed continuously; it cannot
qualified workshop as soon as possible.
be cleared from the display.
Check AdBlue®:
Condition B
Condition C
When the [Check AdBlue] warning appears, the Mal-
function Indicator Light (MIL) may also illuminate
depending on conditions.
JVM0547XZ
JVM0545XZ
This warning provides you with an estimation of the
This warning appears when the AdBlue® tank is al-
distance (0 to 1000 km (0 to 621 miles)) that can be
most empty.
driven before inspecting and/or repairing the Ad-
Blue® SCR system.
5-4
Starting and driving
DIESEL PARTICULATE FILTER
(DPF) (where fitted)
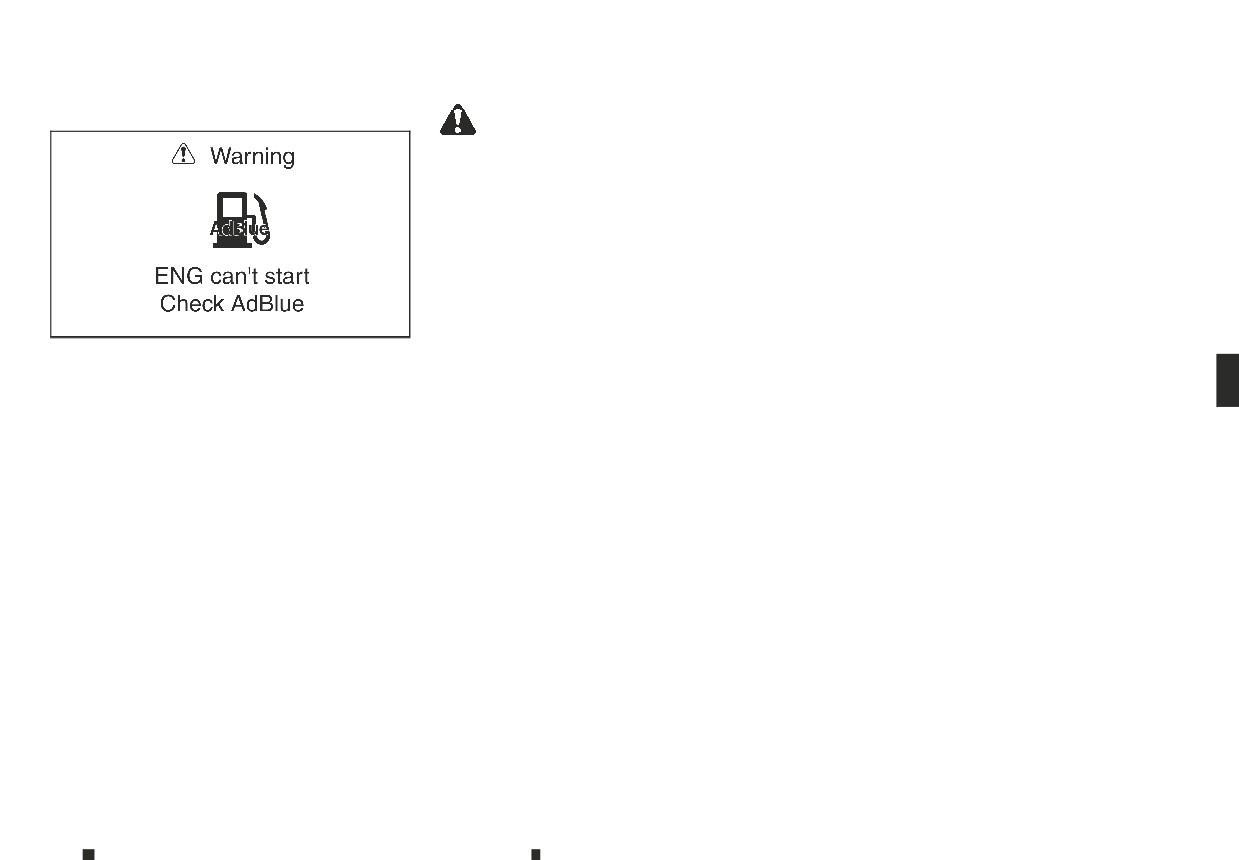
Condition C
• When the engine is frequently stopped and re-
WARNING
started within 10 minutes.
• Be careful not to burn yourself with exhaust
• When the vehicle is frequently used for short
gases.
journeys of 10 minutes or less.
• Do not park the vehicle over flammable mate-
• When the engine is frequently stopped before it
rials such as dry grass, waste paper or rags, as
has warmed up.
they may burn easily.
In these cases, it becomes difficult to burn particu-
CAUTION
late matter that has accumulated in the DPF auto-
To maintain maximum Diesel Particulate Filter
matically. As a result, the DPF warning light in the
(DPF) performance, follow these precautions:
meter will illuminate and the indicator light on the
DPF regeneration switch will blink. This is not a mal-
JVM0548XZ
•
Use low-sulphur fuel.
function.
•
Use an engine oil specified by RENAULT. (Refer
If the DPF warning light comes on, perform the DPF
•
If this warning appears while the engine is
to the maintenance service booklet for your
regeneration process.
stopped, the engine cannot be started. Contact
vehicle.) If an engine oil not a specified by
an approved dealer or qualified workshop.
RENAULT is used, it could cause DPF malfunc-
CAUTION
tion or reduced fuel efficiency.
If the vehicle continues to be driven with the DPF
•
If this warning appears while the engine is run-
ning, the vehicle can still be driven to the nearest
• Do not modify the DPF, muffler or exhaust
warning light illuminated and without doing the
approved dealer or qualified workshop.
pipe. Otherwise it could affect the DPF perfor-
regeneration process, the fail-safe will limit the
mance and cause a malfunction.
engine revolutions and/or torque. In this case, the
•
If the ignition switch is turned off while this warn-
engine oil must be replaced and the process of
ing appears, the engine can be restarted within
• Do not kick or hit the DPF. The DPF has a built-
service regeneration must be carried out by an
3 minutes. Stop the vehicle in a safe place and
in catalyst system in the muffler. Such an im-
approved dealer or qualified workshop.
contact an approved dealer or qualified work-
pact could cause DPF damage.
shop.
The service regeneration is not covered by the
The Diesel Particulate Filter
(DPF) reduces the
warranty.
Have the AdBlue® SCR system inspected and/or re-
amount of materials that affect the environment by
paired by an approved dealer or qualified workshop
collecting particulate matter included in exhaust
as soon as possible.
gases. Normally, particulate matter accumulated in
the DPF is automatically burned and converted to
harmless substances during driving. However, par-
ticulate matter collected in the DPF cannot be
burned under the following conditions:
• When vehicle speed remains below 15 km/h (10
MPH) for a long period of time.
Starting and driving
5-5
ON-ROAD AND OFF-ROAD
DRIVING PRECAUTIONS
AUTOMATIC REGENERATION
Pick-up vehicles have a significantly higher roll-
Off-road vehicles can tip over sideways much
over rate than other types of vehicles.
more easily than they can forward or back-
If the DPF warning light comes on, it indicates that
ward.
particulate matter has accumulated in the DPF to
They have higher ground clearance than passenger
the specified limit. Particulate matter collected in
cars to make them capable of performing in a wide
•
Many hills are too steep for any vehicle. If you
the DPF cannot be burned under low speed driving
variety of on-pavement and off-road applications.
drive up them, you may stall. If you drive down
conditions.
This gives them a higher centre of gravity than ordi-
them, you may not be able to control your
nary cars. An advantage of higher ground clearance
speed. If you drive across them, you may roll
As soon as safely possible, drive the vehicle at a high
is a better view of the road, allowing you to antici-
over.
speed (more than approximately 80 km/h (50 MPH))
pate problems. However, they are not designed for
until the DPF warning light turns off. Always con-
•
Do not shift ranges while driving on downhill
cornering at the same speeds as conventional pas-
form to local regulations.
grades as this could cause loss of control of
senger cars any more than low-slung sports cars
the vehicle.
When the accumulated particulate matter has been
are designed to perform satisfactorily under off-
completely burned, the DPF warning light will turn
road conditions. If at all possible, avoid sharp turns
•
Stay alert when driving to the top of a hill. At
off.
or abrupt manoeuvres, particularly at high speeds.
the top there could be a drop-off or other haz-
ard that could cause an accident.
As with other vehicles of this type, failure to operate
this vehicle correctly may result in loss of control or
•
If your engine stalls or you cannot make it to
vehicle rollover.
the top of a steep hill, never attempt to turn
around. Your vehicle could tip or roll over. Al-
For information about driving using Four-Wheel
ways back straight down in R (Reverse) range.
Drive (4WD) (where fitted), see “Four-Wheel Drive
Never back down in N (Neutral) or with the
(4WD) (where fitted)” later in this section.
clutch pedal depressed (MT model) using only
DRIVING SAFETY PRECAUTIONS
the brake, as this could cause loss of control.
Please observe the following precautions:
•
Heavy braking going down a hill could cause
your brakes to overheat and fade, resulting in
WARNING
loss of control and an accident. Apply brakes
lightly and use a low range to control your
• Drive carefully when off the road and avoid
speed.
dangerous areas. Every person who drives or
rides in this vehicle should be seated with their
•
Unsecured cargo can be thrown around when
seat belt fastened. This will keep you and your
driving over rough terrain. Properly secure all
passengers in position when driving over
cargo so it will not be thrown forward and
rough terrain.
cause injury to you or your passengers.
• Do not drive across steep slopes. Instead drive
either straight up or straight down the slopes.
5-6
Starting and driving
•
To avoid raising the centre of gravity exces-
•
Do not attempt to test a 4WD equipped ve-
•
Avoid parking your vehicle on steep hills. If you
sively, do not exceed the rated capacity of the
hicle on a 2-wheel dynamometer or similar
get out of the vehicle and it rolls forward, back-
roof rail (where fitted) and evenly distribute
equipment even if the other two wheels are
ward or sideways, you could be injured.
the load. Secure heavy loads in the cargo area
raised off the ground. Make sure you inform
•
Whenever you drive off-road through sand,
as far forward and as low as possible. Do not
test facility personnel that your vehicle is
mud or water as deep as the wheel hub, more
equip the vehicle with tyres larger than speci-
equipped with 4WD before it is placed on a dy-
frequent maintenance may be required. See
fied in this manual. This could cause your ve-
namometer. Using the wrong test equipment
the maintenance information in a separate
hicle to roll over.
may result in drivetrain damage or unex-
maintenance booklet.
pected vehicle movement which could result
•
Do not grip the inside or spokes of the steer-
Rinse the underside of the vehicle with fresh
in serious vehicle damage or personal injury.
•
ing wheel when driving off-road. The steering
water after driving through mud or sand. Re-
wheel could move suddenly and injure your
When a wheel is off the ground due to an un-
•
move any brush or sticks that are trapped.
hands. Instead drive with your fingers and
level surface, do not spin the wheel
thumbs on the outside of the rim.
excessively.
•
Before operating the vehicle, ensure that the
•
Accelerating quickly, sharp steering manoeu-
driver and all passengers have their seat belts
vres or sudden braking may cause loss of con-
fastened.
trol.
•
Always drive with the floor mats in place as
•
If at all possible, avoid sharp turning manoeu-
the floor may became hot.
vres, particularly at high speeds. Your vehicle
has a higher centre of gravity than a conven-
•
Lower your speed when encountering strong
tional passenger car. The vehicle is not de-
crosswinds. With a higher centre of gravity,
signed for cornering at the same speeds as
your vehicle is more affected by strong side
conventional passenger cars. Failure to oper-
winds. Slower speeds ensure better vehicle
ate this vehicle correctly could result in loss of
control.
control and/or a rollover accident.
•
Do not drive beyond the performance capabil-
•
Always use tyres of the same type, size, brand,
ity of the tyres, even with 4WD engaged.
construction (bias, bias-belted or radial), and
•
Do not attempt to raise two wheels off the
tread pattern on all four wheels. Install tyre
ground and shift the transmission to any drive
chains on the rear wheels when driving on
or reverse position with the engine running.
slippery roads and drive carefully.
Doing so may result in drivetrain damage or
•
Be sure to check the brakes immediately after
unexpected vehicle movement which could
driving in mud or water. See “Brake system”
result in serious vehicle damage or personal
later in this section for wet brakes.
injury.
Starting and driving
5-7
TURBOCHARGER SYSTEM
CARE WHEN DRIVING
IGNITION SWITCH (models
without Remote Control Key
system)
The turbocharger system uses engine oil for lubri-
Driving your vehicle to fit the circumstances is es-
cation and cooling of its rotating components. The
sential for your safety and comfort. As a driver, you
WARNING
turbocharger turbine turns at extremely high
should be the one who knows best how to drive in
Never remove the key or turn the ignition switch
speeds and it can reach an extremely high tempera-
the given circumstances.
to the <LOCK> position while driving. The steering
ture. It is essential to maintain a flow of clean oil
wheel will lock. This will cause the driver to lose
ENGINE COLD START PERIOD
through the turbocharger system. A sudden inter-
control of the vehicle and could result in serious
ruption to the oil supply may cause a malfunction in
Due to the higher engine speeds, when the engine
vehicle damage or personal injury.
the turbocharger.
is cold, extra caution must be exercised when se-
lecting a gear during the engine warm-up period
MANUAL TRANSMISSION (MT)
To ensure prolonged life and performance of the
after starting the engine.
turbocharger, it is essential to comply with the fol-
lowing maintenance procedure:
LOADING LUGGAGE
CAUTION
Loads and their distribution and the attachment of
•
Change the engine oil of the turbo-charged
equipment (roof baggage carriers, etc.) will consid-
diesel engine as prescribed. See the sepa-
erably change the driving characteristics of the ve-
rately provided maintenance booklet for ad-
hicle. Your driving style and speed must be adjusted
ditional information.
according to the circumstances.
•
Use only the recommended engine oil. For de-
DRIVING IN WET CONDITIONS
tails, refer to the maintenance service booklet
• Avoid accelerating or stopping suddenly.
SSD0392Z
for your vehicle.
•
If the engine has been operating at high rpm
• Avoid sharp turning or lane changing suddenly.
for an extended period of time, let it idle for a
• Avoid following too close to the vehicle in front.
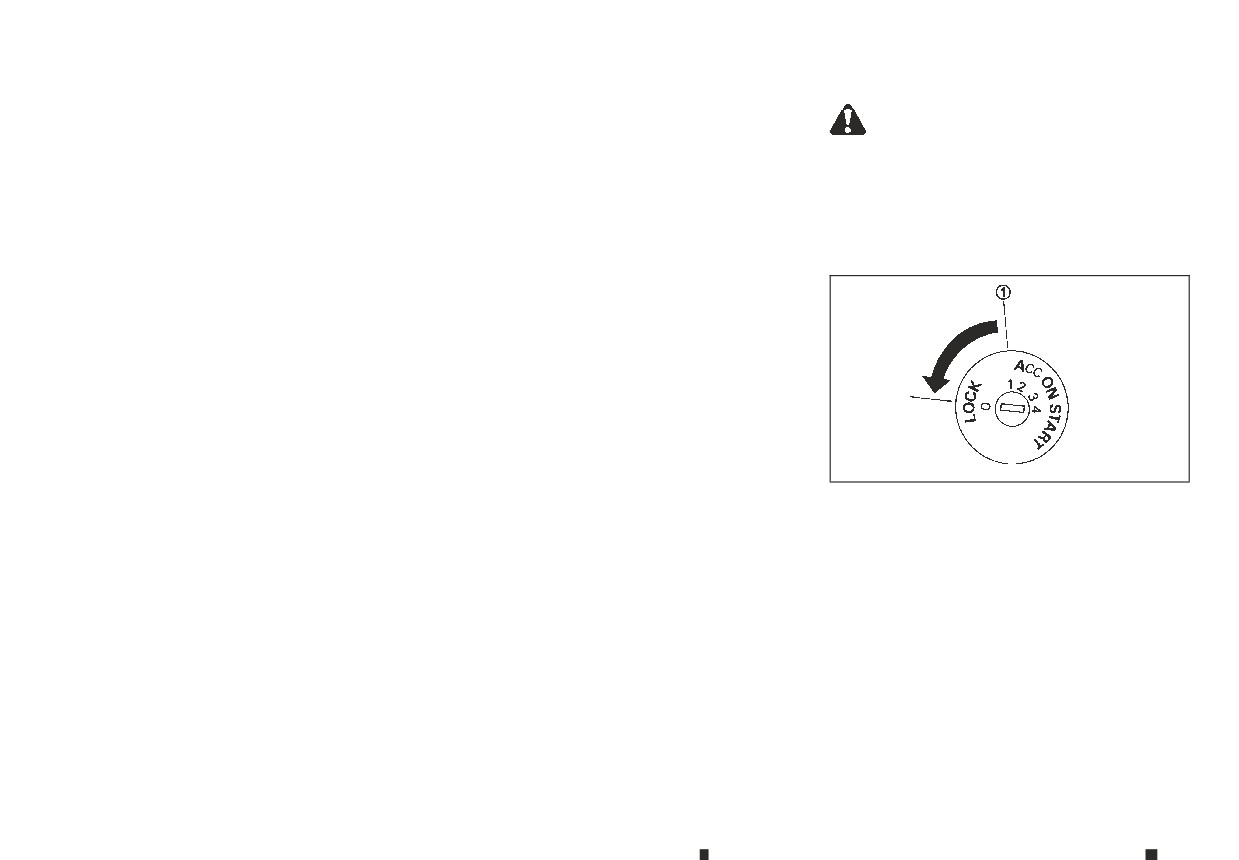
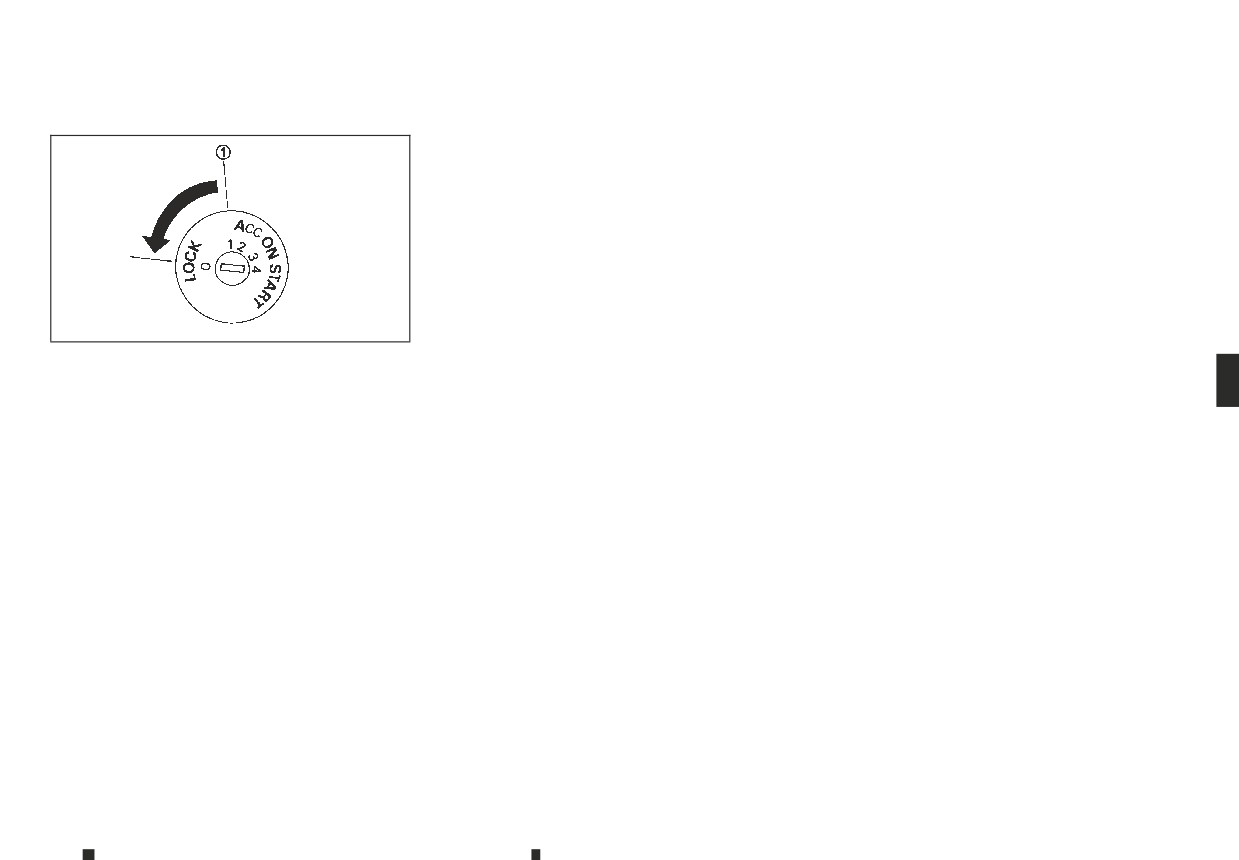
The switch includes an anti-theft steering lock de-
few minutes prior to shutdown.
vice.
When water covers the road surface with water
•
Do not accelerate the engine to high rpm im-
puddles, small water streams, etc., reduce speed to
The ignition key can only be removed when the
mediately after starting it.
prevent hydroplaning which can cause skidding
switch is in the <LOCK> normal parking position (0).
and loss of control. Worn tyres will increase this risk.
There is an “OFF” position ➀ in between <LOCK>
•
When starting the engine at ambient
temperatures below −5°C (23°F), an engine
and <ACC>, although it does not show on the lock
DRIVING IN WINTER CONDITIONS
protection mode may be activated. During this
cylinder.
time, the engine output is reduced. The engine
• Drive cautiously.
To lock the steering wheel, remove the key. To un-
protection mode is switched off automatically
• Avoid accelerating or stopping suddenly.
lock the steering wheel, insert the key and turn it
after a maximum of 3 minutes (provided the
gently while rotating the steering wheel slightly
• Avoid sharp turning or lane changing suddenly.
accelerator pedal is released completely).
right and left.
• Avoid sudden steering.
• Avoid following too close to the vehicle in front.
5-8
Starting and driving
AUTOMATIC TRANSMISSION (AT)
(Park) position. The shift lever can be moved if the
2)
Gently turn the ignition switch while rotating the
ignition switch is in the <ON> position with the foot-
steering wheel left and right.
brake pedal depressed.
KEY POSITIONS
LOCK (Normal parking position) (0):
The ignition key can only be removed at this posi-
tion.
OFF (1):
The engine can be turned off without locking the
SSD0392Z
steering wheel.
ACC (Accessories) (2):
There is an “OFF” position ➀ between the <LOCK>
This position activates electrical accessories such
and <ACC> positions, although it is not marked on
as the radio when the engine is not running.
the ignition switch.
ON (Normal operating position) (3):
The ignition lock is designed so that the ignition
switch cannot be turned to the <LOCK> position
This position turns on the ignition system and elec-
until the shift lever is moved to the P (Park) position.
trical accessories.
When moving the ignition switch to the <LOCK> po-
START (4):
sition, to remove the key from the ignition switch,
make sure the shift lever is in the P (Park) position.
This position starts the engine. As soon as the en-
gine has started, release the key immediately. It will
When the ignition switch cannot be turned to the
automatically return to the <ON> position.
<LOCK> position:
1. Move the shift lever to the P (Park) position.
STEERING LOCK
2. Turn the ignition switch slightly in the <ON> di-
Locking the steering wheel
rection.
1) Place the ignition switch in the <LOCK> position.
3. Place the ignition switch in the <LOCK> position.
2) Remove the key from the ignition switch.
4. Remove the key.
3) Turn the steering wheel 1/6 of a turn clockwise
If the ignition switch is turned to the <LOCK> posi-
from the straight up position.
tion, the shift lever cannot be moved from the P
Unlocking the steering wheel
1) Insert the key into the ignition switch.
Starting and driving
5-9