Renault Twingo (2018 year). Instruction - part 9


  Index      Renault     Renault Twingo - instruction 2018 year in english


Search            


Content   ..  7  8  9  10   ..


Renault Twingo (2018 year). Instruction - part 9


3.14

ELECTRIC WINDOWS 

(2/2)

4

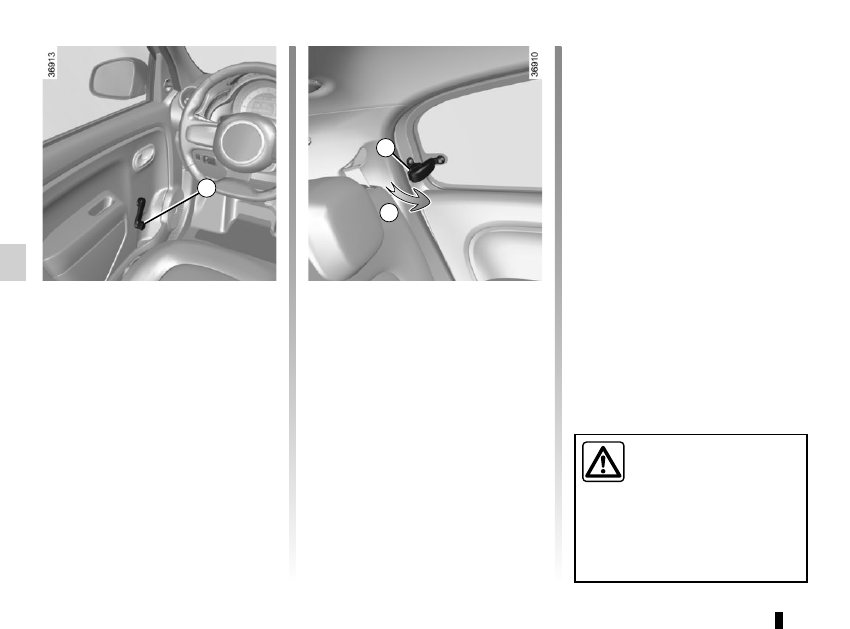
Manual window winders

Move the handle 4 to lower or raise the 

window to the desired height.

Rear windows

To half-open the window, turn handle 5 

(movement A) then lock it by pushing 

the handle to the right.
Make sure it is properly latched into po-

sition when it is closed.

5

A

Operating faults

Electric windows

In case of a fault when closing a window, 

the system reverts to normal mode: 

pull the switch concerned up as often 

as necessary to fully close the window 

(the window will close gradually), hold 

the switch (still on the closure side) for 

three seconds then lower and raise the 

window fully to reinitialise the system.

If necessary, contact an approved 

Dealer.

When closing the windows, 

ensure that no part of the 

body (arm, hand, etc.) is 

protruding from the vehicle.

Risk of serious injury.

3.15

SUNROOF

1

–  Partial opening: press the switch 1 

on side 

\

 until the desired 

amount of opening.

–  Full opening: press the switch 1 on 

side 

\

 for around 6 seconds.

–  To close: press the switch 1 on side 

[

 for around 6 seconds.

Precautions during use

– check that the sunroof is properly 

closed before leaving your vehicle;

– clean the seal every three months 

using products recommended by our 

Technical Department;

–  Do not open the sunroof immedi-

ately after it has rained or immedi-

ately after washing the vehicle.

–  vehicle with roof bars:

Generally, it is not advisable to oper-

ate the sunroof.
Before using the sunroof, check the 

objects and/or accessories (bike 

racks, roof boxes, etc.) attached to 

the roof bars: they should be prop-

erly arranged and secured and 

should not interfere with the opera-

tion of the sunroof.
Contact an authorised dealer for de-

tails of possible conversions.

Operating faults

If the roof will not close, please consult 

an authorised dealer.

Driver’s responsibility
Never leave your vehicle 

with the key in the ignition 

and leaving a child, an adult 

who is not self-sufficient or a pet 

inside, even for a short while.
The reason for this is that the child 

may endanger himself or others by 

starting the engine, activating equip-

ment such as the window winders 

for example, or locking the doors.
If something gets caught, immedi-

ately reverse the direction of travel 

by pressing the switch 1 on side 

\

.

Risk of serious injury.

3.16

Unlocking and opening the doors or 

tailgate switches on the timed cour-

tesy lights and lights.

Boot light 2

It comes on when the boot is opened.

Courtesy light

Press the switch 1 for:
– permanent lighting;
–  lighting controlled by the unlocking of 

the vehicle or by opening one of the 

doors. This switches off after a time 

delay, once the doors concerned 

have been closed correctly;

–  lighting switches off immediately.

INTERIOR LIGHTING

1

2

With the doors properly shut, lock-

ing or starting the engine make the 

interior lights and the courtesy lights 

go out.

3.17

Nothing should be placed 

on the floor area in front of 

the driver as such objects 

may slide under the pedal 

during braking manoeuvres, thus 

obstructing its use.

Front door storage pockets 1

They can hold a 1.5-litre bottle.

PASSENGER COMPARTMENT STORAGE, FITTINGS 

(1/5)

1

Ensure that no hard, heavy 

or pointed objects are 

placed in the “open” storage 

compartments in such a 

way that they may fall onto passen-

gers during sudden turning, braking 

or in the event of an accident.

3

Dashboard storage 2

Depending on the vehicle, it may be 

fitted with a storage compartment 3.

2

Glovebox

When closed with a cover, lift the 

catch 4 to open the glovebox.
The cover is fitted with storage areas.

4

3.18

Centre console storage 

compartment 5

PASSENGER COMPARTMENT STORAGE, FITTINGS 

(2/5)

When turning corners, 

accelerating or braking, 

ensure that the recepta-

cle being held by the cup 

holder is not dislodged.
There is a risk of injury if hot liquid 

escapes.

Centre console storage 

compartment 7

Depending on the vehicle, it is closed 

with a cover 8.

6

Cup holder 6

This can be used for storing a mobile 

ashtray, drinks cans, etc. 

7

8

5

3.19

PASSENGER COMPARTMENT STORAGE, FITTINGS 

(3/5)

9

Rear door storage 

compartment 9

Storage compartments can hold a 

1.5 litre bottle.

10

Cup holder 10

This can be used for storing a mobile 

ashtray, cup holder, etc.

When turning corners, 

accelerating or braking, 

ensure that the recepta-

cle being held by the cup 

holder is not dislodged.
There is a risk of injury if hot liquid 

escapes.

11

Rear centre console storage 

compartment 11

Ensure that no hard, heavy 

or pointed objects are 

placed in the “open” storage 

compartments in such a 

way that they may fall onto passen-

gers during sudden turning, braking 

or in the event of an accident.

3.20

PASSENGER COMPARTMENT STORAGE, FITTINGS 

(4/5)

12

Storage compartment under 

the rear bench seat 12

14

Sun visor storage 13

This can be used for storing motorway 

tickets, cards, etc.

14

15

Front sun visor

Lower sun visor 14.

Vanity mirror

Lift the cover 15.

When driving, ensure the 

courtesy mirror cover is 

closed. Risk of injury.

13

3.21

PASSENGER COMPARTMENT STORAGE, FITTINGS 

(5/5)

Driver sunglasses holder 16

Passenger grab handle 17

This offers support and can be held 

when the vehicle is moving. Do not use 

it for getting into or out of the vehicle.

16

17

3.22

Accessories socket 2

It is provided for connecting accessories 

approved by our Technical Department.

Ashtray A

It can be housed in either position 1 

or 3.

Cigarette lighter 2

With the ignition on, push in the ciga-

rette lighter 2. It will spring back with a 

click when it is ready. Pull it out to use.
After use, replace it without pushing it 

all the way in.

ASHTRAY, CIGARETTE LIGHTER, ACCESSORIES SOCKET

1

If your vehicle is not fitted with a 

cigar lighter and an ashtray, these 

can be obtained from an approved 

Dealer.

3

2

A

Connect accessories with 

a maximum power of 

120 watts (12 V) only.

When several accessory 

sockets are used at the same time, 

the total power of the connected 

accessories must not exceed 

180 watts.

Fire hazard.

3.23

The headrest is a safety 

component; check that it is 

fitted and in the correct po-

sition. The top of the head-

rest should be as close as possible 

to the top of the head.

To raise the headrest

Raise the headrest as far as it will go, 

then press button A and remove the 

headrest.

If necessary, fold the seatback down to 

take out the headrest (see the informa-

tion on the “Rear bench seat” in 

Section 3).

To refit the headrest

Enter the rods in their housing and 

push down the headrest until it locks to 

use it in the high position. Check that it 

is correctly locked.

Position for use

Raise the headrest as far as possible to 

use it in the high position. Check that it 

is correctly locked.

Storage position

Press button A and lower the headrest 

completely.
When the headrest is set at the 

lowest position, this is for storage 

only. It should not be in this position 

when a seat is occupied.

REAR HEAD RESTS

A

3.24

REAR BENCH SEAT

B

To fold down the seatback:

–  Ensure that the front seats are far 

enough forward;

–  Lower the headrest as far as it will 

go;

–  Place the seat belts in their guides A;

–  Pull the tab 1 upwards and lower the 

seatback B.

To raise the seatback again, proceed 

in the reverse order. Ensure that it is 

properly secured in place.
Refit the seatback and click it back into 

place.

Increasing the luggage compartment 

volume (depending on the vehicle). 
The seatback can be positioned upright 

in order to increase the luggage com-

partment volume: 

–  pull the tab 1 and lower the seat-

back B;

–  Lift the lever 2;

–  lift the seatback B and click it onto 

the rod 2, ensuring that it is properly 

locked in place.

To return to the initial position:

–  pull the tab 1 and lower the seat-

back B;

–  lower the rod 2 as far as it will go;

–  raise the seatback B and make sure 

it properly locks in place.

For safety reasons, carry 

out any adjustments when 

the vehicle is not being 

driven.

When moving the rear 

seats, ensure that nothing 

obstructs the anchorage 

points (passenger’s arm or 

leg, a pet, gravel, cloth, toys, etc.).

When refitting the seat-

back, make sure it is cor-

rectly locked in place.

If seat covers are fitted

make sure these do not prevent the 

seatback latch from locking in.

Make sure that the seat belts are 

positioned correctly.

Reposition the headrests.

1

A

2

1

2

B

3.25

Opening the doors manually 

from the inside

If it is impossible to unlock the tailgate, 

it can be done manually from inside:
–  access the luggage compartment by 

tilting the rear bench seatback(s),

–  insert a pencil or similar object in 

recess 5 and slide the unit as shown 

in the illustration;

–  push the boot lid to open it.

BOOT

To open

Without remote control
With the doors unlocked, press the 

button 2 and lift the boot lid 1.

With remote control
With the doors unlocked or not, press 

the button 3 on the remote control A 

or B for 2 seconds and lift the boot lid 1.
In this case, upon closing, the boot will 

still be unlocked: remember to lock the 

vehicle before leaving.

1

5

4

To close

Lower the boot lid using the handle 

inside the boot 4 to assist you.

2

As the engine is located under the 

boot carpet, do not slide or store an-

ything under the boot carpet.

3

A

B

3

The attaching of any carry-

ing device (bike rack, lug-

gage box, etc.) resting on 

the luggage compartment 

lid is prohibited. To install a carrying 

device on your vehicle, contact an 

Approved Dealer.

3.26

Luggage cover 2

(depending on vehicle)
The luggage cover lifts automatically 

when the luggage compartment is 

opened.

Removal
–  Unclip the clips 1 from both straps at-

tached to the tailgate struts;

–  pull the luggage cover towards you.

Refitting
To refit the luggage cover, proceed in 

the reverse order to removal.

LUGGAGE COVER/REAR PARCEL SHELF

1

Rear parcel shelf 4

(depending on vehicle)
The parcel shelf automatically lifts when 

the luggage compartment is opened.

Removal
–  Unhook the two straps 3;

–  pull the shelf towards you.

Refitting
To refit the parcel shelf, proceed in the 

reverse order to removal.

2

4

3

Do not place any heavy or 

solid objects on the luggage 

cover. These may pose a 

risk to the vehicle occu-

pants if the driver has to brake sud-

denly or if the vehicle is involved in 

an accident.

3.27

BOOT ARRANGEMENTS

Anchorage points

Attachment points 2.

If your vehicle is not equipped with 

anchorage points, you can get them 

from an authorised dealer.

2

Hooks 1

These can be used to hang bags.

As the engine is located under the 

boot, do not slide or store anything 

under the boot carpet.

1

3.28

Always position the heavi-

est items directly on the 

floor. Use the lashing 

points 1 on the boot floor, if 

these are fitted to the vehicle. The 

luggage should be loaded in such a 

way that no items will be thrown for-

ward and strike the occupants if the 

driver has to brake suddenly. Fasten 

the rear seat belts, even if the seats 

are not occupied.

TRANSPORTING OBJECTS IN THE LUGGAGE COMPARTMENT 

Always position the objects transported 

so that the largest surface is against:

–  The rear bench seatback for normal 

loads (example A).

– The front seatbacks with the rear 

seatbacks folded down, as is the case 

for maximum loads (example B).

If you have to place objects on the folded 

seatback, it is necessary that you lower 

the headrests before folding the seat-

back so that it can be folded as flat as 

possible against the seat.

B

A

1

3.29

Spoiler A

Accessing the mounting 

points

Open the doors to access the mount-

ing points 1.

For information on the range of 

equipment adapted to your vehi-

cle, we advise you to consult an ap-

proved Dealer.
Refer to the manufacturer’s instruc-

tions for information on how to fit 

and use the roof rack bar.
Please keep these instructions with 

the rest of the vehicle documenta-

tion.
Maximum permissible load on 

roof rack: 60 kg (including the car-

rying device).

Precautions during use

Handling the tailgate
Before handling the tailgate, check the 

objects and/or accessories (bike rack, 

roof box, etc.) fitted to the roof bars: 

these must be correctly positioned and 

secured, so as not to hinder the opera-

tion of the tailgate.

ROOF BARS/SPOILER

If the roof bars, approved by 

our Technical Department, 

are supplied with screws, 

only use these screws for 

attaching the roof bars to the vehi-

cle.

A

1

For your safety, it is forbid-

den to attach objects and/or 

accessories to the spoiler or 

the boot of the vehicle. 

Risk of injury if the rear windscreen 

or the spoiler break.


Content   ..  7  8  9  10   ..