Renault Scenic (2018 year). Instruction - part 2


  Index      Renault     Renault Scenic - instruction 2018 year in english


Search            


Content   ..   1  2  3   ..


Renault Scenic (2018 year). Instruction - part 2


1.18

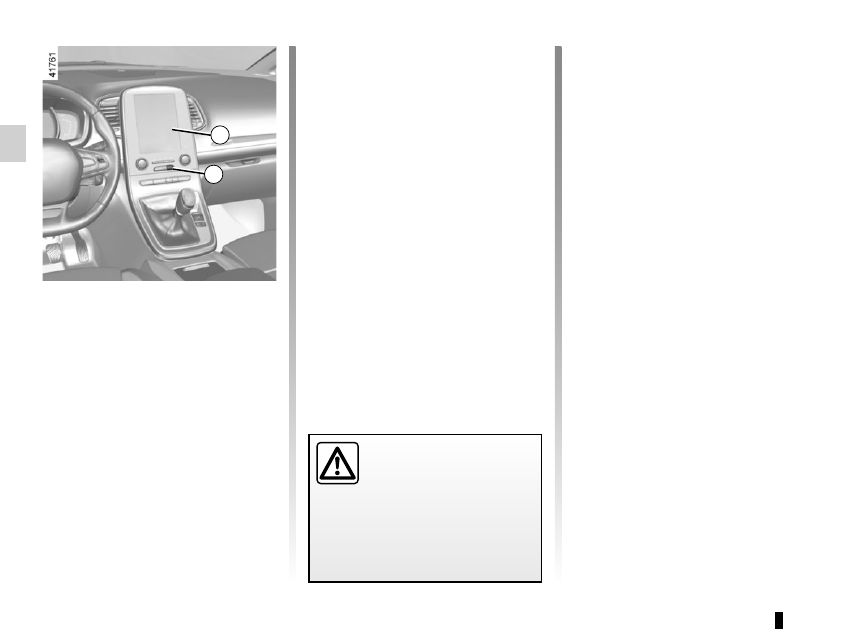
AUTOMATIC LOCKING WHEN DRIVING

Operating principle

After the vehicle is started, the system 

automatically locks the doors when you 

are driving at approximately 6 mph 

(10 km/h) and over.

The door can be unlocked:

–  by pressing central door unlocking 

switch 2.

–  at a standstill, by opening a front 

door from inside the vehicle.
Note: if a door is opened or closed, it 

will automatically lock again when the 

vehicle reaches a speed of 6 mph 

(10 km/h).

Activating/deactivating the 

function

To switch it on: with the vehicle at a 

standstill and the engine running, press 

switch 2 until a beep sounds.

To deactivate: with the vehicle station-

ary and the engine running, press the 

switch 2 until you hear two beeps.

You can also deactivate/activate the 

function from the menu on the multi-

function screen 1 (refer to the informa-

tion on the “Vehicle settings customisa-

tion menu” section 1, “Auto door locking 

while driving” function).

Operating faults

If you experience an operating fault (no 

automatic locking, the indicator light in-

corporated in switch 2 does not light up 

when trying to lock the doors and boot, 

etc.), make sure that locking has not 

been deactivated by mistake and check 

that the doors and boot are properly 

closed. If they are correctly locked and 

the fault is still present, contact an au-

thorised dealer.

2

Driver’s responsibility
If you decide to keep the 

doors locked when you are 

driving, remember that it 

may be more difficult for those as-

sisting you to gain access to the 

passenger compartment in the 

event of an emergency.

1

1.19

FRONT HEADRESTS

The headrest is an impor-

tant safety component: 

ensure that it is in place and 

in the correct position. The 

distance between your head and the 

headrest and the distance between 

the head and section A should be 

as small as possible.

To raise the headrest

Pull the headrest upwards to the de-

sired height.

To lower the headrest

Press button 2 and guide the headrest 

down to the desired height.

To adjust the angle of the 

headrest

Depending on the vehicle, move sec-

tion A towards or away from you to the 

required position.

To adjust side supports B

Depending on the vehicle, sections B 

can be adjusted independently to the 

desired position.

To remove the headrest

Raise it to its highest position (tilt the 

seatback backwards if necessary). 

Press button 2 and lift the headrest to 

release it.

To refit the headrest

Check that the headrest rods are 

clean 3.

Insert the headrest rods into the holes 1 

(tilt the seatback backwards if neces-

sary).

Lower the headrest until it locks, press 

button 2 and lower the headrest as far 

as it will go.

Check that the headrest is properly 

locked in place.

B

A

B

2

3

1

1.20

FRONT SEATS WITH MANUAL CONTROL 

(1/3)

Settings

To move the seat forwards or back
Lift and hold the handle 1 to unlock the 

seat. Release the handle at the desired 

position and make sure that it is locked.

To raise or lower the seat base
Move the lever 2 as many times as nec-

essary upwards or downwards until the 

required position is reached.

1

2

3

To tilt the seatback
Lift handle 3 and tilt the seatback to the 

desired position. Release the handle at 

the desired position and make sure that 

it is locked.

For safety reasons, make 

these adjustments only 

when the vehicle is station-

ary.

We would advise you not to recline 

the seatbacks too far to ensure that 

the effectiveness of the seat belts is 

not reduced.
Nothing should be placed on the 

floor (area in front of driver) as such 

objects may slide under the pedal 

during braking manoeuvres, thus 

obstructing its use.

1.21

Heated seats
With the ignition on:
–  pressing the switch 5 on the required 

seat for the first time activates the 

heating system at maximum power. 

Both integrated switch warning lights 

come on;

–  a second press decreases the heat-

ing to minimum power. One inte-

grated warning light comes on;

–  pressing for the third time turns the 

heating off.

FRONT SEATS WITH MANUAL CONTROL 

(2/3)

5

4

To adjust the seat’s lumbar position
Lower handle 4 to increase the support 

and lift it to decrease it.

For safety reasons, carry 

out any adjustments when 

the vehicle is not being 

driven.

1.22

Table function

Depending on the vehicle, the passen-

ger seatback may be folded down onto 

the seat base to create a table.

–  Lower the headrest;

–  move the seat back;

–  lower the seat base fully;

–  pull the handle 7 and fully lower the 

seatback.

When the front seat is in 

table position, the front pas-

senger airbag airbag must 

be deactivated (see the in-

formation on “Child safety: activat-

ing/deactivating the front passenger 

airbag” in Section 1).
Risk of serious injury caused by 

items resting on the seatback table 

which may be dislodged when the 

airbagairbag is deployed.
The label (on the dashboard) and 

the markings (on the windscreen) 

remind you of these instructions.

7

For your safety, attach any 

transported objects when 

the seat is in the table po-

sition.

When using the passenger seat in table 

position, you must not use the two rear 

seats immediately behind it.

Repositioning the seat

Make sure that nothing prevents the 

seat from moving.
It is essential to pull the handle 7 to 

raise the seatback. Ensure it is cor-

rectly locked in place.

Be sure to hold the seat-

back when placing the seat 

in table position.
Risk of injury.

For safety reasons, carry 

out any adjustments when 

the vehicle is not being 

driven.

FRONT SEATS WITH MANUAL CONTROL 

(3/3)

1.23

DRIVER’S SEAT WITH ELECTRIC CONTROLS 

(1/2)

For safety reasons, carry 

out any adjustments when 

the vehicle is not being 

driven.

Make sure that the seatbacks are 

correctly locked in place.
We would advise you not to recline 

the seatbacks too far to ensure that 

the effectiveness of the seat belts is 

not reduced.
No object should be placed on the 

floor (in front of the driver). such 

objects may slide under the pedals 

during sudden braking manoeuvres 

and obstruct their use.

1

2

3

On equipped vehicles, switch 1 grants 

access to the seats menu on the multi-

function screen (please refer to the fol-

lowing pages).

Make sure that the seat-

backs are correctly locked 

in place.

Adjusting the seatback

To tilt the seatback, move the top of 

switch 2 forwards or backwards.

Adjusting the lumbar support 

on the seat

Move the switch 3 forwards, back-

wards, up or down.

1.24

DRIVER’S SEAT WITH ELECTRIC CONTROLS 

(2/2)

5

Heated seats

With the ignition on:
–  pressing the switch 6 on the rele-

vant seat for the first time activates 

the heating system on high. Both in-

tegrated switch warning lights come 

on. The system automatically de-

cides whether or not the heating is 

needed;

–  pressing the switch for the second 

time changes the heating to low. One 

integrated warning light comes on;

–  pressing for the third time turns the 

heating off.

Operating faults
When an operating fault is detected, 

the warning lights in the switch 6 for 

the seat concerned flash or, depending 

on the vehicle, switch off after approxi-

mately five seconds.
Consult an approved dealer

Adjusting the seat position

To move the seat forwards or back

Move switch 4 forwards or backwards.
To raise or lower the seat base

Move the back of switch 4 up or down.
To tilt the seat base 

(depending on the vehicle)

Move the front of switch 4 upwards or 

downwards.

Adjusting the seat length

Lift handle 5 to unlock. Release the 

handle at the desired position and 

make sure that it is locked.

6

4

1.25

FRONT SEATS: Functions 

(1/3)

Massage

You can activate the driver and front 

passenger seat massage function.
Using the multifunction screen, 

select menu “Vehicle”, “Seats” then 

“Massage”.

Browse menu “Driver” or “Passenger” 

to:
–  select the type of massage (Tonic, 

Relaxing or Lumbar);

–  adjust the intensity (+ or -);
–  adjust the speed (+ or -);
–  reset the selected settings. Press 2 

then “Reset”;

– activate/deactivate the massage 

seat (ON or OFF).

Note:
–  the duration of the massage is ap-

proximately ten minutes. Then the 

function is disabled automatically 

(back in OFF position);

– the mode that you select in the 

“Multi-Sense” menu may affect the 

massage configuration (please refer 

to the information on “Multi-Sense” in 

Section 3);

– with the engine switched off, the 

massage function will run just once.

2

Using the multifunction screen, de-

pending on the vehicle you can access 

a number of seat functions.
On equipped vehicles, the switch 1 per-

mits direct access to the “Seats” menu 

on the multifunction screen.
Please refer to the multimedia equip-

ment instructions for further informa-

tion.

1

Massage

Passenger

Driver

Massage

ON

Tonic

Relaxing Lumbar

Intensity

Speed

1.26

FRONT SEATS: Functions 

(2/3)

Settings

Using the multifunction screen, select 

menu “Vehicle”, “Seats” then “Settings”.
You can activate or deactivate the fol-

lowing elements:
–  easy driver access;
–  easy passenger access;
–  Courtesy for passenger;
– visual feedback of current move-

ment.

Easy driver and passenger access
Press “ON” or “OFF” to activate or de-

activate this function.
When this function is activated, the seat 

moves backwards automatically as the 

driver or passenger leaves the vehicle. 
The passenger seat returns to its origi-

nal position when the door is closed.
The driver’s seat returns to its origi-

nal position when you press the start 

button with the door closed.

Courtesy for passenger
Press “ON” or “OFF” to activate or de-

activate this function.
When this function is activated, the 

driver can adjust the passenger seat 

using switches 34 and 5.

2

3

4

5

Easy access driver

Easy access passenger

Courtesy for passenger

Position

ON

ON

OFF

1.27

FRONT SEATS: Functions 

(3/3)

Position
It is possible to store the driving posi-

tion of the driver seat.
The driving position includes all the 

electric settings for the seat base and 

seatback.
The driving position can be stored and 

recalled by pressing the buttons:

–  RENAULT hands-free card detected;

–  when the driver’s door is opened.

3

3

Recalling the driving position
With the vehicle at a standstill
, using 

the multifunction screen, select menu 

“Vehicle”, “Seats”, “Settings” then 

“Position”, select “Recall” and confirm.
Note: recall of the saved driving po-

sition is interrupted if one of the seat 

adjustment buttons is pressed during 

recall.
When driving, it is not possible to 

recall a driving position.

4

5

For safety reasons, carry 

out any adjustments when 

the vehicle is stationary.

Storing your driving position

– Adjust the driver seat using 

switches 34 and 5 (refer to previous 

page);

–  from the multifunction screen, select 

menu “Vehicle”, “Seats”, “Settings” 

then “Position” and select “Save”.

The position of the driver is then stored.

ON

Position

Visual feedback

Recall

Save

1.28

Always wear your seat belt when trav-

elling in your vehicle. You must also 

comply with the legislation of the par-

ticular country you are in.

SEAT BELTS 

(1/3)

Seat belts which are incor-

rectly adjusted or twisted 

may cause injuries in the 

event of an accident.

Use one seat belt per person, 

whether child or adult.
Even pregnant women should wear 

a seat belt. In this case, ensure that 

the lap belt is not exerting too much 

pressure on the abdomen, but do 

not allow any slack.

Before starting, first adjust your driv-

ing position, then ask all occupants 

to adjust their seat belts to ensure 

optimum protection.

Adjusting your driving 

position

–  Sit well back in your seat (having 

first removed your coat or jacket). 

This is essential to ensure your back 

is positioned correctly;

–  adjust the distance between the 

seat and the pedals. Your seat 

should be as far back as possible 

while still allowing you to depress 

the clutch pedal fully. The seatback 

should be adjusted so that your arms 

are slightly bent when you hold the 

steering wheel;

–  adjust the position of your head-

rest. For maximum safety, your head 

must be as close as possible to the 

headrest;

–  adjust the height of the seat. This 

adjustment allows you to select the 

seat position which offers you the 

best possible view;

  adjust the position of the steering 

wheel.

Adjusting the seat belts

Sit with your back firmly against the 

seatback.
Shoulder strap 1 should be as close as 

possible to the base of the neck but not 

on it.
Lap belt 2 should be worn flat over the 

thighs and against the pelvis.
The belt should be worn so that it is 

as close as possible to your body, ie.: 

avoid wearing heavy clothing or keep-

ing bulky objects under the belts, etc.

1

2

1.29

SEAT BELTS 

(2/3)

Locking

Unwind the belt slowly and smoothly 

and ensure that buckle 3 locks into 

catch 5 (check that it is locked by pull-

ing on buckle 3).

If the belt jams, allow it to return slightly 

before attempting to unwind it again.

If your seat belt is completely jammed, 

pull slowly, but firmly, so that just over 

3 cm unwinds. Allow it to return slightly 

before attempting to unwind it again.

If there is still a problem, contact an ap-

proved dealer.

ß

Driver’s seat belt reminder 

and, depending on the vehi-

cle, front passenger seat belt re-

minder

This lights up on the interior rear-view 

mirror, or, depending on the vehicle, on 

the central display when the engine is 

started then, if the driver’s or the front 

passenger’s seat belt (if this seat is oc-

cupied) is not fastened and the vehicle 

has reached approximately 12.4 mph 

(20 km/h), it flashes and a beep sounds 

for around 2 minutes.

Note: an object placed on the passen-

ger seat base may activate the warning 

light in some cases.
Rear seat belt reminder (depending 

on vehicle)

Warning light 

ß

 lights up on the 

instrument panel, accompanied by the 

graphic 6 for approximately 30 seconds 

each time the vehicle is started, a door 

is opened or a rear seat belt is fastened 

or unfastened.

1

3

4

5

5

Check that the rear passengers are 

wearing seat belts and that the number 

of seat belts shown as fastened cor-

responds to the number of rear seat 

places occupied.
Depending on the vehicle, on the 

graphic 6:

–  marker in green: seat belt fastened;

–  marker in red: seat belt unfastened.

Unfastening

Press button 4 and the seat belt will be 

rewound by the inertia reel. Guide the 

belt.

6

1.30

SEAT BELTS 

(3/3)

Adjusting the height of the 

front seat belts

Use button 7 to adjust the seat belt 

height so that the shoulder strap is worn 

as shown previously. Press the button 7 

and raise or lower the seat belt. Make 

sure that the seat belt is locked in posi-

tion correctly after you have adjusted it.
The following information applies 

to the vehicle’s front and rear seat 

belts.

7

–  No modification may be made to the component parts of the originally 

fitted restraint system: belts, seats and their mountings. For special op-

erations (e.g. fitting child seats) contact an authorised dealer.

– Do not use devices which allow any slack in the belts (e.g. clothes 

pegs, clips, etc.): a seat belt which is worn too loosely may cause injury in the 

event of an accident.

–  Never wear the shoulder strap under your arm or behind your back.
–  Never use the same belt for more than one person and never hold a baby or 

child on your lap with your seat belt around them.

–  The belt should never be twisted.
–  Following an accident, have the seat belts checked and replaced if necessary. 

Always replace your seat belts as soon as they show any signs of wear.

–  Make sure that the buckle is inserted into the appropriate catch.
–  Ensure that no objects are placed in the area around the seat belt catch as 

they could prevent it from being properly secured.

–  When the rear seats are being put back, make sure that the seat belts and 

buckles are correctly positioned so that they can be used properly.

–  Make sure the seat belt catch is properly positioned (it should not be hidden 

away, crushed or flattened by people or objects).

1.31

Second row centre rear seat

Unwind belt 5 slowly from its housing 4.
Click buckle 9 into black catch 8.
Snap the last sliding buckle 6 into the 

red catch 7.
To store away the seat belt, guide it into 

housing  4 and store the two buckles 

into their respective housings A and B 

or, depending on the vehicle, hook 

buckle 9 on magnet C.

Second row rear side seats

Slowly unwind belt 1.
Click the sliding buckle 2 into the corre-

sponding red catch 3.

Check that the rear seat 

belts are positioned and op-

erating correctly each time 

the rear seats are moved.

Rear seat functions
Refer to the information on “Rear 

seat functions” in Section 3.

REAR SEAT BELTS

1

Third row rear seats (7-seater 

versions)

Slowly unwind the strap 10.
Click the buckle 11 into the correspond-

ing black catch 12.

10

11

12

2

3

9

8

6

7

5

A

B

4

C

1.32

METHODS OF RESTRAINT IN ADDITION TO THE FRONT SEAT BELTS 

(1/4)

Depending on the vehicle, they are 

composed of:

–  seat belt inertia reel pretension-

ers;

–  central seat belt pretensioners;
–  chest-level load limiter;
–  
airbags  – Driver and passenger 

front 

These systems are designed to act in-

dependently or together when the vehi-

cle is subjected to a frontal impact.
Depending on the severity of the 

impact, the system can trigger:
–  seat belt locking;
–  the seat belt inertia reel pretensioner 

(which engages to correct seat belt 

slack);

–  the lap belt pretensioners to hold the 

occupant in his seat;

–  the front airbag.

Pretensioners

The pretensioners hold the seat belt 

against the body, holding the occupant 

more securely against the seat, thus in-

creasing the seat belt’s efficiency.
In the event of a severe frontal impact 

and if the ignition is switched on, the 

system may engage the following de-

pending on the force of the impact:
– the seat belt inertia reel preten-

sioner 1 which instantly retracts the 

seat belt;

–  the lap pretensioner 2 on the front 

seats.

–  Have the entire restraint 

system checked following 

an accident.

– No operation whatso-

ever is permitted on any part 

of the system (pretensioners, 

airbags, computers, wiring) and 

the system components must not 

be reused on any other vehicle, 

even if identical.

–  Only qualified personnel from our 

Network may work on the airbags; 

otherwise the system may trigger 

accidentally and cause injury.

–  The electric trigger system may 

only be tested by a specially 

trained technician using special 

equipment.

–  When the vehicle is scrapped, 

contact an approved dealer for 

disposal of the pretensioner and 

airbags gas generators.

1

2

1.33

METHODS OF RESTRAINT IN ADDITION TO THE FRONT SEAT BELTS 

(2/4)

Load limiter

Above a certain severity of impact, this 

mechanism is used to limit the force of 

the belt against the body so that it is at 

an acceptable level.

driver and passenger front 

Airbags

Fitted to the driver and passenger side.
The presence of this equipment is indi-

cated by the word “airbag” on the steer-

ing wheel, dashboard (in the area of the 

airbag A) and, depending on the vehi-

cle, a label on the lower section of the 

windscreen.
Each airbag system consists of:
–  an airbag and gas generator fitted on 

the steering wheel for the driver and 

in the dashboard for the passenger;

–  an electronic unit for system monitor-

ing which controls the gas generator 

electrical trigger system;

– remote sensors;

– a single 

å

 warning light on the 

instrument panel.

A

The airbag system uses py-

rotechnic principles. This 

explains why, when the 

airbag inflates, it will gener-

ate heat, produce smoke (this does 

not mean that a fire is about to start) 

and make a banging noise. In a situ-

ation where an airbag is required, it 

will inflate immediately and this may 

cause some minor, superficial graz-

ing to the skin or other problems.


Content   ..   1  2  3   ..