Peugeot 807 Dag (2007.5). Instruction - part 2


  Index      Peugeot     Peugeot 807 Dag 2007.5 - instruction in english


Search            


Content   ..   1  2  3   ..


Peugeot 807 Dag (2007.5). Instruction - part 2


>Visuel à venir

Accesses

R

EA

D

to

 SET

 O

FF

19

2

either inside or outside the vehicle.

Do not lean through an open window, do not 

leave any object protruding through the door 

during opening or closing.

Do not leave children or pets near the 

opening and closing controls without 

supervision.

Obstacle detection

The detection system is triggered when 

an obstacle which has a certain physical 

resistance hinders the movement of the 

door. 

If an obstacle is detected during: 

- closing of the door, the door opens fully,

- opening of the door, the door stops. 

When the obstacle has been removed, 

complete or restart the action using the 

remote control or the interior controls.

Failure to observe these recommendations 

may result in injury or damage if part of 

the body or an object becomes jammed or 

caught.

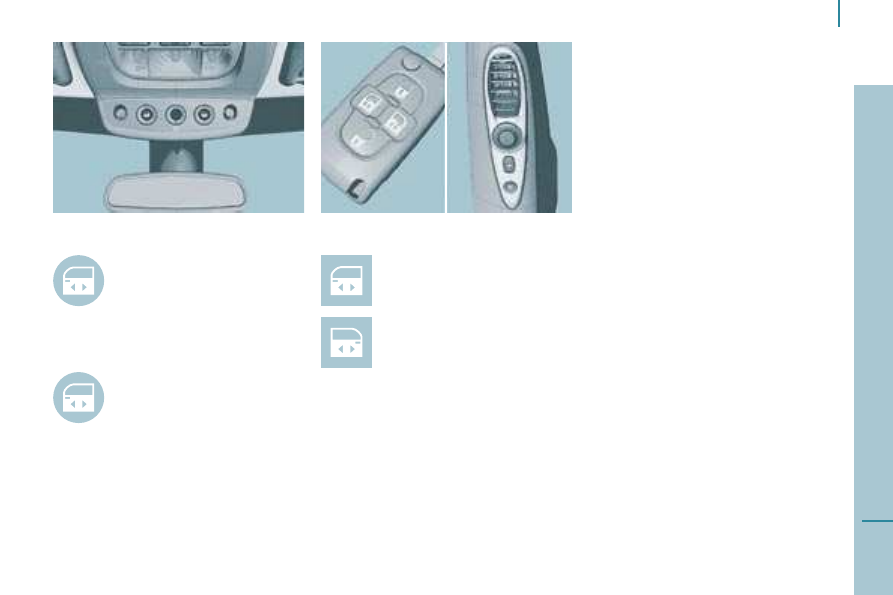
Opening/Closing using the 

remote control

Press one of the buttons to open 

or close the corresponding rear 

door (right or left).

Opening/Closing  

from the front

Press the corresponding control.

An audible signal accompanies 

the opening and closing of the door.

ELECTRIC SLIDING SIDE DOORS

Remember to close the sliding doors when 

your vehicle is parked for long periods, 

the electric open door monitoring system 

consumes power.

General recommendations

It is imperative that the doors are only 

operated when the vehicle is stationary.

Always ensure that the door is operated 

safely. Check that no person, animal or 

object is preventing the required operation, 

Opening/Closing from row 2 

Press the corresponding control.

>Visuel à venir

Accesses

20

CHILD SAFETY

A -  Mechanical

This prevents either of the rear doors being 

opened from inside.

 Turn the switch 

a quarter of a turn using 

the ignition key. 

B -  Electric

This disarms all the electrical controls in the 

rear:

 electric windows,

 sliding side doors,

 sunroofs in rows 2 and 3.

With the ignition on, press button 

B.

A message appears on the display, 

accompanied by an audible signal.

Simultaneous locking or unlocking 

of the tailgate and the doors

The tailgate is locked or unlocked by the 

remote control or the driver’s door or 

passenger door lock.

To open, operate the handle 

C and lift the 

tailgate.

Tailgate release

This enables the tailgate to be unlocked in 

the event of a central locking fault.

 Fold back a row 2 rear seat,

 Fold back a row 3 rear seat or the bench 

seat 

to gain access to the lock from 

inside the boot,

 Insert a small screwdriver into hole 

D in 

the lock and push it towards the left to 

unlock the tailgate

.

Always remove the ignition key when 

leaving the vehicle, even for a short 

time. 

The tailgate locks automatically when 

the vehicle is being driven at more than 

6 mph (10 km/h) and unlocks when one of 

the front doors is opened.

"Tailgate open" warning

When the engine is running or the vehicle is 

being driven, you are warned if the tailgate 

is not closed correctly by a diagram on the 

display, accompanied by an audible signal.

TAILGATE

Accesses

R

EA

D

to

 SET

 O

FF

21

2

SUNROOFS

You have three sunroofs each with an 

independent control.

However, the front passenger’s control 

can also operate the two rear sunroofs 

simultaneously.

To partially open the roof: press and hold 

part 

A of the control.

To open the roof completely: press part A 

of the control briefly.

To close it completely: press part B of 

the control briefly to slide it, then press 

the control again continuously to close it 

completely.

Safety auto-reverse

When the sunroof is sliding closed and 

meets an obstacle, it stops then partially 

opens again.

Malfunction

In the event of a malfunction, unwanted 

opening of the roof on closing (for 

example, in the presence of ice), following 

reconnection of the battery or if the sunroof 

does not close: 

- press 

until the roof is fully open,

- press 

within one second to close the 

roof,

- if the roof does not close, press 

B several 

times until the roof is fully closed. 

- release then continue to press the control 

for approximately five seconds after 

closing of the roof.

The safety auto-reverse function is not 

active during these operations.

Disarming of the row 2 and 3 controls

Press the rear electrical functions disarming 

switch.

The sunroof shutter is manual.

To open it, lift the handle and slide it 

rearwards.

To close it, slide it forwards until the handle 

locks. 

Good practice

Do not open the sunroofs immediately 

after a shower or immediately after washing 

the car.

Always ensure that the sunroofs are closed 

correctly before leaving the vehicle.

In the event of contact during operation of 

the roof, you must reverse the movement 

of the roof. To do this, press the switch 

concerned.

When the driver operates the roof switch, 

he must ensure that no one is preventing 

correct closing of the roof. Be aware of 

children when operating the roof. 

The driver must ensure that the passengers 

use the sunroof correctly.

Instruments and controls

22

INSTRUMENTS AND CONTROLS

CONTROL BLOCK

Display

Instruments and controls

R

EA

D

to

 SET

 O

FF

23

2

INSTRUMENT PANELS

With monochrome display

With colour display

1.  Rev counter.

2.  Speedometer.

3.  Fuel level and coolant temperature.

4.  Display.

Instruments and controls

24 WARNING LIGHTS

Each time the vehicle is started: a series of warning lights come on applying a check auto-test. They switch off almost immediately. Engine 

running: the warning light becomes a warning if it remains on continuously or flashes. This initial warning may be accompanied by an audible 

signal and a message on the display. "Do not ignore these warnings."

Warning light

is

indicates

Solution - action

STOP

lit, associated 

with another 

warning light and 

accompanied by 

a message on the 

display.

major faults linked with the "Brake 

fluid level", "Engine oil pressure", 

"Coolant temperature", "Electronic 

brake force distribution", "Power 

steering" and "Punctured wheel" 

warning lights.

You must stop, park, switch off the ignition and call a 

PEUGEOT dealer.

Handbrake/Brake 

fluid level/EBFD

lit.

handbrake applied or not released 

correctly.

lit.

remaining on, 

even though the 

level is correct and 

associated with the 

ABS warning light.

failure of the electronic brake force 

distribution.

Releasing the handbrake switches off the warning light. 

Chapter 2, "Starting and stopping" section.

Top up using a fluid recommended by PEUGEOT.

You must stop, park, switch off the ignition and call a 

PEUGEOT dealer.

low brake fluid level.

Engine oil 

pressure

lit while driving.

remaining on, even 

though the level is 

correct.

major fault.

Park, switch off the ignition and allow to cool. Visually check 

the level. Chapter 7, "Levels" section.

Call a PEUGEOT dealer.

insufficient pressure.

Instruments and controls

R

EA

D

to

 SET

 O

FF

25

2

Warning light

is

indicates

Solution - action

Coolant 

temperature and 

level

lit.

abnormal increase in temperature.

Park and switch off the ignition then allow to cool. Visually 

check the level. Chapter 2, "Instruments and controls" section.

Service

lit temporarily.

minor faults or warnings.

remaining on.

Consult the warnings log on the display or on the screen. See 

chapter 4, "RD4/RT4 - Trip computer" section, depending on 

the seriousness of the fault, contact a PEUGEOT dealer.

In the case of a low diesel additive level, see chapter 7, 

"Levels" section.

major faults.

Row 1 seat belt 

not fastened

lit.

flashing, 

accompanied by an 

audible signal of 

increasing volume.

the vehicle is moving with the driver 

or front passenger seat belt not 

fastened.

Pull the strap then insert the tongue in the buckle.

Check that the seat belt is fastened by pulling the strap. 

Chapter 5, "Seat belts" section.

the driver or a front passenger has 

not fastened his seat belt.

flashing.

drop in coolant level.

Chapter 7, "Levels" section. Contact a PEUGEOT dealer.

Front/side/curtain 

air bag

flashing or 

remaining on.

failure of an air bag.

Have the system checked by a PEUGEOT dealer without delay. 

Chapter 5, "Air bags" section.

Front passenger 

air bag disarmed lit.

intentional disarming of this air bag 

in the presence of a rear facing child 

seat.

Chapter 5, "Air bags-children on board" section.

Instruments and controls

26

Warning light

is

indicates

Solution - action

Low fuel level

lit.

flashing.

malfunction of the gauge or cutting 

off of the supply following a serious 

impact.

Fill up with fuel without delay. The evaluation of the fuel 

reserve is a parameter which is sensitive to the style of driving, 

the profile of the road, the time elapsed and the distance 

travelled from the time the warning light comes on.

Restore the supply. Chapter 7, "Fuel" section.

fuel reserve being used.

EOBD emission 

control system

flashing or 

remaining on.

failure of the injection, ignition 

(risk of destruction of the catalytic 

converter in the case of a petrol 

engine) or emission control system.

Have the system checked by a PEUGEOT dealer as soon as 

possible.

Battery charge

lit.

fault in the charging circuit.

Check the battery terminals, … Chapter 8, "Battery" section.

flashing.

placing of the active functions on 

standby (economy mode).

Chapter 8, "Battery" section.

remaining on, in 

spite of the checks.

faulty circuit, injection or ignition 

malfunction.

Call a PEUGEOT dealer.

ABS

remaining on or 

coming on above 

7 mph (12 km/h).

failure of the anti-lock braking 

system.

The vehicle retains conventional braking without assistance  

but you are advised to stop. Call a PEUGEOT dealer.

Instruments and controls

R

EA

D

to

 SET

 O

FF

27

2

Warning light

is

indicates

Solution - action

ESP/ASR

flashing.

wheel skid avoided.

The system optimises drive and permits improvement of the 

directional stability of the vehicle. Chapter 5, "Driving safety" 

section.

remaining on.

system malfunction. E.g.: under-

inflation of the tyres.

Check the pressure of the tyres. Call a PEUGEOT dealer.

remaining on with 

the button (below 

the steering wheel 

on the left) pressed.

deactivation of the system.

Operation of the system is deactivated. Chapter 5, "Driving 

safety" section.

Diesel pre-heating lit.

climatic conditions requiring pre-

heating.

Wait until the warning light is switched off before operating the 

starter.

Dipped 

headlamps/

Daytime lights

lit

manual selection or automatic 

lighting.

Rotate the ring on the lights stalk to the second position.

lighting of the dipped headlamps from 

the time the ignition is switched on 

- daytime lights. Depending on the 

country in which the vehicle is sold.

Chapter 3, "Steering wheel controls" section.

Main beam 

headlamps

pulling of the stalk towards you.

Pull the stalk to return to dipped headlamps.

Direction 

indicators 

flashing with 

buzzer.

change of direction via the lights 

stalk, to the left of the steering 

wheel.

To the Right: control to be pushed upwards. 

To the Left: control to be pushed downwards.

opening of the driver’s door with the 

lights still on.

Rotate the ring on the lights stalk to position 0.

and with an audible 

signal, ignition off.

Instruments and controls

28

Warning light

is

indicates

Solution - action

Rear fog lamps

lit.

manual selection.

The fog lamps only operate if the side lights or dipped 

headlamps are on. In conditions of normal visibility, take care 

to switch them off on penalty of being booked. "This light is a 

dazzling red."

Cruise control

lit.

cruise control selected.

Manual selection. Chapter 3, "Steering wheel controls" section.

Speed limiter

lit.

speed limiter selected.

Manual selection. Chapter 3, "Steering wheel controls" section.

Service spanner

lit.

service due shortly.

Refer to the list of checks in the servicing booklet. 

Have the service carried out by a PEUGEOT dealer.

Automatic 

gearbox

displayed.

gear lever position selected.

Chapter 2, "Instruments and controls" section.

Display

is

indicates

Solution - action

Particle emission 

filter saturation 

warning

displayed and 

associated with 

the service 

warning light.

malfunction of the particle emission 

filter (diesel additive level, risk of 

clogging, ...).

Have the filter checked by a PEUGEOT dealer. 

Chapter 7, "Levels" section.

Front fog lamps

lit.

manual selection.

The fog lamps only operate if the side lights or dipped 

headlamps are on.

Instruments and controls

R

EA

D

to

 SET

 O

FF

29

2

Wait for the engine to cool before 

topping up the level.

The cooling system is pressurised.

In the event of a breakdown and in order to 

avoid any risk of scalding, unscrew the cap 

two turns to allow the pressure to drop.

When the pressure has dropped, remove the 

cap and top up the level.

Contact

 a PEUGEOT dealer.

COOLANT TEMPERATURE INDICATOR

In zone


A, the temperature is correct.

In zone 

B, the temperature is too high. 

The central 

STOP warning light and the 

maximum coolant temperature warning 

light 

1 come on, accompanied by an audible 

signal and the message

 "Engine coolant 

temp. too high" on the display. 

You must stop immediately.

With monochrome screen

With colour screen

INSTRUMENT PANEL DISPLAY 

After switching on the ignition, three 

functions are shown in succession:

- service indicator,

- engine oil level indicator (see 

corresponding section),

- total distance recorder (total and trip 

distances).

It also displays the automatic gearbox 

positions and programmes selected (see 

opposite).

The total and trip distances are 

displayed for thirty seconds, when 

the ignition is switched off, on opening the 

driver’s door as well

 as on locking and 

unlocking the vehicle.

Instruments and controls

30

Service indicator

The display, located in the control block, 

informs you when the next service will be 

due in accordance with the "Manufacturer’s" 

servicing schedule indicated in the servicing 

booklet. This information is determined in 

relation to the distance travelled since the 

previous service.

Refer to the list of checks in the 

servicing booklet which was given to 

you on delivery of the vehicle. If necessary, 

refer to the site:  

http://public.infotec.peugeot.com.

Operation
A few moments after the ignition has been 

switched on, the spanner indicating a 

service operation lights up; the display for 

the total distance recorder tells you (in round 

figures) the distance remaining before the 

next service.

The points at which a service is due are 

calculated from the last indicator zero reset.

The point at which a service is due is 

determined by the distance travelled.

A few seconds after the ignition is switched 

on, the oil level is displayed, then the total 

distance recorder resumes normal operation 

showing the total and trip distances.

The distance remaining before the next 

service is less than 500 miles/1 000 km
Each time the ignition is switched on and 

for a few seconds, the spanner flashes and 

the number of miles/kilometres remaining is 

displayed:

A few seconds after the ignition is switched 

on, the oil level is displayed, then the total 

distance recorder resumes normal operation 

and the spanner remains lit. This indicates 

that a service should be carried out shortly.

The service is overdue
Each time the ignition is switched on and for 

a few seconds, the spanner flashes and the 

excess distance is displayed.

With the engine running the spanner 

remains lit until the service has been 

carried out.

The distance remaining may be weighted 

by the time factor, depending on the user’s 

driving habits. 

The spanner may also light when the two 

year time limit has been exceeded.

Example: 4 800 miles/km remain before 

the next service is due. When the ignition 

is switched on and for a few seconds, the 

display shows:

Instruments and controls

R

EA

D

to

 SET

 O

FF

31

2

Zero re-set

Your PEUGEOT dealer carries out this 

operation after each service. 

However, if you carry out the service 

yourself, the re-set procedure is as follows:

 Switch off the ignition,

 Press and hold the trip recorder re-set 

button,

 Switch on the ignition.

The display begins a countdown.

When the display shows 

"=0", release the 

button; the spanner disappears.

Engine oil level indicator

When the ignition is switched on, the engine 

oil level is indicated for a few seconds, after 

the service information.

Oil level correct

Lack of oil
Flashing of 

"OIL", linked 

with the service warning 

light, accompanied by 

an audible signal and a 

message on the display, indicates a lack of 

oil which could damage the engine.

If the lack of oil is confirmed by a check 

using the dipstick, it is essential that the 

level is topped up.

Oil level gauge fault
Flashing of 

"OIL --" 

indicates a malfunction 

of the engine oil level 

gauge.

Contact a PEUGEOT dealer.

Dipstick
A
 = maximum, never exceed 

this level as a surplus of oil may 

damage the engine.

Contact a PEUGEOT dealer 

without delay.

B = minimum, top up the level via 

the oil filler cap, using the type of 

oil suited to your engine.

Trip recorder zero reset 

button
With the ignition on, press the 

button until the zeros appear. 

Lighting rheostat
With the lights on, press the 

button to vary the intensity of 

the lighting of the instruments 

and controls. When the lighting 

reaches the minimum (or maximum) setting, 

release the button then press it again to 

increase (or reduce) the brightness.

As soon as the lighting is of the required 

brightness, release the button.

The level read will only be correct 

if the vehicle is on level ground and 

the engine has been off for more than 

15 minutes.

After this operation, if you wish to 

disconnect the battery, lock the vehicle 

and wait for at least five minutes, otherwise 

the zero re-set will not be registered.

Gearboxes and steering wheel

32

GEARBOXES AND STEERING WHEEL

Park: position of the lever when 

parked.

To immobilise the vehicle or start 

the engine.

Drive: position of the lever while 

driving.

To move the vehicle forwards in 

automatic mode.

Reverse: position of the lever in 

reverse gear.

To reverse the vehicle.

Neutral: position of the lever in 

neutral.

To park the vehicle (handbrake 

on) and start the engine.

Manual 1, 2, 3, 4: selection of the 

gears by pressing the gear lever.

To move the vehicle forwards in 

manual mode.

AUTOMATIC GEARBOX

The four-speed "Porshe Tiptronic-system" 

automatic gearbox offers a choice between:

- the comfort of 

integral automatic 

operation, enhanced by a snow 

programme,

- or the pleasure of 

manual gear changing.

Gear selection gate


Move the lever in the gate to select a 

position. 

Once the position is selected, the 

corresponding indicator light appears on 

the instrument panel display.

Gearboxes and steering wheel

R

EA

D

to

 SET

 O

FF

33

2

Automatic mode

Automatic changing of the 

four gears.

  Select position 

D.

Moving off


It is essential to press the 

brake pedal to exit position P,


select position 

R or D,

You can also move off from position 

N.

   gradually release the pressure 

on the brake pedal; the vehicle 

moves off immediately.


With your foot on the 

brake, release the 

handbrake,


select position 

RD or M,

  gradually release the pressure 

on the brake pedal; the vehicle 

moves off immediately.

The gearbox always selects the most 

suitable gear according to the following 

parameters:

- the style of driving,

- the road profile,

- the vehicle load.

The gearbox is then operating in auto-

adaptive mode, without any action on your 

part.

For immediate maximum acceleration 

without touching the gear lever, press 

the accelerator pedal down as far as it will 

go to the end of its travel passing the point 

of resistance (kickdown). The gearbox will 

automatically change down or maintain the 

gear selected until maximum engine speed 

is reached.

On a descent, the gearbox will automatically 

change down in order to provide efficient 

engine braking and good re-acceleration.

If you take your foot off the accelerator 

suddenly, the gearbox will not change to a 

higher gear for reasons of safety.

With the engine running, to move off from 

position 

P.

Gearboxes and steering wheel

34

Manual mode

Manual changing of the gears by pressing.

  Select lever position 

M,

   press the lever to the 

+ sign to 

change to a higher gear, from 1 

to 4,

   conversely, press the lever to 

the 

- sign to change to a lower 

gear.

You can change from position 

(automatic mode) to position 

(manual mode) at any time.

It is only possible to change from one gear 

to another if the vehicle speed and engine 

speed permit. If they do not, the vehicle will 

operate temporarily in automatic mode.

When the vehicle is stationary or moving 

very slowly, the gearbox automatically 

selects gear 

1.

The  (snow) programme does not operate 

in manual mode.

Stopping the vehicle, starting the 

engine

Reverse gear

   Select position 

R, with the 

vehicle stationary and the 

engine at idle.

If the battery is flat and the lever is 

in position 

P, it will be impossible to 

change to another position.

   Select position 

P to 

immobilise the vehicle or 

to 

start the engine, with the 

handbrake on or off.

   You can also select position 

N 

to 

park or to start the engine

with the handbrake on.

If position 

N is engaged inadvertently 

while driving, allow the engine to 

return to idle before engaging position 

D to 

accelerate.


Content   ..   1  2  3   ..