Peugeot 508 Dag (2010.5). Instruction - part 13
 

  Index      Peugeot     Peugeot 508 Dag 2010.5 - instruction in english


Search            


Content   ..  11  12  13  14   ..


Peugeot 508 Dag (2010.5). Instruction - part 13


178

i

Practical information

  Putting the wheel back in place 

   Put the box back in place in the centre of 

the wheel and clip it. 

   Put the polystyrene storage box back in 

place.   

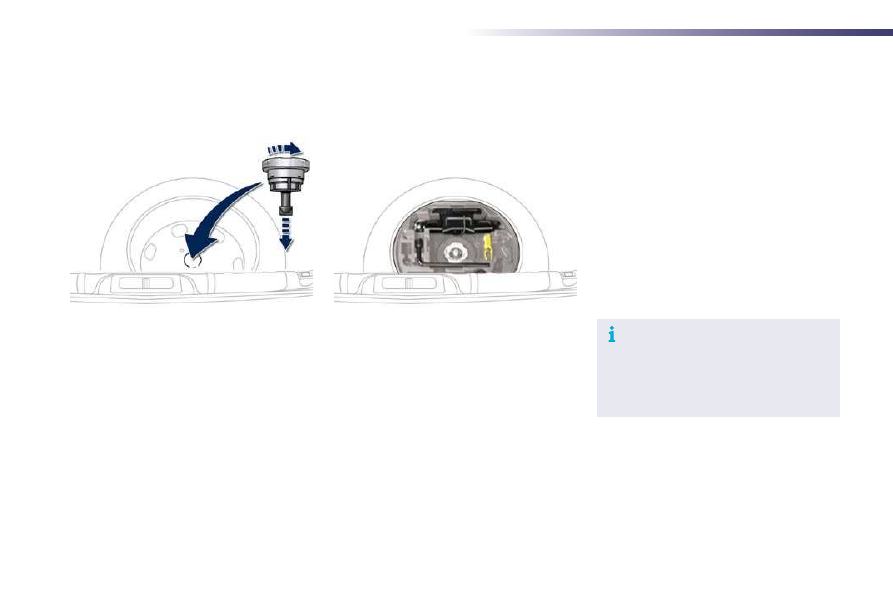
   Put the wheel back in its housing. 
   Unscrew the yellow central bolt by a few 

turns then put it in place in the centre of the 
wheel. 

   Tighten fully until the central bolt clicks to 

retain the wheel correctly. 

  Tyre under-infl ation detection 

 The spare wheel is not fitted with a 
sensor. The punctured wheel must be 
repaired by a PEUGEOT dealer or a 
qualified workshop.   

8

179

i

Practical information

Removing a wheel 

  Parking the vehicle 

 Immobilise the vehicle where it does not 
block traffic: the ground must be level, 
stable and not slippery. 
 Apply the parking brake unless it has 
been programmed to automatic mode, 
switch off the ignition and engage first 
gear *  to block the wheels. 
 Check that the braking warning lamp 
and the  P  warning lamp in the parking 
brake control lever come on. 
 The occupants must get out of the 
vehicle and wait where they are safe. 
 Never go underneath a vehicle raised 
using a jack; use an axle stand.    

  List of operations 

   Remove the bolt cover from each of 

the bolts using the tool  3  (according to 
equipment). 

   Fit the security socket  4  on the wheelbrace  1

to slacken the security bolt (if fitted). 

   Slacken the other bolts using the 

wheelbrace  1  only. 

  *    position  R  for the electronic gear control 

gearbox;  P  for the automatic gearbox.  

180

Practical information

   Place the jack  2  in contact with one of the 

two front  A  or rear  B  locations provided on 
the underbody, whichever is closest to the 
wheel to be changed. 

   Raise the vehicle until there is sufficient 

space between the wheel and the ground 
to admit the spare (not punctured) wheel 
easily. 

   Remove the bolts and store them in a clean 

place. 

   Remove the wheel.    

   Extend the jack  2  until its base plate is in 

contact with the ground. Ensure that the 
centreline of the jack base plate is directly 
below the location  A  or  B  used. 

8

181

i

Practical information

  Fitting a wheel 

  Fitting the "space-saver" 
spare wheel 

 If your vehicle is fitted with alloy wheels, 
when tightening the bolts on fitting, it 
is normal to notice that the washers 
do not come into contact with the 
"space-saver" spare wheel. The wheel 
is secured by the conical surface of 
each bolt.  

  After changing a wheel 

 To store the punctured wheel in the boot 
correctly, first remove the central cover. 
 When using the "space-saver" type 
spare wheel, do not exceed 50 mph 
(80 km/h). 
 Have the tightening of the bolts and the 
pressure of the spare wheel checked 
by a PEUGEOT dealer or a qualified 
workshop without delay. 
 Have the punctured wheel repaired 
and refitted to the vehicle as soon as 
possible.  

  List of operations 

   Put the wheel in place on the hub. 
   Screw in the bolts fully by hand. 
   Pre-tighten the security bolt using the 

wheelbrace  1  fitted with the security 
socket  4 . 

   Pre-tighten the other bolts using the 

wheelbrace  1  only. 

182

Practical information

   Lower the vehicle fully. 

   Fold the jack  2  and detach it. 

   Tighten the security bolt using the 

wheelbrace  1  fitted with the security 
socket  4 . 

   Tighten the other bolts using the 

wheelbrace  1  only. 

   Refit the bolt covers on each of the bolts 

(according to equipment). 

   Store the tools in the box.    

8

183

i

Practical information

            Changing a bulb 

Model with xenon and directional 
headlamps 

1.    Daytime running lamps/sidelamps 

(light emitting diodes - LEDs).

2.    Directional dipped/main beam 

headlamps (D1S-35W).

3.    Direction indicators (PY21-21W).
4.
    Foglamps (directional according to 

version) (H8).

Model with halogen headlamps 

1.    Dipped and main beam headlamps 

(H7-55W).

2.    Sidelamps (W5-5W).
3.
    Main beam headlamps (H7-55W).
4.
    Daytime running lamps (SP13-13W).
5.
    Foglamps (directional according to 

version) (H8).

6.    Direction indicators (PY21-21W).

 For H7 type bulbs with lugs... take care to 
observe their correct installation so as to 
ensure the best lighting performance.   

 In some weather conditions (e.g. low 
temperature or humidity), the presence 
of misting on the internal surface of the 
glass of the headlamps and rear lamps 
is normal; it disappears after the lamps 
have been on for a few minutes.   

184

!

!

Practical information

Dipped beam headlamps 
(halogen model) 

   Remove the protective plastic cover by 

pulling on the tab. 

   Disconnect the bulb connector. 
   Extract the bulb by pulling and change it.  
 For reassembly, carry out these operations in 
reverse order.   

 The headlamps are fitted with 
polycarbonate glass with a protective 
coating: 
    do not clean them using a dry 

or abrasive cloth, nor with a 
detergent or solvent product,

   use a sponge and soapy water, 
   when using a high pressure washer 

on persistent marks, do not direct 
at the lamps or their outlines for 
too long, so as not to damage their 
protective coating and seals.  

  Risk of electrocution 

 Xenon bulbs (D1S-35W) must be 
replaced by a PEUGEOT dealer or a 
qualified workshop.   

   Do not touch the bulb directly with 

your fingers, use lint-free cloths.  

 Changing a bulb should only be done 
after the headlamp has been switched 
off for a few minutes (risk of serious 
burns). 
 It is imperative to use only anti-
ultraviolet (UV) type bulbs in order not 
to damage the headlamp. 
 Always replace a failed bulb with a 
new bulb with the same type and 
specification.  

8

185

i

Practical information

Sidelamps (halogen model) 

   Remove the protective plastic cover by 

pulling on the tab. 

   Unclip the bulb holder. 
   Remove the bulb by pulling it out and 

change it.  

 For reassembly, carry out these operations in 
reverse order.   

       Main beam headlamps (halogen 
model) 

   Remove the protective plastic cover by 

pulling on the tab. 

   Disconnect the bulb connector. 
   Remove the bulb by pulling it out and 

change it.  

 For reassembly, carry out these operations in 
reverse order.   

         Dipped and main beam 
headlamps (xenon model) 

 D1S xenon bulbs must be changed 
by a PEUGEOT dealer or a qualified 
workshop, as there is a risk of 
electrocution. 
 It is recommended that the D1S bulbs 
are changed at the same time when one 
of them fails.   

186

Practical information

lamps 

   Turn the wheel fully inwards for easy 

access to the wheel arch liner. 

   Remove the two fixing screws for the 

access flap, located in the wheel arch. 

   Pull away the wheel arch liner. 

   Turn the bulb holder a quarter of a turn and 

pull it out. 

   Disconnect the bulb holder connector. 
   Pull the bulb and change it.  
 For reassembly, carry out these operations in 
reverse order. 
 You may also contact a PEUGEOT dealer 
or a qualified workshop to have these bulbs 
replaced.   

8

187

Practical information

Direction indicators 

   Lie down under the vehicle. 
   Remove the screws securing the 

underbody shield. 

   Remove the underbody shield. 

   Turn the bulb holder a quarter turn and pull 

it out. 

   Replace the faulty bulb.  
 For reassembly, carry out these operations in 
reverse order. 
 You can also contact a PEUGEOT dealer or a 
qualified workshop for the replacement of these 
bulbs.   

Integrated direction indicator 
side repeaters 

 You should contact a PEUGEOT dealer or a 
qualified workshop for the replacement of these 
bulbs.   

Door mirror spotlamps 

 You should contact a PEUGEOT dealer or a 
qualified workshop for the replacement of the 
light emitting diode - LED.  

188

i

Practical information

1.    Brake lamps/sidelamps 

(light emitting diodes - LEDs).

2.    Reversing lamps (P21W).
3.
    Direction indicators (PY21W amber).
4.
    Sidelamps (light emitting diodes - 

LEDs).

5.    Foglamps (H21W).

Rear lamps (Saloon) 

Reversing lamp, direction 
indicator and foglamp bulbs 

   Open the boot, then the plastic cover. 
   Remove the two lamp unit fixing nuts. 
   Extract the lamp unit carefully from the 

outside. 

   Disconnect the electrical connector. 

   Spread the six tabs and remove the bulb 

holder. 

   Turn the bulb a quarter of a turn and pull it 

out.  

 For reassembly, carry out these operations in 
reverse order.   

   Changing the light emitting 
diode-LED lamps 

 For replacement, contact a PEUGEOT 
dealer or qualified workshop.   

8

189

i

Practical information

    Brake lamps (light emitting diodes - 

LEDs).

2.    Reversing lamps (W19W).
3.
    Direction indicators (PY21W amber).
4.
    Sidelamps (light emitting diodes - 

LEDs).

5.    Foglamps (light emitting diodes - LEDs).

                    Rear lamps (SW) 

   Open the boot then remove the access 

cover. 

   Remove the sealing foam. 
   Disconnect the lamp connector. 
   Remove the lamp fixing nut. 

Direction indicators 
(on the wings) 

   Carefully remove the lamp unit from 

outside. 

   Remove the sealing foam. 
   Unclip the bulb holder. 
   Turn the bulb a quarter of a turn and pull it 

out.  

 For reassembly, carry out these operations in 
reverse order.  

   Changing the light emitting 
diode-LED lamps 

 For replacement, contact a PEUGEOT 
dealer or qualified workshop.   

190

Practical information

  Reversing lamp (tailgate) 

   Open the tailgate and then remove the 

access cover. 

   Disconnect the lamp connector. 
   Remove the lamp fixing nut. 

   Carefully remove the lamp from the 

outside. 

   Remove the sealing foam. 

   Turn the bulb holder a quarter of a turn and 

pull it out.  

 For reassembly, carry out these operations in 
reverse order.   

8

191

Practical information

             Third brake lamp (light emitting 
diodes - LEDs) 

 Contact a PEUGEOT dealer or qualified 
workshop.   

Number plate lamps 

   Insert a thin screwdriver into one of the 

outer holes of the lens. 

   Push it outwards to unclip. 
   Disconnect the lamp connector. 
   Remove the lens. 
   Pull the bulb out and change it.    

192

i

!

Practical information

                     Changing a fuse 

 Procedure for replacing a failed fuse with a new fuse to rectify a failure of the corresponding function. 

 The extraction tweezer and spare fuses are 
located in the glove box.  

  Access to the tools 

 Before changing a fuse, the cause of the failure 
must be identified and rectified. 
   Identify the failed fuse by checking the 

condition of its filament.  

  Changing a fuse 

Good

Failed

   Use the special tweezer to extract the fuse 

from its housing. 

   Always replace the faulty fuse with a fuse 

of the same rating. 

   Check that the number marked on the 

fusebox, the rating marked on the fuse and 
the following tables all agree.  

 PEUGEOT will not accept responsibility 
for the cost incurred in repairing your 
vehicle or for rectifying malfunctions 
resulting from the installation of 
accessories not supplied and not 
recommended by PEUGEOT and 
not installed in accordance with its 
instructions, in particular when the 
combined consumption of all of the 
additional equipment connected 
exceeds 10 milliamperes.   

  Installing electrical 
accessories 

 Your vehicle's electrical system is 
designed to operate with standard or 
optional equipment. 
 Before installing other electrical 
equipment or accessories on your 
vehicle, contact a PEUGEOT dealer or 
a qualified workshop. 

8

193

Practical information

  Dashboard fuses 

 The fusebox is placed in the lower dashboard 
(left-hand side). 

  Access to the fuses 

   Open the hinged switch panel, then apply 

light force to bypass the stops.    

  Fuse   

 N°   

  Rating   

 (A)   

Functions

F6 A or B

15

 Audio system. 

F8

3

 Alarm. 

F13

10

 Front cigar lighter. 

F14

10

 Front 12 V socket. 

F16

3

 Rear courtesy lamp, rear map reading lamps. 

F17

3

 Rear courtesy lamp, courtesy mirror. 

F28 A or B

15

 Audio system. 

F30

20

 Rear wiper. 

F32

10

 Audio amplifier. 


Content   ..  11  12  13  14   ..