Peugeot 308 CC (2014 year). Instruction - part 5
 

  Index      Peugeot     Peugeot 308 CC - instruction 2014 year in english


Search            


Content   ..  3  4  5  6   ..


Peugeot 308 CC (2014 year). Instruction - part 5


4

!

i

ACCESS

308CC_EN_CHAP04_OUVERTURES_ED01-2013

       Locating your vehicle 

      Press the closed padlock 

to locate your locked ve-

hicle in a car park.  

  Electronic  engine  immobiliser 
 

The key contains an electronic chip 

which has a special code. When the 

ignition is switched on, this code must 

be recognised in order for starting to be 

possible. 

 This electronic engine immobiliser locks 

the engine management system a few 

minutes after the ignition is switched off 

and prevents starting of the engine by 

anyone who does not have the key.  

             Anti-theft protection 

  In the event of a fault, you are 

informed by illumination of this 

warning lamp, an audible signal 

and a message in the screen. 

 In this case, your vehicle will not start; 

contact a PEUGEOT dealer as soon as 

possible.  

 This is indicated by lighting of the cour-

tesy lamps and side spotlamps and 

fl ashing of the direction indicators for a 

few  seconds.  

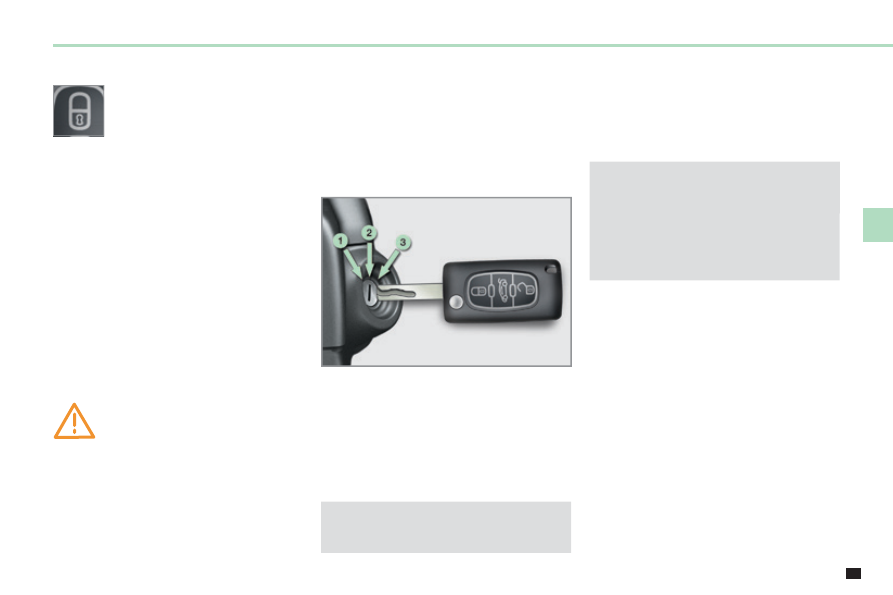
          Starting the vehicle 

      Insert the key in the ignition switch.  


The system recognises the starting 

code. 

     Turn the key fully towards the dash-

board to position  

3 (Starting) . 

   

 When the engine starts, release 

the  key.   

  Switching the vehicle off 

      Immobilise the vehicle. 

     Turn the key fully towards you to po-

sition  

1 (Stop) . 

    Remove the key from the ignition 

switch.   

  Switching off the engine leads to a 

loss of braking assistance.  

  Keep safely, away from your vehicle, 

the label attached to the keys given to 

you on acquisition of the vehicle.   

 If the key has been left in the igni-

tion switch at position  

2 (Ignition 

on) , the ignition will be switched off 

automatically after one hour. 

 To switch the ignition back on, turn 

the key to position  

1 (Stop) ,  then 

back to position  

2 (Ignition on) .   

           Key left in the "Ignition on" position 
 On opening the driver's door, an alert 

message is displayed, accompanied by 

an audible signal, to remind you that the 

key is still in the ignition switch at posi-

tion  

1 (Stop) . 

4

64

ACCESS

308CC_EN_CHAP04_OUVERTURES_ED01-2013

                Remote control problem 

 Following disconnection of the vehicle 

battery, replacement of the remote con-

trol battery or in the event of a remote 

control malfunction, you can no longer 

unlock, lock or locate your vehicle. 

      First of all, use the key in the lock to 

unlock or lock your vehicle. 

     Then, reinitialise the remote control.  

  Changing  the  battery  

  Battery ref.: CR1620 / 3 volts.  

  Reinitialisation 
      Switch off the ignition. 

     Turn the key to position  

2 (Ignition 

on) . 

     Press the closed padlock immedi-

ately for a few seconds. 

     Switch off the ignition and remove 

the key from the ignition switch.  

 The remote control is fully operational 

again.  

      Unclip the casing using a coin at the 

notch. 

     Slide the fl at battery out of its loca-

tion. 

     Slide the new battery into its loca-

tion observing the original direction. 

     Clip the casing. 

     Reinitialise  the  remote  control.    

  If the battery is fl at, you are in-

formed by illumination of this 

warning lamp, an audible signal 

and a message. 


If the problem persists, contact a 

PEUGEOT dealer as soon as possible.  

4

!

65

ACCESS

308CC_EN_CHAP04_OUVERTURES_ED01-2013

               Lost keys 

 Go to a PEUGEOT dealer with the vehicle's registration document, your 

p ersonal identifi cation documents and if possible the key code label. 

 The PEUGEOT dealer will be able to look up the key code and the transpon-

der code required to order a new key.  

         Do not throw the remote control 

batteries away, they contain metals 

which are harmful to the environ-

ment. 

 Take them to an approved collec-

tion point. 

  Remote  control 

 The high frequency remote control is a sensitive system; do not operate it while it is in your 

pocket as there is a possibility that it may unlock the vehicle, without you being aware of it. 

 Do not repeatedly press the buttons of your remote control out of range and out of sight of 

your vehicle. You run the risk of stopping it from working and the remote control would have 

to be reinitialised. 

 No remote control can operate when the key is in the ignition switch, even when the ignition 

is switched off, except for reinitialisation.  

  Locking  the  vehicle 

 Driving with the doors locked may make access to the passenger compart-

ment by the emergency services more diffi cult in an emergency. 

 As a safety precaution, never leave children alone in the vehicle, except for a 

very short period. 

 In all cases, it is essential to remove the key from the ignition switch when 

leaving the vehicle.  

  Anti-theft  protection 

 Do not make any modifi cations to the electronic engine immobiliser system; 

this could cause malfunctions.  

  When purchasing a second-hand vehicle 

 Have the pairing of all of the keys in your possession checked by a PEUGEOT 

dealer, to ensure that only your keys can be used to open and start the vehicle.  

4

!

i

66

ACCESS

308CC_EN_CHAP04_OUVERTURES_ED01-2013

ALARM 

 System which protects and provides a de-

terrent against theft and break-ins. It pro-

vides the following types of monitoring.  

  Locking the vehicle with full 

alarm system 

 For all work on the alarm system, 

contact a PEUGEOT dealer or a 

qualifi ed workshop.  

  Activation 
      Switch off the ignition and get out of 

the vehicle. 

     Press the locking button on the re-

mote  control.  

 The monitoring system is active: the in-

dicator lamp in the button fl ashes once 

per second. 

 After the locking button on the remote 

control is pressed, the exterior perime-

ter monitoring is activated after a delay 

of 5 seconds and the interior volumetric 

monitoring after a delay of 45 seconds. 

  -  Exterior  perimeter 
 The system checks for opening of the 

vehicle. 

 The alarm is triggered if anyone tries to 

open a door, the boot, the bonnet...    

  -  Interior  volumetric 
 The system checks for any variation in the 

volume in the passenger compartment. 

 The alarm is triggered if anyone breaks a 

window, enters the passenger compart-

ment or moves inside the vehicle.    

  Self-protection  function 
 The system checks for the putting out of 

service of its components. 

 The alarm is triggered if the battery, the 

central control or the wires of the siren 

are put out of service or damaged.  

  Deactivation 
      Press the unlocking button on the 

remote  control.  

 The alarm system is deactivated: the in-

dicator lamp in the button goes off.   


If an opening (door, boot...) is 

not closed fully, the vehicle is not 

locked but the exterior perimeter 

monitoring will be activated after 

a delay of 45 seconds at the same 

time as the interior volumetric mon-

itoring. 

 If a door or the boot is not opened 

after unlocking the vehicle, the 

v ehicle will lock itself again auto-

matically after thirty seconds but 

without reactivating the alarm.  

4

!

i

67

ACCESS

308CC_EN_CHAP04_OUVERTURES_ED01-2013

  Triggering of the alarm 


The monitoring functions remain 

active until the alarm has been trig-

gered eleven times in succession. 

 When the vehicle is unlocked using 

the  remote  control,  rapid  fl ashing 

of the indicator lamp in the button 

informs you that the alarm was trig-

gered during your absence. When 

the ignition is switched on, this 

fl ashing stops immediately.   

  Failure of the remote control 

 To deactivate the monitoring functions: 

  Locking the vehicle without 

activating the alarm 

       Unlock the vehicle using the key in 

the driver's door lock. 

   

 Open the door; the alarm is trig-

gered. 

   

 Switch on the ignition; the alarm 

stops. The indicator lamp in the but-

ton  goes  off.    

       Lock or deadlock the vehicle using 

the key in the driver's door lock.    


To be effective, this deactivation 

must be carried out each time the 

ignition is switched off. 

 In  "cabriolet"  confi guration,  interior 

volumetric monitoring is deactivated 

automatically.  

  Deactivation of the interior 

volumetric monitoring 
      Switch off the ignition. 

     Within ten seconds, press the but-

ton until the indicator lamp is on 

continuously. 

     Get out of the vehicle. 

     Press the locking button on the re-

mote control immediately.  

 The exterior perimeter monitoring alone 

is activated: the indicator lamp in the 

button fl ashes once per second. 

  Locking the vehicle with exterior 

perimeter monitoring only 

 Deactivate the interior volumetric moni-

toring to avoid unwanted triggering of 

the alarm in certain cases such as: 

   -   leaving a pet in the vehicle, 

  -   leaving a window partially open, 

  -  

washing  your  vehicle.  

  Reactivation of the interior 

volumetric monitoring 
      Press the unlocking button on the 

remote control to deactivate the ex-

terior perimeter monitoring. 

     Press the locking button on the re-

mote control to activate all the moni-

toring  functions.  

 The indicator lamp in the button again 

fl ashes once per second.   

  This is indicated by sounding of the si-

ren and fl ashing of the direction indica-

tors for thirty seconds. 

  Operating  fault 

  When the ignition is switched on, fi xed 

illumination of the indicator lamp in the 

button indicates a fault with the system. 

 Have it checked by a PEUGEOT dealer 

or a qualifi ed workshop.   

  Automatic  activation *  

  2 minutes after the last door or the boot 

is closed, the system is activated auto-

matically. 

      To avoid triggering the alarm on en-

tering the vehicle, fi rst press the un-

locking button on the remote control.    

  *    Depending  on  country  of  sale.  

4

i

i

68

ACCESS

308CC_EN_CHAP04_OUVERTURES_ED01-2013

  The rear windows do not have an 

automatic mode or safety anti-

pinch function for closing. 


The electric window controls re-

main operational for about 45 sec-

onds after switching off the ignition 

or until the vehicle is locked after 

opening a door. 

 if it is not possible to operate the 

passenger's window from the driv-

er's control panel, carry out the 

peration from the passenger's 

door  panel.  

ELECTRIC WINDOWS 

 Fitted with an anti-pinch system on the 

front windows and a system which con-

trols all four windows on all models. 


1.    Driver's electric window.  


2.    Passenger's electric window.  


3.    Rear right electric window.  


4.    Rear left electric window.  


5.    Deactivation of electric windows 

at the rear.   

 If the window opens unintentionally 

when closing is requested (for ex-

ample, in the presence of ice): 

      press the switch until the win-

dow opens completely, 

     then pull the switch immediately 

until the window closes, 

     continue to pull the switch for 

approximately three seconds 

after the window has closed.  


The safety anti-pinch function is 

not active during these opera-

tions.    

  Front windows safety anti-pinch 
 In automatic mode, when the front win-

dow rises and meets and obstacle it 

stops and partially lowers again. 

   -  


automatic mode   

      Press or pull switch  

1  fully. The win-

dow opens or closes completely 

when the switch is released. 

     Pressing the switch again stops the 

movement of the window.  

  One-touch  electric  windows 

 You have two options: 

   -  


manual mode   

      Press or pull switch  

1   gently.  The 

window stops as soon as the switch 

is  released.  

  Deactivation of the electric 

windows at the rear 

    

 For the safety of your children, 

press switch  

5  to deactivate the rear 

electric window switches regardless 

of their position.  

 When the indicator lamp is on, the rear 

switches are deactivated. 

 When the indicator lamp is off, the rear 

switches are activated.  

4

!

i

i

69

ACCESS

308CC_EN_CHAP04_OUVERTURES_ED01-2013

 This procedure reinitialises the op-

eration of the electric windows and 

the automatic partial opening of the 

door windows 

  Switch for all four windows 

 This switch opens or closes all of the 

windows at once. 

  Always remove the key from the 

ignition when leaving the vehicle, 

even for a short time. 

 In the event of contact during op-

eration of the windows, you must 

reverse the movement of the win-

dow. To do this, press the switch 

concerned. 

 When the driver operates the pas-

senger electric window switches, 

he must ensure that no one is pre-

venting correct closing of the win-

dows. 


The driver must ensure that the 

passengers use the electric win-

dows correctly. 

 Be aware of children when operat-

ing  the  windows.   

  Reinitialisation 

 Following reconnection of the battery or 

in the event of a malfunction you must 

reinitialise the operation of the electric 

windows. For each of the controls on 

the control pad on the driver's side: 

      release the switch and pull it again 

until it closes completely, 

   

 hold the switch for approximately 

three seconds after closing, 

     press the switch to lower the win-

dow automatically, 

     when the window has reached the 

low position, press the switch again 

for approximately one second.  


The safety anti-pinch function is not 

active during these operations.  

      Press switch  

6  and release it. The 

windows open completely. 

     Pressing the switch again stops the 

movement of the windows.  

 or 

      Pull switch  

6  and hold it in this posi-

tion. The windows close completely. 

     If you release the switch before the 

windows have closed completely, 

the windows stop.  

 This switch is operated under the 

full responsibility of the driver.  

4

!

i

i

i

i

70

ACCESS

308CC_EN_CHAP04_OUVERTURES_ED01-2013

DOORS 

    

 After unlocking the vehicle com-

pletely using the remote control or 

the key, take hold of the door handle 

then pull it.  


The window lowers automatically by 

a few millimetres to permit opening 

of the door.  

   From  inside 

    

 Pull the door control to open the 

door; this unlocks this vehicle com-

pletely.  


The window lowers automatically by 

a few millimetres to permit opening 

of  the  door.    

 The interior door controls do not 

operate when the vehicle is dead-

locked. 

 If you leave the door open for more 

than one minute, the window rises 

again. 

 Pull the handle again to reactivate 

the  system.  

  Opening 

  From  outside 

 When the selective unlocking is ac-

tivated, the fi rst press of the remote 

control unlocking button permits 

unlocking of the driver's door only. 

 With the selective unlocking acti-

vated: 

   -  

the  driver's  door  control  unlocks 

the driver's door only, 

  -  

the  passenger's  door  control 

unlocks the passenger's door 

and the boot.  

  In freezing conditions, the presence 

of ice may hinder the automatic par-

tial opening of the window; remove 

the ice which may have formed along 

the lower seal, located at the base of 

the  window.   

4

i

i

!

!

!

71

ACCESS

308CC_EN_CHAP04_OUVERTURES_ED01-2013

  When  locking/deadlocking  from 

outside 
 

When the vehicle is locked or 

deadlocked from the outside, the 

red indicator lamp fl ashes and the 

button is inactive. 

      For normal locking, pull the in-

terior door control to open the 

vehicle. 

    For deadlocking, you have to 

use the remote control or the 

key to unlock the vehicle.    

             Central locking control 


System which provides full manual 

locking or unlocking of the doors and 

boot from the inside. 

  Locking 
      Press this button to lock the vehicle.  


The red indicator lamp in the button 

comes on. 

 If one of the doors or the boot is 

open, the central locking from the 

inside does not take place. 

  Unlocking 
      Press this button again to unlock the 

vehicle.  


The red indicator lamp in the button 

goes  off.  

  Closing 

 The window rises automatically after a 

few seconds and adjusts to provide per-

fect sealing when closed. 

   -  


when the engine is run-

ning 

, this warning lamp 

comes on, accompanied by 

a message in the screen for 

a few seconds, 

 When washing your vehicle: 

   -   fi rst  lock  the  vehicle  using  the 

remote control or the key, 

  -   avoid spraying the upper part of 

the windows, 

  -   keep the end of the high pres-

sure nozzle at least 1 metre 

from the windows and door 

seals.   

 When a door is not closed correctly: 

 Be aware of the risk of pinching 

when the window rises automati-

cally on closing the door. 

 The glove box and the front arm-

rest compartment are not locked so 

that they remain accessible.  

  -  


when the vehicle is moving   (speed 

higher than 6 mph (10 km/h)), this 

warning lamp comes on, accompanied 

by an audible signal and a message in 

the screen for a few seconds.  

4

!

72

ACCESS

308CC_EN_CHAP04_OUVERTURES_ED01-2013

  Activation 

    

 Press this button for more than 

two  seconds.  

 A confi rmation message appears in the 

multifunction  screen.  

  Deactivation 
    

 Press this button again for more 

than two seconds.  

 A confi rmation message appears in the 

multifunction  screen.   

          Emergency locking 

 To lock or unlock the doors mechani-

cally in the event of a central locking 

system failure or fl at battery. 

      Using the key, remove the black cap 

on the edge of the door. 

     Insert the key in the cavity without 

forcing, then without turning it, move 

the the latch sideways towards the 

interior of the door. 

     Remove the key and refi t the cap.   

  Locking the driver's door 
      Insert the key in the lock, then turn it 

to  the  right.   

  Unlocking the driver's door 
      Insert the key in the lock, then turn it 

to  the  left.   

  Locking the passenger door 

  Unlocking the passenger door 
      Pull the interior door opening control.    

 If one of the doors is open, the au-

tomatic central locking does not 

take place. 

 If the boot is open, the automatic 

central locking of the doors is active.  

  Anti-intrusion  security 

 System which provides full automatic lock-

ing or unlocking of the doors and boot while 

driving. 

 You can activate or deactivate this function. 

  Unlocking 
      Above 6 mph (10 km/h), press this 

button to unlock the doors and boot 

temporarily.   

  Locking 
 

When the speed exceeds 6 mph 

(10 km/h), the doors and boot lock au-

tomatically. 

4

i

i

73

ACCESS

308CC_EN_CHAP04_OUVERTURES_ED01-2013

  Unlocking and partially opening 

the boot 

BOOT 

  Boot  anti-theft  protection 

 The boot is designed to remain secure, 

even  in  the  "cabriolet"  confi guration,  if 

the vehicle is locked. 

 So, when the vehicle is locked and the 

roof is open, the boot cannot be un-

locked: 

   -   by means of the interior door open-

ing control, 

  -   by pressing the manual central lock-

ing control  

A , when the key is not in 

the  ignition  switch.   

  Opening 

      After unlocking the boot or the ve-

hicle using the remote control or the 

key, press the opening control, then 

raise the boot lid.  

 When selective unlocking is acti-

vated, the boot can also be opened 

by a second press on the open 

padlock on the remote control. 

     Press this button for more 

than two seconds to un-

lock the boot. The boot 

opens  slightly.  

 This action also unlocks the doors.  

 If a battery failure occurs, the boot 

is locked. Contact a PEUGEOT 

dealer or a qualifi ed workshop.  

  Closing 

      Lower the boot lid to the horizontal 

position, using one of the interior 

grab handles. 

     Press fi rmly on the boot lid, over the 

third brake lamp, guiding it down un-

til fully closed.  

 If the boot lid is not closed correctly: 

   -  


when the engine is running , 

this warning lamp comes on, 

accompanied by a message in 

the screen for a few seconds, 

  -  


when the vehicle is moving   (speed 

above 6 mph (10 km/h)), this warn-

ing lamp comes on, accompanied 

by an audible signal and a message 

in the screen for a few seconds.   

4

i

!

74

ACCESS

308CC_EN_CHAP04_OUVERTURES_ED01-2013

  The key cannot be removed from 

the lock until the cap is put back on 

the tank. 


Opening the cap may trigger an 

inrush of air. This vacuum, which 

is completely normal, is caused by 

the sealing of the fuel system.  

FUEL  TANK  

  To fi ll the tank safely: 

       

the engine must be switched off,  

     open the fuel fi ller fl ap, 

     insert the key in the cap, then turn it 

to  the  left,   

  When refuelling is complete: 

      put the cap back in place, 

    turn the key to the right, then re-

move it from the cap, 

     close the fi ller fl ap.    

       remove the cap and secure it on the 

hook, located on the inside of the 

fl ap, 

     fi ll the tank, but  

do not continue af-

ter the 3rd cut-off of the nozzle ; 

this could cause malfunctions.   


Capacity of the tank: approximately 

60 litres.    

  Refuelling 

 A label affi xed to the inside of the fi ller 

fl ap reminds you of the type of fuel to be 

used according to your engine. 

 More than 5 litres of fuel must be add-

ed in order to be registered by the fuel 

gauge. 

 When the low fuel level is reached, 

this warning lamp comes on in the 

instrument panel, accompanied by 

an audible signal and a message 

in the multifunction screen. When the lamp 

fi rst  comes  on,  there  is   

approximately  


6 litres  of fuel remaining. 

 Until  suffi cient  fuel  has  been  added,  this 

warning lamp appears every time the ig-

nition is switched on, accompanied by an 

audible signal and a message. When driv-

ing, this audible signal and message are 

repeated with increasing frequency, as the 

fuel level drops towards  

"0" . 

  Operating  fault 

 A malfunction of the fuel gauge is indi-

cated by the return to zero of the fuel 

gauge needle. 

 Have it checked by a PEUGEOT dealer 

or a qualifi ed workshop.  

       With Stop & Start, never refuel with 

the system in STOP mode; you 

must switch off the ignition with the 

key.  

  Low  fuel  level 

  You must refuel to avoid running out of 

fuel. 

 If you run out of fuel (Diesel), refer also 

to the "Checks" section.   

4

i

i

75

ACCESS

308CC_EN_CHAP04_OUVERTURES_ED01-2013

           Quality of the fuel used for 

petrol engines 

  The petrol engines are perfectly com-

patible with E10 or E24 type petrol 

biofuels (containing 10 % or 24 % etha-

nol), conforming to European standards 

EN 228 and EN 15376. 

 E85 type fuels (containing up to 85 % 

ethanol) are reserved exclusively for ve-

hicles marketed for the use of this type 

of fuel (BioFlex vehicles). The quality of 

the ethanol must comply with European 

standard EN 15293. 


For Brazil only, special vehicles are 

marketed to run on fuels containing up 

to 100 % ethanol (E100 type).   

             Quality of the fuel used for 

Diesel engines 

  The Diesel engines are perfectly com-

patible with biofuels which conform to 

current and future European standards 

(Diesel fuel which complies with stan-

dard EN 590 mixed with a biofuel which 

complies with standard EN 

14214) 

available at the pumps (containing up 

to 7 % Fatty Acid Methyl Ester). 

MISFUEL PREVENTION 

(DIESEL) *  

 Mechanical  device  which  prevents  fi ll-

ing the tank of a Diesel vehicle with 

petrol. It avoids the risk of engine dam-

age that can result from fi lling with the 

wrong fuel. 

 Located  in  the  fi ller  neck,  the  misfuel 

prevention device appears when the 

fi ller cap is removed. 

  Operation 

 It remains possible to use a fuel 

can to fi ll the tank.  

In  order  to  ensure  a  good  fl ow  of 

fuel, do not place the nozzle of the 

fuel can in direct contact with the 

fl ap  of  the  misfuel  prevention  de-

vice and pour slowly. 

 When a petrol fi ller nozzle is introduced 

into  the  fuel  fi ller  neck  of  your  Diesel 

vehicle, it comes into contact with the 

fl ap.  The  system  remains  closed  and 

prevents fi lling. 


Do not persist but introduce a Diesel 

type fi ller nozzle.   

   Travelling  abroad 
 As Diesel fuel pump nozzles may 

be different in other countries, the 

presence of the misfuel prevention 

device may make refuelling impos-

sible. 


Before travelling abroad, we rec-

ommend that you check with the 

PEUGEOT dealer network, whether 

your vehicle is suitable for the fuel 

pumps in the country in which you 

want to travel.   

 The B30 biofuel can be used in cer-

tain Diesel engines; however, this use 

is subject to strict application of the 

special servicing conditions. Contact a 

PEUGEOT  dealer  or  a  qualifi ed  work-

shop. 

 The use of any other type of (bio)fuel 

(vegetable or animal oils, pure or dilut-

ed, domestic fuel...) is strictly prohibited 

(risk of damage to the engine and fuel 

system).   

  *    According  to  country  of  sale.  

5

76

VISIBILITY

EXTERIOR LIGHTING 

CONTROLS 

 Control stalk for the selection and con-

trol of the various front and rear lamps 

providing the vehicle's lighting. 

  Main  lighting 

 The various front and rear lamps of the 

vehicle are designed to adapt the driv-

er's visibility progressively in relation to 

the climatic conditions: 

   -  

sidelamps,  to  be  seen, 


  dipped beam headlamps to see 

without dazzling other drivers, 

  -  

main beam headlamps to see clearly 

when the road is clear.   

  Additional  lighting 

 Other  lamps  are  fi tted  to  fulfi l  the  re-

quirements of particular driving condi-

tions: 

   -   a rear foglamp to be seen from a 

distance, 

  -   front foglamps for even better for-

ward vision, 

  -  

directional  headlamps  for  improved 

visibility when cornering, 

  -   daytime running lamps to be seen 

during  the  day.   

  Settings 

 Various automatic lighting control modes 

are also available depending on options: 

   -  

daytime  running  lamps, 

  -  

automatic  illumination  of  headlamps, 

  -  

directional  lighting, 

  -  

guide-me-home  lighting.   

  Manual  controls 

      Automatic illumination of 

headlamps. 

 The lighting is controlled directly by the 

driver by means of the ring  

A  and the 

stalk  

B . 

 Lamps  off.  

 Sidelamps. 


B.   Stalk for switching headlamps: pull 

the stalk towards you to switch the 

lighting between dipped and main 

beam headlamps. 

 In the lamps off and sidelamps modes, 

the driver can switch on the main beam 

headlamps temporarily ("headlamp 

fl ash") by maintaining a pull on the stalk. 


Dipped headlamps or 

main beam headlamps. 

  Displays 

 Illumination of the corresponding indi-

cator lamp in the instrument panel con-

fi rms that the lighting selected is on.  


A. 


Main lighting mode selection ring: 

turn it to position the symbol required 

facing the mark. 

5

!

i

i

77

VISIBILITY

   Front  and  rear  foglamps. 

 Press, turning ring  

C : 

      forwards once to switch on the front 

foglamps, 

     forwards again to switch on the rear 

foglamp, 

     rearwards once to switch off the rear 

foglamp, 

   

 rearwards again to switch off the 

front  foglamps.  

      In good or rainy weather, both day 

and night, the front foglamps and 

the rear foglamp are prohibited. In 

these situations, the power of their 

beams may dazzle other drivers. 

They should only be used in fog or 

snow. 

 In these weather conditions, it is 

your responsibility to switch on the 

foglamps and dipped beam head-

lamps manually as the sunshine 

sensor may detect suffi cient light. 

 Do not forget to switch off the front 

foglamps and the rear foglamp 

when they are no longer necessary.  

  Switching off the lamps when 

the ignition is switched off 
 

On switching off the ignition, all 

of the lamps turn off immediately,

except for dipped beam if guide-

me-home lighting is activated.  


C.   Foglamp selection ring. 

 The foglamps operate with the dipped 

and main beam headlamps. 

 In some weather conditions (e.g. 

low temperature or humidity), the 

presence of misting on the internal 

surface of the glass of the head-

lamps and rear lamps is normal; 

it disappears after the lamps have 

been on for a few minutes.   

  Switching on the lamps after the 

ignition is switched off 
 To reactivate the lighting control, ro-

tate ring  

A  to the  "0"  position - lamps 

off, then to the desired position. 

 On opening the driver's door a tem-

porary audible signal warns the 

driver that the lighting is on. 

 The lamps, with the exception of 

the sidelamps, switch off automati-

cally after a maximum duration of 

thirty minutes to prevent discharg-

ing of the battery.   

 When the lighting is switched off au-

tomatically (with AUTO model) or 

when the dipped beam headlamps 

are switched off manually, the front fo-

glamps and the sidelamps will remain 

on. 

      Turn the ring rearwards to switch off 

the front foglamps, the sidelamps 

will  then  switch  off.    

5

78

VISIBILITY

       Manual guide-me-home lighting 


The temporary illumination of the 

dipped beam headlamps after the ve-

hicle's ignition has been switched off 

makes the driver's exit easier when the 

light is poor. 

  Switching  on 
      With  the  ignition  off,  "fl ash"  the 

headlamps using the lighting stalk. 

     A further "headlamp fl ash" switches 

the  function  off.   

  Switching  off 
 

The manual guide-me-home lighting 

switches off automatically after a set 

time.   

       Daytime running lamps 

 Daytime lighting, compulsory in certain 

countries, which comes on automati-

cally when the engine is started making 

the vehicle more visible to other users. 

  This function is assured: 

   -   in countries where it is imposed by 

regulations,  


by illumination of the dipped beam 

headlamps with the sidelamps and 

number plate lamps; this function 

cannot be deactivated. 

  -   for other countries where it is pro-

vided,  


by the use of dedicated light emit-

ting diode (LED) lamps; this function 

can be activated or deactivated via 

the vehicle confi guration menu.  

 The lighting control stalk must be placed 

in position  

"0"  or  "AUTO"  (day mode). 


Deactivation of the daytime running 

lamps is effective after operating the 

lighting control or after the next engine 

start; activation is immediate.  


The instruments and controls (instru-

ment panel, multifunction screen, air 

conditioning control panel, ...) are not 

illuminated, except in night mode with 

manual or automatic illumination of 

headlamps.   

          LED lamps 

 Where  LED  lamps  are  fi tted,  the  fi la-

ment bulbs for the daytime running 

lamps/sidelamps in the front lamp units 

are not used.  

 They come on when the engine is started. 

 Depending on the destination country, 

they are used for: 

   -  

daytime  running  lamps *   in  day  mode 

and sidelamps in night mode (they 

are brighter when daytime running 

lamps),  

 or 

   -  

sidelamps  in  day  and  night  mode.  

  *    function that can be set in the vehicle 

confi guration menu.  


Content   ..  3  4  5  6   ..