Peugeot 308 CC Dag (2010.5). Instruction - part 11
 

  Index      Peugeot     Peugeot 308 CC Dag 2010.5 - instruction in english


Search            


Content   ..  9  10  11  12   ..


Peugeot 308 CC Dag (2010.5). Instruction - part 11


10

!

146

PRACTICAL INFORMATION

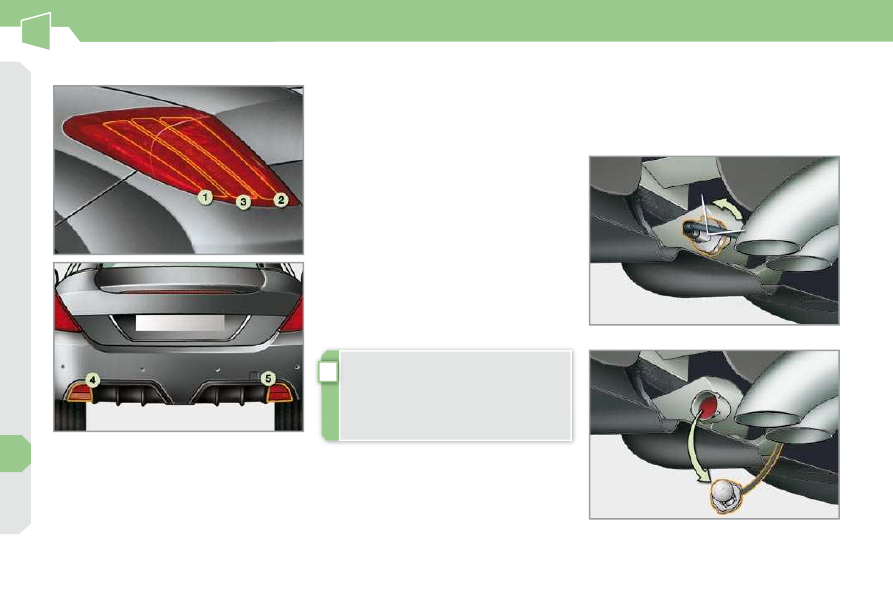
                                  Rear lamps 

   1.    Brake lamps (  LEDs  ).  
  2.    Sidelamps (  LEDs  ).  
  3.    Direction indicators (  LEDs  ).  
  4.    Foglamp   (P   21 W  ).  
  5.    Reversing   lamp   (P   21 W  ).   

  Changing the foglamp and reversing 
lamp bulbs 
 These two bulbs are changed from out-

side the rear bumper: 

 On the left-hand side, take care not 

to touch the silencer; risk of burns, 

if you change the bulb after switch-

ing off the ignition.  

   

   turn the bulb holder one quarter of a 

turn and remove it, 

  

   turn  the  bulb  one  quarter  of  a  turn 

and change it.  

 To  refi t,  carry  out  these  operations  in

reverse order. 

  Changing brake lamps, sidelamps 
and direction indicators 
 For the replacement of this type of LED 

lamp, contact a PEUGEOT dealer.  

10

!

147

PRACTICAL INFORMATION

  Changing the third brake lamp 
(LEDs) 

 For the replacement of this type of LED 

lamp, contact a PEUGEOT dealer.  

  Changing the number plate lamp 
bulbs (W 5 W) 

   

   Insert  a  thin  screwdriver  in  one  of 

the exterior holes of the lens. 

  

   Push it towards the outside to unclip it. 

  

   Remove the lens. 

  

   Pull the bulb and change it.   

  High pressure washing  
 When  using  this  type  of  washing 

on stubborn dirt, do not persist on 

the headlamps, the lamps and their 

surrounds to avoid damaging their 

protective coating and seals.  

10

!

i

148

PRACTICAL INFORMATION

 PEUGEOT  will  not  accept  re-

sponsibility for the cost incurred in 

repairing  your  vehicle  or  for  recti-

fying  malfunctions  resulting  from 

the  installation  of  accessories  not 

supplied  and  not  recommended 

by  PEUGEOT  and  not  installed  in 

accordance  with  its  instructions, 

in  particular  when  the  combined 

consumption of all of the addition-

al  equipment  connected  exceeds

10 milliamperes.   

  Installing electrical accessories 
 Your  vehicle's  electrical  system  is 

designed to operate with standard 

or optional equipment. 

 Before installing other electrical equip-

ment or accessories on your vehicle, 

contact a PEUGEOT dealer. 

CHANGING A FUSE 

  Access to tooling 

 The  extraction  tweezer  and  the  spare 

fuses are fi tted to the back of the dash-

board fusebox cover. 

 For access to them: 
   

   turn the screw a quarter of a turn to 

the left, 

  

   unclip  the  cover  by  pulling  the  top 

right, 

  

   disengage and pull away the cover, 

  

   remove  carrier  on  which  are  fi tted 

the tweezer and replacement fuses.   

  Changing a fuse 

 Before changing a fuse, you must: 
   

   identify and correct the cause of the 

fault, 

  

   switch off all all electrical consumers, 

  

   immobilise  the  vehicle  and  switch 

the ignition off, 

  

   identify the failed fuse using the al-

location tables and layout diagrams 

in the following pages.  

  Good  

  Failed  

  Tweezer  

 When changing a fuse, you must: 
   

   use  the  special  tweezer  to  extract 

the fuse from its housing and check 

its fi lament, 

  

   always  replace  the  failed  fuse  with 

a  fuse  of  the  same  rating  (same

colour); using a different rating may 

cause faults (risk of fi re).  

 If  the  fuse  fails  again  soon  after  it  is 

changed,  have  the  electrical  system 

checked by a PEUGEOT dealer. 

10

149

PRACTICAL INFORMATION

  Dashboard fuses 

 The fusebox is placed in the lower dash-

board (left-hand side). 

  Access to the fuses 

   

   refer  to  the  paragraph  "Access  to 

tooling".   

  Fuse tables 

   Fuse N°   

   Rating   

  Functions  

   F1   

   -   

 Not used. 

   F2   

   30 A   

 Earth for locking and deadlocking 

   F3   

   5 A   

 Airbags and pretensioners control unit. 

   F4   

   10 A   

 Clutch pedal and dual-function brake switches, 

electrochromatic rear view mirror, air conditioning, 

steering wheel angle sensor, automatic gearbox, 

switching and protection unit. 

   F5   

   30 A   

 Front one-touch electric windows, folding mirrors 

supply. 

   F6   

   30 A   

 Rear one-touch electric windows, exterior door 

opening controls. 

   F7   

   5 A   

 Front and rear courtesy lamps, map reading lamps, 

sun visor lighting, glove box lighting. 

   F8   

   20 A   

 Audio equipment, radio/telephone, multifunction screen, tyre 

under-infl ation detection, interior storage compartments. 

   F9   

   30 A   

 Front 12 V socket, cigar lighter. 

   F10   

   15 A   

 Steering mounted controls, alarm siren, alarm 

control unit. 

   F11   

   15 A   

 Low current ignition switch. 

10

150

PRACTICAL INFORMATION

   Fuse N°   

   Rating   

  Functions  

   F12   

   15 A   

 Instrument panel, seat belt and passenger's front 

airbag warning lamps display, air conditioning, 

driver's seat memory unit, retractable roof unit. 

   F13   

   5 A   

 Engine fusebox, airbags. 

   F14   

   15 A   

 Multifunction screen, amplifi er, hands-free kit, 

rain/sunshine sensor, parking sensors control unit, 

passenger's seat memory unit. 

   F15   

   30 A   

 Locking and deadlocking. 

   F17   

   40 A   

 Rear screen and door mirrors demist/defrost. 

   SH   

   -   

 PARC shunt. 

   Fuse N°   

   Rating   

  Functions  

   G36   

   30 A   

 Driver and passenger heated seats. 

   G37   

   5 A   

 Trailer fuse box. 

   G38   

   30 A   

 Driver's seat memory unit. 

   G39   

  -  

 Not used. 

   G40   

   30 A   

 Hi-Fi amplifi er, passenger's seat memory unit. 

10

151

PRACTICAL INFORMATION

  Engine compartment fuses 

 The  fusebox  is  placed  in  the  engine 

compartment near the battery (left-hand 

side). 

  Access to the fuses 

   

   Unclip the cover. 

  

   Change  the  fuse  (see  corresponding 

paragraph). 

  

   When  you  have  fi nished,  refi t  the 

cover  carefully  to  ensure  correct 

sealing of the fusebox.   

  Fuse table 

   Fuse N°   

   Rating   

  Functions  

   F1   

   20 A   

 Engine control unit supply, injection pump and EGR 

electrovalves (2 litre HDI), injectors (2 litre HDI). 

   F2   

   15 A   

 Horn. 

   F3   

   10 A   

 Front screenwash. 

   F4   

   20 A   

 Headlamp wash. 

   F5   

   15 A   

 Purge canister, turbine discharge and Turbo 

pressure regulation electrovalves (1.6 litre THP 16V), 

oil vapour heater (1.6 litre THP 16V), Diesel fuel 

heater (1.6 litre HDI). 

   F6   

   10 A   

 Vehicle speed sensor, ABS/ESP control unit. 

   F7   

   10 A   

 Power steering control unit, automatic gearbox, 

engine coolant level detector. 

   F8   

   25 A   

 Starter motor control. 

   F9   

   10 A   

 Diagnostic socket, directional headlamps, air 

fl ow sensor (Diesel), particle emission fi lter pump 

(Diesel), door mirror controls. 

   F10   

   30 A   

 Engine control unit actuators (petrol: ignition 

coils, electrovalves, oxygen sensors, injectors, 

heaters, fuel pump, controlled thermostat) (Diesel: 

electrovalves, heaters). 

   F11   

   40 A   

 Air conditioning fan. 

10

152

PRACTICAL INFORMATION

   Fuse N°   

   Rating   

  Functions  

   F12   

   30 A   

 Windscreen wipers slow/fast speed. 

   F13   

   40 A   

 Built-in systems interface supply (ignition positive). 

   F14   

   -   

 Not used. 

   F15   

   10 A   

 Right-hand main beam headlamp. 

   F16   

   10 A   

 Left-hand main beam headlamp. 

   F17   

   15 A   

 Left-hand dipped headlamp. 

   F18   

   15 A   

 Right-hand dipped headlamp. 

   F19   

   15 A   

 Oil vapour heater (1.6 litre VTi 16V), purge canister 

solenoid valve (1.6 litre VTi 16V), oxygen sensors 

(petrol), air cooling electrovalves (Diesel). 

   F20   

   10 A   

 Controlled thermostat, variable timing electrovalves, 

Turbo pressure regulation electrovalve (Diesel), 

engine coolant level detector (Diesel). 

   F21   

   5 A   

 Fan assembly relay supply, Valvetronic relay control 

(1.6 litre VTi 16V), Turbo cooling (1.6 litre THP 

16V), air fl ow sensor (1.6 litre HDI). 

10

153

PRACTICAL INFORMATION

  Table of mini and midi-fuses above the battery 

  *    The  midi-fuses  and  maxi-fuses  pro-

vide  additional  protection  for  the 

electrical  systems. All  work  on  these 

types of fuse must be carried out by a 

PEUGEOT dealer.  

   Fuse N°   

   Rating   

  Functions  

   F1   

   -   

 Not used. 

   F2   

   5 A   

 Dual function brake switch. 

   F3   

   5 A   

 Battery charge unit. 

   F4   

   25 A   

 ABS/ESP solenoid valves. 

   F5   

   -   

 Not used. 

   F6   

   15 A   

 Automatic gearbox. 

   F7 *    

   80 A   

 Power steering electropump assembly. 

   F8 *    

   60 A   

 Fan assembly. 

   F9 *    

   70 A/30 A   

 Pre-heat unit (Diesel)/

Valvetronic electric motor (1.6 litre THP 16V). 

   F10 *    

   40 A   

 ABS/ESP electropump assembly. 

   F11

  *   

   100 A   

 Switching and protection unit. 

   F12 *    

   -   

 Not used. 

  Table of maxi-fuses 

   Fuse N°   

   Rating   

  Functions  

   MF1 *    

   -   

 Not used. 

   MF2 *    

   30 A   

 Trailer control unit. 

   MF3 *    

   50 A   

 Passenger compartment fusebox. 

   MF4 *    

   80 A   

 Built-in systems interface. 

   MF5 *    

   80 A   

 Built-in systems interface. 

   MF6 *    

   -   

 Not used. 

   MF7 *    

   30 A   

 Heated seats. 

   MF8 *    

   20 A   

 Headlamp wash. 

10

i

154

PRACTICAL INFORMATION

BATTERY 

  Access to the battery 

  Starting using another battery 

   

   Connect  the  red  cable  to  the  posi-

tive terminal (+) of the fl at battery  A , 

then  to  the  positive  terminal  (+)  of 

the slave battery  B . 

 The battery is located under the bonnet. 

 For access to it: 
   

   open  the  bonnet  using  the  interior

release lever, then the exterior safety 

catch, 

  

   secure the bonnet stay, 

  

   remove  the  plastic  cover  to  gain

access to the two terminals, 

  

   unclip  the  fusebox  to  remove  the 

battery, if necessary.   

    Disconnecting the cables 

   

   Raise the locking tab fully.   

  Reconnecting the cables 

   

   Position the open clip  1  of the cable 

on  the  positive  terminal  (+)  of  the 

battery. 

  

   Press vertically on the clip  1  to posi-

tion it correctly against the battery. 

  

   Lock the clip by lowering the tab  2 .  

 Do not force the tab as locking will 

not be possible if the clip is not po-

sitioned correctly; start the proce-

dure again.  

10

!

i

155

PRACTICAL INFORMATION

  

   Connect  one  end  of  the  green  or 

black cable to the negative terminal (-) 

of the slave battery  B . 

  

   Connect the other end of the green 

or  black  cable  to  the  earth  point   C  

on the broken down vehicle. 

  

   Operate  the  starter,  let  the  engine 

run. 

  

   Wait until the engine returns to idle 

and disconnect the cables.   

 Do  not  disconnect  the  terminals 

while the engine is running. 

 Do not charge the batteries without 

disconnecting the terminals fi rst. 

 The batteries contain harmful sub-

stances such as sulphuric acid and 

lead. They must be disposed of in 

accordance  with  regulations  and 

must not, in any circumstances, be 

discarded with household waste. 

 Take used remote control batteries 

and  vehicle  batteries  to  a  special 

collection point. 

  Charging the battery using 
a battery charger 

   

   Disconnect  the  battery  from  the

vehicle. 

  

   Follow  the  instructions  for  use  pro-

vided  by  the  manufacturer  of  the 

charger. 

  

   Reconnect  starting  with  the  nega-

tive terminal (-). 

    

Check that the terminals and connec-

tors are clean. If they are covered with 

sulphate (whitish or greenish deposit), 

remove them and clean them.  

 To  avoid  discharging  the  battery, 

do  not  leave  the  lights  on  repeat-

edly  with  the  ignition  off  (refer  to 

the "Energy economy mode" para-

graph). 

 It  is  advisable  to  disconnect  the 

battery if the vehicle is to be left un-

used for more than one month. 

  Before disconnecting the battery 
 Wait  2  minutes  after  switching  off 

the  ignition  before  disconnecting 

the battery. 

 Close  the  roof,  the  windows  and 

the doors before disconnecting the 

battery.  

  Following reconnection of the 
battery 


Following  reconnection  of  the  bat-

tery, switch on the ignition and wait 

1  minute  before  starting  to  permit 

 initialisation  of  the  electronic  sys-

tems.  However,  if  slight  diffi culties 

are encountered following this ope-

ration, contact a PEUGEOT dealer. 

 Referring to the corresponding section, 

you must yourself reinitialise: 

   -   the remote control key, 

  -   the  electric  windows  and  the 

automatic partial opening of the 

door windows, 

  -   the  GPS  satellite  navigation 

system.    

10

!

i

156

PRACTICAL INFORMATION

 Let the engine run for the duration 

specifi ed to ensure that the battery 

charge is suffi cient. 

 Do  not  repeatedly  and  continu-

ously restart the engine in order to 

charge the battery. 

 A  fl at  battery  prevents  the  engine 

from starting (refer to the "Battery" 

paragraph).  

 If  the  telephone  is  being  used  at 

this time: 

   -   it will be maintained for 5 minu tes 

with  the  hands-free  kit  of  your 

Peugeot  Connect  Sound  or 

Peugeot Connect Navigation, 

  -   it  will  still  be  possible  to  fi n-

ish  the  call  with  the  Peugeot 

Connect Media.   

ENERGY ECONOMY MODE 

 System which manages the duration of 

use  of  certain  functions  to  conserve  a 

suffi cient level of charge in the battery. 

 After the engine has stopped, you can 

still use functions such as the audio and 

telematics  system, windscreen  wip-

ers, dipped beam headlamps, courtesy 

lamps,  etc.  for  a  maximum  combined 

duration of thirty minutes. 

  Exiting economy mode 

 These  functions  are  reactivated  auto-

matically next time the vehicle is driven. 
   

   In order to resume the use of these 

functions immediately, start the en-

gine and let it run: 

   -   for  less  than  ten  minutes,  to  use 

the  equipment  for  approximately 

fi ve minutes, 

  -   for more than ten minutes, to use 

the  equipment  for  up  to  approxi-

mately thirty minutes.   

  Switching to economy mode 

 Once  the  thirty  minutes  are  over,  a 

message  appears  in  the  multifunction 

screen  indicating  that  the  vehicle  has 

switched to economy mode and the ac-

tive functions are put on standby. 

CHANGING A WIPER BLADE 

  Removing 

   

   Raise the corresponding wiper arm. 

  

   Unclip the wiper blade and remove it.   

  Fitting 

   

   Put  the  corresponding  new  wiper 

blade in place and clip it. 

  

   Fold down the wiper arm carefully.   

  Before removing a front wiper 
blade 

   

   Within one minute after switching off 

the ignition, operate the wiper stalk 

to  position  the  wiper  blades  verti-

cally on the windscreen.   

  After fitting a front wiper blade 

   

   Switch on the ignition. 

  

   Operate  the  wiper  stalk  again  to 

park the wiper blades.   

LOAD REDUCTION MODE 

 System  which  manages  the  use  of

certain functions in relation to the level 

of charge remaining in the battery. 

 When  the  vehicle  is  being  driven,  the 

load reduction function temporarily de-

activates  certain  functions,  such  as 

the  air  conditioning,  the  "AIRWAVE"

systems, the heated rear screen... 

 Certain deactivated functions are reac-

tivated automatically as soon as condi-

tions permit. 

10

i

i

157

PRACTICAL INFORMATION

TOWING THE VEHICLE 

 Procedure for having your vehicle towed 

or for towing another vehicle using a re-

movable towing eye. 

  Access to the tools 

  Towing your vehicle 

   

   On the front bumper, unclip the cover 

by pressing at the bottom. 

  

   Screw the towing eye in fully. 

  

   Install the towing bar. 

  

   Place the gear lever in neutral (posi-

tion  N

  on the automatic gearbox).  

 The towing eye is installed in the boot 

under the fl oor. 

 For access to it: 
   

   change to the "coupé" confi guration, 

  

   open the boot, 

  

   raise the fl oor, 

  

   secure  it  by  hooking  its  handle  on 

the boot seal, 

  

   remove  the  towing  eye  from  the 

holder.   

  General recommendations 

  

   Release the steering by turning the 

ignition key one position and release 

the parking brake. 

  

   Switch on the hazard warning lamps 

on the towed vehicle. 

  

   Move off gently and drive slowly for 

a limited distance.   

Failure  to  observe  this  special 

condition  could  result  in  damage 

to  certain  components  (braking, 

transmission...)  and  the  absence 

of braking assistance the next time 

the engine is started. 

 Observe  the  legislation  in  force  in 

your country. 

 Ensure that the weight of the tow-

ing vehicle is higher than that of the 

towed vehicle. 

 The  driver  must  stay  at  the  wheel 

of the towed vehicle. 

 Driving  on  motorways  and  fast 

roads is prohibited when towing. 

 When towing a vehicle with all four 

wheels on the ground, always use 

an approved towing bar; rope and 

straps are prohibited. 

 When  towing  a  vehicle  with  the 

engine  off,  there  is  no  longer  any 

power  assistance  for  braking  or 

steering. 

 In  the  following  cases,  you  must 

 always  call  on  a  professional  reco-

very service: 

   -   vehicle broken down on a motor-

way or fast road, 

  -   when it is not possible to put the 

gearbox into neutral, unlock the 

steering, or release the parking 

brake, 

  -   towing with only two wheels on 

the ground, 

  -   where  there  is  no  approved 

towing bar available...   

10

i

158

PRACTICAL INFORMATION

TOWING A TRAILER, 
A CARAVAN, ETC. 

 Your  vehicle  is  primarily  designed  for 

transporting people and luggage, but it 

may also be used for towing a trailer. 

  Distribution of loads 

   

   Distribute  the  load  in  the  trailer  so 

that the heaviest items are as close 

as possible to the axle and the nose 

weight  approaches  the  maximum 

permitted without exceeding it.  

 Air density decreases with altitude, thus 

reducing  engine  performance.  Above 

1 000 metres, the maximum towed load 

must  be  reduced  by  10 %  for  every 

1 000 metres of altitude. 

 Refer to the "Technical Data" section for 

details of the weights and towed loads 

which apply to your vehicle.  

  Side wind 

   

   Take  into  account  the  increased 

sensitivity to side wind.   

  Cooling 
 Towing  a  trailer  on  a  slope  increases 

the temperature of the coolant. 

 As  the  fan  is  electrically  controlled,  its 

cooling  capacity  is  not  dependent  on 

the engine speed. 
   

   To  lower  the  engine  speed,  reduce 

your speed.  

  Towbar suitable for the attachment of a 

trailer or caravan with additional lighting 

and signalling. 

  Driving advice 

 We recommend the use of genuine 

PEUGEOT  towbars  and  their  har-

nesses that have been tested and 

approved  from  the  design  stage 

of  your  vehicle,  and  that  the  fi t-

ting of the towbar is entrusted to a 

PEUGEOT dealer. 

 If  the  trailer  is  not  fi tted  by  a 

PEUGEOT  dealer,  it  is  imperative 

that  it  is  fi tted  using  the  vehicle's 

electrical  pre-equipment,  in  accor-

dance  with  the  manufacturer's  in-

structions. 

 Driving with a trailer subjects the towing 

vehicle  to  more  signifi cant  stress  and 

the driver must take particular care.  

   

   On the rear bumper, unclip the cover 

by pressing at the bottom. 

  

   Screw the towing eye in fully. 

  

   Install the towing bar. 

  

   Switch on the hazard warning lamps 

on both vehicles. 

  

   Move off gently and drive slowly for 

a limited distance.   

  Towing another vehicle 

10

i

158

PRACTICAL INFORMATION

TOWING A TRAILER, 
A CARAVAN, ETC. 

 Your  vehicle  is  primarily  designed  for 

transporting people and luggage, but it 

may also be used for towing a trailer. 

  Distribution of loads 

   

   Distribute  the  load  in  the  trailer  so 

that the heaviest items are as close 

as possible to the axle and the nose 

weight  approaches  the  maximum 

permitted without exceeding it.  

 Air density decreases with altitude, thus 

reducing  engine  performance.  Above 

1 000 metres, the maximum towed load 

must  be  reduced  by  10 %  for  every 

1 000 metres of altitude. 

 Refer to the "Technical Data" section for 

details of the weights and towed loads 

which apply to your vehicle.  

  Side wind 

   

   Take  into  account  the  increased 

sensitivity to side wind.   

  Cooling 
 Towing  a  trailer  on  a  slope  increases 

the temperature of the coolant. 

 As  the  fan  is  electrically  controlled,  its 

cooling  capacity  is  not  dependent  on 

the engine speed. 
   

   To  lower  the  engine  speed,  reduce 

your speed.  

  Towbar suitable for the attachment of a 

trailer or caravan with additional lighting 

and signalling. 

  Driving advice 

 We recommend the use of genuine 

PEUGEOT  towbars  and  their  har-

nesses that have been tested and 

approved  from  the  design  stage 

of  your  vehicle,  and  that  the  fi t-

ting of the towbar is entrusted to a 

PEUGEOT dealer. 

 If  the  trailer  is  not  fi tted  by  a 

PEUGEOT  dealer,  it  is  imperative 

that  it  is  fi tted  using  the  vehicle's 

electrical  pre-equipment,  in  accor-

dance  with  the  manufacturer's  in-

structions. 

 Driving with a trailer subjects the towing 

vehicle  to  more  signifi cant  stress  and 

the driver must take particular care.  

   

   On the rear bumper, unclip the cover 

by pressing at the bottom. 

  

   Screw the towing eye in fully. 

  

   Install the towing bar. 

  

   Switch on the hazard warning lamps 

on both vehicles. 

  

   Move off gently and drive slowly for 

a limited distance.   

  Towing another vehicle 

10

i

i

159

PRACTICAL INFORMATION

 In all cases, keep a check on the cool-

ant temperature. 

  Braking 
 Towing  a  trailer  increases  the  braking 

distance.  

  Tyres 

   

   Check  the  tyre  pressures  of  the 

 towing  vehicle  and  of  the  trailer, 

observing  the  recommended  pres-

sures.   

  Lighting 

   

   Check the electrical lighting and sig-

nalling on the trailer.  

 The rear parking sensors will be de-

activated  automatically  if  a  genuine 

PEUGEOT towbar is used.   

   

   If the warning lamp and the 

 STOP 

 warning  lamp  come 

on,  stop  the  vehicle  and 

switch  off  the  engine  as 

soon as possible.   

 The maximum towed load on a long in-

cline  depends  on  the  gradient  and  the 

ambient temperature. 

VERY COLD CLIMATE SCREEN *  

 Removable  protective  screen  which 

prevents  the  accumulation  of  snow  at 

the radiator cooling fan. 

  Fitting 

   

   Offer up the very cold climate screen 

to  the  front  of  the  lower  section  of 

the front bumper. 

  

   Press around its edge to engage its 

fi xing clips one by one.   

 Do  not  forget  to  remove  the  very 

cold climate screen: 

   -   when the ambient temperature 

exceeds 10 °C, 

  -   when towing, 

  -   at speeds above 75 mph (120 km/h).   

  *   According to country.  

  Removal 

   

   Use a screwdriver as a lever to release 

each fi xing clip in turn.  

   "Comfort": 
 windstop,  cover  for  windstop,  reading 

lamp, parking sensors...  

  "Transport solutions": 
 boot liner, towbar-mounted bicycle carrier, 

towbars, towbar wiring harnesses... 

 The trailer towbar and its wiring harness 

must be fi tted by a PEUGEOT dealer.  

ACCESSORIES 

 A wide range of accessories and genu-

ine  parts  is  offered  by  the  PEUGEOT 

dealer network. 

 These accessories and parts have been 

tested  and  approved  for  reliability  and 

safety. 

 They are all adapted to your vehicle and 

benefi t from PEUGEOT's recommenda-

tion and warranty.  

10

i

i

159

PRACTICAL INFORMATION

 In all cases, keep a check on the cool-

ant temperature. 

  Braking 
 Towing  a  trailer  increases  the  braking 

distance.  

  Tyres 

   

   Check  the  tyre  pressures  of  the 

 towing  vehicle  and  of  the  trailer, 

observing  the  recommended  pres-

sures.   

  Lighting 

   

   Check the electrical lighting and sig-

nalling on the trailer.  

 The rear parking sensors will be de-

activated  automatically  if  a  genuine 

PEUGEOT towbar is used.   

   

   If the warning lamp and the 

 STOP 

 warning  lamp  come 

on,  stop  the  vehicle  and 

switch  off  the  engine  as 

soon as possible.   

 The maximum towed load on a long in-

cline  depends  on  the  gradient  and  the 

ambient temperature. 

VERY COLD CLIMATE SCREEN *  

 Removable  protective  screen  which 

prevents  the  accumulation  of  snow  at 

the radiator cooling fan. 

  Fitting 

   

   Offer up the very cold climate screen 

to  the  front  of  the  lower  section  of 

the front bumper. 

  

   Press around its edge to engage its 

fi xing clips one by one.   

 Do  not  forget  to  remove  the  very 

cold climate screen: 

   -   when the ambient temperature 

exceeds 10 °C, 

  -   when towing, 

  -   at speeds above 75 mph (120 km/h).   

  *   According to country.  

  Removal 

   

   Use a screwdriver as a lever to release 

each fi xing clip in turn.  

   "Comfort": 
 windstop,  cover  for  windstop,  reading 

lamp, parking sensors...  

  "Transport solutions": 
 boot liner, towbar-mounted bicycle carrier, 

towbars, towbar wiring harnesses... 

 The trailer towbar and its wiring harness 

must be fi tted by a PEUGEOT dealer.  

ACCESSORIES 

 A wide range of accessories and genu-

ine  parts  is  offered  by  the  PEUGEOT 

dealer network. 

 These accessories and parts have been 

tested  and  approved  for  reliability  and 

safety. 

 They are all adapted to your vehicle and 

benefi t from PEUGEOT's recommenda-

tion and warranty.  


Content   ..  9  10  11  12   ..