Peugeot 207 Dag (2010 year). Instruction - part 5
 

  Index      Peugeot     Peugeot 207 Dag - instruction 2010 year in english


Search            


Content   ..  3  4  5  6   ..


Peugeot 207 Dag (2010 year). Instruction - part 5


!

73

  Deactivating the rear window 
switches 

  Reinitialisation 

 Following reconnection of the battery or 
in  the  event  of  a  malfunction  you  must 
reinitialise  the  operation  of  the  electric 
windows: 
      release  the  switch  and  pull  it  again 

until the window closes completely, 

     hold  the  switch  for  approximately 

one second after closing, 

 Always  remove  the  key  from  the 
ignition  when  leaving  the  vehicle, 
even for a short time. 
 In  the  event  of  contact  during  op-
eration  of  the  windows,  you  must 
reverse  the  movement  of  the  win-
dow.  To  do  this,  press  the  switch 
concerned. 
 When the driver operates the pas-
senger  electric  window  switches, 
they  must  ensure  that  no  one  is 
preventing  correct  closing  of  the 
windows. 
 The  driver  must  ensure  that  the 
passengers  use  the  electric  win-
dows correctly. 
 Be aware of children when operating 
the windows.  

REAR QUARTER WINDOWS 

 On the 3-door versions, system for ven-
tilation  of  the  rear  seats  by  the  partial 
opening of the window. 

  Opening 

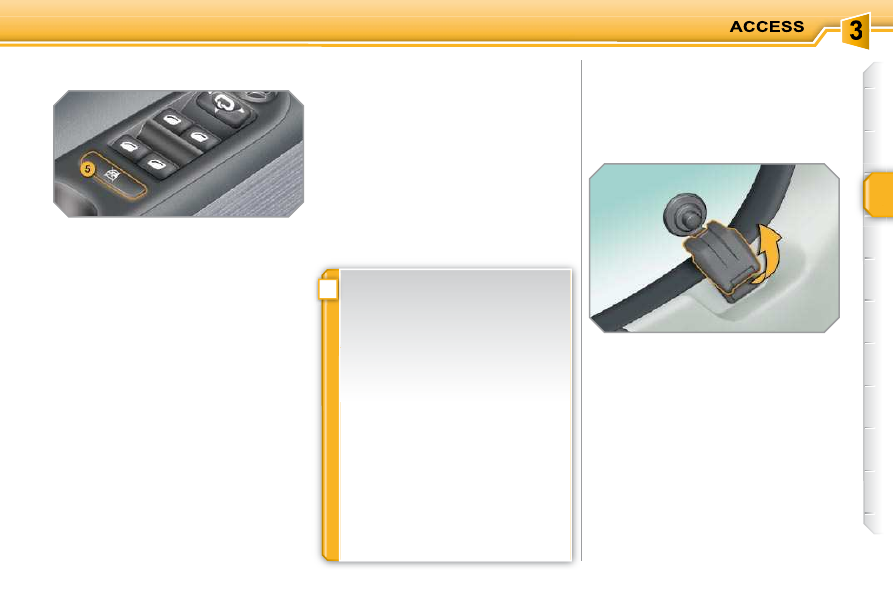
      For the safety of your children, press 

switch  5  to prevent operation of the 
rear  windows  irrespective  of  their 
position.  

 When  the  button  is  pressed  down,  the 
rear window switches are deactived. 
 When the button is raised, the rear window 
switches are active.   

  Closing 

      Pull the lever to release the window. 
     Tilt the lever fully inwards to secure 

the window in the closed position.   

      Tilt the lever outwards. 
     Push it fully to secure the window in 

the open position.   

     press  the  switch  to  lower  the  win-

dow automatically, 

     when  the  window  has  reached  the 

low position, press the switch again 
for approximately one second.  

  The safety anti-pinch function is not 
active during these operations.
  

!

ACCESS

74

DOORS 

      After unlocking the vehicle using the 

remote  control  or  the  key,  pull  the 
door handle.   

  From inside 

      Pull  the  front  door  control  to  open 

the  door;  this  unlocks  the  vehicle 
completely. 

     Pull  the  rear  door  control  to  open 

the door; this unlocks the door con-
cerned only.  

 The  interior  door  controls  do  not 
operate  when  the  vehicle  is  dead-
locked.   

  Closing 

 If a door is not closed correctly: 

   -  

when the engine is running, 
this  warning  lamp  comes 
on, accompanied by a mes-
sage  on  the  multifunction 
screen for a few seconds, 

  -  

when  the  vehicle  is  moving  (speed 
above 6 mph (10 km/h)), this warn-
ing  lamp  comes  on,  accompanied 
by an audible signal and a message 
on the multifunction screen for a few 
seconds.   

  Opening 

  From outside 

i

!

i

75

 If  the  vehicle  is  locked  or  dead-
locked from the outside, the red in-

dicator lamp fl ashes and button  A  

is inactive. 
      In  this  case,  use  the  remote 

control or the key to unlock the 
vehicle.    

 If  one  of  the  doors  or  the  boot  or 
rear  screen  is  open,  the  automat-
ic  central  locking  does  not  take 
place.  

           Manual centralised control 

 System  which  provides  full  manual 
locking  or  unlocking  of  the  doors  from 
the inside. 

  Locking 
      Press button  A  to lock the vehicle.  
 The  red  indicator  lamp  on  the  button 
comes on. 

          Automatic centralised control 

 System  which  provides  full  automatic 
locking  or  unlocking  of  the  doors,  boot 
and rear screen while driving. 
 You can activate or deactivate this function. 

  Activation 

      Press  button   A   for  more  than 

two seconds.  

 A confi rmation message appears on the 

multifunction screen.  

  Unlocking 
      Above 6 mph (10 km/h), press but-

ton   A   to  unlock  the  doors,  the  boot 
and the rear screen temporarily.   

 If one of the doors is open, the cen-
tral locking from the inside does not 
take place.  

  Unlocking 
      Press  button   A   again  to  unlock  the 

vehicle.  

 The  red  indicator  lamp  on  the  button 
switches off. 

  Locking 
 When  the  speed  exceeds  6  mph 
(10 km/h),  the  doors,  the  boot  and  the 
rear screen lock automatically. 

  Deactivation 
      Press button  A  again for more than 

two seconds.  

 A confi rmation message appears on the 

multifunction screen.   

ACCESS

  Emergency control 

 System  which  locks  or  unlocks  the 
doors  mechanically  in  the  event  of  a 
malfunction of the central locking. 

      Insert the key in the lock, located on 

the edge of the door, then turn it one 
eighth of a turn.   

  Locking the driver's door 
      Insert the key in the lock, then turn it 

to the right.   

  Unlocking the driver's door 
      Insert the key in the lock, then turn it 

to the left.   

  Locking the front and rear 
passenger doors 

  Unlocking the front and rear 
passenger doors 
      Pull the interior door opening control.   

   -  

 when  the  engine  is  run-
ning
 ,  this  warning  lamp 
comes  on,  accompanied 
by  a  message  on  the  mul-
tifunction  screen  for  a  few 
seconds, 

  -  

 when the vehicle is moving  (speed 
above 6 mph (10 km/h)), this warn-
ing  lamp  comes  on,  accompanied 
by an audible signal and a message 
on the multifunction screen for a few 
seconds.   

          Tailgate release 

 System for mechanical unlocking of the 
boot  in  the  event  of  a  central  locking 
malfunction. 

  Unlocking 
      Fold  back  the  rear  seats  to  gain 

access  to  the  lock  from  inside  the 
boot. 

     Insert a small screwdriver into hole  A  

of the lock to unlock the tailgate.    

  Opening 

      After unlocking the vehicle using the 

remote  control  or  the  key,  pull  the 
handle and raise the tailgate.   

BOOT (SALOON) 

  Closing 

 If the tailgate is not closed correctly: 

ACCESS

  Emergency control 

 System  which  locks  or  unlocks  the 
doors  mechanically  in  the  event  of  a 
malfunction of the central locking. 

      Insert the key in the lock, located on 

the edge of the door, then turn it one 
eighth of a turn.   

  Locking the driver's door 
      Insert the key in the lock, then turn it 

to the right.   

  Unlocking the driver's door 
      Insert the key in the lock, then turn it 

to the left.   

  Locking the front and rear 
passenger doors 

  Unlocking the front and rear 
passenger doors 
      Pull the interior door opening control.   

   -  

 when  the  engine  is  run-
ning
 ,  this  warning  lamp 
comes  on,  accompanied 
by  a  message  on  the  mul-
tifunction  screen  for  a  few 
seconds, 

  -  

 when the vehicle is moving  (speed 
above 6 mph (10 km/h)), this warn-
ing  lamp  comes  on,  accompanied 
by an audible signal and a message 
on the multifunction screen for a few 
seconds.   

          Tailgate release 

 System for mechanical unlocking of the 
boot  in  the  event  of  a  central  locking 
malfunction. 

  Unlocking 
      Fold  back  the  rear  seats  to  gain 

access  to  the  lock  from  inside  the 
boot. 

     Insert a small screwdriver into hole  A  

of the lock to unlock the tailgate.    

  Opening 

      After unlocking the vehicle using the 

remote  control  or  the  key,  pull  the 
handle and raise the tailgate.   

BOOT (SALOON) 

  Closing 

 If the tailgate is not closed correctly: 

i

i

77

  Opening 

      After unlocking the vehicle using the 

remote  control  or  the  key,  with  the 
rear screen closed, pull on the han-
dle  A  and raise the tailgate.   

   -  

 when the engine is running , 
this warning lamp comes on, 
accompanied  by  a  message 
on  the  multifunction  screen 
for a few seconds, 

  -  

 when  the  vehicle  is  moving   (speed 
above  6  mph  (10  km/h)),  this  warning 
lamp  comes  on,  accompanied  by  an 
audible  signal  and  a  message  on  the 
multifunction screen for a few seconds.   

  Closing 

      Lower the tailgate using the interior 

grab handle.  

 If the tailgate is not closed correctly: 

 REAR SCREEN (SW) 

  Opening 

      After  unlocking  the  vehicle  using  the 

remote control or the key, with the boot 
closed,  press  the  control   B   and  raise 
the rear screen using the base  C  of the 
wiper arm.  

 The boot and the rear screen can-
not both be open at the same time. 
 If the rear wiper is in a wiping posi-
tion,  the  rear  screen  will  not  open 
until the end of the cycle.  

  Closing 

      Close the rear screen by pressing at 

the centre of the glass.  

 If the rear screen is not closed correctly: 

   -  

 when the engine is running , 
this warning lamp comes on, 
accompanied  by  a  message 
on  the  multifunction  screen 
for a few seconds, 

  -  

 when  the  vehicle  is  moving   (speed 
above  6  mph  (10  km/h)),  this  warning 
lamp  comes  on,  accompanied  by  an 
audible  signal  and  a  message  on  the 
multifunction screen for a few seconds.  

BOOT (SW) 

 If the rear screen is open, the central 
locking does not take place.  

!

ACCESS

78

         PANORAMIC SUNROOF 
(SALOON) 

 System  which  consists  of  a  panoramic 
tinted  glass  area  to  increase  the  light 
and visibility in the passenger compart-

ment.  It  is  fi tted  with  a  manual  blind 

in  two  parts  to  maintain  a  comfortable 
temperature. 

      Take  the  blind  by  its  handle  and 

push  it  rearwards  to  the  required 
position.   

  Opening 

  Closing 

      Take the blind by its handle and pull 

it forwards to the required position.   

 If an obstacle is encountered during 
operation of the blind, the movement 
of the blind must be reversed. To do 
this, press the control concerned. 
 When the driver operates the blind 
control,  they  must  ensure  that  no 
one is preventing correct closing of 
the blind. 
 The  driver  must  ensure  that  pas-
sengers use the blind correctly. 
 Be aware of children when operat-
ing the blind.  

PANORAMIC SUNROOF (SW) 

 System  which  consists  of  a  panoramic 
tinted  glass  area  to  increase  the  light 
and visibility in the passenger compart-

ment.  It  is  fi tted  with  an  electric  blind 

in  two  parts  to  maintain  a  comfortable 
temperature. 

  Opening 

      Pull control  A .  
 The blind stops when the control is re-
leased.  

  Closing 

      Press control  A .  
 The blind stops when the control is re-
leased. 

i

79

 The  key  cannot  be  removed  from 

the lock until the cap is refi tted. 

FUEL TANK 

  Fuel  tank  capacity:  approximately 
50 litres (petrol) or 48 litres (Diesel).
  

 Opening  the  fi ller  cap  may  create  a 

noise a caused by an inrush of air. This 
vacuum  is  entirely  normal,  resulting 
from the sealing of the fuel system. 
 To fi ll the tank in complete safety: 
       the engine must be switched off,  
  

   open the fuel fi ller fl ap, 

     insert the key in the cap, then turn it 

to the left, 

 When you have fi lled the tank: 
      put the cap back in place, 
     turn the key to the right, then remove 

it from the cap, 

  

   close the fl ap.   

     remove  the  cap  and  hook  it  onto 

the clip located on the inside of the 

fl ap, 

  

   fi ll  the  tank,   but  do  not  continue 

after the 3rd cut-off of the pump ; 
this could cause malfunctions.  

  Low fuel level 

  Filling 

 When  the  fuel  tank  minimum 
level  is  reached  this  warning 
lamp  comes  on  on  the  instru-

ment panel. When it fi rst comes 

on there remains  approximately 5 litres  
of fuel in the tank. 
 You must refuel as soon as possible to 
avoid running out of fuel. 
 If you run out of fuel (Diesel), refer also 
to the "Checks" section.  

 A label affi xed to the inside of the fl ap 

reminds  you  of  the  type  of  fuel  to  be 
used depending on your engine. 
 Additions of fuel must be of at least 5 litres, 
in order to be taken into account by the fuel 
gauge. 

i

DIESEL

ACCESS

80

           Quality of the fuel used for 
petrol engines 

             Quality of the fuel used for 
Diesel engines 

  The  petrol  engines  are  perfectly  com-
patible  with  E10  type  petrol  biofuels 
(containing  10%  ethanol),  conforming 
to European standards EN 228 and EN 
15376. 
 E85  type  fuels  (containing  up  to  85% 
ethanol) are reserved exclusively for ve-
hicles marketed for the use of this type 
of fuel (BioFlex vehicles). The quality of 
the ethanol must comply with European 
standard EN 15293. 
 For  Brazil  only,  special  vehicles  are 
marketed to run on fuels containing up 
to 100% ethanol (E100 type).   

  The  Diesel  engines  are  perfectly  com-
patible  with  biofuels  which  conform  to 
current and future European standards 
(Diesel fuel which complies with stand-
ard EN 590 mixed with a biofuel which 
complies  with  standard  EN  14214) 
available  at  the  pumps  (containing  up 
to 7 % Fatty Acid Methyl Ester). 
 The  B30  biofuel  can  be  used  in  cer-
tain  Diesel  engines;  however,  this  use 
is  subject  to  strict  application  of  the 
special  servicing  conditions.  Consult  a 
PEUGEOT dealer. 
 The  use  of  any  other  type  of  (bio)fuel 
(vegetable or animal oils, pure or dilut-
ed, domestic fuel...) is strictly prohibited 
(risk  of  damage  to  the  engine  and  fuel 
system).   

 MISFUEL PREVENTION 

 Mechanical  device  which  prevents  fi ll-

ing  the  tank  of  a  Diesel  vehicle  with 
petrol. It avoids the risk of engine dam-

age that can result from fi lling with the 

wrong fuel. 
 Located  in  the  fi ller  neck,  the  misfuel 

prevention  device  appears  when  the 

fi ller cap is removed. 

  Operation 

 When a petrol fi ller nozzle is intoduced 

into  the  fuel  fi ller  neck  of  your  Diesel 

vehicle,  it  comes  into  contact  with  the 

fl ap.  The  system  remains  closed  and 

prevents fi lling. 
  Do not persist but introduce a Diesel 

type fi ller nozzle.   

   The device allows fi lling from a fuel 

can.
In  order  to  ensure  a  good  fl ow  of 

fuel, do not place the nozzle of the 
fuel  can  in  direct  contact  with  the 

fl ap of the misfuelling device. 

i

DIESEL

ACCESS

80

           Quality of the fuel used for 
petrol engines 

             Quality of the fuel used for 
Diesel engines 

  The  petrol  engines  are  perfectly  com-
patible  with  E10  type  petrol  biofuels 
(containing  10%  ethanol),  conforming 
to European standards EN 228 and EN 
15376. 
 E85  type  fuels  (containing  up  to  85% 
ethanol) are reserved exclusively for ve-
hicles marketed for the use of this type 
of fuel (BioFlex vehicles). The quality of 
the ethanol must comply with European 
standard EN 15293. 
 For  Brazil  only,  special  vehicles  are 
marketed to run on fuels containing up 
to 100% ethanol (E100 type).   

  The  Diesel  engines  are  perfectly  com-
patible  with  biofuels  which  conform  to 
current and future European standards 
(Diesel fuel which complies with stand-
ard EN 590 mixed with a biofuel which 
complies  with  standard  EN  14214) 
available  at  the  pumps  (containing  up 
to 7 % Fatty Acid Methyl Ester). 
 The  B30  biofuel  can  be  used  in  cer-
tain  Diesel  engines;  however,  this  use 
is  subject  to  strict  application  of  the 
special  servicing  conditions.  Consult  a 
PEUGEOT dealer. 
 The  use  of  any  other  type  of  (bio)fuel 
(vegetable or animal oils, pure or dilut-
ed, domestic fuel...) is strictly prohibited 
(risk  of  damage  to  the  engine  and  fuel 
system).   

 MISFUEL PREVENTION 

 Mechanical  device  which  prevents  fi ll-

ing  the  tank  of  a  Diesel  vehicle  with 
petrol. It avoids the risk of engine dam-

age that can result from fi lling with the 

wrong fuel. 
 Located  in  the  fi ller  neck,  the  misfuel 

prevention  device  appears  when  the 

fi ller cap is removed. 

  Operation 

 When a petrol fi ller nozzle is intoduced 

into  the  fuel  fi ller  neck  of  your  Diesel 

vehicle,  it  comes  into  contact  with  the 

fl ap.  The  system  remains  closed  and 

prevents fi lling. 
  Do not persist but introduce a Diesel 

type fi ller nozzle.   

   The device allows fi lling from a fuel 

can.
In  order  to  ensure  a  good  fl ow  of 

fuel, do not place the nozzle of the 
fuel  can  in  direct  contact  with  the 

fl ap of the misfuelling device. 

81

LIGHTING CONTROL STALK 

 System for selection and control of the 
various  front  and  rear  lamps  providing 
the vehicle's lighting. 

  Manual controls 

 The  lighting  commands  are  made  di-
rectly by the driver by means  of ring  
 and stalk  B . 

 lighting off, 

 sidelamps only, 

 dipped 

or 

main 

beam 

headlamps, 

  B.   stalk  for  inversion  of  the  beam  by 

pulling: 

dipped 

headlamps/main 

beam headlamps. 

 In the lighting off and sidelamps modes, 
the driver can switch on the main beam 

headlamps  directly  ("headlamp  fl ash") 

by pulling and holding the stalk.  

  Displays 

 The corresponding indicator lamp comes 

on on the instrument panel to confi rm the 

switching on of the lighting selected. 

  Main lighting 

 The  vehicle's  various  front  and  rear 
lamps  are  designed  to  adapt  the  driv-
er's visibility gradually in relation to the 
climatic conditions: 
   -  

sidelamps, to be seen, 

  -  

dipped  beam  headlamps  to  see 
without dazzling other drivers, 

  -  

main  beam  headlamps  for  good 
visibility when the road is clear.   

  Additional lighting 

 Other lamps are installed to respond to 
particular driving conditions: 
   -  

rear foglamps to be seen from a dis-
tance, 

  -  

front foglamps for even better visibility, 

  -  

directional  headlamps  for  improved 
visibility around bends.   

  Programmes 

 Various 

automatic 

lighting 

control 

modes  are  also  available  according  to 
the following options: 
   -  

"guide-me-home" lighting, 

  -  

automatic lighting, 

  -  

static directional lighting.  

  A.   main  lighting  mode  selection  ring, 

with: 

  Model without AUTO lighting  

  Model with AUTO lighting   

 automatic  illumination  of 
headlamps. 

!

i

82

  Model with rear foglamps only  

  Model with front and rear 

foglamps 

 front and rear foglamps 

 rear foglamps 

  C.  foglamps selection ring. 
 These operate with the dipped and main 
beam headlamps. 

      To switch on the foglamps, turn ring  C  

forwards.  

 When  the  lights  are  switched  off  au-

tomatically  (on  AUTO  model),  the  fog 

lamps  and  the  dipped  headlamps  will 
remain on. 
      To  switch  off  all  of  the  lighting  turn 

ring  C  rearwards.  

      To switch on the foglamps, turn ring  

 forwards. 

     To switch off the rear foglamps, turn 

ring   rearwards twice in succession.  

 When  the  lighting  is  switched  off  au-

tomatically  (on AUTO  model)  or  when 

the dipped headlamps are switched off 
manually,  the  foglamps  and  the  side-
lamps will remain on. 
      Turn  the  ring  rearwards  to  switch 

off the foglamps, the sidelamps will 
then switch off.  

 In good weather or in rain, both day 
and  night,  the  front  foglamps  and 
the  rear  foglamps  are  prohibited. 
In these situations, the intensity of 
their beams may dazzle other drivers. 
 Do not forget to switch off the front 
foglamps  and  the  rear  foglamps 
when they are no longer necessary.  

  Lighting on reminder 
 The triggering of an audible signal 
when a front door is opened warns 
the  driver  that  they  have  forgotten 
to  switch  off  the  vehicle's  lighting, 
with the ignition off. 
 In this case, switching off the light-
ing will stop the audible signal. 
 When the ignition is switched off, if 
the  dipped  headlamps  remain  on, 
they  will  be  switched  off  automati-
cally after thirty minutes to prevent 
discharging of the battery.   

!

83

 In  fog  or  snow,  the  brightness 

sensor  may  detect  suffi cient  light. 

Therefore, the lighting will not come 
on automatically. 
 Do not cover the brightness sensor, 
coupled  with  the  rain  sensor  and 
located  in  the  centre  of  the  wind-
screen behind the rear view mirror; 
the  associated  functions  would  no 
longer be controlled.   

  Coupling with the "Guide-me-home" 
lighting 
 Association with the automatic illumina-
tion  of headlamps  provides  the  "guide-
me-home"  lighting  with  the  following 
additional options: 
   -  

selection  of  the  lighting  duration  to 
15, 30 or 60 seconds in the vehicle 
parameters  on  the  multifunction 

screen confi guration menu, 

  -  

automatic  activation  of  "guide-me-
home" lighting when automatic illumi-
nation of headlamps is in operation.   

          Automatic illumination of headlamps 

 The sidelamps and dipped beam head-
lamps  are  switched  on  automatically, 
without  any  action  on  the  part  of  the 
driver, when a low level of external light 
is detected (sensor behind the rear view 

mirror) or when the windscreen wipers 

are switched on. 
 As  soon  as  the  brightness  returns  to  a 

suffi cient  level  or  after  the  windscreen 

wipers  are  switched  off,  the  lighting  is 
switched off automatically. 

  "Guide-me-home" lighting 

 The dipped headlamps remain on tem-
porarily, after switching off the vehicle's 
ignition, to make the driver's exit easier 
in poor light. 

  Activation 
      With  the  ignition  off,  activate  a 

"headlamp fl ash" using stalk  B . 

  

   A second "headlamp fl ash" switches 

the function off again.   

  Switching off 
 The 

"guide-me-home" 

lighting 

is 

switched off automatically following the 
door  locking  command,  after  a  given 
time.   

  Activation 
      Turn ring  A  to the " AUTO " position. 

The automatic illumination of head-
lamps  is  accompanied  by  a  mes-
sage on the multifunction screen.   

  Operating fault 

 In the event of a malfunction of 
the brightness sensor, the light-
ing  comes  on  accompanied  by 
the  service  warning  lamp,  an 

audible  signal  and  a  message  on  the 
multifunction screen. 
 Have it checked by a PEUGEOT dealer. 

  Daytime running lamps *  

 On vehicles fi tted with daytime running 

lamps, the dipped headlamps come on 
when the vehicle is started. 

 This  indicator  lamp  comes  on 
on the instrument panel. 

 The  instruments  and  controls  (multi-
function screen, air conditioning control 

panel,  ...)  are  not  lit,  unless  the  auto-

matic  lighting  mode  is  activated  or  the 
lighting is switched on manually.  

  Deactivation 
      Turn ring  A  to a position other than 

" AUTO ".  Deactivation  is  accompa-
nied by a message on the multifunc-
tion screen.   

  *   According to country.  

!

83

 In  fog  or  snow,  the  brightness 

sensor  may  detect  suffi cient  light. 

Therefore, the lighting will not come 
on automatically. 
 Do not cover the brightness sensor, 
coupled  with  the  rain  sensor  and 
located  in  the  centre  of  the  wind-
screen behind the rear view mirror; 
the  associated  functions  would  no 
longer be controlled.   

  Coupling with the "Guide-me-home" 
lighting 
 Association with the automatic illumina-
tion  of headlamps  provides  the  "guide-
me-home"  lighting  with  the  following 
additional options: 
   -  

selection  of  the  lighting  duration  to 
15, 30 or 60 seconds in the vehicle 
parameters  on  the  multifunction 

screen confi guration menu, 

  -  

automatic  activation  of  "guide-me-
home" lighting when automatic illumi-
nation of headlamps is in operation.   

          Automatic illumination of headlamps 

 The sidelamps and dipped beam head-
lamps  are  switched  on  automatically, 
without  any  action  on  the  part  of  the 
driver, when a low level of external light 
is detected (sensor behind the rear view 

mirror) or when the windscreen wipers 

are switched on. 
 As  soon  as  the  brightness  returns  to  a 

suffi cient  level  or  after  the  windscreen 

wipers  are  switched  off,  the  lighting  is 
switched off automatically. 

  "Guide-me-home" lighting 

 The dipped headlamps remain on tem-
porarily, after switching off the vehicle's 
ignition, to make the driver's exit easier 
in poor light. 

  Activation 
      With  the  ignition  off,  activate  a 

"headlamp fl ash" using stalk  B . 

  

   A second "headlamp fl ash" switches 

the function off again.   

  Switching off 
 The 

"guide-me-home" 

lighting 

is 

switched off automatically following the 
door  locking  command,  after  a  given 
time.   

  Activation 
      Turn ring  A  to the " AUTO " position. 

The automatic illumination of head-
lamps  is  accompanied  by  a  mes-
sage on the multifunction screen.   

  Operating fault 

 In the event of a malfunction of 
the brightness sensor, the light-
ing  comes  on  accompanied  by 
the  service  warning  lamp,  an 

audible  signal  and  a  message  on  the 
multifunction screen. 
 Have it checked by a PEUGEOT dealer. 

  Daytime running lamps *  

 On vehicles fi tted with daytime running 

lamps, the dipped headlamps come on 
when the vehicle is started. 

 This  indicator  lamp  comes  on 
on the instrument panel. 

 The  instruments  and  controls  (multi-
function screen, air conditioning control 

panel,  ...)  are  not  lit,  unless  the  auto-

matic  lighting  mode  is  activated  or  the 
lighting is switched on manually.  

  Deactivation 
      Turn ring  A  to a position other than 

" AUTO ".  Deactivation  is  accompa-
nied by a message on the multifunc-
tion screen.   

  *   According to country.  

i

84

STATIC DIRECTIONAL 
LIGHTING 

 When  the  dipped  or  main  beam  head-
lamps are on, this function enables the 
beam to light the inside of the turn with 
an additional angle of approximately 30°. 
 The use of this lighting is optimum above 
all at low and average speed (city driv-

ing, winding roads, ...). 

  with directional lighting  

  Programming 

  Switching on 

 The  system  is  switched  on  from  a  cer-
tain  speed  and  a  certain  angle  of  rota-
tion of the steering wheel.  

  Operating fault 

 The function is activated or 
deactivated  via  the  multi-

function  screen  confi gura-

tion menu. 
 This  function  is  activated 
by default.  

 In  the  event  of  a  malfunction, 

this  warning  lamp  fl ashes  on 

the  instrument  panel,  accom-
panied  by  a  message  on  the 
multifunction screen. 

 Have it checked by a PEUGEOT dealer.  

  Switching off 

 The  system  is  switched  off  below  a 
certain angle of rotation of the steering 
wheel. 
 It  is  switched  off  when  reverse  gear  is 
engaged.  

HEADLAMP ADJUSTMENT 

This  position  is  suffi cient  to  avoid 

causing dazzle.  
Higher settings may limit the spread 
of light from the headlamps. 
 The initial setting is position  "0" . 

 To  avoid  causing  a  nuisance  to  other 
road  users,  the  height  of  the  headlam-
ps should be adjusted in relation to the 
load in the vehicle. 
  0  .   Driver only or driver + front passenger. 
  - .   Intermediate setting 
  1.    5 people. 
  - .   5 people + load in the boot. 
  2.    Driver  only  +  maximum  authorised 

load in the boot.  

  without directional lighting  

85

WIPER CONTROL STALK 

 System for the selection and control of 
the various front and rear wiping modes 
permitting  the  dispersal  of  rain  and 
cleaning. 
 The vehicle's various front and rear wip-
ers  are  designed  to  progressively  im-
prove the driver's visibility according to 
the weather conditions. 

  Manual controls 

 The  wiping  commands  are  made  di-
rectly by the driver using stalk  A  and its 
ring  B . 

  Model with intermittent wiping  

  Model with AUTO wiping   

fast (heavy rain),  

normal (moderate rain),  

intermittent  (in  proportion  to 

the speed of the vehicle),  

automatic  (refer  to  a  fol-

lowing page).   

off,  

single wipe (press downwards),  

  Programmes 

 Various automatic wiping control modes 
are also available depending on the fol-
lowing options: 
   -  

automatic rain sensitive windscreen 
wipers, 

  -  

rear wiping on engaging reverse gear.  

  Windscreen wipers 
   A.   wiping speed selection control:  


Content   ..  3  4  5  6   ..