Peugeot 106 Dag (2001.5). Instruction - part 2


  Index      Peugeot     Peugeot 106 Dag 2001.5 - instruction in english


Search            


Content   ..   1  2  3   ..


Peugeot 106 Dag (2001.5). Instruction - part 2


I N ST RU M EN T S AN D CON T ROLS

20

1

2

3

4

5

9

10

11

8

13

12

14

15

16

17

18

19

20

21

6

7

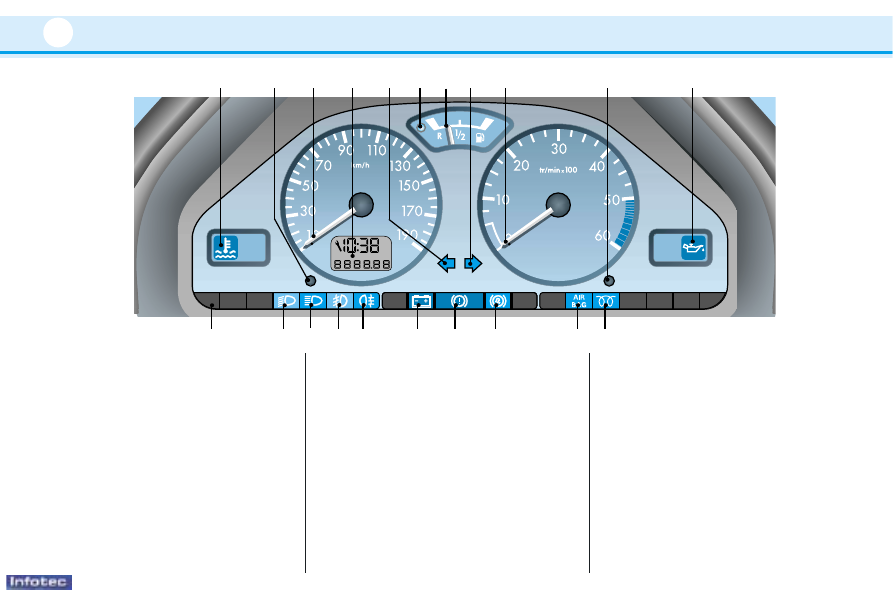
Instrument panel (Diesel)

1 - Maximum coolant temperature
2 - Display control:

- total distance display
- trip recorder - trip recorder reset
- service indicator

3 - Speedometer
4 - Display:

- digital clock
- service indicator
- total distance
- trip recorder

5 - Left-hand indicator

6 - Low fuel level

7 - Fuel gauge

8 - Right-hand indicator

9 - Rev. counter

10 - Clock adjustment, lighting rheostat

11 - Oil pressure

12 - Pre-heat (diesel)

13 - Front* and side** airbag warning

light and passenger airbag

disarm*

14 - ABS* (Anti-lock Braking System)

15 - Handbrake, low brake fluid level

and engine not running

16 - Battery charge 

17 - Rear fog lamp

18 - Front fog lamps*

19 - Main beam

20 - Dipped beam

21 - Passenger airbag disarm

* According to specification or country.

** According to model.

06-05-2002

Diesel engine pre-heat

Wait until the warning lamp goes
out then operate the starter. On
some models the warning lamp will
not light when the engine is hot.

Battery charge 

warning lamp

Indicates either:
- faulty operation of the charging

circuit, or

- loose battery or starter terminals,

or

- broken or slack alternator belt, or
- a faulty alternator.
Consult a PEUGEOT dealer.

Anti-lock brake system

warning lamp (ABS)*

Indicates faulty ABS operation.
The vehicle does, however, retain
conventional braking.
Consult a PEUGEOT dealer.

Coolant temperature gauge  

- Needle in zone (A): temperature

correct

- Needle in zone (B): the coolant

temperature is too high

Handbrake and brake

fluid level warning
lamp

Indicates either:

- that the engine is not running,
- that the handbrake is on or has

not been released correctly 
(engine running),

- an excessive drop in the brake

fluid level (engine running and
handbrake released). 

Note : with the engine running and
the handbrake off, if the warning
light remains lit then you must stop.
Consult a PEUGEOT dealer.

Low engine oil 
pressure

It is essential to stop.
Indicates either:
- insufficient engine oil pressure,

or

- lack of oil in the lubrication system.
Top up the oil level if necessary.
Consult a PEUGEOT dealer.

High coolant

temperature

warning lamp

It is essential to stop.

Indicates too high a temperature,
caused by: 

- a fan malfunction. Check the fuses

and replace them if necessary,

- a coolant leak; the cooling system is

pressurised, turn the cap to the 1st
notch, or* unscrew the cap two turns,
to let the pressure drop before 
topping up the level,

- a coolant pump malfunction.

Warning lamps 

I N ST RU M EN T S AN D CON T ROLS

21

B

A

06-05-2002

Engine auto-diagnostics
warning light*

It comes on each time the ignition is
switched on.

If it comes on with the engine run-
ning it indicates a malfunction in the
injection, ignition or emission
control system. If your vehicle is fit-
ted with a catalytic converter, there
is a risk of damage to it.

Contact a PEUGEOT dealer rapidly.

Front and side*

airbags

If the passenger airbag is armed or
if your vehicle is not fitted with a
passenger airbag, the warning light
comes on for 6 seconds when the
ignition is switched on.

Front airbag disarmed

If the passager airbag is disarmed,
the indicator light remains on.

In all cases, if the warning light
flashes, contact a PEUGEOT dealer.

Low fuel level

warning

Indicates that the quantity of fuel
remaining is less than 1 gallon
[5 litres] (Tank capacity approxima-
tely 10 gallons [45 litres]).

AIR

BAG

I N ST RU M EN T S AN D CON T ROLS

22

F

E

- If the needle is in zone E, the

temperature is correct.

- If the needle is in zone F, the

temperature is too high. To lower
the temperature of the oil, reduce
your speed.

Oil temperature gauge*

Fuel supply cut-off*

If there is a major collision, a device
switches off the supply of fuel to the
engine.  

To re-establish the supply to the
engine, press the button.

* According to specification

06-05-2002

Instrument panel display

When the ignition is switched on, this display shows in turn, the following infor-
mation:
- digital clock,
- service indicator,
- oil level indicator,*
- total distance.

Engine oil level

When the ignition is switched on, engine not running, the service indicator is dis-
played for a few seconds, then the engine oil level is indicated for approximate-
ly 10 seconds.

Maximum

Minimum

Check the level with the dipstick and top it up. The figure shown
is only correct if the vehicle has been on stable, level ground, with
the engine stopped, for 10 minutes. 

No oil

When the LEDs flash, it is essential to top up the oil to the correct
level, otherwise the engine will be damaged.

* According to specification

Total distance and trip recorder 

One brief press on button changes the
display between total distance and the
trip recorder.

Resetting the trip recorder to zero 

A long press on the button resets the trip
recorder to zero.

I N ST RU M EN T S AN D CON T ROLS

23

A

06-05-2002

SERVICE INDICATOR

This is a reminder of when the next
service is due in accordance with the
manufacturer’s maintenance sche-
dule.

Operation

When the ignition is switched on the
display shows the distance remai-
ning (rounded figures) before the
next service is due.

Example: 4800 km remain before
the next service is due. For five
seconds after the ignition is switched
on, the display shows:

5 seconds after switching on the igni-
tion the display resumes normal ope-
ration and shows the total and trip
distances.

When the distance remaining
before the next service is less
than 1000 km.

Example: 900 km remain before the
next service is due.
For five seconds after the ignition is
switched on, the display shows:

5 seconds after switching on the igni-
tion the display resumes normal ope-
ration. This indicates that a service
should be carried out shortly:

When a service is overdue.

For five seconds after the ignition is
switched on, the service symbol and
the excess distance flash.

Example: the service is overdue by
300 km The vehicle should be servi-
ced very soon.

For 5 seconds after the ignition is
switched on the display shows:

5 seconds after switching on the igni-
tion the display resumes normal ope-
ration.

I N ST RU M EN T S AN D CON T ROLS

24

06-05-2002

Service intervals

If your vehicle is used in certain par-
ticularly difficult conditions it is
necessary to follow the "Arduous
conditions" servicing schedule,
which involves shorter intervals bet-
ween services (see the Warranty
and Maintenance Record booklet).

Comment: If the time limit between
two services is reached before the
relevant mileage limit, the service
spanner symbol will light up and the
display will show 0.

To change the service interval

-  Switch off the ignition.

-  Press and hold button 1.

- Switch on the ignition.

- Release the button straight away.

- The service interval is displayed.

- Each time button is pressed 

briefly, the service intervals are
alternated.

Example

- When the required service interval

is displayed, press button for
10

seconds to confirm (the

selected service interval flashes
for 10 seconds).

Release the button to confirm when
the display stops flashing.

Reset to zero

Your PEUGEOT dealer will carry out
this operation after each service. 

However, if you carry out your
service yourself, the zero reset
procedure is as follows:

-  switch off the ignition,

-  press and hold button 1,

-  switch on the ignition,

- keep  button  1

pressed for

10 seconds,

the display indicates [= 0] and the
service spanner symbol disappears.

I N ST RU M EN T S AN D CON T ROLS

25

1

06-05-2002

Y OU R 1 0 6  I N  DETAI L

26

A

B

C

G

H

I

J

L

K

M

D

E

F

AUDIO RB1

06-05-2002

Y OU R 1 0 6  I N  DETAI L

27

j

jj

k

kk

j

jj

k

kk

k

j

Button

Function

A

TA

Traffic information priority on/off.

B

RDS

RDS on/off. 

Press for more than 2 seconds: regional following mode on/off.

C

BND/AST

Selection of wavebands FM1, FM2, FM3, AM.

Press for more than 2 seconds: autostore, automatic storing of stations.

D

SRC

Source selection; radio, cassette or CD*.

Press for more than 2 seconds: CD* shuffle.

E

Press fully: cassette fast rewind.

F

Press fully:cassette fast fowards.

E + F

Press half-way: reverses the direction of play of the cassette.
Press fully: ejects the cassette.

G

Increase the audio setting.

H

Decrease the audio setting.

I

AUDIO

Selects the bass, treble, loudness and sound distribution.

J

Higher frequency automatic search.

Selection of next CD* track.

K

Lower frequency automatic search.

Selection of previous CD* track.

L

MAN

Manual/automatic operation of button and K.

M

Audio system on/off. Volume adjustment.

1 to 6

Selects a stored station.

Press for more than 2 seconds.

Selects a CD*.

* Available as an accessory.

06-05-2002

Y OU R 1 0 6  I N  DETAI L

28

GENERAL FUNCTIONS

On / off

With the ignition key in the ACCESSORIES or IGNITION position, press the "M" button to switch the set on or off.

ANTI-THEFT SYSTEM

The first time you use the set following disconnection of the set or the battery, you must enter the confidential
code which was given to you on handover of your vehicle.

Entering the code

Switch the set on.
The display shows "CODE" then the set changes over to code request mode and "- - - -" is displayed.
Enter your four-digit code number using buttons "1" to "6".
For example : if your code is 5345 press buttons "5""3""4" and "5" in turn.
When the fourth number has been entered correctly, the radio starts automatically.

Error in entering the code

If an error is made when entering one of the first three digits, do not continue the operation and switch off the
radio to prevent blocking it.
Each incorrect code entry will result in the set being blocked for a period of from 5 seconds to 30 minutes, after
the 7th incorrect entry.
To unblock the set, leave it switched on during the waiting period. When "- - - -" is displayed, you can enter the
code again.
If the set is switched off during the waiting period, this waiting period  will restart when the set is switched on
again.
After 14 incorrect code entries, the radio will be permanently blocked and the message "END" will be displayed.

ADJUSTING THE SOUND

Adjusting the volume

Turn the "M" button to increase or decrease the volume of the set.
If the radio overheats, the volume will reduce.

Note: If you have a car-phone fitted with a “mute” signal output connected to the set, the set will automatically
change to “mute” when the car-phone is used.

06-05-2002

Y OU R 1 0 6  I N  DETAI L

29

AUDIO SETTINGS

Press the “AUDIO” button several times in succession to access the bass (BASS), treble (TREB), loudness
(LOUD), fader (FAD) and balance (BAL).
Exit from audio mode is automatic after a few seconds, without pressing any button or by pressing the “AUDIO”
button after adjusting the balance.
Note: bass and treble settings are specific to each source. It is possible to set them differently for radio, cassette
and CD.

Bass setting

When “BASS” is displayed, press the “G” or “H” buttons to vary the setting.
– “BASS –9”

for a minimum bass setting,

– “BASS 0”

for a normal position,

– “BASS +9”

for a maximum bass setting.

Treble setting

When “TREB” is displayed, press the “G” or “H” buttons to vary the setting.
– “TREB –9”

for a minimum treble setting,

– “TREB 0”

for a normal position,

– “TREB +9”

for a maximum treble setting.

Adjusting the loudness

This function automatically emphasises bass and treble tones when the volume is low. 
Press the “G” or “H” buttons to switch this function on or off.

Setting the front/rear sound distribution (Fader)

When “FAD” is displayed, press the “G” or “H” buttons to vary the setting.
The “G” button increases the volume at the front.
The “H” button increases the volume at the rear.
This function can be deactived by pressing buttons “M” and “I” simultaneously.

Setting the right/left sound distribution (Balance)

When “BAL” is displayed, press the “G” or “H” buttons to vary the setting.
The “G” button increases the volume on the right-hand side.
The “H” button increases the volume on the left-hand side.

06-05-2002

Y OU R 1 0 6  I N  DETAI L

30

RADIO

Notes on radio reception

Your radio is subject to phenomena which do not affect domestic sets. Both MW/LW and FM reception are subject
to various forms of interference which are no reflection on the quality of your set, but are due to the nature of the
signals and the way in which they are  transmitted.

On MW/LW, interference may be noticed when passing underneath high voltage power lines or bridges or through

tunnels.

On FM, interference may be the result of increasing distance from the transmitter, reflection of the signal by 
obstacles  (mountains, hills, buildings etc), or of being in an area which is not covered by a transmitter.

Selecting the radio

Press the "SRC" button, until the radio is selected.

Selecting a waveband

By short presses on the "BND/AST" button, you can select the FM1, FM2, FM3 and AM wavebands.

Automatic station search

Briefly press button “J” or “K” to search for the station immediately above or below. By continuing to press the
button in the direction selected, you will obtain continous scrolling of the frequency.

The scrolling stops at the first station found as soon as you release the button.

If the TA traffic programme is selected, only stations broadcasting this type of programme are selected.

Searching for a station occurs first in “LO” sensitivity (selection of the most powerful transmitters) during 
scanning of the waveband, then in “DX” sensitivity (selection of the weakest and most distant transmitters).

Manual station search

Press the “MAN” button.

Briefly press button “J” or “K” respectively to increase or reduce the frequency displayed.
By continuing to press the button in the direction selected, you will obtain continuous scrolling of the frequency.
Scrolling stops as soon as you release the button.
Pressing the “MAN” button again returns you to automatic station search.

06-05-2002

Y OU R 1 0 6  I N  DETAI L

31

Manual storing of stations in the memory

Select the station required.
Press for more than two seconds one of the buttons “1” to “6”.
The sound stops then becomes audible again, confirming that the station has been stored in memory.

Automatic storing of FM stations in the memory (autostore)

Press the “BND/AST” button for more than two seconds, to automatically store the 6 stations with the strongest
signal in FM.  These stations are stored in the FM3 waveband.
– If it is not possible to find 6 stations, the remaining memories are empty.

Recalling stations stored in the memory

For each waveband, briefly pressing the buttons “1” to “6” recalls the corresponding stored station.

RDS FUNCTION

Using the RDS (Radio Data System) function on FM

RDS allows you to continue to listen to the same station, whatever frequency it is using for the region you are
going through.
Switch the function on or off by briefly pressing the “RDS” button.

RDS station following

The display indicates the name of the station selected. The radio is continually searching for the station which has
the best reception and which is transmitting the same programme.

06-05-2002

Y OU R 1 0 6  I N  DETAI L

32

Traffic information programmes

Press the "TA" button to switch the function on or off.
Any traffic information flash will be given priority, whatever source you are listening to (radio, cassette or CD).
If you wish to interrupt a message, press the "TA" button; this switches off the function.
Note: the volume of the traffic information announcements is independent of the volume of normal radio
listening. You can adjust it using the volume button. The setting will be stored and will be used when the
next messages are broadcast.
While traffic information is being broadcast, the display will alternately show “TRAFFIC” and the name of the
station.
When the station selected cannot broadcast traffic information, the display shows “NO TA”.

Regional following mode (REG)

When they are part of a network, certain stations broadcast regional programmes in the various areas they
serve.
With regional following mode you can keep listening to the same programme.
To do this press the “RDS” button for more than two seconds to switch this function on or off.

06-05-2002

Y OU R 1 0 6  I N  DETAI L

33

CASSETTE

Selecting cassette mode

When a cassette is inserted, the cassette player will start automatically.
If a cassette is already inserted, press the "SRC" button until the cassette is selected.

Ejecting the cassette

Fully press both buttons "E" and "F" to eject the cassette from the player.

Direction of play

The player will play sides 1 and 2 of the cassette alternately, by automatically reversing the direction of play at the
end of a side.
To manually reverse the direction of play, press both buttons "E" and "F" part way.

Fast forward/rewind

Fully press one of the buttons "E" or "F" to fast forward or fast rewind the cassette. At the end of the fast forward
rewind, the set plays the current side.
Note: During fast forwards or rewind of a cassette, the audio system will automatically play the last radio
station.

Recommendations for using casssettes

- Use good quality cassettes.
- Avoid use of cassettes which play for longer than 90 minutes.
- Never expose the cassettes to heat or the direct rays of the sun.
- Re-tighten the tape if necessary before introducing the cassette in the player.
- Clean the playing head regularly with a damp type cleaning cassette.

06-05-2002


Content   ..   1  2  3   ..