Chrysler Cirrus, Dodge Stratus, Plymouth Breeze Haynes. Manual - part 25
7B-6
Chapter
7
Part
B Automatic
transaxle
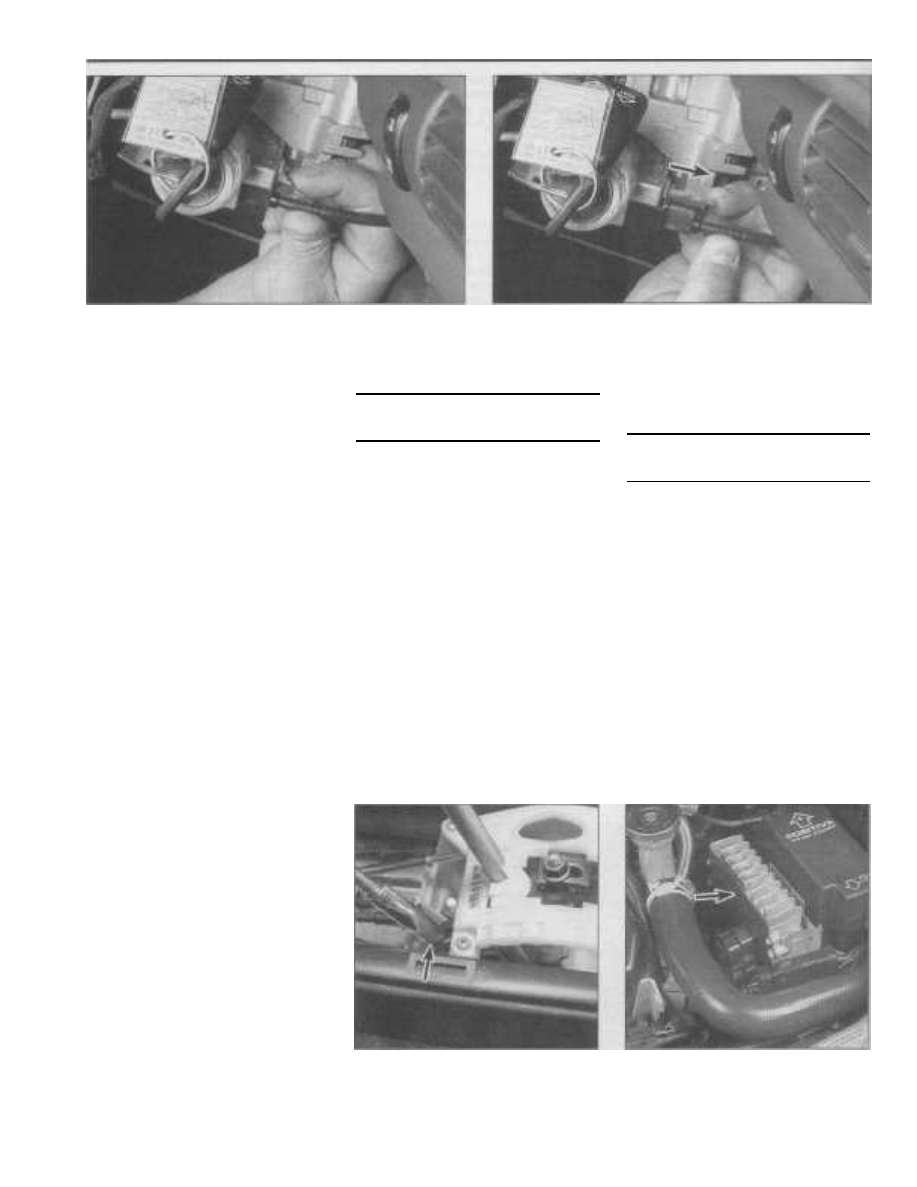
7.10a Depress the interlock cable retaining clip .. .
7.10b . . . then withdraw it from the ignition lock cylinder housing
cylinder housing (see illustrations).
11
Detach the interlock cable from the rout-
ing clip and remove it from the vehicle.
12
To install the interlock cable, turn the
ignition switch to the RUN position and insert
the cable end into the ignition lock cylinder
and make sure it snaps into place.
13
Then, route it down the steering column,
secure it with the retaining clip and continue
down to the gearshift assembly.
14
Attach the interlock cable to the
gearshift lever cam (see illustration 7.8).
15
Next, push the cable housing into the
groove in the gearshift assembly base. The
cable housing is fully seated when it snaps
into place (see illustration 7.7).
16
Adjust the interlock cable (see below).
17 Install the steering column covers and
the center console (see Chapter 11).
Adjustment
Refer to illustration 7.21
18
Disconnect the negative cable from the
remote battery terminal.
19
Remove the center console (see Chap-
ter 11).
20
Remove the ignition key from the lock
cylinder with the switch in the Lock position.
Make sure the gearshift lever is in the PARK
position.
21
When the adjustment nut on the inter-
lock lever is loosened, the cable automati-
cally indexes itself to the correct position.
Loosen the adjustment nut and allow the
cable to index itself (see illustration). After
the cable has found its position, tighten the
adjusting nut.
22
With the ignition in the OFF (locked)
position, the gearshift lever should be locked
in the PARK position. If the gearshift lever can
be moved to select another gear position,
inspect the cable for binding, proper installa-
tion and repeat the adjustment procedure.
23
Next, place the ignition key in the RUN
position (engine OFF). Move the gearshift
lever to the REVERSE position. You should
be unable to remove the key from the ignition
lock cylinder. If the key can be removed,
inspect the cable for binding, proper installa-
tion and repeat the adjustment procedure.
24
After adjustment, install the center con -
sole (see Chapter 11) and attach the negative
cable to the remote battery terminal.
8
Transmission Control Module
(TCM) - removal and installation
Note: Do not interchange TCM's from differ-
ent year vehicles. After replacing a TCM take
the vehicle to your local dealer service
department or other qualified transmission
shop to have the TCM calibrated for your
vehicle.
Caution: The TCM is an Electro-Static Dis-
charge (ESD) sensitive electronic device,
meaning a static electricity discharge from
your body could possibly damage electrical
components. Make sure to properly ground
yourself and the TCM before handling it.
Avoid touching the electrical terminals of the
TCM unless absolutely necessary.
Removal
Refer to illustration 8.3
1
Disconnect the negative cable from the
remote battery terminal.
2
On 2.4L engines, remove the air cleaner
assembly (see Chapter 4).
3
Detach the electrical connector from the
TCM (see illustration).
4
Remove the 3 mounting screws and
withdraw the TCM from the vehicle.
Installation
5
Installation is the reverse of removal.
9
Automatic transaxle - removal
and installation
Removal
Refer to illustrations 9.18, 9.19, 9.20, 9.21,
9.24 and 9.34
1
Open the hood and place protective
covers on the front fenders and cowl. Special
fender covers are available, but an old bed-
spread or blankets will also work.
2
Disconnect the negative cable from the
remote battery terminal.
3
Remove the air cleaner assembly (see
Chapter 4).
4
Remove the Transmission Control Mod-
ule (see Section 8).
5
Remove the shift cable and bracket
from the transaxle (see Section 4).
6
Disconnect and plug the transaxle oil
cooler lines and position them out of the way.
7
Loosen the driveaxle hub nuts (see
Chapter 8) and front wheel lug nuts. Raise the
vehicle and place it securely on jackstands.
7.21 Loosening the interlock cable
adjusting nut (arrow)
8.3 Transmission Control Module
(TCM) (arrow)