Opel Combo (2018 year). Manual - part 7


  Index      Opel     Opel Combo (2018 year) - manual in english


Search            copyright infringement  


Content      ..     5      6      7      8     ..


Opel Combo (2018 year). Manual - part 7


102

Lighting

Depending on version, hazard

warning flashers may come on

automatically during hard braking.

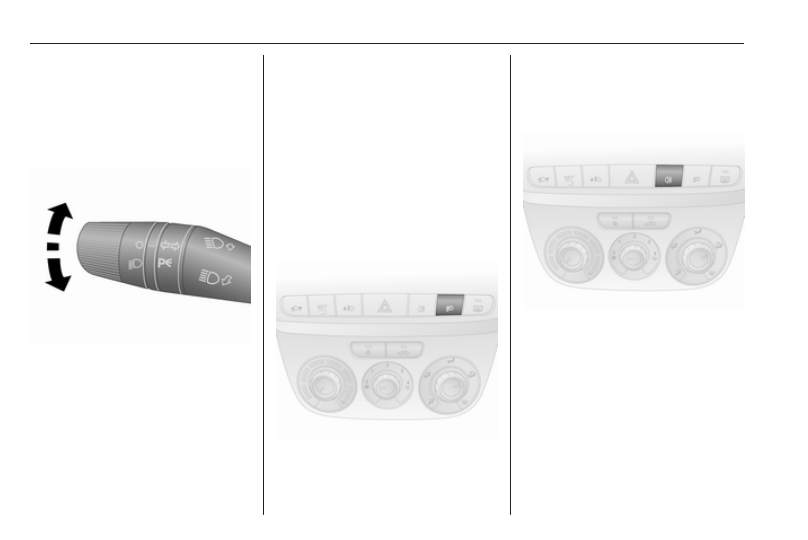
Turn and lane-change

signals

Lever up

: right turn signal

Lever down : left turn signal
A resistance point can be felt when

moving the lever.
Constant flashing is activated when

the lever is being moved beyond the

resistance point. It is deactivated

when the steering wheel is moved in

the opposite direction or lever is

manually moved back to its neutral

position.
Activate temporary flashing by

holding the lever just before the

resistance point. Turning lights will

flash until lever is being released.
To activate five flashes, tap the lever

briefly without passing the resistance

point.

Front fog lights

Operated by pressing >.
Switching on front fog lights will

switch sidelights on automatically.

Press > again to turn the front fog

lights off.

Rear fog lights

Operated by pressing ø.
The rear fog light can only be

switched on when both the ignition

and headlights or sidelights (with front

fog lights) are on.
Press ø again to turn the rear fog

light off, or turn off the headlights

and/or the front fog lights.

-------------------------------------------------------------------------------------------------------------------------------------------------------------

Lighting

103

Reversing lights

The reversing lights come on when

the ignition is on and reverse gear is

selected.

Misted light covers

The inside of the light housing may

mist up briefly in poor, wet and cold

weather conditions, in heavy rain or

after washing. The mist disappears

quickly by itself; to help, switch on the

headlights.

Interior lighting

Instrument panel

illumination control

When driving at night with the

headlights on, adjust the brightness

of the vehicle's interior lighting

(including instrument panel, climate

control display etc.) via the settings

menu of the Driver Information Centre

3

 91.

To adjust brightness:

Standard version of Driver

Information Centre

1. Press SETq once to access the

settings menu.

2. Scroll through the menu options

by pressing R or S until menu

option ILLU appears in the

display.

3. Press SETq to access this menu

option.

4. Press R or S to increase or

decrease the displayed value.

5. Press SETq briefly to confirm

changes and automatically return

to the previous display screen.

Multifunction version of Driver

Information Centre

1. Press SETq to access the

settings menu.

2. Scroll through the menu options

by pressing R or S until menu

option Dimmer appears in the

display.

3. Press SETq to access this menu

option.

-------------------------------------------------------------------------------------------------------------------------------------------------------------

104

Lighting

4. Press R or S to increase or

decrease the displayed value.

5. Press SETq briefly to confirm

changes and automatically return

to the previous display screen.

Depending on version, it may also be

possible to adjust the brightness by

pressing R or S without accessing

the settings menu.
Driver Information Centre 3 91.

Interior lights

Depending on model variant, during

entry and exit of the vehicle the front

and rear courtesy lights come on

automatically and then switch off after

a delay.

Note

In the event of an accident of a

certain severity, the interior lights

come on automatically. Fuel cut-off

system 3 97.

Front courtesy light

Centre switch position: automatic

interior light.
To operate manually when the doors

are closed, press the lens on either

side.

Front courtesy light with reading

lights

Centre switch position: automatic

interior light.
Can be operated individually or

together with switch 7 when the

doors are closed.
Press 7 left or right to operate

respective reading light.

-------------------------------------------------------------------------------------------------------------------------------------------------------------

Lighting

105

Rear courtesy lights

Centre switch position: automatic

interior light.
To operate manually when the doors

are closed, press the lens on either

side.

Load compartment lighting

Depending on model variant, load

compartment lighting switches on

when the rear doors / tailgate or

sliding side door is opened.

Removable rear courtesy light

Depending on model variant, the

removable rear courtesy light may

illuminate when the rear doors /

tailgate or sliding side doors are

opened and the central switch is in the

middle position.
Switch the light on permanently by

pressing the top part of the central

switch c.
Switch the light off permanently by

pressing the bottom part of the central

switch (AUTO OFF).
To use as a handheld torch, press

button on top of the lamp assembly

(see illustration) to release it, swing

torch down carefully and remove.

Press switch on the end of torch to

turn the light on/off.
Replace the torch in its original

position to recharge the battery after

use.

-------------------------------------------------------------------------------------------------------------------------------------------------------------

106

Lighting

Lighting features

Exit lighting

If equipped, headlights come on for

approx. 30 seconds after the vehicle

is parked and the system is activated.

Activation

1. Switch off ignition.
2. Remove ignition key.
3. Pull turn signal lever towards

steering wheel.

4. Operate turn signal lever again

within two minutes.

This action can be repeated up to

seven times to a maximum period of

210 seconds.
Control indicator 8 3 90 illuminates

in the instrument cluster during use.

Depending on version, a warning

message may also be displayed in

the Driver Information Centre 3 91.

Deactivation

Pull turn signal lever for more than

two seconds to deactivate.

Battery discharge protection

To ensure reliable engine restarts,

several vehicle battery discharge

protection features are implemented

as part of the stop-start system, e.g.

some lights may be switched off

automatically after some time.
Stop-start system 3 117.

-------------------------------------------------------------------------------------------------------------------------------------------------------------

Climate control

107

Climate control

Climate control systems ............. 107

Heating and ventilation system 107

Air conditioning system ........... 108

Electronic climate control

system .................................... 109

Air vents ..................................... 111

Adjustable air vents ................. 111

Fixed air vents ......................... 112

Maintenance .............................. 112

Air intake ................................. 112

Pollen filter ............................... 112

Air conditioning regular

operation ................................ 112

Service .................................... 112

Climate control systems

Heating and ventilation

system

Controls for:

● temperature
● fan speed
● air distribution

Heated rear window Ü 3 34.
Heated front seats ß 3 40.

Temperature

red : warm

blue : cold

Heating will not be fully effective until

the engine has reached normal

operating temperature.

Fan speed

Adjust the air flow by switching the fan

to the desired speed.

Air distribution

M

: to head area

L

: to head area and foot well

K

: to foot well and windscreen

J

: to windscreen, front door

windows and foot well

V

: to windscreen and front door

windows

Intermediate settings are possible.

Demisting and defrosting the

windows

● Set temperature control to

warmest level.

● Set fan speed to highest level.
● Set air distribution control to V.
● Switch on heated rear window Ü.

-------------------------------------------------------------------------------------------------------------------------------------------------------------

108

Climate control

● Open side air vents as required

and direct them towards door

windows.

● For simultaneous warming of the

foot well, set air distribution

control to J.

Air conditioning system

Controls for:

● temperature
● fan speed
● air distribution

n

: cooling

4

: air recirculation

Heated rear window Ü 3 34.
Heated front seats ß 3 40.

Temperature

red : warm

blue : cold
Heating will not be fully effective until

the engine has reached normal

operating temperature.

Fan speed

Adjust the air flow by switching the fan

to the desired speed.

Air distribution

M

: to head area

L

: to head area and foot well

K

: to foot well and windscreen

J

: to windscreen, front door

windows and foot well

V

: to windscreen and front door

windows

Intermediate settings are possible.

Cooling n

Press n to switch on cooling.

Activation is indicated by the LED in

the button. Cooling is only functional

when the engine is running and

climate control fan is switched on.
Press n again to switch off cooling.
The air conditioning system cools and

dehumidifies (dries) the air when

outside temperature is above a

specific level. Therefore

condensation may form and drip from

under the vehicle.
If no cooling or drying is required,

switch the cooling system off to save

fuel.
Activated cooling may inhibit

Autostops. Stop-start system 3 117.

Air recirculation system

Press 4 to activate air recirculation

mode. Activation is indicated by the

LED in the button.
Press 4 again to deactivate air

recirculation mode.

-------------------------------------------------------------------------------------------------------------------------------------------------------------

Climate control

109

9 Warning

The exchange of fresh air is

reduced in air recirculation mode.

In operation without cooling the air

humidity increases, so the

windows may mist up. The quality

of the passenger compartment air

deteriorates, which may cause the

vehicle occupants to feel drowsy.

In warm and very humid ambient air

conditions, the windscreen may mist

up from outside, when cold air is

directed towards it. If windscreen

mists up from outside, activate

windscreen wiper and deactivate V.

Maximum cooling

Briefly open the windows so that hot

air can disperse quickly.

● Cooling n on.
● Air recirculation system 4 on.
● Set air distribution control to M.
● Set temperature control to

coldest level.

● Set fan speed to highest level.
● Open all air vents.

Demisting and defrosting the

windows

● Set temperature control to

warmest level.

● Set fan speed to highest level.
● Set air distribution control to V.
● Switch cooling n on.
● Switch on heated rear window Ü.
● Open side air vents as required

and direct them towards door

windows.

● For simultaneous warming of the

foot well, set air distribution

control to J.

Stop-start system 3 117.

Electronic climate control

system

Controls for:

● temperature
● air distribution and menu

selection

● fan speed

n

: cooling

AUTO : automatic mode

4

: air recirculation

Ê

: demisting and defrosting

OFF : switch on/off
Heated rear window Ü 3 34.
Heated front seats ß 3 40.

-------------------------------------------------------------------------------------------------------------------------------------------------------------

110

Climate control

The preselected temperature is

automatically regulated. In the

automatic mode the fan speed and air

distribution automatically regulate the

air flow.
The system can be manually adapted

by use of air distribution and air flow

controls.
The electronic climate control system

is only fully operational when the

engine is running.
For correct operation do not cover the

sensor on the instrument panel.

Automatic mode

Basic setting for maximum comfort:

● Press AUTO.
● Open all air vents.
● Cooling n on.
● Set desired temperature.

Temperature preselection

Temperatures can be set to the

desired value.
For reasons of comfort, change

temperature only in small increments.

Turn AUTO knob to adjust.

clockwise

: warm

anticlockwise : cold
Heating will not be fully effective until

the engine has reached normal

operating temperature.
When the minimum temperature is

set below 16 ℃, the electronic climate

control system runs at maximum

cooling. LO appears in the display.
If the maximum temperature is set

above 32 ℃, the electronic climate

control system runs at maximum

heating. HI appears in the display.

Note

If A/C is switched on, reducing the

set cabin temperature can cause the

engine to restart from an Autostop or

inhibit an Autostop.

Stop-start system 3 117.

Fan speed

The selected fan speed is indicated

with bars in the display.
Press ] or < to increase or decrease

the fan speed.

maximum fan

speed

: all bars displayed

minimum fan

speed

: one bar displayed

Cooling n must be switched off

before fan can be deactivated.
To return to automatic fan speed:

Press AUTO.

Demisting and defrosting the

windows

Press Ê.
Temperature and air distribution are

set automatically and the fan runs at

a high speed.
When the vehicle reaches normal

operating temperature the function

remains active for approx.

three minutes.
To return to automatic mode: press

n

 or AUTO.

Air distribution

Press R, S or 6.
LED in buttons illuminate.
Arrows shown in the display indicate

the distribution settings.

-------------------------------------------------------------------------------------------------------------------------------------------------------------

Climate control

111

Cooling

Press n to switch on cooling. Cooling

is only functional when the engine is

running and climate control fan is

switched on.
Press n again to switch off cooling.
The air conditioning system cools and

dehumidifies (dries) when outside

temperature is above a specific level.

Therefore condensation may form

and drip from under the vehicle.
If no cooling or drying is required

press n again to switch the cooling

system off, thus saving fuel.

Manual air recirculation mode

Operated by pressing 4.
recirculation on : LED in button

illuminated; D

appears in the

display

recirculation off : LED in button

extinguishes; E

appears in the

display

9 Warning

The exchange of fresh air is

reduced in air recirculation mode.

In operation without cooling the air

humidity increases, so the

windows may mist up. The quality

of the passenger compartment air

deteriorates, which may cause the

vehicle occupants to feel drowsy.

In warm and very humid ambient air

conditions, the windscreen may mist

up from outside, when cold air is

directed towards it. If windscreen

mists up from outside, activate

windscreen wiper and deactivate V.
Stop-start system 3 117.

Air vents

Adjustable air vents

At least one air vent must be open

while cooling is on in order to prevent

the evaporator from icing up due to

lack of air movement.

9 Warning

Do not attach any objects to the

slats of the air vents. Risk of

damage and injury in case of an

accident.

Centre air vents, side air vents

-------------------------------------------------------------------------------------------------------------------------------------------------------------

112

Climate control

Slide knob to the left to open vent.
Direct the flow of air by swivelling the

vent.
Slide knob to the right to close vent.

Fixed air vents

Additional air vents are located

beneath the windscreen and door

windows and in the foot wells.

Maintenance

Air intake

The air intake in front of the

windscreen in the engine

compartment must be kept clear to

allow air intake. Remove any leaves,

dirt or snow.

Pollen filter

The pollen filter cleans dust, soot,

pollen and spores from the air

entering the vehicle through the air

intake.

Air conditioning regular

operation

In order to ensure continuously

efficient performance, cooling must

be operated for a few minutes once a

month, irrespective of the weather

and time of year. Operation with

cooling is not possible when outside

temperature is too low.

Service

For optimal cooling performance, it is

recommended that the climate control

system be checked annually, starting

three years after initial vehicle

registration, including:

● functionality and pressure test
● heating functionality
● leakage check
● check of drive belts
● cleaning of condenser and

evaporator drainage

● performance check

-------------------------------------------------------------------------------------------------------------------------------------------------------------

Climate control

113

Note

Refrigerant R-134a contains

fluorinated greenhouse gases with a

global warming potential of 1430.
The air conditioning system is filled

with 0.45 kg and has a CO

2

equivalent of 0.644 tonnes.

-------------------------------------------------------------------------------------------------------------------------------------------------------------

114

Driving and operating

Driving and

operating

Driving hints ............................... 114

Control of the vehicle ............... 114

Steering ................................... 115

Starting and operating ............... 115

New vehicle running-in ............ 115

Ignition switch positions ........... 115

Starting the engine .................. 116

Vehicle shutdown .................... 116

Overrun cut-off ........................ 117

Stop-start system .................... 117

Parking .................................... 120

Engine exhaust .......................... 121

Diesel particle filter .................. 121

Catalytic converter ................... 121

Manual transmission .................. 122
Manual transmission automa‐

ted .............................................. 123

Transmission display ............... 123

Starting the engine .................. 123

Selector lever .......................... 123

Manual mode ........................... 125

Electronic driving programmes 125

Fault ........................................ 126

Brakes ........................................ 127

Antilock brake system ............. 127

Parking brake .......................... 128

Brake assist ............................. 128

Hill start assist ......................... 128

Ride control systems ................. 129

Traction Control system .......... 129

Electronic Stability Control ...... 130

Driver assistance systems ......... 131

Cruise control .......................... 131

Parking assist .......................... 132

Fuel ............................................ 135

Fuel for petrol engines ............. 135

Fuel for diesel engines ............ 135

Fuel for natural gas operation . 136

Refuelling ................................ 136

Fuel consumption - CO

2

-

Emissions ............................... 138

Trailer hitch ................................ 139

General information ................. 139

Driving characteristics and

towing tips .............................. 139

Trailer towing ........................... 139

Driving hints

Control of the vehicle

Never coast with engine not

running (except during Autostop)

Many systems will not function in this

situation (e.g. brake servo unit, power

steering). Driving in this manner is a

danger to yourself and others. All

systems function during an Autostop,

but there may be a controlled

reduction in power steering assist and

vehicle speed is reduced.
Stop-start system 3 117.

Pedals

To ensure the pedal travel is

uninhibited, there must be no mats in

the area of the pedals.
Use only floor mats which fit properly

and are fixed by the retainers on the

driver's side.

Driving downhill

Engage a gear when driving downhill

to ensure that sufficient brake

pressure is available.

-------------------------------------------------------------------------------------------------------------------------------------------------------------

Driving and operating

115

Steering

If power steering assist is lost

because the engine stops or due to a

system malfunction, the vehicle can

be steered but may require increased

effort.

Caution

Never leave the steering wheel on

full lock when the vehicle is

stationary, as this may damage

the power steering pump.

Starting and operating

New vehicle running-in

Do not brake unnecessarily hard for

the first few journeys.
During the first drive, smoke may

occur because of wax and oil

evaporating off the exhaust system.

Park the vehicle in the open for a

while after the first drive and avoid

inhaling the fumes.
During the running-in period, fuel and

engine oil consumption may be

higher.
Additionally, the cleaning process of

the diesel particle filter may take

place more often.
Diesel particle filter 3 121.
Autostop may be inhibited to allow for

charging of the vehicle battery.
Stop-start system 3 117.

Ignition switch positions

Turn key:

0 : ignition off:

Some functions remain active

until key is removed or driver's

door is opened, provided the

ignition was on previously

1 : ignition on, steering wheel lock

released.
Control indicators illuminate and

most electrical functions are

operable.
Diesel engine is preheating.

2 : engine start: Release key after

starting procedure begins

-------------------------------------------------------------------------------------------------------------------------------------------------------------

116

Driving and operating

Steering wheel lock

Remove key from ignition switch and

turn steering wheel until it engages.

Starting the engine

Turn key to position 1 and move the

steering wheel slightly to release the

steering wheel lock.
Manual transmission: operate clutch

and brake pedal.
Manual transmission automated:

operate brake pedal, the transmission

automatically shifts to N (neutral).
Do not operate the accelerator pedal.

Diesel engine: turn key to position 1

for preheating until control

indicator ! extinguishes.
Turn key briefly to position 2 and

release.
Before restarting or to switch off the

engine, turn key back to position 0.

Autostop

During an Autostop, the engine is

restarted automatically by depressing

the clutch pedal.
Vehicles with manual transmission

automated (MTA): Shift to a forward

gear, release brake pedal or move

lever to +, – or R to enable an

automatic restart.
Stop-start system 3 117.

Starting the vehicle at low

temperatures

The start of the engine without

additional heaters is possible down to

-25 °С for diesel engines and -30 °C

for petrol engines. Required is an

engine oil with the correct viscosity,

the correct fuel, performed services

and a sufficiently charged vehicle

battery.

Turbo engine warm-up

Upon start-up, engine available

torque may be limited for a short time,

especially when the engine

temperature is cold. The limitation is

to allow the lubrication system to fully

protect the engine.

Vehicle shutdown

Fuel cut-off system

In the event of a collision of a certain

severity, the fuel system is cut-off and

the engine is switched off

automatically, for safety reasons.

-------------------------------------------------------------------------------------------------------------------------------------------------------------

Driving and operating

117

Control indicator 9 illuminates if the

fuel cut-off switch is triggered and,

depending on version, a

corresponding warning message may

also appear in the Driver Information

Centre 3 91.
Generic warning control indicator 9

3

 82.

Note

In addition, the vehicle is

automatically unlocked and the

hazard warning flashers and interior

lights are illuminated.

Turn the ignition key to position 0 to

prevent vehicle battery discharge and

seek the assistance of a workshop

immediately. Have the vehicle

checked for fuel leaks in the engine

compartment, beneath the vehicle

and near the fuel tank.
To reset the fuel cut-off system and

enable the vehicle to be driven:

1. Turn the ignition key to position 1

3

 115.

2. Fully actuate the right turn signal

light 3 102.

3. Deactivate the right turn signal

light.

4. Fully actuate the left turn signal

light.

5. Deactivate the left turn signal

light.

6. Repeat steps 2, 3, 4 and 5.
7. Turn the ignition key to position 0.

9 Danger

If you can smell fuel in the vehicle,

or a fuel leak is present, have the

cause of this remedied

immediately by a workshop. Do

not reset the fuel cut-off system, to

avoid the risk of fire.

Fuel system messages 3 97.

Overrun cut-off

The fuel supply is automatically cut-

off during overrun, i.e. when the

vehicle is driven with a gear engaged

but accelerator is released.
Depending on driving conditions, the

overrun cut-off may be deactivated.

Stop-start system

The stop-start system helps to save

fuel and to reduce exhaust emissions.

When conditions allow, it switches off

the engine as soon as the vehicle is

at a low speed or at a standstill, e.g.

at a traffic light or in a traffic jam. It

starts the engine automatically as

soon as the clutch is depressed.
A vehicle battery sensor ensures that

an Autostop is only performed if the

vehicle battery is sufficiently charged

for a restart.

Activation

The stop-start system is available as

soon as the engine is started, the

vehicle starts-off and the conditions

as stated below in this section are

fulfilled.

-------------------------------------------------------------------------------------------------------------------------------------------------------------


Content      ..     5      6      7      8     ..