Opel Cascada (2017 year). Manual - part 11


  Index      Opel     Opel Cascada (2017 year) - manual in english


Search            copyright infringement  


Content      ..     9      10      11      12     ..


Opel Cascada (2017 year). Manual - part 11


166

Driving and operating

Button logic to operate the systems is

as follows:

● Front-rear parking assist is

active: short press deactivates

front-rear parking assist.

● Front-rear parking assist is

active: long press activates

advanced parking assist if a

forward gear is engaged.

● Advanced parking assist is

active: short press activates

front-rear parking assist.

● Advanced parking assist is

active: long press deactivates

advanced parking assist.

● Advanced parking assist and

front-rear parking assist are

active: short press deactivates

both systems.

Activation

When reverse gear is engaged, the

front and rear parking assist is ready

to operate.
The front parking assist is also

activated automatically at a speed up

to 11 km/h.

An illuminated LED in the parking

assist button r or D indicates that

the system is ready to operate.
If the vehicle exceeds a speed of

11 km/h, the front parking assist is

deactivated. The front parking assist

is always reactivated when vehicle

speed drops below 11 km/h.

Indication

The system warns the driver with

acoustic signals against potentially

hazardous obstacles behind and in

front of the vehicle. Depending on

which side of the vehicle is closer to

an obstacle, you will hear acoustic

warning signals on the respective

side of the vehicle. The interval

between the sounds becomes shorter

as the vehicle gets closer to that

obstacle. When the distance is less

than approx. 30 cm, the sound is

continuous.
Additionally, the distance to obstacles

is shown in the Driver Information

Centre 3 96.

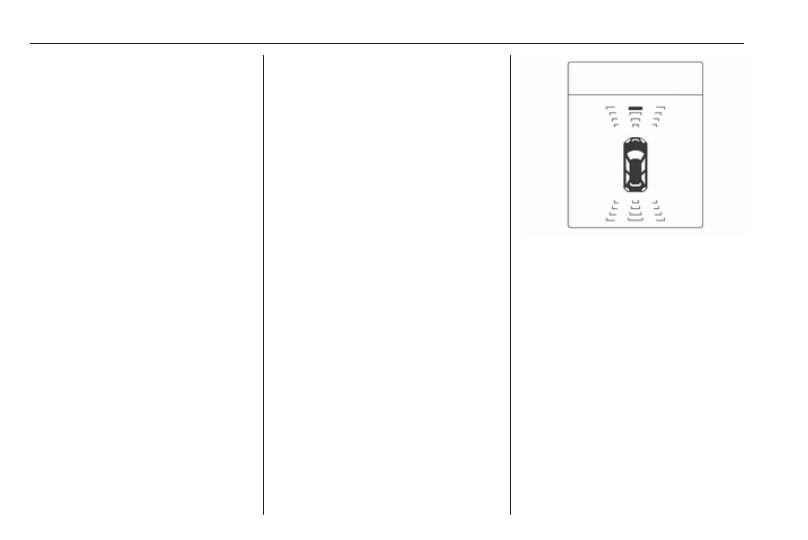
The distance to a front and rear

obstacle is indicated by changing

distance lines around the vehicle.
Rear obstacles are indicated

acoustically and visually at the same

time.
Front obstacles are indicated visually

first. At distances less than 80 cm an

acoustic signal also sounds.
The distance indication in the Driver

Information Centre can be inhibited

by vehicle messages with a higher

priority. After approving the message

by pressing SET/CLR on the turn

signal lever, distance indication

appears again.

-------------------------------------------------------------------------------------------------------------------------------------------------------------

Driving and operating

167

Deactivation

The rear parking assist automatically

switches off when reverse gear is

disengaged.
The front parking assist is deactivated

automatically at a speed above

11 km/h.

Manual deactivation is possible by

pressing the parking assist button

r or D briefly.
When the system is deactivated, the

LED in the button extinguishes.
Additionally, Park Assist Off pops-up

in the Driver Information Centre when

the system is deactivated manually.

After a manual deactivation, the front

parking assist is activated again if the

parking assist button r or D is

pressed or if reverse gear is engaged.

Fault

In the event of a fault in the system or

if the system does not work due to

temporary conditions, e.g. ice

covered sensors, a message is

displayed in the Driver Information

Centre.
Vehicle messages 3 102.

Advanced parking assist

9 Warning

The driver bears full responsibility

for accepting the parking slot

suggested by the system and the

parking manoeuvre.
Always check the surrounding

area in all directions when using

advanced parking assist.

The advanced parking assist system

manoeuvres the driver into a parking

slot by giving instructions in the Driver

Information Centre and via acoustic

signals. The driver must control

acceleration, braking, steering and

gearshifting.
The system uses the sensors of the

front-rear parking assist in

combination with two additional

sensors on both sides of the front and

rear bumper.

-------------------------------------------------------------------------------------------------------------------------------------------------------------

168

Driving and operating

Parking assist button D and

operation logic

Advanced parking assist and front-

rear parking assist, (see previous

description) are both operated by

pressing D.
Short press of D deactivates or

activates the front parking assist.
Long press of D (approx.

one second) activates or deactivates

the advanced parking assist.
Button logic to operate the systems is

as follows:

● Front-rear parking assist is

active: short press deactivates

front-rear parking assist.

● Front-rear parking assist is

active: long press activates

advanced parking assist if a

forward gear is engaged.

● Advanced parking assist is

active: short press activates

front-rear parking assist.

● Advanced parking assist is

active: long press deactivates

advanced parking assist.

● Advanced parking assist and

front-rear parking assist are

active: short press deactivates

both systems.

Activation

When searching for a parking slot, the

system is ready to operate by

pressing D for approx. one second.
The system can only be activated and

can only search for a parking slot at a

speed up to 30 km/h.

The maximum allowed parallel

distance between the vehicle and a

row of parked cars is 1.8 metres.

Functionality

When the vehicle passes a row of

cars and the system is activated, the

advanced parking assist system

begins searching for a suitable

parking slot. When a suitable slot is

detected, visual feedback in the

Driver Information Centre and an

acoustic signal are given.
If the driver does not stop the vehicle

within 10 metres after a parking slot is

proposed, the system starts to search

for another suitable parking slot.

-------------------------------------------------------------------------------------------------------------------------------------------------------------

Driving and operating

169

The parking slot suggestion of the

system is accepted when the vehicle

is stopped by the driver within

10 metres after the "Stop" message is

given. The system calculates the

optimal route into the parking slot.

Then it manoeuvres the driver into the

slot by giving detailed instructions.

The instructions in the display show:

● A hint when driving faster than

30 km/h.

● The demand to stop the vehicle,

when a parking slot is detected.

● The direction of driving during the

parking manoeuvre.

● The steering wheel position

during parking.

● For some of the instructions a

progress bar is shown.

A successful parking manoeuvre is

indicated by the 'End position'

symbol.
Always pay attention to the sound of

the front-rear parking assist.

Continuous sound means that the

distance to an obstacle is less than

approx. 30 cm.

Changing the parking side

The system is configured to detect

parking slots by default on the

passenger side. To detect parking

slots on the driver side, switch on turn

indicator to the driver side for the

duration of searching.

-------------------------------------------------------------------------------------------------------------------------------------------------------------

170

Driving and operating

As soon as turn indicator is switched

off, the system searches for parking

slots on the passenger side again.

Display priorities

After activating the advanced parking

assist, a message appears in the

Driver Information Centre. Advanced

parking assist indication in the Driver

Information Centre can be inhibited

by vehicle messages with a higher

priority. After approving the message

by pressing SET/CLR on the turn

signal lever, advanced parking assist

instructions appear again and the

parking manoeuvre can be continued.

Deactivation

The system is deactivated by:

● short press of D if advanced

parking assist and front-rear

parking assist are activated

● long press of D if advanced

parking assist is activated

● successfully ending parking

manoeuvre

● driving faster than 30 km/h
● switching off the ignition

Deactivation by the driver or by the

system during manoeuvring will be

indicated by Parking Deactivated in

the Driver Information Centre.

Fault

A message appears in the Driver

Information Centre when:

● there is a fault in the system
● the driver did not successfully

complete the parking manoeuvre

● the system is not operational

If an object is detected during parking

instructions, Stop is indicated in the

Driver Information Centre. Removing

the object will resume the parking

manoeuvre. If the object is not

removed, the system will be

deactivated. Press D for approx.

one second to activate the system

and search for a new parking slot.

Basic notes on parking assist

systems

9 Warning

Under certain circumstances,

various reflective surfaces on

objects or clothing as well as

external noise sources may cause

the system to fail to detect

obstacles.
Special attention must be paid to

low obstacles which can damage

the lower part of the bumper.

Caution

Performance of the system can be

reduced when sensors are

covered, e.g. by ice or snow.
Performance of the parking assist

system can be reduced due to

heavy loading.
Special conditions apply if there

are taller vehicles in the vicinity

(e.g. off-road vehicles, mini vans,

vans). Object identification and

-------------------------------------------------------------------------------------------------------------------------------------------------------------

Driving and operating

171

correct distance indication in the

upper part of these vehicles

cannot be guaranteed.
Objects with a very small reflection

cross-section, e.g. objects of

narrow size or soft materials, may

not be detected by the system.
Parking assist systems do not

detect objects outside the

detection range.

Note

The parking assist system can be

activated and deactivated by

changing the settings in the

Info-Display. If a trailer coupling is

attached, it must be selected in the

menu.
Vehicle personalisation 3 104.
Note

The parking assist system

automatically detects factory-fitted

towing equipment. It is deactivated

when the connector is plugged in.

It is possible that the sensor detects

a non-existing object (echo

disturbance) caused by external

acoustical or mechanic

disturbances.
Advanced parking assist system

may not respond to changes in the

parking space after initiating a

parallel parking manoeuvre.
Note

After use the advanced parking

assist requires a calibration. For

optimal parking guidance, a driving

distance of at least 35 km, including

a number of bends, is required.

Side blind spot alert

The Side blind spot alert system

detects and reports objects on either

side of the vehicle, within a specified

"blind spot" zone. The system alerts

visually in each exterior mirror, when

detecting objects that may not be

visible in the interior and exterior

mirrors.
The system's sensors are located in

the bumper on the left and right side

of the vehicle.

9

Warning

Side blind spot alert does not

replace driver vision.
The system does not detect:

● Vehicles outside the side blind

zones which may be rapidly

approaching.

● Pedestrians, cyclists or

animals.

Before changing a lane, always

check all mirrors, look over the

shoulder and use the turn signal.

When the system detects a vehicle in

the side blind zone while driving

forward, either while passing a

vehicle or being passed, an amber

warning symbol B will illuminate in

the relevant exterior mirror. If the

driver then activates the turn signal,

the warning symbol B starts flashing

amber as a warning not to change

lanes.

-------------------------------------------------------------------------------------------------------------------------------------------------------------

172

Driving and operating

Note

If the passing vehicle is at least

10 km/h faster than the passed

vehicle, the warning symbol B in the

relevant exterior mirror may not

illuminate.

Side blind spot alert is active from

speeds of 10 km/h up to 140 km/h.

Driving faster than 140 km/h

deactivates the system, indicated by

low lighting warning symbols B in

both exterior mirrors. Reducing the

speed again will extinguish the

warning symbols. If a vehicle is then

detected in the blind zone, the

warning symbols B will illuminate as

normal on the relevant side.

When the vehicle is started, both

exterior mirror displays will briefly

come on to indicate that the system is

operating.
The system can be activated or

deactivated in the menu Settings in

the Info-Display, vehicle

personalisation 3 104.
Deactivation is indicated by a

message in the Driver Information

Centre.

Detection zones

The system sensor covers a zone of

approx. 3 metres on both sides of the

vehicle. This zone starts at each

exterior mirror and extends rearwards

by approx. 3 metres. The height of the

zone is between approx. 0.5 metres

and 2 metres off the ground.
The system is deactivated if the

vehicle is towing a trailer.
Side blind spot alert is designed to

ignore stationary objects such as

guardrails, posts, curbs, walls and

beams. Parked vehicles or oncoming

vehicles are not detected.

Fault

Occasional missed alerts can occur

under normal circumstances.
Side blind spot alert does not operate

when the left or right corners of the

rear bumper are covered with mud,

dirt, snow, ice or slush. Cleaning

instructions 3 230.
In the event of a fault in the system or

if the system does not work due to

temporary conditions, a message is

displayed in the Driver Information

Centre. Seek the assistance of a

workshop in case of a permanent

fault.

Rear view camera

The rear view camera assists the

driver when reversing by displaying a

view of the area behind the vehicle.
The view of the camera is displayed

in the Colour-Info-Display.

-------------------------------------------------------------------------------------------------------------------------------------------------------------

Driving and operating

173

9 Warning

The rear view camera does not

replace driver vision. Note that

objects that are outside the

camera's field of view and the

advanced parking assist sensors,

e.g. below the bumper or

underneath the vehicle, are not

displayed.
Do not reverse the vehicle by only

looking at the Info-Display and

check the surrounding area

behind and around the vehicle

before reversing.

Activation

Rear view camera is automatically

activated when reverse gear is

engaged.

Functionality

The camera is mounted between the

number plate lights and has a viewing

angle of 130°.

The area displayed by the camera is

limited. The distance of the image that

appears on the display differs from

the actual distance.

Guiding lines

Dynamic guiding lines are horizontal

lines in 1 metre intervals projected on

the picture to define the distance to

shown objects.

Trajectory lane of the vehicle is

shown in accordance with the

steering angle.
The function can be deactivated in the

Settings menu in the Info-Display.

Vehicle personalisation 3 104.

-------------------------------------------------------------------------------------------------------------------------------------------------------------

174

Driving and operating

Warning symbols

Warning symbols are indicated as

triangles 9 on the picture, which show

obstacles detected by the rear

sensors of the advanced parking

assist.
Additionally 9 appears on the top line

of the Info-Display with a warning to

check the vehicle surrounding.
The top line of the display can be

cleared by pressing the multifunction

knob.

Display settings

Navi 650/Navi 950: Brightness can be

set by first pressing and then turning

the outer ring of the multifunction

knob.
CD 600: Brightness can be set by first

pressing and then turning the

multifunction knob.

Deactivation

The camera is deactivated when a

certain forward speed is exceeded or

if reverse gear is not engaged for

approx. 10 seconds.
Activation or deactivation of the rear

view camera can be changed in the

Settings menu in the Info-Display.

Vehicle personalisation 3 104.

Fault

Fault messages are displayed with a

9 on the top line of the Info-Display.
The rear view camera may not

operate properly when:

● The surrounding area is dark.
● The sun or the beam of

headlights is shining directly into

the camera lens.

● Ice, snow, mud, or anything else

covers the camera lens. Clean

the lens, rinse it with water, and

wipe it with a soft cloth.

● The vehicle had a rear-end

accident.

● There are extreme temperature

changes.

Traffic sign assistant

Functionality

The traffic sign assistant system

detects designated traffic signs via a

front camera and displays them in the

Driver Information Centre.

-------------------------------------------------------------------------------------------------------------------------------------------------------------

Driving and operating

175

Traffic signs which will be detected

are:
Limit and no passing signs

● speed limit
● no passing
● end of speed limit
● end of no passing

Road signs

Beginning and end of:

● motorways
● A-roads
● play streets

Add-on signs

● additional hints to traffic signs
● restriction of trailer towing
● tractor constraints
● wet warning
● ice warning
● direction arrows

Speed limit signs and no passing

signs are displayed in the Driver

Information Centre until the next

speed limit sign or end of speed limit

is detected or up to a defined sign

timeout.

Indication of multiple signs on the

display is possible.

An exclamation mark in a frame

indicates that there is an add on sign

detected which cannot be recognised

by the system.
The system is active up to a speed of

200 km/h depending on the lighting

conditions. At night the system is

active up to a speed of 160 km/h.
As soon as vehicle speed becomes

slower than 55 km/h the display will

be reset and the content of the traffic

sign page will be cleared, e.g. when

entering a city zone. The next

recognized speed indication will be

displayed.

Display indication

Traffic signs are displayed in the

Traffic sign detection page in the

Driver Information Centre.

-------------------------------------------------------------------------------------------------------------------------------------------------------------

176

Driving and operating

Select Settings X by pressing

MENU and select Traffic sign

detection entry via the adjuster wheel

on the turn signal lever 3 96.
When another function in the Driver

Information Centre menu was

selected then Traffic sign detection

page is chosen again, the last

recognised traffic sign will be

displayed.

Alert function

Once activated, speed limit and no

passing signs are displayed as pop-

up alerts in the Driver Information

Centre.

The alert function can be activated or

deactivated in the setting menu of the

traffic sign assistant page by pressing

SET/CLR on the turn signal lever.

-------------------------------------------------------------------------------------------------------------------------------------------------------------

Driving and operating

177

When the setting page is displayed,

select Off to deactivate alert function.

Reactivate by selecting On.
When switching on the ignition, alert

function is deactivated.
Pop-up indication is displayed for

approx. 8 seconds in the Driver

Information Centre.

System reset

The content of the traffic sign memory

can be cleared in the setting menu of

the traffic sign assistant page by

pressing and holding SET/CLR on the

turn signal lever. Upon successful

reset, a chime will sound and the

following symbol is indicated until the

next traffic sign is detected.

In some cases, traffic sign assistant is

reset automatically by the system.

Fault

The traffic sign assistant system may

not operate correctly when:

● The area of the windscreen,

where the front camera is

located, is not clean.

● Traffic signs are completely or

partially covered or difficult to

discern.

● There are adverse environmental

conditions, e.g. heavy rain, snow,

direct sunlight or shadows. In this

event, No Traffic Sign Detection

due to Weather is indicated in the

Driver Information Centre.

● Traffic signs are incorrectly

mounted or damaged.

● Traffic signs do not comply with

the Vienna Convention on traffic

signs (Wiener Übereinkommen

über Straßenverkehrszeichen).

Caution

The system is intended to help the

driver within a defined speed

range to discern certain traffic

signs. Do not ignore traffic signs

which are not displayed by the

system.
The system does not discern any

other than the conventional traffic

signs that might give or end a

speed limit.
Do not let this special feature

tempt you into taking risks when

driving.
Always adapt speed to the road

conditions.

-------------------------------------------------------------------------------------------------------------------------------------------------------------

178

Driving and operating

The driver assistance systems do

not relieve the driver from full

responsibility for vehicle

operation.

Lane departure warning

The lane departure warning system

observes the lane markings between

which the vehicle is driving via a front

camera. The system detects lane

changes and warns the driver in the

event of an unintended lane change

via visual and acoustic signals.
Criteria for the detection of an

unintended lane change are:

● no operation of turn signals
● no brake pedal operation
● no active accelerator operation or

speeding-up

● no active steering

If the driver is performing these

actions, no warning will be issued.

Activation

The lane departure warning system is

activated by pressing ). The

illuminated LED in the button

indicates that the system is switched

on. When the control indicator ) in

the instrument cluster illuminates

green, the system is ready to operate.
The system is only operable at

vehicle speeds above 56 km/h and if

lane markings are available.
When the system recognises an

unintended lane change, the control

indicator ) changes to yellow and

flashes. Simultaneously a chime

sound is activated.

Deactivation

The system is deactivated by

pressing ), the LED in the button

extinguishes.
At speeds below 56 km/h the system

is inoperable.

Fault

The lane departure warning system

may not operate properly when:

● the windscreen is not clean
● there are adverse environmental

conditions like heavy rain, snow,

direct sunlight or shadows

-------------------------------------------------------------------------------------------------------------------------------------------------------------

Driving and operating

179

The system cannot operate when no

lane marking is detected.

Fuel

Fuel for petrol engines

Only use unleaded fuel that complies

with European standard EN 228 or

E DIN 51626-1 or equivalent.
The engine is capable of running with

fuel that contains up to 10% ethanol

(e.g. named E10).
Use fuel with the recommended

octane rating. The engine specific

requirements are given in the engine

data overview 3 241. A country

specific label at the fuel filler flap can

supersede the requirement.

Caution

Do not use fuel or fuel additives

that contain metallic compounds

such as manganese-based

additives. This may cause engine

damage.

Caution

Use of fuel that does not comply to

EN 228 or E DIN 51626-1 or

equivalent can lead to deposits or

engine damage and may affect

your warranty.

Caution

Use of fuel with too low an octane

rating could lead to uncontrolled

combustion and engine damage.

Fuel for diesel engines

Only use diesel fuel that complies

with EN 590.
In countries outside the European

Union use Euro-Diesel fuel with a

sulphur concentration below 50 ppm.

-------------------------------------------------------------------------------------------------------------------------------------------------------------

180

Driving and operating

Caution

Use of fuel that does not comply to

EN 590 or similar can lead to

engine powerloss, increased wear

or engine damage and may affect

your warranty.

Do not use marine diesel oils, heating

oils, Aquazole and similar diesel-

water emulsions. Diesel fuels must

not be diluted with fuels for petrol

engines.

Refuelling

9 Danger

Before refuelling, switch off

ignition and any external heaters

with combustion chambers.

Switch off any mobile phones.
Follow the operating and safety

instructions of the filling station

when refuelling.

9 Danger

Fuel is flammable and explosive.

No smoking. No naked flames or

sparks.
If you can smell fuel in your

vehicle, have the cause of this

remedied immediately by a

workshop.

Caution

In case of misfuelling, do not

switch on ignition.

Fuel filler flap is located at right rear

side of vehicle.

The fuel filler flap can only be opened

if the vehicle is unlocked. Release the

fuel filler flap by pushing the flap.
To open, turn the cap slowly

anticlockwise.

-------------------------------------------------------------------------------------------------------------------------------------------------------------

Driving and operating

181

The fuel filler cap can be retained in

the bracket on the fuel filler flap.
To refuel, fully insert the pump nozzle

and switch it on.
After the automatic cut-off, the tank

can be topped up by operating the

pump nozzle a maximum of two more

times.

Caution

Wipe off any overflowing fuel

immediately.

To close, turn the fuel filler cap to the

right until it clicks.
Close the flap and allow it to engage.

Vehicles with misfuel inhibitor

9 Warning

Do not try to open the flap of the

fuel filler neck manually on

vehicles with misfuel inhibitor.
Disregard could lead to trapping of

the fingers.

Vehicles with a selective catalytic

reduction system are equipped with a

misfuel inhibitor.

The misfuel inhibitor ensures that the

flap of the fuel filler neck can only be

opened by using a nozzle for diesel

fuel or a funnel for emergency

refilling.
Turn the fuel filler cap slowly

anticlockwise.
The cap can be retained in the

bracket on the fuel filler flap.
Place the nozzle in a straight line to

the filler neck and press with slight

force to insert.

In case of an emergency, refill with a

canister. A funnel must be used to

open the cap of the filler neck.

The funnel is located in the load

compartment.
Place the funnel in a straight line to

the filler neck and press with slight

force to insert.
Use the funnel to fill the diesel fuel into

the filler neck.
After topping-up, put the funnel into

the plastic bag and stow it in the

storage compartment.
Selective catalytic reduction system

3

 144.

-------------------------------------------------------------------------------------------------------------------------------------------------------------


Content      ..     9      10      11      12     ..