Nissan Sentra (2019 year). Instruction - part 12


  Index      Nissan     Nissan Sentra - instruction 2019 year in english


Search            


Content   ..  10  11  12  13   ..


Nissan Sentra (2019 year). Instruction - part 12


AUTOMATIC ANTI-GLARE
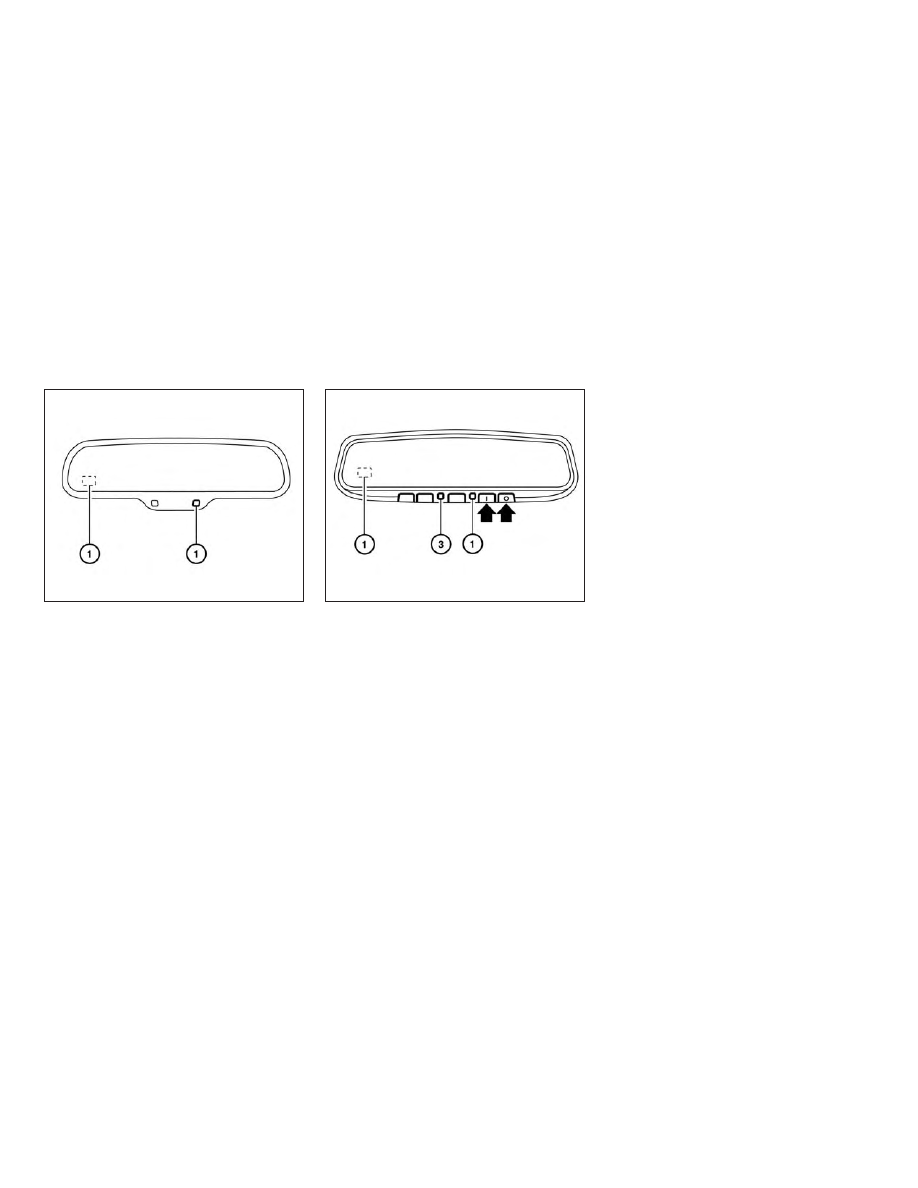
REARVIEW MIRROR (if so equipped)

The inside mirror is designed so that it au-
tomatically dims according to the intensity
of the headlights of the vehicle following
you. The automatic anti-glare feature is ac-
tivated when the ignition switch is in the
ON position.

NOTE:

Do not hang any objects over the sen-
sors

1

or apply glass cleaner to the sen-

sors. Doing so will reduce the sensitivity
of the sensors, resulting in improper op-
eration.

The indicator light

3

will illuminate when

the automatic anti-glare feature is operat-
ing.

Type B (if so equipped)

∙ To turn off the anti-glare feature, press

the O button and the indicator light will
turn off.

∙ To turn on the anti-glare feature, press

the |

button and the indicator light

will turn on.

For additional information on HomeLink®
Universal Transceiver operation, refer to
“HomeLink® Universal Transceiver” in the
“Instruments and controls” section of this
manual.

Type A (if so equipped)

LPD2418

Type B (if so equipped)

LPD2411

3-32

Pre-driving checks and adjustments

OUTSIDE MIRRORS

The outside mirror remote control will op-
erate only when the ignition switch is in the
ACC or ON position.

Move the small switch

1

to select the right

or left mirror. Adjust each mirror to the de-
sired position using the large switch

2

.

Move the switch to the center (neutral) po-
sition to prevent accidentally moving the
mirror.

WARNING

∙ Objects viewed in the outside mirror

on the passenger side are closer than
they appear. Be careful when moving
to the right. Using only this mirror
could cause an accident. Use the in-
side mirror or glance over your shoul-
der to properly judge distances to
other objects.

∙ Do not adjust the mirrors while driv-

ing. You could lose control of your ve-
hicle and cause an accident.

Manual folding outside mirrors

Pull the outside mirror toward the door to
fold it.

Heated mirrors (if so equipped)

Some outside mirrors can be heated to
defrost, defog, or de-ice for improved vis-
ibility. For additional information, refer to
“Rear window and outside mirror (if so
equipped) defroster switch” in the “Instru-
ments and controls” section of this manual.

LPD0237

LPD2112

Pre-driving checks and adjustments

3-33

4 Monitor, climate, audio, phone and
voice recognition systems

NissanConnect® Owner’s Manual . . . . . . . . . . . . . . . . 4-2
Control panel buttons . . . . . . . . . . . . . . . . . . . . . . . . . . . 4-3

How to use the touch-screen. . . . . . . . . . . . . . . . . 4-3

How to use the

MENU button . . . . . . . . . . . 4-5

(brightness control) button . . . . . . . . . . . . . 4-7

How to use the VOL (volume) knob /
PUSH

(power) button . . . . . . . . . . . . . . . . . . . 4-7

Selecting menu from launch bar . . . . . . . . . . . . . 4-7

RearView Monitor . . . . . . . . . . . . . . . . . . . . . . . . . . . . . . . 4-8

RearView Monitor system operation . . . . . . . . . . 4-9
How to read the displayed lines. . . . . . . . . . . . . . 4-10
Difference between predicted and
actual distances. . . . . . . . . . . . . . . . . . . . . . . . . . . . . 4-10
How to park with predicted course
lines (if so equipped) . . . . . . . . . . . . . . . . . . . . . . . . . 4-12
Adjusting the screen . . . . . . . . . . . . . . . . . . . . . . . . 4-13
How to turn on and off predicted
course lines (if so equipped) . . . . . . . . . . . . . . . . . 4-14
RearView Monitor system limitations . . . . . . . . 4-14
System maintenance. . . . . . . . . . . . . . . . . . . . . . . . 4-15

Vents. . . . . . . . . . . . . . . . . . . . . . . . . . . . . . . . . . . . . . . . . . . 4-16
Heater (manual) (if so equipped) . . . . . . . . . . . . . . . . 4-16

Controls . . . . . . . . . . . . . . . . . . . . . . . . . . . . . . . . . . . . . 4-17

Heater operation . . . . . . . . . . . . . . . . . . . . . . . . . . . . 4-18
Air flow charts . . . . . . . . . . . . . . . . . . . . . . . . . . . . . . . 4-19

Heater and air conditioner (manual)
(if so equipped) . . . . . . . . . . . . . . . . . . . . . . . . . . . . . . . . . 4-22

Controls . . . . . . . . . . . . . . . . . . . . . . . . . . . . . . . . . . . . . 4-23
Heater operation . . . . . . . . . . . . . . . . . . . . . . . . . . . . 4-24
Air conditioner operation . . . . . . . . . . . . . . . . . . . . 4-25
Air flow charts . . . . . . . . . . . . . . . . . . . . . . . . . . . . . . . 4-26

Heater and air conditioner (automatic)
(if so equipped) . . . . . . . . . . . . . . . . . . . . . . . . . . . . . . . . . 4-30

Automatic operation . . . . . . . . . . . . . . . . . . . . . . . . 4-31
Manual operation . . . . . . . . . . . . . . . . . . . . . . . . . . . 4-32
Operating tips . . . . . . . . . . . . . . . . . . . . . . . . . . . . . . . 4-33

Servicing air conditioner (if so equipped). . . . . . . . 4-33
Audio system. . . . . . . . . . . . . . . . . . . . . . . . . . . . . . . . . . . 4-33

Radio. . . . . . . . . . . . . . . . . . . . . . . . . . . . . . . . . . . . . . . . 4-33
FM radio reception . . . . . . . . . . . . . . . . . . . . . . . . . . 4-34
AM radio reception . . . . . . . . . . . . . . . . . . . . . . . . . . 4-34
Audio operation precautions . . . . . . . . . . . . . . . . 4-34
FM/AM radio. . . . . . . . . . . . . . . . . . . . . . . . . . . . . . . . . 4-38
USB (Universal Serial Bus) Connection
Port . . . . . . . . . . . . . . . . . . . . . . . . . . . . . . . . . . . . . . . . . 4-43
iPod®* player operation . . . . . . . . . . . . . . . . . . . . . . 4-46
Bluetooth® streaming audio . . . . . . . . . . . . . . . . . 4-49

Steering wheel switch for audio control. . . . . . 4-52
Antenna . . . . . . . . . . . . . . . . . . . . . . . . . . . . . . . . . . . . . 4-53

Siri® Eyes Free (if so equipped) . . . . . . . . . . . . . . . . . . 4-53

Requirements . . . . . . . . . . . . . . . . . . . . . . . . . . . . . . . 4-53
Operating Siri® Eyes Free . . . . . . . . . . . . . . . . . . . . 4-54
Troubleshooting guide . . . . . . . . . . . . . . . . . . . . . . 4-55

Car phone or CB radio . . . . . . . . . . . . . . . . . . . . . . . . . . 4-56
Bluetooth® Hands-Free Phone System . . . . . . . . . 4-56

Regulatory information . . . . . . . . . . . . . . . . . . . . . . 4-58
Using the system. . . . . . . . . . . . . . . . . . . . . . . . . . . . 4-59
Indicators . . . . . . . . . . . . . . . . . . . . . . . . . . . . . . . . . . . 4-60

Control buttons . . . . . . . . . . . . . . . . . . . . . . . . . . . . . 4-60
Connecting procedure . . . . . . . . . . . . . . . . . . . . . . 4-61
Voice commands . . . . . . . . . . . . . . . . . . . . . . . . . . . 4-63
Phone display screen. . . . . . . . . . . . . . . . . . . . . . . . 4-65
Making a call . . . . . . . . . . . . . . . . . . . . . . . . . . . . . . . . 4-66
Receiving a call . . . . . . . . . . . . . . . . . . . . . . . . . . . . . . 4-67
During a call . . . . . . . . . . . . . . . . . . . . . . . . . . . . . . . . . 4-67
Ending a call. . . . . . . . . . . . . . . . . . . . . . . . . . . . . . . . .4-68
Text messaging (if so equipped) . . . . . . . . . . . . .4-68
Bluetooth® connections screen . . . . . . . . . . . . . 4-71
Phone and text message settings . . . . . . . . . . . 4-72

Refer to the NissanConnect® Owner’s
Manual that includes the following infor-
mation.

∙ NissanConnect® Services

∙ Navigation system

∙ Audio system

∙ Apple CarPlay

TM

∙ Android Auto

TM

∙ Bluetooth® Hands-Free Phone system

∙ Viewing information

∙ Other settings

∙ Voice recognition

∙ General system information

WARNING

∙ Positioning of the heating or air con-

ditioning controls and display con-
trols should not be done while driving
in order that full attention may be
given to the driving operation.

∙ Do not disassemble or modify this

system. If you do, it may result in acci-
dents, fire, or electrical shock.

∙ Do not use this system if you notice

any abnormality, such as a frozen
screen or lack of sound. Continued
use of the system may result in acci-
dent, fire or electric shock.

∙ In case you notice any foreign object

in the system hardware, spill liquid on
it, or notice smoke or smell coming
from it, stop using the system imme-
diately. Ignoring such conditions may
lead to accidents, fire or electrical
shock. It is recommended that you
visit a NISSAN dealer for servicing.

NISSANCONNECT® OWNER’S
MANUAL

4-2

Monitor, climate, audio, phone and voice recognition systems

1.

MENU button

2.

button*

3. Display screen

4.

(brightness control) button

5. VOL

(volume)

knob

/

PUSH

(power) button

* For additional information regarding the
Bluetooth® Hands-Free Phone System
control button, refer to “Bluetooth® Hands-
Free Phone System” in this section.

When you use this system, make sure the
engine is running.

If you use the system with the engine not
running for a long time, it will discharge
the battery, and the engine will not start.

Reference symbols:

“Example” — Words marked in quotes refer
to a key shown only on the display. These
keys can be selected by touching the
screen.

HOW TO USE THE TOUCH-SCREEN

CAUTION

∙ The glass display screen may break if

it is hit with a hard or sharp object. If
the glass screen breaks, do not touch
it. Doing so could result in an injury.

∙ To clean the display, never use a rough

cloth, alcohol, benzine, thinner or any
kind of solvent or paper towel with a
chemical cleaning agent. They will
scratch or deteriorate the panel.

∙ Do not splash any liquid such as water

or car fragrance on the display. Con-
tact with liquid will cause the system
to malfunction.

LHA4680

CONTROL PANEL BUTTONS

Monitor, climate, audio, phone and voice recognition systems

4-3

To help ensure safe driving, some functions
cannot be operated while driving.

The on-screen functions that are not avail-
able while driving will be “grayed out” or
muted.

WARNING

∙ ALWAYS give your full attention to

driving.

∙ Avoid using vehicle features that

could distract you. If distracted, you
could lose control of your vehicle and
cause an accident.

Touch-screen operation

Menu Item

Result

Selecting the item

Touch an item to select. To select the “Phone” key, touch the “Phone” key on the screen. Touch the “

” key to

return to the previous screen.

Adjusting the item

Touch the “+” key or the “

⫺” key to adjust the settings of an item. Touch the up arrow to scroll up the page one

item at a time. Touch the down arrow to scroll down the page one item at a time.

Inputting characters

Touch the number key. There are some options available when inputting characters.

123

Touch to manually enter numbers.

OK

Completes the character input.

LHA4700

4-4

Monitor, climate, audio, phone and voice recognition systems

Touch-screen maintenance

If you clean the display screen, use a dry,
soft cloth. If additional cleaning is neces-
sary, use a small amount of neutral deter-
gent with a soft cloth. Never spray the
screen with water or detergent. Dampen
the cloth first and then wipe the screen.

HOW TO USE THE

MENU

BUTTON

To select and/or adjust several functions,
features and modes that are available for
your vehicle:

1. Press the

MENU button.

2. Touch the “Settings” key.

3. Touch the desired item.

LHA4706

LHA4700

Monitor, climate, audio, phone and voice recognition systems

4-5

Menu item

Result

Settings

Touch to change the following settings.

Connections

Touch this key to select either Bluetooth® phone, Bluetooth® audio or USB audio options. For additional
information, refer to “USB connections screen” and “Bluetooth® connections screen” in this section.

Phone

For additional information, refer to “Bluetooth® Hands-Free Phone System” in this section.

Sound

For additional information, refer to “Audio system” in this section.

Volume & Beeps

For additional information, refer to “Volume & beeps” in this section.

Clock

Touch this key to adjust clock settings.

On-screen Clock

Touch to toggle ON or OFF the clock display on the upper right corner of the display screen.

Clock Format

Touch to set the clock to 12 hour or 24 hour formats.

Daylight Savings Time

Touch to adjusts the daylight saving time to on or off.

Set Clock Manually

Touch to adjust the clock manually; then touch to change between AM and PM, the hour and the
minutes.

System Voice

For additional information, refer to “Settings” in this section.

Camera

Touch this key to change the camera settings.

Others

Touch this key to select and/or adjust various functions of this system. A screen with additional options
will appear.

Display

Touch this key to adjust the appearance of the display. For additional information, refer to “Adjusting the
screen” in this section.

Language

Touch this key to change the language on the display.

OSS Licenses

Touch this key to display software licensing information.

Return All Settings to Default

Touch this key to return all settings to default and to clear the memory.

4-6

Monitor, climate, audio, phone and voice recognition systems

(brightness control) BUTTON

To change the display brightness, press
the

button. Pressing the button again

will change the display to the day or the
night display.

Press and hold the

button for more

than 2 seconds to turn the display off. Press
and hold the button again to turn the dis-
play on.

HOW TO USE THE VOL (volume)
KNOB / PUSH

(power)

BUTTON

Press the PUSH

(power) button to

turn audio function on and off. Turn the VOL
(volume) knob to adjust audio volume.

SELECTING MENU FROM LAUNCH
BAR

Various system functions can be accessed
by touching the items on the Launch Bar

1

which is displayed on most of the main

menu screens (the Launch Bar does not
appear on some screens such as settings
screens, camera screens, etc.)

Touch the keys on the Launch Bar to dis-
play the corresponding menu screens.

The following menu items are available on
the Launch Bar:

∙ AM

∙ FM

∙ USB/iPod

∙ Bluetooth

∙ AUX

∙ Settings

LHA4707

Monitor, climate, audio, phone and voice recognition systems

4-7

LHA4780

REARVIEW MONITOR

4-8

Monitor, climate, audio, phone and voice recognition systems

WARNING

∙ Failure to follow the warnings and in-

structions for proper use of the Rear-
View Monitor system could result in
serious injury or death.

∙ RearView Monitor is a convenience

feature and is not a substitute for
proper backing. Always turn and look
out the windows and check mirrors to
be sure that it is safe to move before
operating the vehicle. Always back up
slowly.

∙ The system is designed as an aid to

the driver in showing large stationary
objects directly behind the vehicle, to
help avoid damaging the vehicle.

∙ The distance guide lines and the ve-

hicle width lines should be used as a
reference only when the vehicle is on a
level paved surface. The distance
viewed on the monitor is for reference
only and may be different than the
actual distance between the vehicle
and displayed objects.

CAUTION

Do not scratch the camera lens when
cleaning dirt or snow from the front of
the camera.

The RearView Monitor system automati-
cally shows a rear view of the vehicle when
the shift lever is shifted into the R (Reverse)
position. The radio can still be heard while
the RearView Monitor is active.

To display the rear view, the RearView Moni-
tor system uses a camera located just
above the vehicle’s license plate

1

.

REARVIEW MONITOR SYSTEM
OPERATION

With the ignition switch in the ON position,
move the shift lever to the R (Reverse) po-
sition to operate the RearView Monitor.

LHA3819

Monitor, climate, audio, phone and voice recognition systems

4-9

HOW TO READ THE DISPLAYED
LINES

Guiding lines which indicate the vehicle
width and distances to objects with refer-
ence to the vehicle body line

A

are dis-

played on the monitor.

Distance guide lines

Indicate distances from the vehicle body.

∙ Red line

1

: approx. 1.5 ft (0.5 m)

∙ Yellow line

2

: approx. 3 ft (1 m)

∙ Green line

3

: approx. 7 ft (2 m)

Vehicle width guide lines

4

Indicate the vehicle width when backing
up.

Predicted course lines

5

(if so equipped)

Indicate the predicted course when back-
ing up. The predicted course lines will be
displayed on the monitor when the shift
lever is in the R (Reverse) position and the
steering wheel is turned. The predicted
course lines will move depending on how
much the steering wheel is turned and will
not be displayed while the steering wheel is
in the straight-ahead position.

The vehicle width guide lines and the width
of the predicted course lines are wider than
the actual width and course.

DIFFERENCE BETWEEN PREDICTED
AND ACTUAL DISTANCES

The displayed guidelines and their loca-
tions on the ground are for approximate
reference only. Objects on uphill or downhill
surfaces or projecting objects will be actu-
ally located at distances different from
those displayed in the monitor relative to
the guidelines (refer to illustrations). When
in doubt, turn around and view the objects

as you are backing up, or park and exit the
vehicle to view the positioning of objects
behind the vehicle.

LHA4805

4-10

Monitor, climate, audio, phone and voice recognition systems

Backing up on a steep uphill

When backing up the vehicle up a hill, the
distance guide lines and the vehicle width
guide lines are shown closer than the actual
distance. Note that any object on the hill is
further than it appears on the monitor.

Backing up on a steep downhill

When backing up the vehicle down a hill, the
distance guide lines and the vehicle width
guide lines are shown farther than the actual
distance. Note that any object on the hill is
closer than it appears on the monitor.

Backing up near a projecting object

The predicted course lines

A

(if so

equipped) do not touch the object in the
display. However, the vehicle may hit the
object if it projects over the actual backing
up course.

LHA4941

LHA4942

LHA4806

Monitor, climate, audio, phone and voice recognition systems

4-11

Backing up behind a projecting
object

The position

C

is shown farther than the

position

B

in the display. However, the po-

sition

C

is actually at the same distance as

the position

A

. The vehicle may hit the

object when backing up to the position

A

if the object projects over the actual back-
ing up course.

HOW TO PARK WITH PREDICTED
COURSE LINES (if so equipped)

WARNING

∙ If the tires are replaced with different

sized tires, the predicted course lines
may be displayed incorrectly.

∙ On a snow-covered or slippery road,

there may be a difference between
the predicted course line and the ac-
tual course line.

∙ If the battery is disconnected or be-

comes

discharged,

the

predicted

course lines may be displayed incor-
rectly. If this occurs, please perform
the following procedures:

– Turn the steering wheel from lock

to lock while the engine is running.

– Drive the vehicle on a straight road

for more than 5 minutes.

∙ When the steering wheel is turned

with the ignition switch in the ACC po-
sition, the predicted course lines may
be displayed incorrectly.

1. Visually check that the parking space is

safe before parking your vehicle.

2. The rear view of the vehicle is displayed

on the screen

A

when the shift lever is

moved to the R (Reverse) position.

LHA4013

LHA4769

4-12

Monitor, climate, audio, phone and voice recognition systems

3. Slowly back up the vehicle adjusting

the steering wheel so that the pre-
dicted course lines

B

enter the park-

ing space

C

.

4. Maneuver the steering wheel to make

the vehicle width guide lines

D

parallel

to the parking space

C

while referring

to the predicted course lines.

5. When the vehicle is parked in the space

completely, move the shift lever to the
P (Park) position and apply the parking
brake.

ADJUSTING THE SCREEN

1. While on the main menu screen, touch

the “Settings” key.

2. Touch the “Camera” key.

3. Touch the “Brightness”, “Contrast”, Tint”,

“Color”, or “Black Level” key.

4. Adjust the item by touching the “+” or “–”

key on the touch-screen display.

NOTE:

Do not adjust any of the display settings
of the RearView Monitor while the ve-
hicle is moving.

LHA4770

LHA3522

Monitor, climate, audio, phone and voice recognition systems

4-13


Content   ..  10  11  12  13   ..