Nissan Murano Hybrid (2016 year). Instruction - part 24


  Index      Nissan     Nissan Murano Hybrid - instruction 2016 year in english


Search            


Content   ..  22  23  24  25   ..


Nissan Murano Hybrid (2016 year). Instruction - part 24


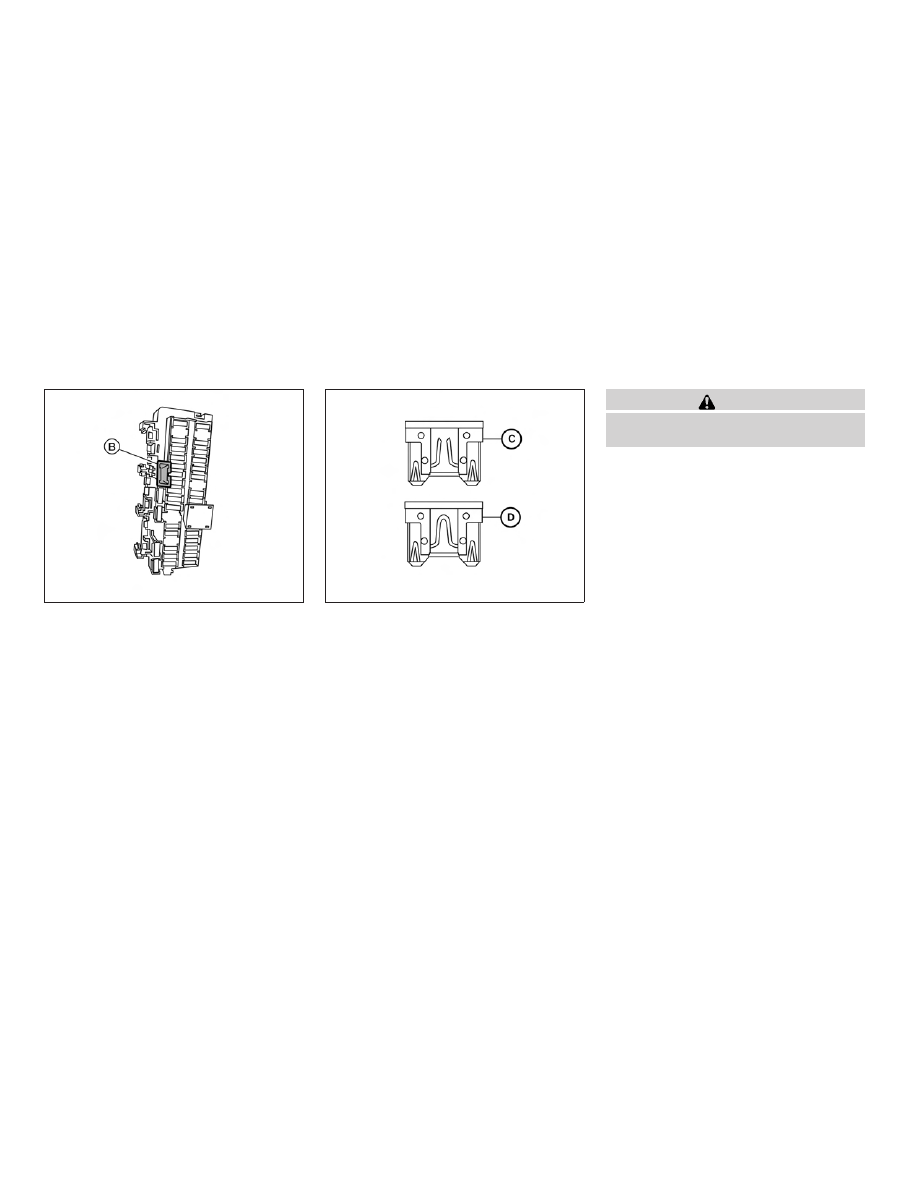
4. Remove the fuse with the fuse puller

B

.

5. If the fuse is open

C

, replace it with an

equivalent good fuse

D

.

6. Push the fuse box cover to install.

If a new fuse also opens, have the electrical
system checked and repaired. It is recommended
you visit a NISSAN dealer for this service.

CAUTION

Be careful not to allow children to swallow
the battery or removed parts.

LDI2902

LDI2713

BATTERY REPLACEMENT

8-26

Maintenance and do-it-yourself

NISSAN INTELLIGENT KEY®

Replace the battery in the Intelligent Key as fol-
lows:

1. Remove the mechanical key from the Intelli-

gent Key.

2. Insert a small flathead screwdriver

A

into

the slit

B

of the corner and twist it to sepa-

rate the upper part from the lower part. Place
a cloth over the screwdriver to protect the
casing.

LDI2001

LDI2637

Maintenance and do-it-yourself

8-27

3. Replace the battery with a new one.

Recommended battery: CR2032 or equiva-
lent.

● Do not touch the internal circuit and elec-

tric terminals as doing so could cause a
malfunction.

● Hold the battery by the edges. Holding

the battery across the contact points will
seriously deplete the storage capacity.

● Make sure that the + side faces the bot-

tom of the lower part.

4. Close the lid securely as illustrated with

C

and

D

.

5. Operate the buttons to check the operation.

If you need assistance with replacement, it is
recommended you visit a NISSAN dealer for this
service.

FCC Notice:

For USA:
This device complies with Part 15 of the
FCC Rules. Operation is subject to the fol-
lowing two conditions: (1) This device may
not cause harmful interference, and (2) this
device must accept any interference re-
ceived, including interference that may
cause undesired operation.

Note:

Changes or modifications not expressly ap-
proved by the party responsible for compli-
ance could void the user’s authority to op-
erate the equipment.

For Canada:
This device complies with Industry Canada
licence-exempt RSS standard(s). Opera-
tion is subject to the following two condi-
tions: (1) this device may not cause inter-
ference, and (2) this device must accept any
interference, including interference that
may cause undesired operation of the de-
vice.

HEADLIGHTS
Replacing the halogen headlight bulb
(if so equipped)

If bulb replacement is required, it is recom-
mended you visit a NISSAN dealer for this ser-
vice.

CAUTION

● Aiming is not necessary after replacing

the bulb. When aiming adjustment is
necessary, it is recommended you visit a
NISSAN dealer for this service.

● Do not leave the headlight assembly

open without a bulb installed for a long
period of time. Dust, moisture, smoke,
etc. entering the headlight body may
affect bulb performance. Remove the
bulb from the headlight assembly just
before a replacement bulb is installed.

● Only touch the base when handling the

bulb. Never touch the glass envelope.
Touching the glass could significantly
affect

bulb

life

and/or

headlight

performance.

LIGHTS

8-28

Maintenance and do-it-yourself

● High pressure halogen gas is sealed

inside the halogen bulb. The bulb may
break if the glass envelope is scratched
or the bulb is dropped.

● Use the same number and wattage as

shown in the chart.

Fog may temporarily form inside the lenses of the
exterior lights in the rain or in a car wash. A
temperature difference between the inside and
the outside of the lens causes the fog. This is not
a malfunction. If large drops of water collect
inside the lens, it is recommended you visit a
NISSAN dealer for servicing.

Replacing the LED headlight bulb (if
so equipped)

If LED headlight bulb replacement is required, it is
recommended you visit a NISSAN dealer for this
service.

FOG LIGHTS

Replacing the fog light bulb

If bulb replacement is required, it is recom-
mended you visit a NISSAN dealer for this ser-
vice.

CAUTION

● High pressure halogen gas is sealed

inside the halogen bulb. The bulb may
break if the glass envelope is scratched
or the bulb is dropped.

● When handling the bulb, do not touch

the glass envelope.

● Use the same number and wattage as

originally installed as shown in the
chart.

● Do not leave the bulb out of the fog light

for a long period of time as dust, mois-
ture and smoke may enter the fog light
body and affect the performance of the
fog light.

Maintenance and do-it-yourself

8-29

EXTERIOR AND INTERIOR LIGHTS

Item

Wattage (W)

Bulb No.

Headlight assembly (Type A) (if so equipped)*

High (Halogen)

65

H9

Low (Halogen)

55

H11

Turn

28/8

7444NA

Side marker

5

W5W

Park/Daytime running

Headlight assembly (Type B) (if so equipped)*

High

Low

Turn

28/8

7444NA

Side marker

5

W5W

Park/Daytime running

Front fog lights*

55

H11

Door mirror turn signal light*

Map light*

Personal light*

Vanity mirror light*

1.3

37LL

Glove box light*

Cargo light*

5

High-mounted stop light*

Rear combination light*

Tail/Stop

Turn

21

WY21W

Rear side marker

5

W5W

Backup (reversing) light assembly*

Backup

16

921

Tail

License plate light*

5

W5W

* It is recommended you visit a NISSAN dealer for replacement.

Always check with the Parts Department at a NISSAN dealer for the latest parts information.

LDI2918

8-30

Maintenance and do-it-yourself

1.

Map light

2

Headlight assembly

3

Personal light

4.

Door mirror turn signal light

5.

Fog light

6.

High-mounted stoplight

7.

License plate light

8.

Rear combination light

9.

Backup (reversing) light assembly

10.

Cargo light

11.

Daytime running light

Replacement procedures

All other lights are either type A, B, C or D. When
replacing a bulb, first remove the lens, lamp
and/or cover.

Indicates bulb removal

Indicates bulb installation

WDI0263

Maintenance and do-it-yourself

8-31

If you have a flat tire, refer to the “In case of
emergency” section of this manual.

TIRE PRESSURE

Tire Pressure Monitoring System
(TPMS)

WARNING

Radio waves could adversely affect
electric medical equipment. Those
who use a pacemaker should con-
tact the electric medical equipment
manufacturer for the possible influ-
ences before use.

This vehicle is equipped with the Tire
Pressure Monitoring System (TPMS). It
monitors tire pressure of all tires except
the spare. When the low tire pressure
warning light is lit and the Tire Pressure
Low - Add Air warning appears in the
vehicle information display, one or more of
your tires is significantly under-inflated. If
equipped, the system also displays pres-
sure of all tires (except the spare tire) on
the display screen by sending a signal
from a sensor that is installed in each
wheel.

The TPMS will activate only when the
vehicle is driven at speeds above 16 mph
(25 km/h). Also, this system may not de-
tect a sudden drop in tire pressure (for
example a flat tire while driving).

For additional information, refer to “Low
tire pressure warning light” in the “Instru-
ments and controls” section, “Tire Pres-
sure Monitoring System (TPMS)” in the
“Starting and driving” section and “Flat
tire” in the “In case of emergency” section
of this manual.

Tire inflation pressure

Check the tire pressures (including the
spare) often and always prior to long dis-
tance trips. The recommended tire pres-
sure specifications are shown on the
F.M.V.S.S./C.M.V.S.S. certification label
or the Tire and Loading Information label
under the “Cold Tire Pressure” heading.
The Tire and Loading Information label is
affixed to the driver side center pillar. Tire
pressures should be checked regularly
because:

● Most tires naturally lose air over time.
● Tires can lose air suddenly when

driven over potholes or other objects
or if the vehicle strikes a curb while
parking.

The tire pressures should be checked
when the tires are cold. The tires are
considered COLD after the vehicle has
been parked for 3 or more hours, or driven
less than 1 mile (1.6 km) at moderate
speeds.

The TPMS with Easy Fill Tire Alert pro-
vides visual and audible signals outside
the vehicle for inflating the tires to the
recommended COLD tire pressure. For
additional information, refer to “TPMS
with Easy Fill Tire Alert” in the “Starting
and driving” section of this manual.

Incorrect tire pressure, including un-
der inflation, may adversely affect
tire life and vehicle handling.

WHEELS AND TIRES

8-32

Maintenance and do-it-yourself

WARNING

● Improperly inflated tires can fail

suddenly and cause an accident.

● The Gross Vehicle Weight Rating

(GVWR)

is

located

on

the

F.M.V.S.S./C.M.V.S.S.

certifica-

tion label. The vehicle weight ca-
pacity is indicated on the Tire and
Loading Information label. Do
not load your vehicle beyond this
capacity. Overloading your ve-
hicle may result in reduced tire
life, unsafe operating conditions
due to premature tire failure, or
unfavorable handling character-
istics and could also lead to a
serious accident. Loading beyond
the specified capacity may also
result in failure of other vehicle
components.

● Before taking a long trip, or

whenever you heavily load your
vehicle, use a tire pressure gauge
to ensure that the tire pressures
are at the specified level.

● For additional information re-

garding tires, refer to “Important
Tire Safety Information” (US) or
“Tire

Safety

Information”

(Canada) in the Warranty Infor-
mation Booklet.

Maintenance and do-it-yourself

8-33

Tire and loading information label

1

Seating capacity: The maximum num-
ber of occupants that can be seated
in the vehicle.

2

Tire size - refer to “Tire labeling” in
this section.

3

Cold tire pressure: Inflate the tires to
this pressure when the tires are cold.
Tires are considered COLD after the
vehicle has been parked for 3 or more
hours, or driven less than 1 mile
(1.6 km) at moderate speeds. The
recommended cold tire inflation is set
by the manufacturer to provide the
best balance of tire wear, vehicle
handling, driveability, tire noise, etc.,
up to the vehicle’s GVWR.

4

Original tire size: The size of the tires
originally installed on the vehicle at
the factory.

5

Spare tire size.

6

Vehicle load limit: Refer to “Vehicle
loading information” in the “Technical
and consumer information” section of
this manual.

LDI2737

8-34

Maintenance and do-it-yourself

Checking tire pressure

1. Remove the valve stem cap from the

tire.

2. Press the pressure gauge squarely

onto the valve stem. Do not press too
hard or force the valve stem side-
ways, or air will escape. If the hissing
sound of air escaping from the tire is
heard while checking the pressure,
reposition the gauge to eliminate this
leakage.

3. Remove the gauge.

4. Read the tire pressure on the gauge

stem and compare to the specifica-
tion shown on the Tire and Loading
Information label.

5. Add air to the tire as needed. If too

much air is added, press the core of
the valve stem briefly with the tip of
the gauge stem to release pressure.
Recheck the pressure and add or
release air as needed.

6. Install the valve stem cap.

7. Check the pressure of all other tires,

including the spare.

Size

Cold Tire Inflation
Pressure

Front and Rear
Original Tire:
235/65R18

33 psi, 230 kPa

Front and Rear
Original Tire:
235/55R20

35 psi, 240 kPa

Spare Tire:
T165/90D18

60 psi, 420 kPa

TIRE LABELING

Federal law requires tire manufacturers to
place standardized information on the
sidewall of all tires. This information iden-
tifies and describes the fundamental
characteristics of the tire and also pro-
vides the tire identification number (TIN)
for safety standard certification. The TIN
can be used to identify the tire in case of a
recall.

LDI0393

Example

WDI0394

Maintenance and do-it-yourself

8-35

1

Tire size (example: P215/65R15 95H)

1. P: The “P” indicates the tire is de-

signed for passenger vehicles (not all
tires have this information).

2. Three-digit number (215): This num-

ber gives the width in millimeters of
the tire from sidewall edge to side-
wall edge.

3. Two-digit number (65): This number,

known as the aspect ratio, gives the
tire’s ratio of height to width.

4. R: The “R” stands for radial.

5. Two-digit number (15): This number

is the wheel or rim diameter in inches.

6. Two- or three-digit number (95): This

number is the tire’s load index. It is a
measurement of how much weight
each tire can support. You may not
find this information on all tires be-
cause it is not required by law.

7. H: Tire speed rating. You should not

drive the vehicle faster than the tire
speed rating.

Example

WDI0395

8-36

Maintenance and do-it-yourself

2

TIN (Tire Identification Number) for a

new tire (example: DOT XX XX XXX
XXXX)

1. DOT: Abbreviation for the “Depart-

ment Of Transportation”. The symbol
can be placed above, below or to the
left or right of the Tire Identification
Number.

2. Two-digit

code:

Manufacturer’s

identification mark.

3. Two-digit code: Tire size.

4. Three-digit code: Tire type code

(Optional).

5. Four numbers represent the week

and year the tire was built. For ex-
ample, the numbers 3103 means the
31st week of 2003. If these numbers
are missing then look on the other
sidewall of the tire.

3

Tire ply composition and material

The number of layers or plies of rubber-
coated fabric in the tire. Tire manufactur-

ers also must indicate the materials in the
tire, which include steel, nylon, polyester
and others.

4

Maximum permissible inflation pressure

This number is the greatest amount of air
pressure that should be put in the tire. Do
not exceed the maximum permissible in-
flation pressure.

5

Maximum load rating

This number indicates the maximum load
in kilograms and pounds that can be car-
ried by the tire. When replacing the tires
on the vehicle, always use a tire that has
the same load rating as the factory in-
stalled tire.

6

Term of “tubeless” or “tube type”

Indicates whether the tire requires an in-
ner tube (“tube type”) or not (“tubeless”).

7

The word “radial”

The word “radial” is shown if the tire has
radial structure.

8

Manufacturer or brand name

Manufacturer or brand name is shown.

Example

LDI2786

Maintenance and do-it-yourself

8-37

Other Tire-related Terminology

In addition to the many terms that are
defined throughout this section, Intended
Outboard Sidewall is (1) the sidewall that
contains a whitewall, bears white lettering
or bears manufacturer, brand, and/or
model name molding that is higher or
deeper than the same molding on the
other sidewall of the tire, or (2) the out-
ward facing sidewall of an asymmetrical
tire that has a particular side that must
always face outward when mounted on a
vehicle.

TYPES OF TIRES

WARNING

● When changing or replacing tires, be

sure all four tires are of the same type
(i.e., Summer, All Season or Snow) and
construction. A NISSAN dealer may be
able to help you with information about
tire

type,

size,

speed

rating

and

availability.

● Replacement tires may have a lower

speed rating than the factory equipped
tires, and may not match the potential
maximum vehicle speed. Never exceed
the maximum speed rating of the tire.

● Replacing tires with those not originally

specified by NISSAN could affect the
proper operation of the low tire pres-
sure warning system.

● For additional information regarding

tires, refer to “Important Tire Safety In-
formation” (US) or “Tire Safety Informa-
tion” (Canada) in the Warranty Informa-
tion Booklet.

● Always use tires of the same type, size,

brand, construction and tread pattern
on all four wheels. Failure to do so may
result in a circumference difference be-
tween tires on the front and rear axles
which can cause the Vehicle Dynamic
Control (VDC) system to malfunction re-
sulting in personal injury or death, ex-
cessive tire wear and may damage the
transmission, transfer case and differ-
ential gears.

All-Wheel Drive (AWD) models

CAUTION

● ONLY use spare tires specified for the

AWD model.

If excessive tire wear is found, it is recommended
that all four tires be replaced with tires of the
same size, brand, construction and tread pattern.
The tire pressure and wheel alignment should
also be checked and corrected as necessary. It is
recommended you visit a NISSAN dealer for this
service.

All season tires

NISSAN specifies All Season tires on some mod-
els to provide good performance all year, includ-
ing snowy and icy road conditions. All Season
tires are identified by ALL SEASON and/or M&S
on the tire sidewall. Snow tires have better snow
traction than All Season tires and may be more
appropriate in some areas.

Summer tires

NISSAN specifies summer tires on some models
to provide superior performance on dry roads.
Summer tire performance is substantially re-
duced in snow and ice. Summer tires do not have
the tire traction rating “M&S” on the tire sidewall.

8-38

Maintenance and do-it-yourself

If you plan to operate your vehicle in snowy or icy
conditions, NISSAN recommends the use of
SNOW tires or ALL SEASON tires on all four
wheels.

Snow tires

If snow tires are needed, it is necessary to select
tires equivalent in size and load rating to the
original equipment tires. If you do not, it can
adversely affect the safety and handling of your
vehicle.

Generally, snow tires have lower speed ratings
than factory equipped tires and may not match
the potential maximum vehicle speed. Never ex-
ceed the maximum speed rating of the tire.

If you install snow tires, they must be the same
size, brand, construction and tread pattern on all
four wheels.

For additional traction on icy roads, studded tires
may be used. However, some U.S. states and
Canadian provinces prohibit their use. Check
local, state and provincial laws before installing
studded tires. Skid and traction capabilities of
studded snow tires on wet or dry surfaces may be
poorer than that of non-studded snow tires.

TIRE CHAINS

CAUTION

Tire chains/cables should not be installed
on 235/55R20 size tires. Installation of the
tire chains/cables on 235/55R20 size tires
will cause damage to the vehicle. If you
plan to use tire chains/cables, you should
install

235/65R18

size

tires

on

your

vehicle.

Use of tire chains may be prohibited according to
location. Check the local laws before installing
tire chains. When installing tire chains, make sure
they are the proper size for the tires on your
vehicle and are installed according to the chain
manufacturer’s suggestions. Use only SAE
class “S” chains. 
Class “S” chains are used on
vehicles with restricted tire to vehicle clearance.
Vehicles that can use Class “S” chains are de-
signed to meet the minimum clearances between
the tire and the closest vehicle suspension or
body component required to accommodate the
use of a winter traction device (tire chains or
cables). The minimum clearances are determined
using the factory equipped tire size. Other types
may damage your vehicle. Use chain tensioners
when recommended by the tire chain manufac-
turer to ensure a tight fit. Loose end links of the
tire chain must be secured or removed to prevent
the possibility of whipping action damage to the

fenders or underbody. If possible, avoid fully load-
ing your vehicle when using tire chains. In addi-
tion, drive at a reduced speed. Otherwise, your
vehicle may be damaged and/or vehicle handling
and performance may be adversely affected.

Do not use tire chains on dry roads. Driving with
chains in such conditions can cause damage to
the various mechanisms of the vehicle due to
some overstress.

Maintenance and do-it-yourself

8-39

CHANGING WHEELS AND TIRES

Tire rotation

NISSAN recommends rotating the tires
every 5,000 miles (8,000 km).

For additional information on tire replac-
ing procedures, refer to “Flat tire” in the “In
case of emergency” section of this
manual.

As soon as possible, tighten the
wheel nuts to the specified torque
with a torque wrench.

Wheel nut tightening torque:

83 ft-lb (113 N·m)

The wheel nuts must be kept tight-
ened to specifications at all times. It
is recommended that wheel nuts be
tightened to specification at each
tire rotation interval.

WARNING

● After rotating the tires, check and

adjust the tire pressure.

● Retighten the wheel nuts when

the vehicle has been driven for
600 miles (1,000 km) (also in
cases of a flat tire, etc.).

● Do not include the spare tire in

the tire rotation.

● For additional information re-

garding tires, refer to “Important
Tire Safety Information” (US) or
“Tire

Safety

Information”

(Canada) in the Warranty Infor-
mation Booklet.

Tire wear and damage

1. Wear indicator

2. Location mark

WARNING

● Tires should be periodically in-

spected for wear, cracking, bulg-
ing or objects caught in the tread.
If excessive wear, cracks, bulging
or deep cuts are found, the tire(s)
should be replaced.

WDI0258

WDI0259

8-40

Maintenance and do-it-yourself

● The original tires have built-in

tread wear indicators. When the
wear indicators are visible, the
tire(s) should be replaced.

● Tires degrade with age and use.

Have tires, including the spare,
over 6 years old checked by a
qualified

technician

because

some tire damage may not be ob-
vious. Replace the tires as neces-
sary to prevent tire failure and
possible personal injury.

● Improper service of the spare tire

may result in serious personal in-
jury. If it is necessary to repair the
spare tire, it is recommended you
visit a NISSAN dealer for this
service.

● For additional information re-

garding tires, refer to “Important
Tire Safety Information” (US) or
“Tire

Safety

Information”

(Canada) in the Warranty Infor-
mation Booklet.

Replacing wheels and tires

When replacing a tire, use the same size, tread
design, speed rating and load carrying capacity
as originally equipped. For additional information,
refer to “Wheels and tires” in the “Technical and
consumer information” section of this manual.

WARNING

● The use of tires other than those recom-

mended or the mixed use of tires of
different brands, construction (bias,
bias-belted or radial), or tread patterns
can adversely affect the ride, braking,
handling, VDC system, ground clear-
ance, body-to-tire clearance, tire chain
clearance,

speedometer

calibration,

headlight

aim

and

bumper

height.

Some of these effects may lead to acci-
dents and could result in serious per-
sonal injury.

● For 2WD models, if your vehicle was

originally equipped with 4 tires that
were the same size and you are only
replacing 2 of the 4 tires, install the new
tires on the rear axle. Placing new tires
on the front axle may cause loss of
vehicle control in some driving condi-
tions and cause an accident and per-
sonal injury.

● If the wheels are changed for any rea-

son, always replace with wheels which
have

the

same

off-set

dimension.

Wheels of a different off-set could
cause premature tire wear, degrade ve-
hicle handling characteristics, affect the
VDC system and/or interference with
the brake discs. Such interference can
lead to decreased braking efficiency
and/or early brake pad wear. For addi-
tional information on wheel off-set di-
mensions, refer to “Wheels and tires” in
the “Technical and consumer informa-
tion” section of this manual.

● Since the spare tire is not equipped with

the TPMS, when a spare tire is mounted
or a wheel is replaced, tire pressure will
not be indicated, the TPMS will not
function and the low tire pressure warn-
ing light will flash for approximately
1 minute. The light will remain on after
1 minute. Have your tires replaced
and/or TPMS system reset as soon as
possible. It is recommended you visit a
NISSAN dealer for this service.

● Replacing tires with those not originally

specified by NISSAN could affect the
proper operation of the TPMS.

Maintenance and do-it-yourself

8-41


Content   ..  22  23  24  25   ..