Nissan Frontier. Manual - part 1213


  Index      Nissan     Nissan Frontier (2014 year) - Service and Repair Manual


Search            


Content   ..  1211  1212  1213  1214   ..


Nissan Frontier. Manual - part 1213


DESCRIPTION

TM-63

< SYMPTOM DIAGNOSIS >

[6MT: FS6R31A]

C

E

F

G

H

I

J

K

L

M

A

B

TM

N

O

P

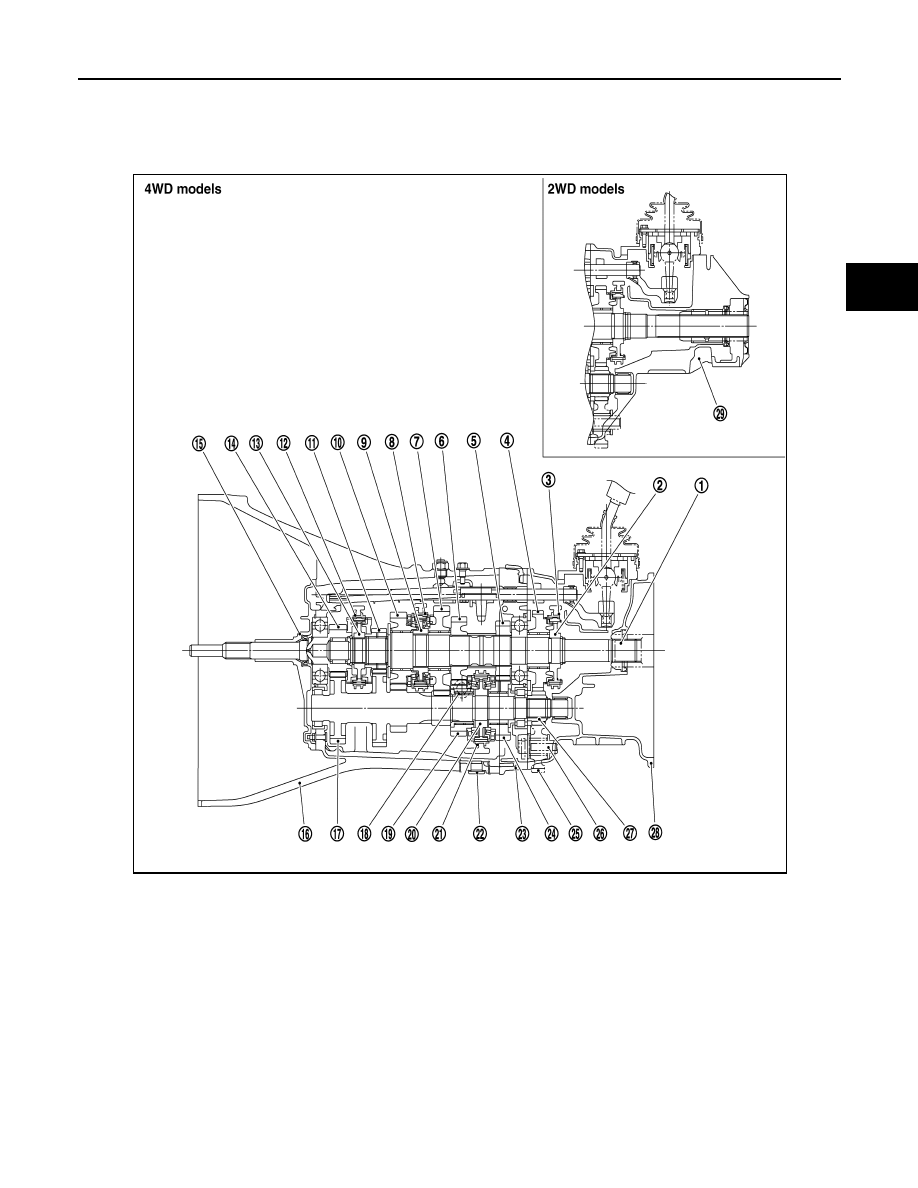
DESCRIPTION

Cross-Sectional View

INFOID:0000000009480441

DOUBLE-CONE SYNCHRONIZER

1.

Mainshaft

2.

Reverse synchronizer hub

3.

Reverse coupling sleeve

4.

Reverse main gear

5.

4th main gear

6.

3rd main gear

7.

1st main gear

8.

1st-2nd coupling sleeve

9.

1st-2nd synchronizer hub

10. 2nd main gear

11. 6th main gear

12. 5th-6th coupling sleeve

13. 5th-6th synchronizer hub

14. Main drive gear 

15. Front cover

16. Transmission case

17. Counter gear

18. Filler plug

19. 3rd counter gear

20. 3rd-4th synchronizer hub

21. 3rd-4th coupling sleeve

22. Drain plug

23. Adapter plate

24. 4th counter gear

25. Reverse idler gear

26. Reverse idler shaft

27. Reverse counter gear

28. OD gear case

29. Rear extension 

PCIB1297E

TM-64

< SYMPTOM DIAGNOSIS >

[6MT: FS6R31A]

DESCRIPTION

The 1st, 3rd and 4th gears are equipped with a double-cone synchronizer to reduce the operating force of the

shift selector.

TRIPLE-CONE SYNCHRONIZER 

The 2nd gear is equipped with a triple-cone synchronizer to reduce the operating force of the shift selector.

PCIB0594E

M/T OIL

TM-65

< PERIODIC MAINTENANCE >

[6MT: FS6R31A]

C

E

F

G

H

I

J

K

L

M

A

B

TM

N

O

P

PERIODIC MAINTENANCE

M/T OIL

Changing

INFOID:0000000009480442

DRAINING

1. Start the engine and let it run to warm up the transmission.
2. Stop the engine. Remove the transmission drain plug and drain the oil.
3. Set a gasket on the drain plug and install it to the transmission. Tighten the drain plug to the specified

torque. Refer to 

TM-77, "Overhaul"

.

CAUTION:

Do not reuse gasket.

FILLING

1. Remove the filler plug. Fill with new oil until oil level reaches the

specified limit near the filler plug hole as shown.

2. After refilling the oil, check oil level. Set a gasket to the filler

plug, then install it to the transmission. Tighten the filler plug to

the specified torque. Refer to 

TM-77, "Overhaul"

.

CAUTION:

Do not reuse gasket.

Checking

INFOID:0000000009480443

OIL LEAKAGE AND OIL LEVEL

1. Make sure that oil is not leaking from the transmission or around it.
2. Check oil level from the filler plug hole as shown.

CAUTION:

Do not start engine while checking oil level.

3. Set a gasket on the filler plug and install it to the transmission.

Tighten the filler plug to the specified torque. Refer to 

TM-77,

"Overhaul"

.

CAUTION:

Do not reuse gasket.

Oil grade and viscosity

: Refer to 

MA-16, "FOR 

USA AND CANADA : Flu-
ids and Lubricants"

.

Oil capacity

: Refer to 

MA-16, "FOR 

USA AND CANADA : Flu-
ids and Lubricants"

.

PCIB0268E

PCIB0268E

TM-66

< REMOVAL AND INSTALLATION >

[6MT: FS6R31A]

REAR OIL SEAL

REMOVAL AND INSTALLATION

REAR OIL SEAL

Removal and Installation

INFOID:0000000009480444

REMOVAL

For 2WD Models

1. Remove rear propeller shaft. Refer to 

DLN-152, "Removal and

Installation"

 (3S1310), 

DLN-163, "Removal and Installation"

(3S1330), 

DLN-174, "Removal and Installation"

 (3S1330-

2BJ100).

2. Remove dust seal and rear oil seal using suitable tool.

CAUTION:

Do not damage rear extension.

For 4WD Models

1. Remove front and rear propeller shafts. Refer to 

DLN-134, "Removal and Installation"

 (front) and 

DLN-

143, "Removal and Installation"

 (2S1330), 

DLN-174, "Removal and Installation"

 (3S1330-2BJ100) (rear).

2. Remove transfer assembly. Refer to 

DLN-101, "Removal and Installation"

.

3. Remove rear oil seal using Tool.

CAUTION:

Do not damage OD gear case.

INSTALLATION

Installation is in the reverse order of removal.

For 2WD Models

LCIA0383E

Tool number

: KV381054S0 (J-34286)

PCIB1218E


Content   ..  1211  1212  1213  1214   ..