Nissan Murano. Manual - part 1023


  Главная      Nissan     Nissan Murano (2014 year) - Service Manual


поиск по сайту            


содержание   ..  1021  1022  1023  1024   ..


Nissan Murano. Manual - part 1023


MIR-70

< REMOVAL AND INSTALLATION >

[WITH ADP]

INSIDE MIRROR

REMOVAL AND INSTALLATION

INSIDE MIRROR

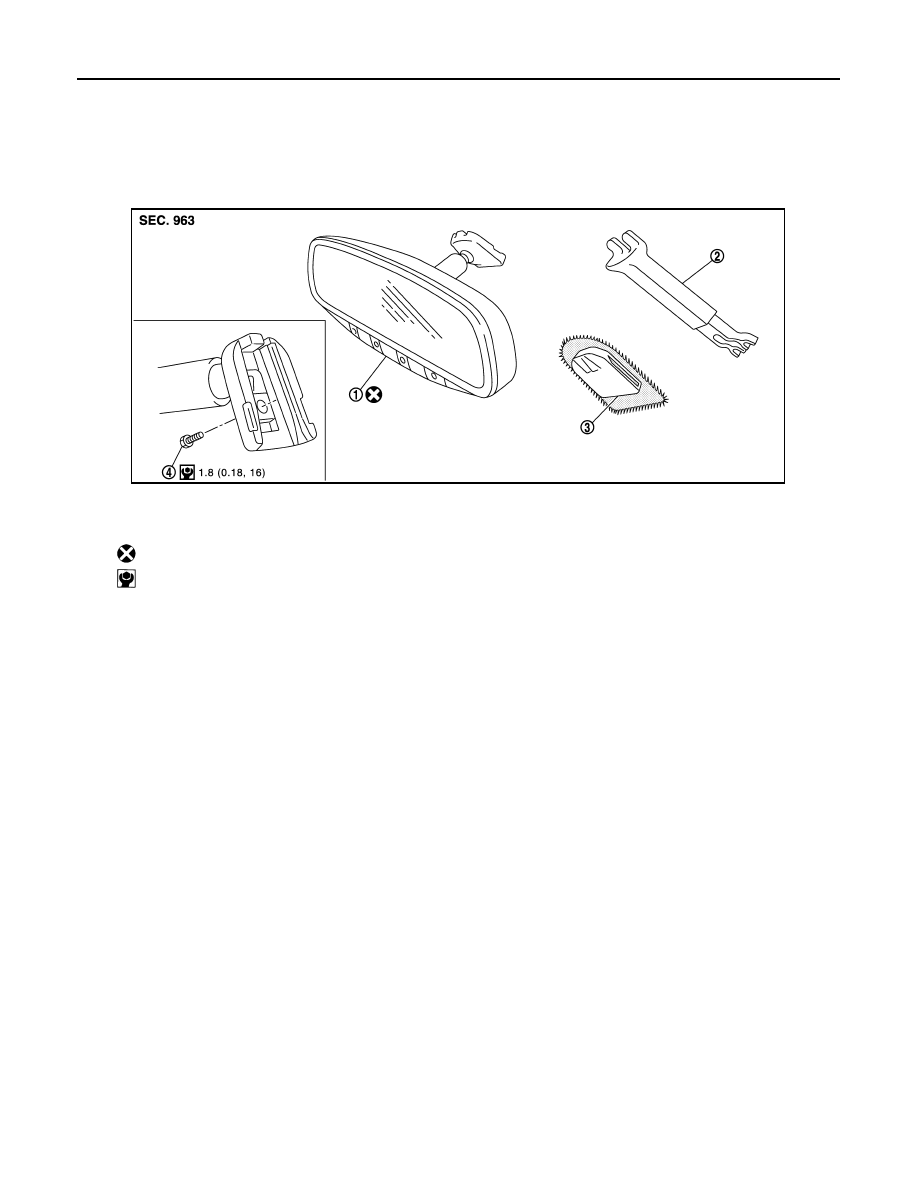
Exploded View

INFOID:0000000009719350

Removal and Installation

INFOID:0000000009719351

CAUTION:

Never reuse the inside mirror disassembled from mirror base.

REMOVAL

1.

Remove the inside mirror cover.

2.

Remove TORX bolt.

3.

Slide the inside mirror upward to remove.

INSTALLATION

Install in the reverse order of removal.

CAUTION:

When inserting the inside mirror into the mirror base, be sure to push the pawl until it get connected to
the mirror base.

1.

Inside mirror

2.

Inside mirror cover

3.

Mirror base

4.

TORX bolt

: Always replace after every disassembly.

: N·m (kg-m, in-lb)

JMLIA0136GB

OUTSIDE MIRROR

MIR-71

< REMOVAL AND INSTALLATION >

[WITH ADP]

C

D

E

F

G

H

I

J

K

M

A

B

MIR

N

O

P

OUTSIDE MIRROR

DOOR MIRROR ASSEMBLY

DOOR MIRROR ASSEMBLY : Exploded View

INFOID:0000000009719352

REMOVAL

DISASSEMBLY

1.

Door mirror assembly

2.

Front door assembly

3.

Door mirror corner cover

4.

Door mirror corner cover 
(with BSW indicator)

5.

BSW indicator assembly

: Clip

JMLIA3464ZZ

JMLIA0123ZZ

MIR-72

< REMOVAL AND INSTALLATION >

[WITH ADP]

OUTSIDE MIRROR

DOOR MIRROR ASSEMBLY : Removal and Installation

INFOID:0000000009719353

CAUTION:

Never damage the mirror bodies.

REMOVAL

1.

Remove the front door finisher. Refer to 

INT-13, "FRONT DOOR FINISHER : Removal and Installation"

.

2.

Disconnect BSW indicator harness connector (with BSW indicator models).

3.

Disengage the fixing clips and remove the door mirror corner cover.

4.

Disconnect the door mirror harness connector.

5.

Remove the door mirror mounting nuts, and remove the door mirror assembly.

INSTALLATION

Install in the reverse order of removal.

GLASS MIRROR

GLASS MIRROR : Exploded View

INFOID:0000000009719354

GLASS MIRROR : Disassembly and Assembly

INFOID:0000000009719355

CAUTION:

Never damage the mirror bodies.

DISASSEMBLY

1.

Door mirror cover

2.

Door mirror assembly

3.

Glass mirror

: Pawl

1.

Door mirror cover

2.

Door mirror assembly

3.

Glass mirror

: Pawl

JMLIA0123ZZ

OUTSIDE MIRROR

MIR-73

< REMOVAL AND INSTALLATION >

[WITH ADP]

C

D

E

F

G

H

I

J

K

M

A

B

MIR

N

O

P

1.

Place the glass mirror upward.

2.

Put a strip of protective tape (A) on the housing.

3.

Insert flat-bladed screwdriver (B) into the recess at lower side
between glass mirror (1) and actuator (2), and push up pawls to
remove glass mirror lower side.
NOTE:
 Insert a small slotted screwdriver into recess, and push up while
rotating (twist) to make work easier.

4.

Insert flat-bladed screwdriver at RH/LH side between glass mirror and actuator, and push up pawls to
remove glass mirror RH/LH side.
NOTE:
 Insert flat-bladed screwdriver into recesses, and push up while rotating (twist) to make work easier.

5.

Remove two terminals of mirror heater attachment. (With heater mirror model)

6.

Pull glass mirror as shown in the figure in order to disengage
both upper pawls, and then remove glass mirror.

ASSEMBLY

Install in the reverse order of removal.

CAUTION:

After installation, visually check that pawls are securely engaged.

DOOR MIRROR COVER

JMLIA0124ZZ

1.

Glass mirror

2.

Actuator

JMLIA0092ZZ


содержание   ..  1021  1022  1023  1024   ..