Nissan X-Trail 32. Manual - part 1106


  Главная      Nissan     Nissan X-Trail 32 - Service Manual


поиск по сайту            


содержание   ..  1104  1105  1106  1107   ..


Nissan X-Trail 32. Manual - part 1106
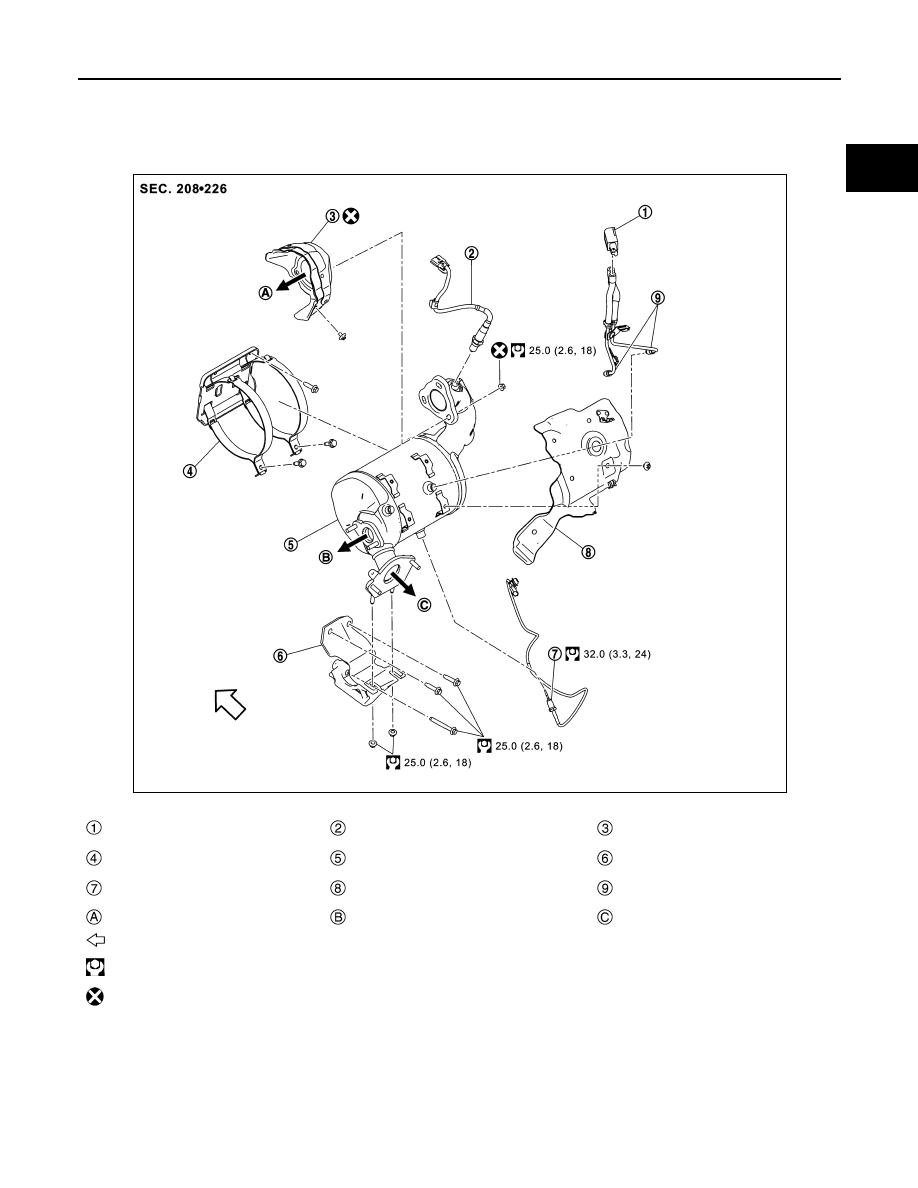


DPF (DIESEL PARTICULATE FILTER)

EM-321

< REMOVAL AND INSTALLATION >

[R9M]

C

D

E

F

G

H

I

J

K

L

M

A

EM

N

P

O

DPF (DIESEL PARTICULATE FILTER)

Exploded View

INFOID:0000000011006844

Removal and installation

INFOID:0000000011006845

CAUTION:

• Perform the operation with the exhaust system fully cooled down because the system is still hot just

after engine stops.

• Be careful not to cut your hand on the insulator edge.
NOTE:

DPF (diesel particulate filter) differ-
ential pressure sensor

A/F sensor 1

Turbocharger heat shield gasket

Particle filter mounting

DPF (diesel particulate filter)

Particle filter bracket

Exhaust gas temperature sensor 2

Heat insulator

DPF (diesel particulate filter) differ-
ential pressure tube assenbly

To turbocharger

To EGR cooler

To exhaust front tube

: Vehicle front

: N·m (kg-m, ft-lb)

: Always replace after every disassembly.

JPBIA6960GB

EM-322

< REMOVAL AND INSTALLATION >

[R9M]

DPF (DIESEL PARTICULATE FILTER)

When remove DPF for 4WD models, perform it after removing engine and transaxle assembly. Refer to 

EM-

366, "Removal and Installation"

.

REMOVAL

1.

Remove cowl top cover and extension cowl top. Refer to 

EXT-24, "Exploded View"

2.

Remove the silencer. Refer to 

EM-310, "Exploded View"

.

3.

Remove the air inlet pipe. Refer to 

EM-325, "Exploded View"

.

4.

Remove the A/F sensor 1 

 and exhaust gas pressure sensor

.

5.

Remove the turbocharger boost control vacuum hose 

 from

turbocharger.

6.

Remove the turbocharger boost control solenoid valve nuts 

.

7.

Move aside the turbocharger boost control solenoid valve 

.

8.

Remove the turbocharger boost control solenoid valve bracket
bolts .

9.

Remove the turbocharger boost control solenoid valve bracket

.

: Vehicle front

JPBIA6976ZZ

: Clip

E1BIA0625ZZ

JPBIA6977ZZ

JPBIA6978ZZ

DPF (DIESEL PARTICULATE FILTER)

EM-323

< REMOVAL AND INSTALLATION >

[R9M]

C

D

E

F

G

H

I

J

K

L

M

A

EM

N

P

O

10. Disconnect the harness connectors 

 and 

.

11. Remove the particle sensor connector bracket.

12. Remove the front wheels. Refer to 

WT-61, "Exploded View"

.

13. Remove the rear torque rod and rear torque rod bracket. Refer to 

EM-365, "Exploded View"

14. Remove front suspension member. Refer to 

FSU-22, "Exploded View"

.

15. Remove exhaust front tube. Refer to 

EX-17, "Exploded View"

.

16. Remove the particle filter bracket 

.

17. Remove DPF (diesel particulate filter) differential pressure tube

assembly .

CAUTION:

Be careful not to impact or damage DPF (diesel particulate
filter) differential pressure sensor.

18. Remove exhaust gas temperature sensor 2 

.

CAUTION:

Be careful not to impact or damage exhaust gas tempera-
ture sensor 2.

19. Remove heat insulator 

.

20. Remove EGR heat shield 

.

E1BIA0628ZZ

JPBIA6979ZZ

JPBIA6980ZZ

: Bolts

: Vehicle front

JPBIA6973ZZ

EM-324

< REMOVAL AND INSTALLATION >

[R9M]

DPF (DIESEL PARTICULATE FILTER)

21. Remove EGR cooler nuts 

.

22. Remove the bolts 

 of the particle filter straps and the straps.

23. Remove the particle filter nuts.

24. Move the engine lower side forward and remove the particle filter.

CAUTION:

Be careful not to impact or damage particle filter pressure sensor. 

INSTALLATION

• Note the following, and install in the reverse order of removal.

CAUTION:

• Be careful not to impact or damage particle filter sensor. 
• When installing never use such tools as an air impact wrench.

1.

Perform “Diesel particulate filter data clear”. Refer to 

EC-957, "Description"

. when replacing diesel partic-

ulate filter. Refer to 

EC-943, "Special Repair Requirement List"

: EGR cooler

: Bolt

: Vehicle front

JPBIA6974ZZ

E1BIA0621ZZ


содержание   ..  1104  1105  1106  1107   ..