Nissan Qashqai J11. Manual - part 2262


  Index      Nissan     Nissan Qashqai J11 - Service and Repair Manual


Search            


Content   ..  2260  2261  2262  2263   ..


Nissan Qashqai J11. Manual - part 2262


ENGINE MAINTENANCE (MR16DDT)

MA-83

< PERIODIC MAINTENANCE >

C

D

E

F

G

H

I

J

K

L

M

B

MA

N

O

A

• If necessary, refill radiator up to filler neck with engine coolant.

CAUTION:

Never adhere the engine coolant to electronic equipments (alternator etc.).

13. Refill reservoir tank to “MAX” level line with engine coolant.

14. Repeat steps 11 through 15 two or more times with radiator cap installed until engine coolant level no

longer drops. 

15. Check cooling system for leakage with engine running.

16. Warm up the engine, and check for flowing noise while repeat at least three time slow acceleration from

idle up to 3,000 rpm.

17. If flowing noise is heard, bleed air from cooling system by repeating step 10 through 16 until flowing noise

is no longer heard. 

ENGINE COOLANT : Flushing

INFOID:0000000011732686

1.

Turn ignition ON, wait for 10 seconds then turn ignition OFF.
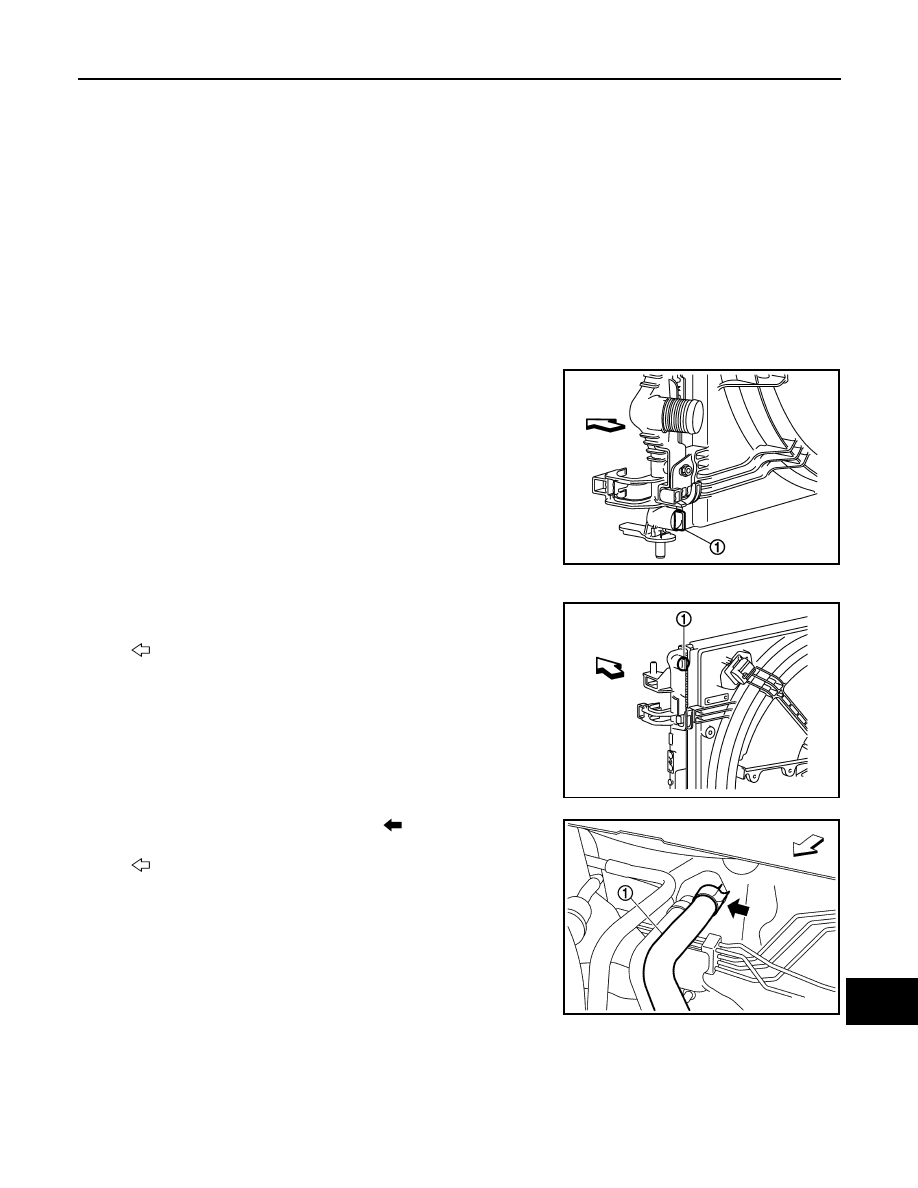
2.

Install reservoir tank if removed and radiator drain plug (1). 

CAUTION:

Be sure to clean drain plug and install with new O-ring.

3.

Open radiator air relief plug (1). 

4.

Disconnect heater hose (1) at position (

) in the figure.

• Enhance heater as high as possible.

5.

Fill reservoir tank with water.
• When engine coolant over flows opened radiator air relief plug, close air relief plug, and continue filling

the engine coolant.

• When engine coolant over flows disconnected heater hose, connect heater hose, and continue filling the

engine coolant.

E1BIA1139ZZ

: Vehicle front

E1BIA1141ZZ

: Vehicle front

JPBIA4208ZZ

MA-84

< PERIODIC MAINTENANCE >

ENGINE MAINTENANCE (MR16DDT)

6.

Install radiator cap.

7.

Run the engine and warm it up to normal operating temperature.

8.

Rev the engine two or three times under no-load.

9.

Stop the engine and wait until it cools down.

10. Drain water from the system. Refer to 

CO-42, "Draining"

.

11. Repeat steps 1 through 10 until clear water begins to drain from radiator.

RADIATOR CAP

RADIATOR CAP : Inspection

INFOID:0000000011732688

• Fit the adapter to the reservoir tank cap tester [SST: — (M.S. 554-

07)] (A) as shown.

• When connecting the reservoir tank cap to the reservoir tank cap

tester, apply water or LLC to the reservoir tank cap seal part.

• Check reservoir tank cap relief pressure.

• Replace the reservoir tank cap if the engine coolant passes

through it, or if any fur signs is detected.

CAUTION:

When installing reservoir tank cap, thoroughly wipe out the res-
ervoir tank filler neck to remove any waxy residue or foreign
material.

RADIATOR

RADIATOR : Inspection

INFOID:0000000011732687

Check radiator for mud or clogging. If necessary, clean radiator as follows.

CAUTION:

• Never bend or damage radiator fins.
• When radiator is cleaned without removal, remove all surrounding parts such as radiator cooling fan

assembly and horns. Then tape harness and harness connectors to prevent water from entering.

1.

Apply water by hose to the back side of the radiator core vertically downward.

2.

Apply water again to all radiator core surfaces once per minute.

3.

Stop washing if any stains no longer flow out from radiator.

4.

Blow air into the back side of radiator core vertically downward.
• Use compressed air lower than 490 kPa (4.9 bar, 5 kg/cm

2

, 71 psi) and keep distance more than 30 cm

(11.81 in). 

5.

Blow air again into all the radiator core surfaces once per minute until no water sprays out.

FUEL LINES

FUEL LINES : Inspection

INFOID:0000000011732690

Inspect fuel lines, fuel filler cap and fuel tank for improper attach-
ment, leaks, cracks, damage, loose connections, chafing or deterio-
ration.
If necessary, repair or replace damaged parts.

AIR CLEANER FILTER

Standard: Refer to 

CO-58, "Radiator"

.

E1BIA0057ZZ

A

: Engine

B

: Fuel line

C

:  Fuel  tank

JPBIA0129ZZ

ENGINE MAINTENANCE (MR16DDT)

MA-85

< PERIODIC MAINTENANCE >

C

D

E

F

G

H

I

J

K

L

M

B

MA

N

O

A

AIR CLEANER FILTER : Exploded View

INFOID:0000000011855617

Refer to 

GI-4, "Components"

 for symbols in the figure.

AIR CLEANER FILTER : Removal and Installation

INFOID:0000000011855618

REMOVAL

1.

Remove air duct 2 (1).
• To remove air duct 2 (1), pinch pawl (A) to unlock, move pawl

(B) frontward and remove air duct 2 upward.

1.

Clip 

2.

Air duct 1

3.

Air duct 2

4.

Air cleaner cover

5.

Air cleaner filter

6.

Air cleaner body

7.

Grommet

8.

Collar

9.

Mass air flow sens

10. Resonator

11.

Clamp

12. Air duct

13. Mounting rubber

14. Bracket

A.

To turbocharger

E1BIA1726GB

E1BIA1728ZZ

MA-86

< PERIODIC MAINTENANCE >

ENGINE MAINTENANCE (MR16DDT)

2.

Unhook air cleaner body clips (1)

3.

Separate air cleaner cover (1) from air cleaner body and remove
air cleaner filter (2). 

INSTALLATION

Install in the reverse order of removal.

AIR CLEANER FILTER : Inspection (Viscous Paper Type)

INFOID:0000000011732674

INSPECTION AFTER REMOVAL

Examine with eyes that there is no stain, clogging, or damage on air cleaner element.
• Remove dusts (such as dead leafs) on air cleaner element surface and inside cleaner case.
• If clogging or damage is observed, replace the air cleaner element.

CAUTION:

Never clean the viscous paper type air cleaner element by blowing as there is a risk of deterioration of
its performance.

E1BIA1003ZZ

E1BIA1004ZZ

E1BIA1005ZZ


Content   ..  2260  2261  2262  2263   ..