Mitsubishi Outlander Sport (2022 year). Manual in english - page 1
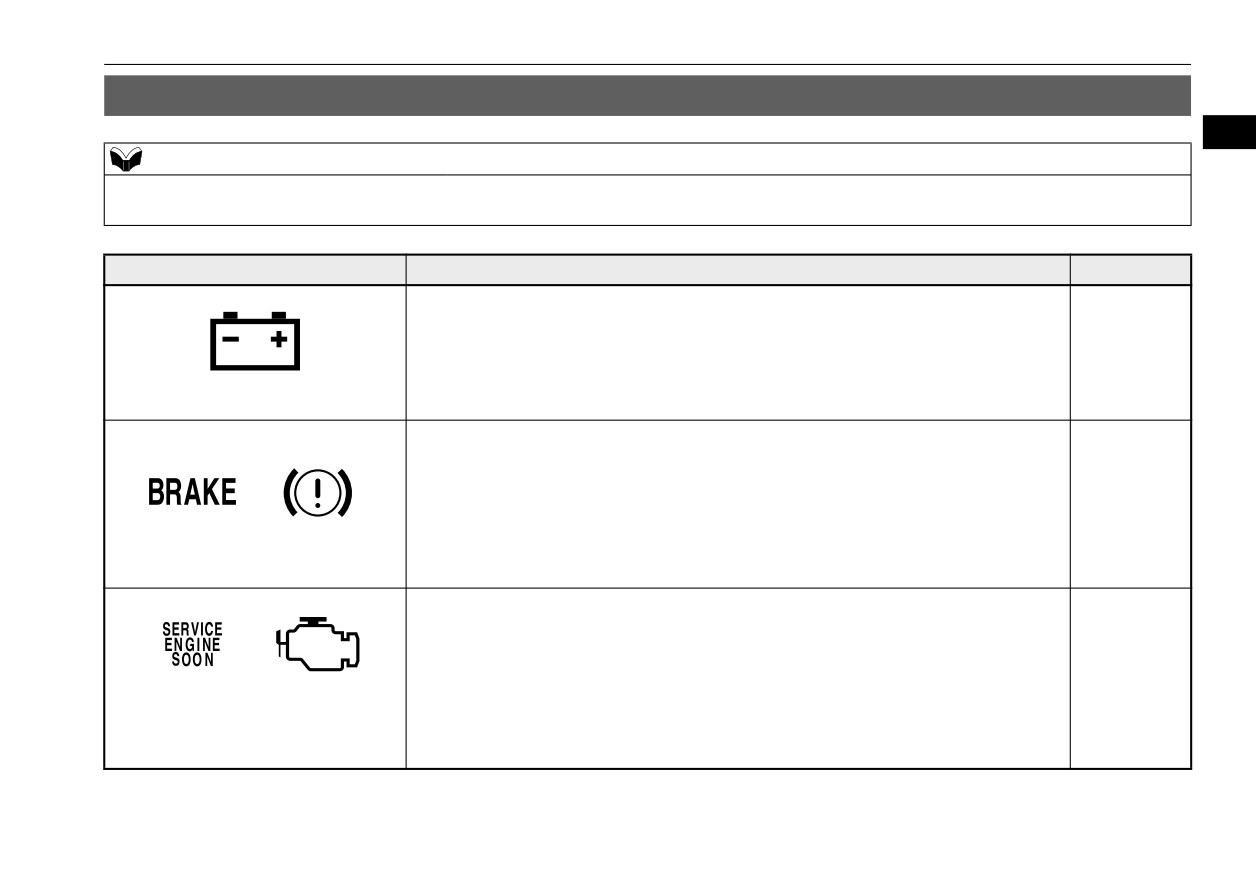
If this warning light comes on or flashes while you’re driving...
If this warning light comes on or flashes while you’re driving...
N00200702449
2
NOTE
z For information regarding warning displays in the multi-information display, refer to “Multi-information display” on page 5-108.
z These warning lights will come on for a few seconds for a bulb check when the ignition switch is first turned to “ON” or the operation mode is put in ON.
Warning lights
Do this
Ref. Page
z Park your vehicle in a safe place and stop the engine.
Contact your Mitsubishi Motors dealer or a repair facility of your choice for assis-
P. 5-146
tance immediately.
Charging system warning light
z If this light comes on while driving, check to see that the parking brake is fully
released.
z If this light stays on after releasing the parking brake, immediately stop and check
or
the brake fluid level.
P. 5-145
z If the brake fluid level is correct, there may be a system malfunction. Avoid hard
braking and high speed, and contact an authorized Mitsubishi Motors dealer or a
Brake warning light
repair facility of your choice for assistance.
z Although your vehicle will usually be drivable and not need towing, have the
or
engine system checked at an authorized Mitsubishi Motors dealer or a repair facility
of your choice immediately. If the vehicle is not drivable, contact emergency road-
P. 5-145
side assistance at 1-888-648-7820 (for vehicles sold in U.S.A.) or 1-888-576-4878
Engine malfunction indicator
(for vehicles sold in Canada), an authorized Mitsubishi Motors dealer, or local tow-
(“SERVICE ENGINE SOON” or
ing company for assistance.
“Check engine light”)
Quick index
2-1
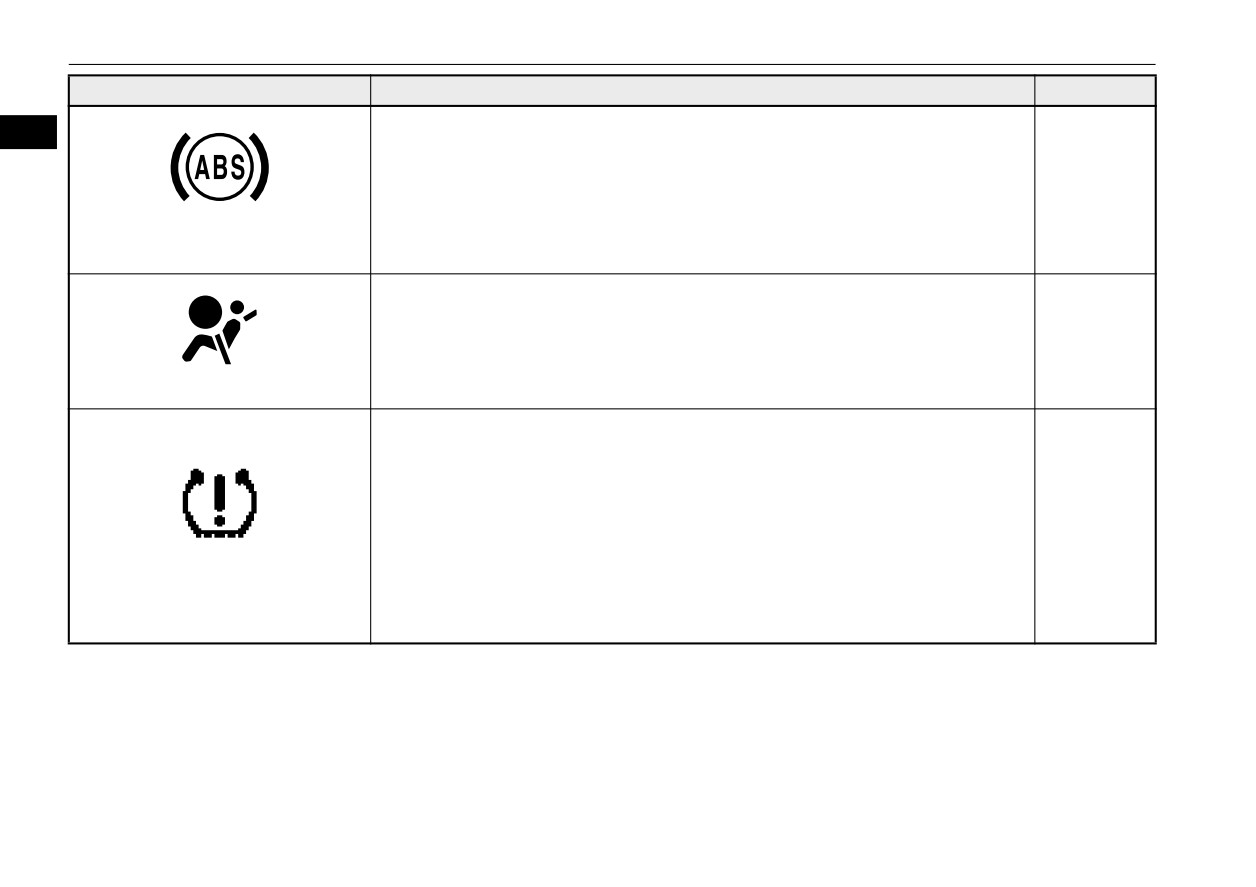
If this warning light comes on or flashes while you’re driving...
Warning lights
Do this
Ref. Page
z When this light comes on, the anti-lock braking system is not functioning and only
2
the ordinary braking system is functioning.
z Park your vehicle in a safe place and stop the engine.
Test the system as described on page 5-70.
P. 5-70
z If the light does not go out after the test, or if it comes on again, we recommend that
Anti-lock braking system warning
you have the system checked at an authorized Mitsubishi Motors dealer or a repair
light
facility of your choice as soon as possible.
z Immediately have the airbag and the pre-tensioner seat belt system checked at an
P. 4-34
authorized Mitsubishi Motors dealer.
SRS warning light
z If the warning light comes on, you should stop and adjust the tires to the proper
inflation pressure as soon as possible.
(See “Tire inflation pressures” on page 9-18.)
Once adjustments have been made, the warning light will go off after a few minutes
of driving.
P. 5-100
z If the warning light blinks for approximately 1 minute and then remains continu-
Tire pressure monitoring system warn-
ously illuminated, the system is not operating properly. If the system returns to nor-
ing light
mal, the warning light will go off. If the warning light does not go off, have the
vehicle inspected at an authorized Mitsubishi Motors dealer.
2-2
Quick index
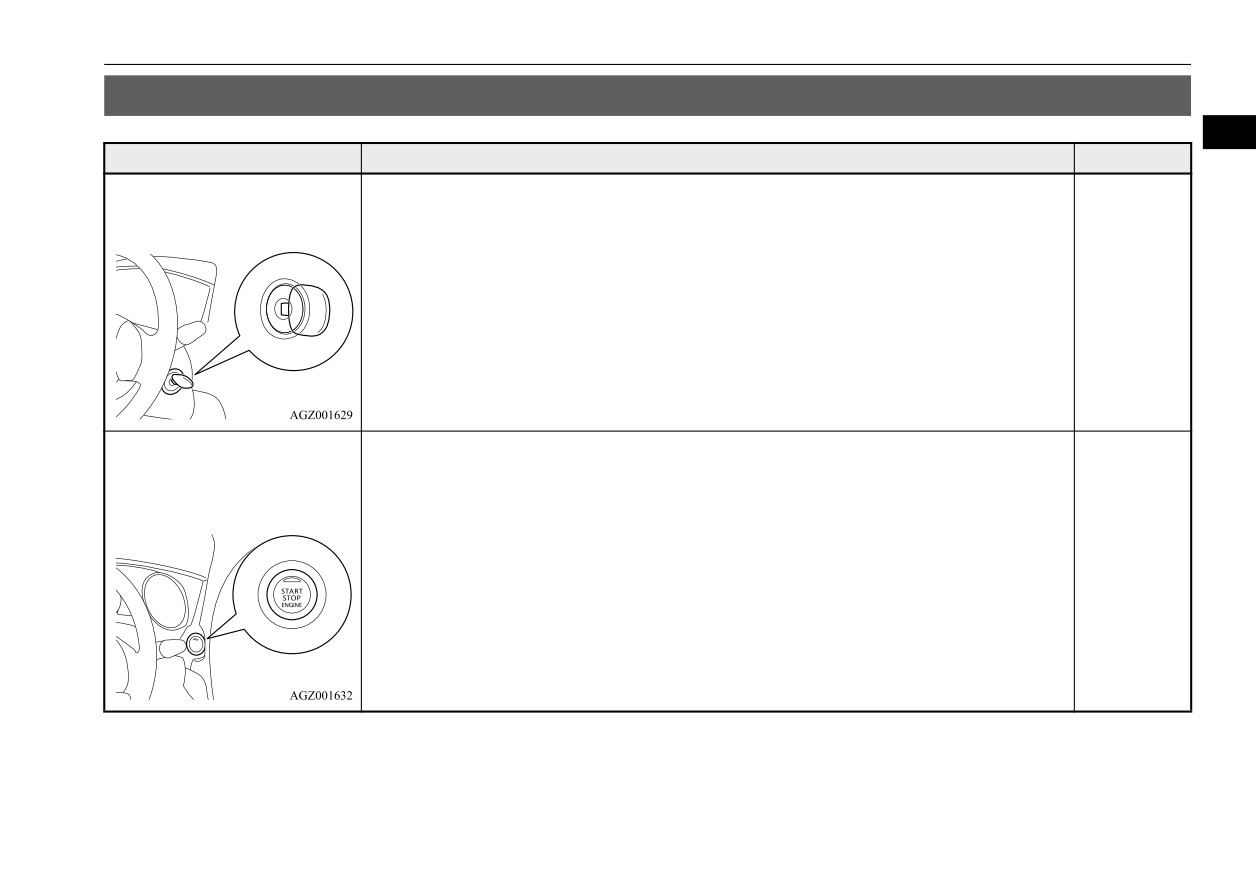
If this problem occurs...
If this problem occurs...
N00200902151
2
Problem
Do this
Ref. Page
Cannot turn the key.
(except for vehicles equipped
with the F.A.S.T.-key)
Will not turn from “ACC” to “OFF”.
Check the position of the selector lever.
P. 5-53
The key cannot be removed unless the selector lever is set to the “P” (PARK) position.
The engine does not start when
the engine switch is pressed.
(for vehicles equipped with the
F.A.S.T.-key)
Make sure the F.A.S.T.-key is in the vehicle.
Make sure the selector lever is in the “P” (PARK) position, and then press the engine switch
P. 5-22
while depressing the brake pedal.
Quick index
2-3
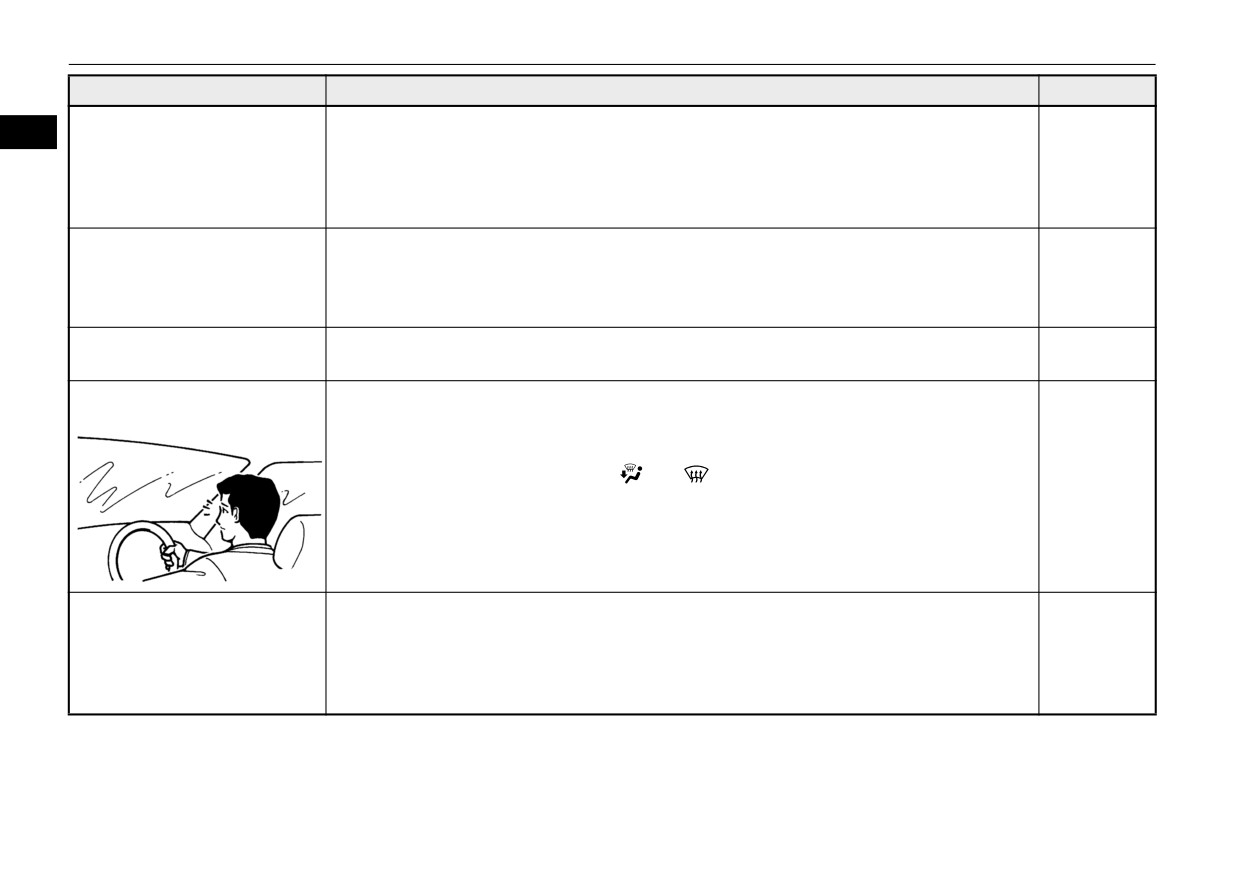
If this problem occurs...
Problem
Do this
Ref. Page
The engine does not start and the
1. Move the selector lever to the “P” (PARK) position, and then change the operation mode
2
operation mode cannot be
to OFF.
changed to OFF.
2. One of the other causes could be low battery voltage. If this occurs, the keyless entry sys-
P. 5-20
(for vehicles equipped with the
tem and the F.A.S.T.-key operation will also not operate. Contact an authorized Mitsubishi
F.A.S.T.-key)
Motors dealer.
The F.A.S.T.-key does not oper-
Use the emergency key to lock and unlock the door.
ate.
Insert the F.A.S.T.-key into the key slot inside the glove compartment, and then start the
P. 5-25
(for vehicles equipped with the
engine or change the operation mode.
F.A.S.T.-key)
Cannot shift the selector lever
Shift the selector lever while pressing the brake pedal.
P. 5-55
from the “P” (PARK) position.
Check that the ignition switch or the operation mode is in ON.
The windows are fogged up.
1. Set the mode selection dial to the “
” or “
” position.
P. 7-8, 7-14
2. Turn on the blower.
The engine does not start.
The lights do not come on.
P. 8-2,
The lights are dim.
Have the battery checked. Recharge or replace as needed.
9-11
The horn does not honk.
The horn sound is weak.
2-4
Quick index
If this problem occurs...
Problem
Do this
Ref. Page
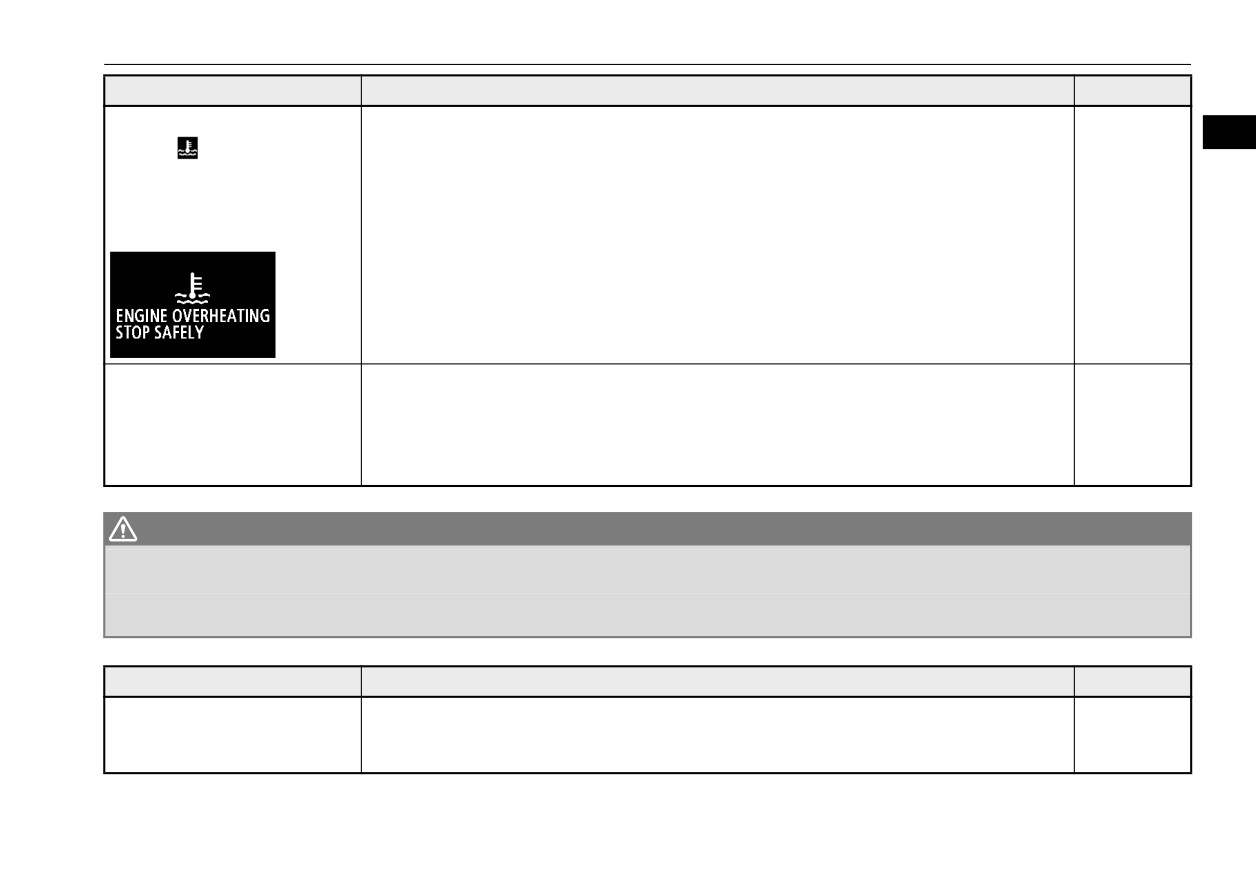
The engine coolant temperature
2
display “
” in the multi-infor-
mation display is flashing.
Steam comes out of the engine
compartment.
The engine is overheated.
P. 8-4
Carefully stop the vehicle in a safe place.
1. Slowly press down on the accelerator pedal to get your vehicle moving again. For an all-
wheel drive vehicle, set the drive mode-selector to the “4WD AUTO” or “4WD LOCK”
If your vehicle becomes stuck in
position and then slowly press down on the accelerator pedal to get your vehicle moving.
P. 8-13
sand, mud or snow
2. If there is nothing to stop your tires from slipping, rock your vehicle back and forth to free
it.
WARNING
z When trying to rock your vehicle out of a stuck position, make sure that there are no people nearby. The rocking motion may cause the vehicle to
suddenly lurch forward or backward, possibly injuring bystanders.
z Avoid revving the engine or spinning the wheels. Prolonged efforts to free a stuck vehicle may result in overheating and transaxle failure.
If your vehicle is still stuck after several rocking attempts, call for help.
Problem
Do this
Ref. Page
The brakes are not functioning
P. 5-66,
properly after crossing a puddle
Dry out the brakes by driving slowly while lightly pressing the brake pedal.
6-5
or stream.
Quick index
2-5
If this problem occurs...
Problem
Do this
Ref. Page
The continuously variable trans-
2
There may be a problem in the CVT.
mission (CVT) makes no shift
change when accelerating. The
If the
or
warning display on the multi-information display will not turn off, or if they
P. 5-58
initial movement of the vehicle
come on frequently, immediately have the vehicle checked at your nearest Mitsubishi Motors
is slow when the vehicle starts
dealer.
moving.
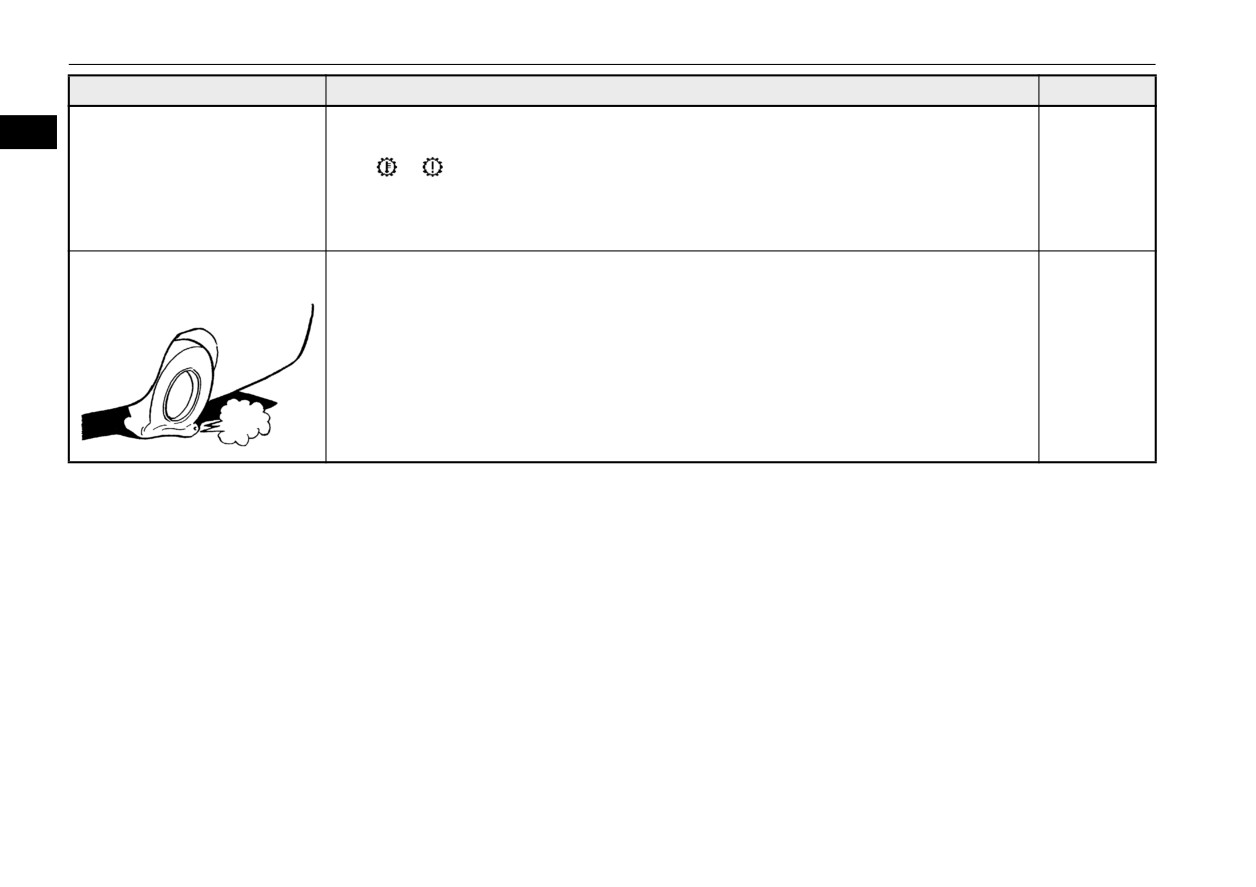
A tire is punctured.
1. Park the vehicle in a safe place where the surface is flat and level.
P. 8-6
2. Replace the flat tire with the spare tire.
2-6
Quick index
Fuel selection
oline to minimize fuel-injector fouling and
Fuel selection
Methanol
minimize intake-valve deposits. Detergent
N00301002033
gasoline helps keep your engine in tune and
Your vehicle is designed to use unleaded gas-
your emission-control system working prop-
Do not operate your vehicle on gasoline con-
oline only. It is equipped with a fuel tank
erly.
taining methanol (wood alcohol). Using this
3
filler pipe especially designed to accept only
type of alcohol could adversely affect the
a small diameter unleaded gasoline dispens-
vehicle’s performance and damage critical
Octane requirement
ing nozzle.
parts of the vehicle’s fuel system.
Your vehicle is designed to operate on
WARNING
Reformulated gasoline
unleaded gasoline having a minimum octane
z
Gasoline is highly flammable and explo-
number of 87 [(MON+RON)/2] or 91 RON.
sive. You could be burned, seriously
Many areas of the country require the use of
injured or killed when handling it. When-
cleaner burning fuel referred to as “Reformu-
ever you refuel your vehicle, stop the
Oxygenated gasoline
lated Gasoline”.
engine and keep flames, sparks, and
Reformulated gasoline contains oxygenates
smoking materials away from the vehicle.
Gasoline sold at some service stations con-
and is specially blended to reduce vehicle
Always handle fuel in well-ventilated out-
tains oxygenates such as ethanol, although
emissions and improve air quality.
door areas.
the oxygenates may not be identified by those
Mitsubishi Motors Corporation strongly sup-
names. Oxygenates are required in some
ports the use of reformulated gasoline. Prop-
areas of the country. Such fuel can be used in
erly blended reformulated gasoline has no
CAUTION
your vehicle.
adverse effect on vehicle performance or the
z Using leaded gasoline in your vehicle will
damage the engine, catalytic converter, and
durability of engine and fuel system.
the oxygen sensors. Also, using leaded gaso-
Ethanol (Gasohol)
line is illegal, and will void your warranty
MMT (methylcyclopentadienyl
coverage of the engine, catalytic converter,
and oxygen sensors.
A mixture of up to 10% ethanol (grain alco-
manganese tricarbonyl)
hol) and 90% unleaded gasoline may be used
in your vehicle, provided the octane number
MMT is a manganese-containing metallic
is at least as high as that recommended for
Gasoline detergent additives
additive that is blended into some gasolines
unleaded gasoline.
to increase the octane number. Mitsubishi
Motors Corporation recommends using gaso-
In the United States, fuel suppliers are
lines without MMT.
required by law to add detergents to their gas-
3-2
General information
Filling the fuel tank
Use of gasolines blended with MMT may
NOTE
Filling the fuel tank
adversely affect performance, and cause the
z
Poor-quality gasoline can cause problems
N00301102063
malfunction indicator on your instrument
such as poor starting, stalling during idling,
panel to come on. If this happens, contact an
abnormal engine noise, and poor accelera-
WARNING
authorized Mitsubishi Motors dealer or a
3
tion. If you experience any of these prob-
z
Gasoline is highly flammable and explo-
repair facility of your choice for assistance.
lems, try using a different brand of gasoline.
sive. You could be burned, seriously
If the engine malfunction indicator (“SER-
injured or killed when handling it. When
VICE ENGINE SOON” or “Check engine
Sulfur in gasoline
refueling your vehicle, always turn the
light”) flashes, have the vehicle inspected
engine off and keep away from flames,
immediately by the nearest authorized
sparks, and smoking materials. Always
Your vehicle may have been designed to sat-
Mitsubishi Motors dealer or a repair facility
handle fuel in well-ventilated outdoor
isfy California’s low-emission regulations
of your choice.
areas.
based on clean-burning low-sulfur gasoline.
z
Repeatedly driving short distances at low
z
Before removing the fuel tank filler cap,
Gasoline sold in parts of the country other
speeds can cause deposits to form in the fuel
be sure to get rid of your body’s static
than California is allowed to have a higher
system and engine, resulting in poor starting
electricity by touching a metal part of the
and poor acceleration. If these problems
sulfur content. Using such gasoline could
car or fuel pump. Any static electricity on
occur, you are advised to add a detergent
adversely affect the vehicle’s catalytic con-
your body could create a spark that
additive to the gasoline when you refuel the
verter and cause the engine malfunction indi-
ignites fuel vapor.
vehicle. The additive will remove the depos-
cator
(“SERVICE ENGINE SOON” or
z
Perform the whole refueling process
its, thereby returning the engine to a normal
(opening the fuel tank filler door, remov-
“Check engine light”) to come on. Illumina-
condition. Be sure to use a Mitsubishi
ing the fuel cap, etc.) by yourself; do not
tion of this indicator while you are using
Motors Genuine cleaning additive. Using an
let any other person near the fuel tank
high-sulfur gasoline does not necessarily
unsuitable additive could make the engine
filler. If you allowed a person to help you
mean the vehicle’s emission-control system is
malfunction. For details, please contact the
and that person was carrying static elec-
malfunctioning. Your authorized Mitsubishi
nearest authorized Mitsubishi Motors dealer.
tricity, fuel vapor could be ignited.
Motors dealer may suggest you try using a
z Do not move away from the fuel tank filler
different, lower-sulfur brand of unleaded gas-
until refueling is finished. If you moved
oline to determine whether the problem is
away and did something else (for example,
fuel-related.
sitting on a seat) part-way through the
refueling process, you could pick up a
fresh charge of static electricity.
z Be careful not to inhale fuel vapor. Fuel
contains toxic substances.
General information
3-3
Filling the fuel tank
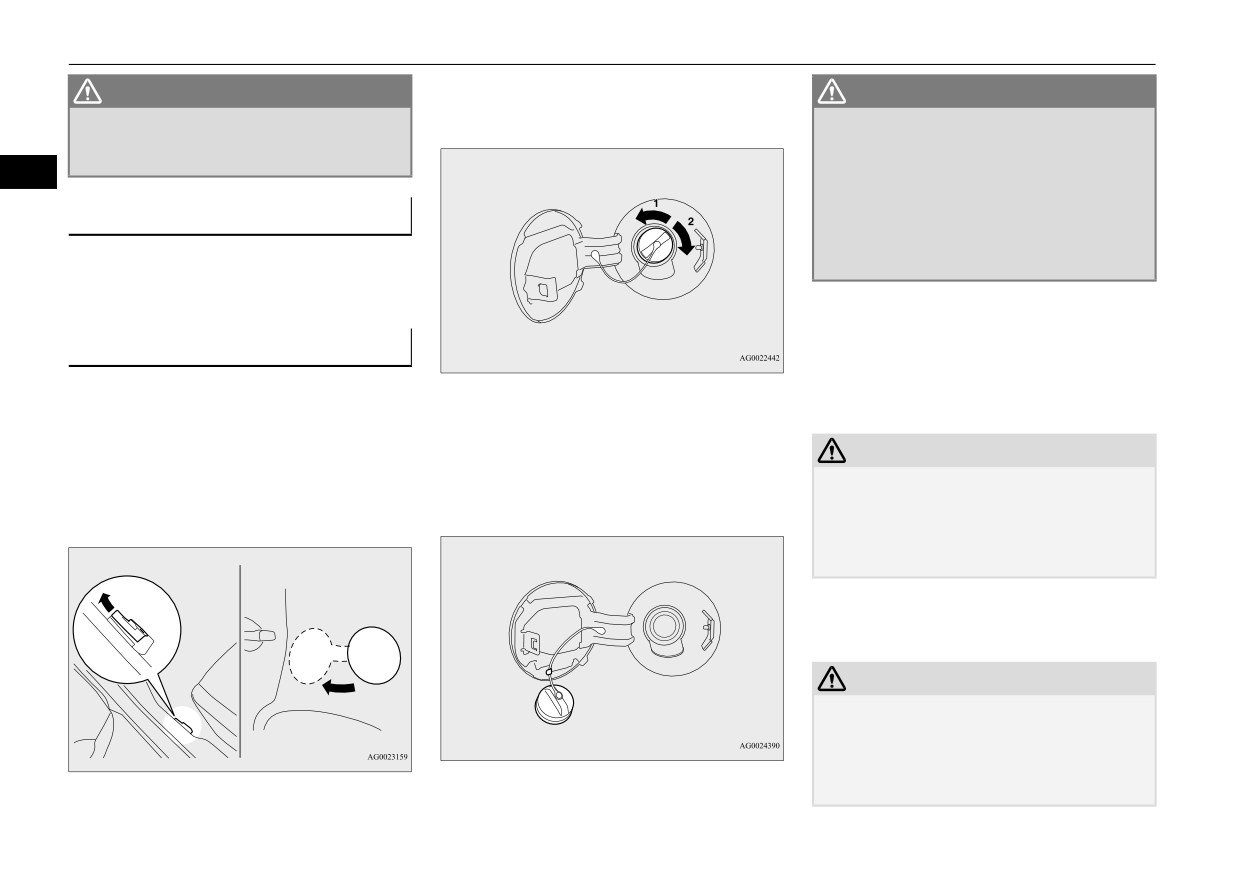
3. Open the fuel tank filler pipe by slowly
WARNING
WARNING
turning the fuel tank filler
cap counter-
z Keep the doors and windows closed while
z Since the fuel system may be under pres-
clockwise.
refueling the vehicle. If they were open,
sure, remove the fuel tank filler cap
fuel vapor could get into the cabin.
slowly. This relieves any pressure or vac-
3
uum that might have built up in the fuel
tank. If the cap is venting vapor or if you
Fuel tank capacity
hear a hissing sound, wait until the sound
stops before removing the cap. Otherwise,
All-wheel drive vehicles: 15.8 gal (60 L)
fuel may spray out, injuring you or others.
Front-wheel drive vehicles: 16.6 gal (63 L)
5. To fill with fuel correctly depends mainly
on correct handling of the fuel filler noz-
Refueling
zle. Do not tilt the nozzle. Insert the noz-
1. Before filling with fuel, stop the engine.
zle in the fuel tank filler port as far as it
1-
Remove
2. The fuel tank filler is located on the rear
goes.
2-
Close
driver side of your vehicle.
The fuel tank filler door can be opened
CAUTION
4. While filling with fuel, hang the fuel cap
from inside the vehicle with the fuel tank
z Your vehicle can only be operated using
cord on the hook located on the inside of
filler door release lever located at the left
unleaded gasoline. Serious engine and cata-
the fuel tank filler door.
lytic converter damage will result if leaded
side of the driver’s seat.
gasoline is filled into these vehicles, and
consequently, this must never be attempted.
6. When the nozzle stops automatically, do
not try to add more fuel.
CAUTION
z To avoid fuel spillage and overfilling, do not
“top-off” the fuel tank. Spilled fuel could
discolor, stain, or crack the vehicle’s paint-
work. If fuel spills on the paintwork, wipe it
off with a soft cloth.
3-4
General information
Modifications to and racing of your vehicle
7. To close, turn the fuel tank filler pipe cap
z Modification of any onboard com-
Modifications to and racing
slowly clockwise until you hear clicking
puter/control module, including repro-
sounds, then gently push the fuel tank
of your vehicle
gramming, or replacing/adding chips to
filler door closed.
N00301600149
any onboard computer/control module
This vehicle should not be modified with
3
WARNING
Review the Warranty and Maintenance Man-
non-Mitsubishi Motors genuine parts.
z
Make sure the fuel tank filler cap is
ual for further details regarding warranty cov-
Mitsubishi Motors designs and manufactures
securely closed. If the fuel cap were loose,
erage.
high quality vehicles with an emphasis on
fuel could leak, resulting in a fire.
safety and durability. Modifications using
non-Mitsubishi Motors genuine parts may
Installation of accessories
affect the performance, safety and/or durabil-
N00301701307
CAUTION
ity of your vehicle, and may violate applica-
z
If you need to replace the fuel tank filler cap,
ble state and/or federal regulations.
CAUTION
use only the cap specified for your model
z Before any electrical or electronic accesso-
vehicle.
DAMAGE OR PERFORMANCE PROB-
ries are installed, consult an authorized
LEMS RESULTING FROM MODIFICA-
Mitsubishi Motors dealer.
TIONS TO OR RACING OF YOUR
z Your vehicle is equipped with a diagnosis
NOTE
VEHICLE ARE NOT COVERED
connector (data link connector) for checking
z
If the fuel tank filler cap is not tight while
UNDER WARRANTY.
and servicing the electronic control system.
driving, the engine malfunction indicator
Mitsubishi Motors does not recommend con-
(“SERVICE ENGINE SOON” or “Check
Examples of modifications to your vehicle
necting a device other than the Scan Tool for
engine light”) may come on when the
inspections and service to this connector
that can cause damage or performance prob-
onboard diagnostic (OBD) system performs
because an unexpected problem could result.
lems include the following:
a self check.
In addition, malfunctions caused by connect-
Always tighten the fuel tank filler cap until
ing a device other than the Scan Tool may
z Failure to use Mitsubishi Motors genuine
you hear at least 3 clicks.
not be covered under warranty.
parts
The indicator will go off after driving several
times. If the indicator does not go off, con-
z Failure to use required fuel and fluids
tact your authorized Mitsubishi Motors
z Failure to use proper size tires and wheels
z The installation of accessories, optional
dealer or a repair facility of your choice
z Modification of the fuel, intake, exhaust,
parts, etc., should only be carried out
immediately.
emission, suspension, engine, drive train
within the limits prescribed by law, and in
or electrical wiring systems
accordance with the guidelines and warn-
ings contained within the documents
accompanying this vehicle.
General information
3-5
Genuine Mitsubishi Motors parts
Only Mitsubishi Motors approved acces-
Important point!
Genuine Mitsubishi Motors
sories should be fitted to your vehicle.
z Improper installation of electrical parts
parts
Due to the large number of accessory and
could cause fire. Refer to the “Modifica-
N00301400219
replacement parts provided by different man-
3
tion/alterations to the electrical or fuel
Mitsubishi Motors Genuine Parts are
ufacturers in the market, it is not always pos-
systems” section within this owner’s man-
designed and manufactured to meet high stan-
sible for an authorized Mitsubishi Motors
ual.
dards of performance, and are recommended
dealer to check whether the attachment or
z Using a cellular phone or radio set inside
for all of your maintenance needs. Also avail-
installation of non-Mitsubishi Motors genu-
the vehicle without an external antenna
able from your Mitsubishi Motors dealer are
ine parts affects the driving safety of your
may cause electrical system interference,
a wide variety of accessories to personalize
vehicle.
which could lead to unsafe vehicle opera-
your new vehicle. Each Mitsubishi Motors
tion.
vehicle has a selection of Mitsubishi Motors
z Tires and wheels which do not meet spec-
Modification/alterations to the
authorized accessories to choose from to tai-
ifications must not be used.
electrical or fuel systems
lor your new vehicle to your own personal
Refer to the “Specifications” section for
N00301800138
preference. Your Mitsubishi Motors dealer’s
information regarding wheel and tire
Parts Manager has information on various
Mitsubishi Motors manufactures high quality
sizes.
audio systems, protection items, as well as
vehicles with an emphasis on safety. It is
interior and exterior accessories available for
important to consult an authorized Mitsubishi
WARNING
your specific model.
Motors dealer before installation of any
z
While driving, do not use a cellular phone
accessory which may involve modification of
in a way that hinders safe driving. Any-
the electrical or fuel systems.
California Perchlorate
thing, including cellular phone usage, that
distracts you from the safe operation of
Materials Requirements
your vehicle increases your risk of an acci-
CAUTION
N00300100017
dent.
z Please consult an authorized Mitsubishi
Certain components of this vehicle, such as
Refer to and follow all state and local laws
Motors dealer concerning any such acces-
airbag modules, seat belt pretensioners, and
in your area regarding cellular phone
sory fitment or modification.
button cell batteries, may contain perchlorate
usage while driving.
If the wires interfere with the vehicle body or
improper installation methods are used (pro-
materials.
tective fuses not included, etc.), electronic
Special handling may apply. For additional
devices may be adversely affected, resulting
information, see www.dtsc.ca.gov/
in a fire, vehicle damage, or other accident.
hazardouswaste/perchlorate.
3-6
General information
Event Data Recording
Event Data Recording
NOTE
N00302700046
z EDR data are recorded by your vehicle only
if a non-trivial crash situation occurs; no data
This vehicle is equipped with an event data
are recorded by the EDR under normal driv-
recorder (EDR).
3
ing conditions and no personal data (e.g.,
The main purpose of an EDR is to record, in
name, gender, age, and crash location) are
certain crash or near crash-like situations,
recorded. However, other parties, such as
such as an airbag deployment or hitting a
law enforcement, could combine the EDR
road obstacle, data that will assist in under-
data with the type of personally identifying
standing how a vehicle’s systems performed.
data routinely acquired during a crash inves-
The EDR is designed to record data related to
tigation.
vehicle dynamics and safety systems for a
short period of time, typically 30 seconds or
To read data recorded by an EDR, special
less.
equipment is required, and access to the vehi-
cle or the EDR is needed. In addition to the
The EDR in this vehicle is designed to record
vehicle manufacturer, other parties, such as
such data as:
law enforcement, that have the special equip-
ment, can read the information if they have
z How various systems in your vehicle were
access to the vehicle or the EDR.
operating;
z Whether or not the driver and passenger
safety belts were buckled/fastened;
z How far (if at all) the driver was depress-
ing the accelerator and/or brake pedal;
and,
z How fast the vehicle was traveling.
These data can help provide a better under-
standing of the circumstances in which
crashes and injuries occur.
General information
3-7
Seat and restraint systems
Seats
4-2
4
Seats and restraint systems
4-2
Front seats
4-3
Rear seats
4-7
Head restraints
4-7
Extending a luggage compartment
4-9
Seat belts
4-11
Seat belt use during pregnancy
4-17
Seat belt pre-tensioner and force limiter systems
4-17
Child restraint systems
4-18
Maintenance and inspection of seat belts
4-28
Supplemental Restraint System (SRS) - airbag
4-29
Seats
Seats
N00408401649
4
locks also are safety equipment, which must
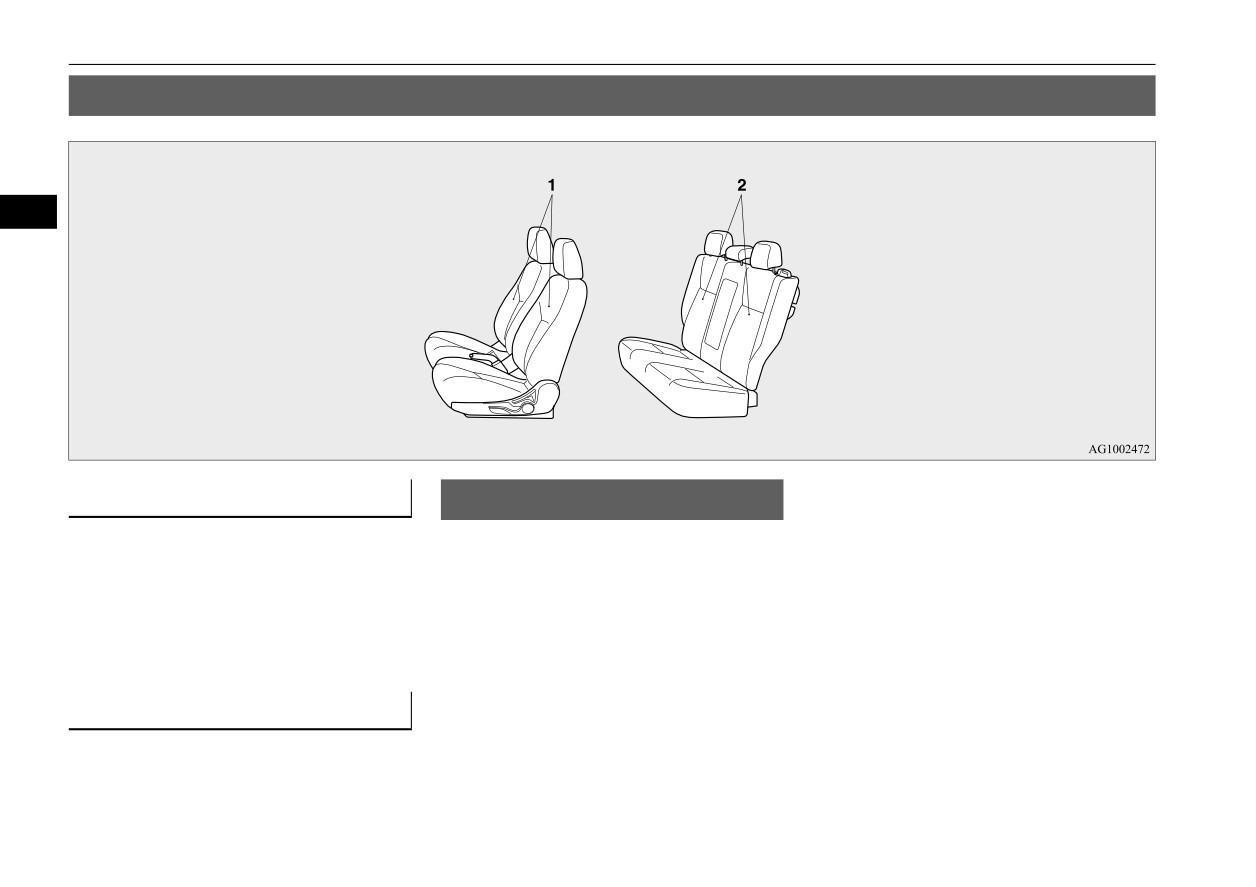
1 - Front seat
Seats and restraint systems
be used correctly.
N00401601264
z To adjust the seat forward or backward
Your vehicle has seat belts and other features
Always check the following before you drive:
Page 4-3
that help protect you and your passengers in
z To adjust the seatbacks Page 4-4
z That everyone in your vehicle is properly
an accident.
z To adjust the seat height (Driver’s seat
wearing their seat belt.
Seat belts are the most important safety
only) Page 4-5
z That infants and small children are prop-
device. When worn properly, seat belts can
z Heated seat (if so equipped) Page 4-6
erly secured in appropriate child restraint
reduce the chance of serious injury or death
systems in the rear seat.
in various types of crashes. For added protec-
z That all doors are fully closed and locked.
2 - Rear seats
tion during a severe frontal collision, your
z That seatbacks are upright, with head
vehicle has a Supplemental Restraint System
z Arm rest Page 4-7
restraints properly adjusted.
(SRS) with airbags for the driver and passen-
gers. The seats, head restraints, and door
4-2
Seat and restraint systems
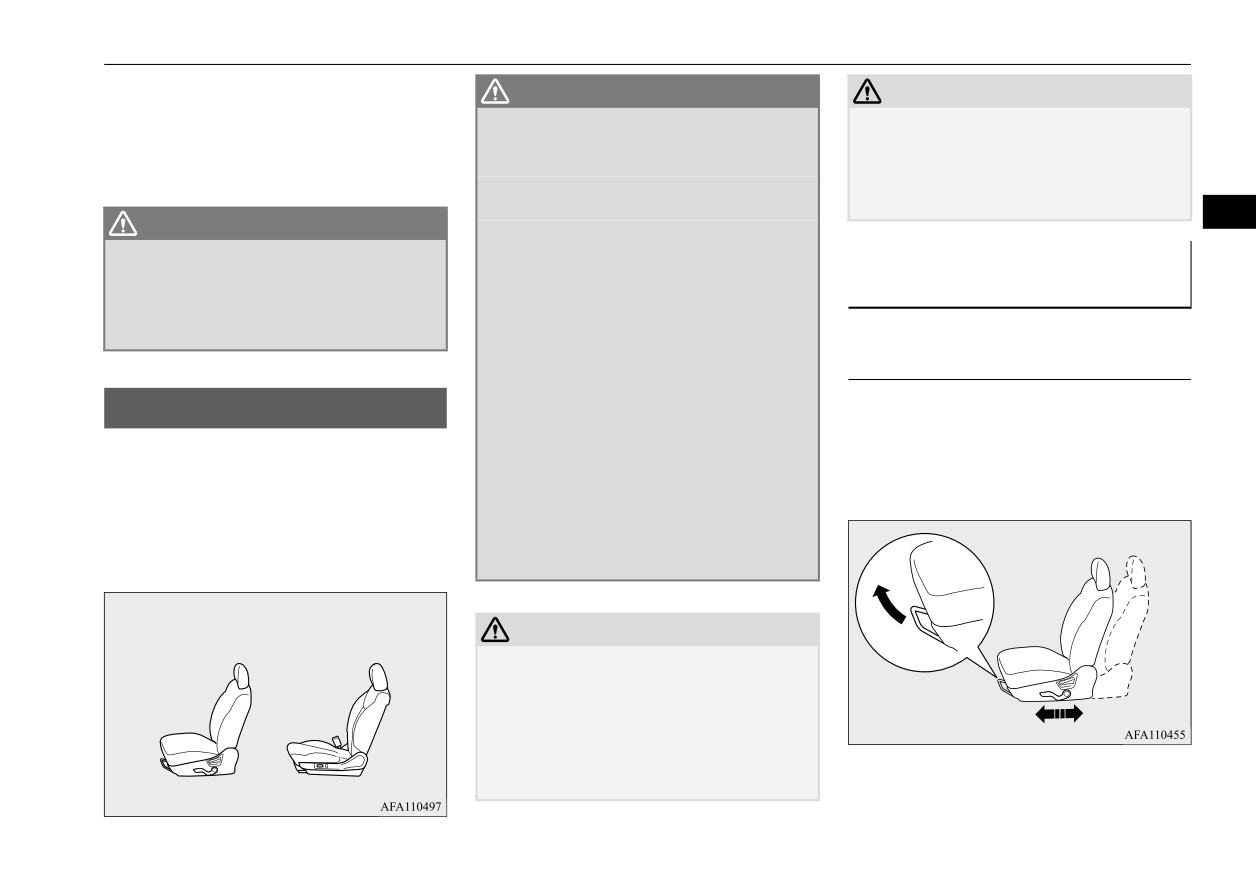
Front seats
Safety equipment cannot prevent injury or
WARNING
CAUTION
death in all motor vehicle accidents. You can
z
Do not attempt to adjust the seat while
z When sliding the seats, be careful not to
help reduce the risk of injury or death, how-
driving. This can cause loss of vehicle con-
catch your hand or leg.
ever, by following the instructions in this
trol and result in an accident.
z When sliding or reclining the seat rearward,
manual.
z
After adjusting the seat, make sure that it
pay careful attention to the rear seat passen-
is securely locked into position.
gers.
4
WARNING
z
To reduce the risk to the driver of serious
z Do not place objects under the seats. This
injury or death during deployment of the
To adjust the seat forward or
could prevent the seat from locking
driver’s airbag, always properly wear the
securely, and it could lead to an accident.
seat belt and adjust the driver’s seat as far
backward
It may also cause damage to the seat or
back as possible while maintaining a posi-
N00401901371
other parts.
tion that still enables you to fully apply the
pedals, easily control the steering wheel,
Manual seat adjustment
and safely operate the vehicle.
z
To reduce the risk to the front passenger
Front seats
Pull the seat adjusting lever up and slide the
of serious injury or death during deploy-
N00401801468
ment of the passenger’s airbag, always
seat forward or backward to the desired posi-
Position the driver’s seat as far back as possi-
properly wear the seat belt and adjust the
tion. Release the adjusting lever to lock the
front passenger’s seat as far back as possi-
seat in place.
ble while maintaining a position that still
ble.
enables you to fully apply the pedals, easily
z
Always place children 12 years old and
control the steering wheel and safely operate
under in the rear seat and use appropriate
the vehicle.
child restraint systems.
Manual seat
Power seat
adjustment
adjustment
CAUTION
z
Make sure that the seat is adjusted by an
adult. If it is adjusted by a child, an unex-
pected accident might occur.
z
Do not place a cushion or the like between
your back and the seatback while driving.
The effectiveness of the head restraints will
be reduced in the event of an accident.
Seat and restraint systems
4-3
Front seats
WARNING
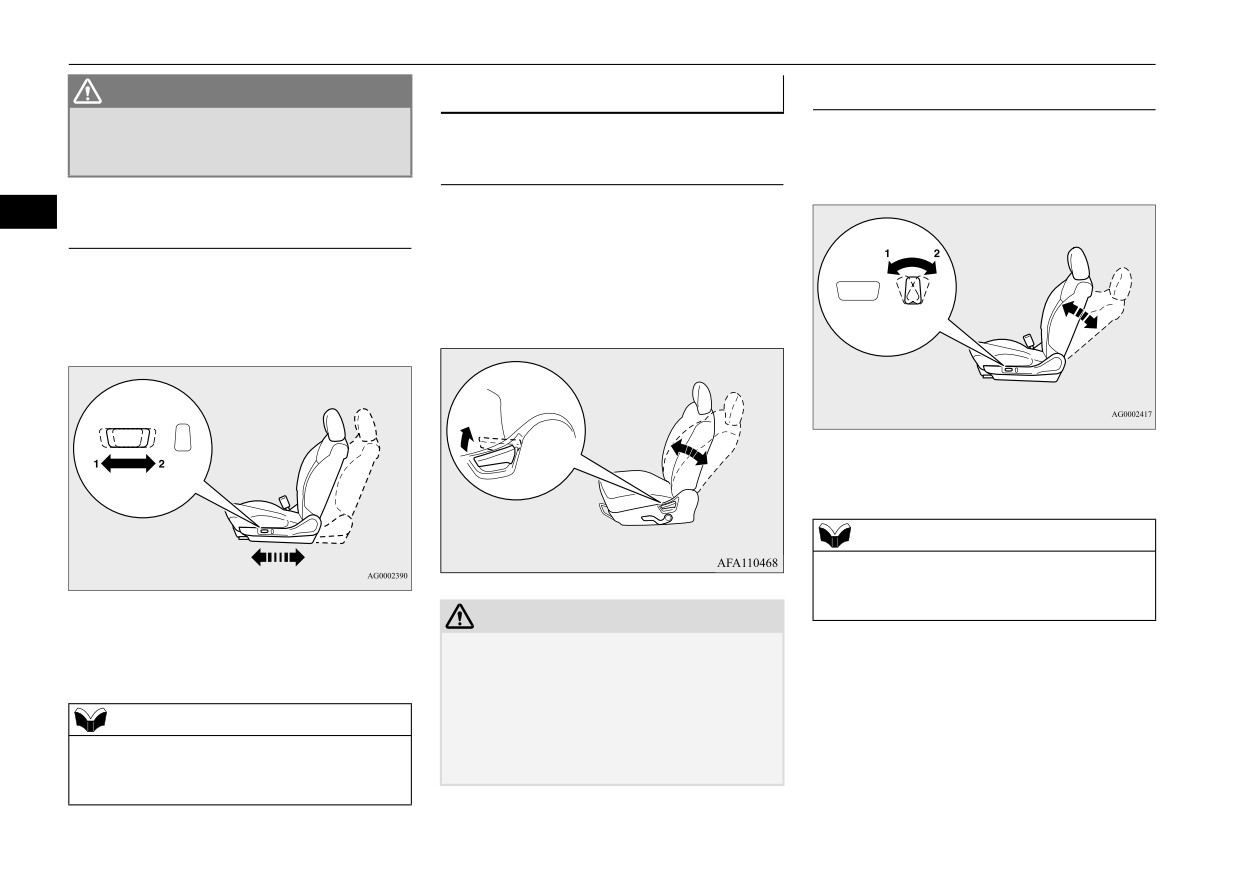
To adjust the seatbacks
Power seat adjustment
z To make sure that the seat is securely
N00402001425
locked, try to move it forward or back-
Operate the switch in the direction of the
ward without using the adjusting lever.
Manual seat adjustment
arrows to adjust the seatback.
4
To adjust the seatback, lean forward slightly,
Power seat adjustment
gently pull the seatback lock lever up, then
lean backward to a comfortable position and
Operate the switch forward or backward to
release the lever. The seatback will lock in
move the seat to the desired position. Release
place.
the switch to lock the seat in place.
1- Move forward
2- Move backward
NOTE
z To prevent the battery from going dead,
operate the power seat with the engine run-
1- Forward (toward the front of the vehicle)
ning.
CAUTION
2- Backward (toward the rear of the vehi-
z The reclining mechanism used in the seat-
cle)
back is spring loaded, and will cause the
seatback to return quickly to the vertical
position when the lock lever is operated.
NOTE
When pulling the lever, sit close to the seat-
z To prevent the battery from going dead,
back or hold the seatback with your hand to
operate the power seat with the engine run-
control its return motion.
ning.
4-4
Seat and restraint systems
Front seats
WARNING
z
To reduce the risk of serious injury or
death in the event of an accident or sud-
den stop, all seatbacks should be kept in
the upright position while the vehicle is in
motion.
4
Seat belt performance during an accident
can be adversely affected if the seatbacks
are reclined. The more a seatback is
reclined, the more likely seat belt perfor-
mance will be adversely affected. If the
seat belt is not properly positioned against
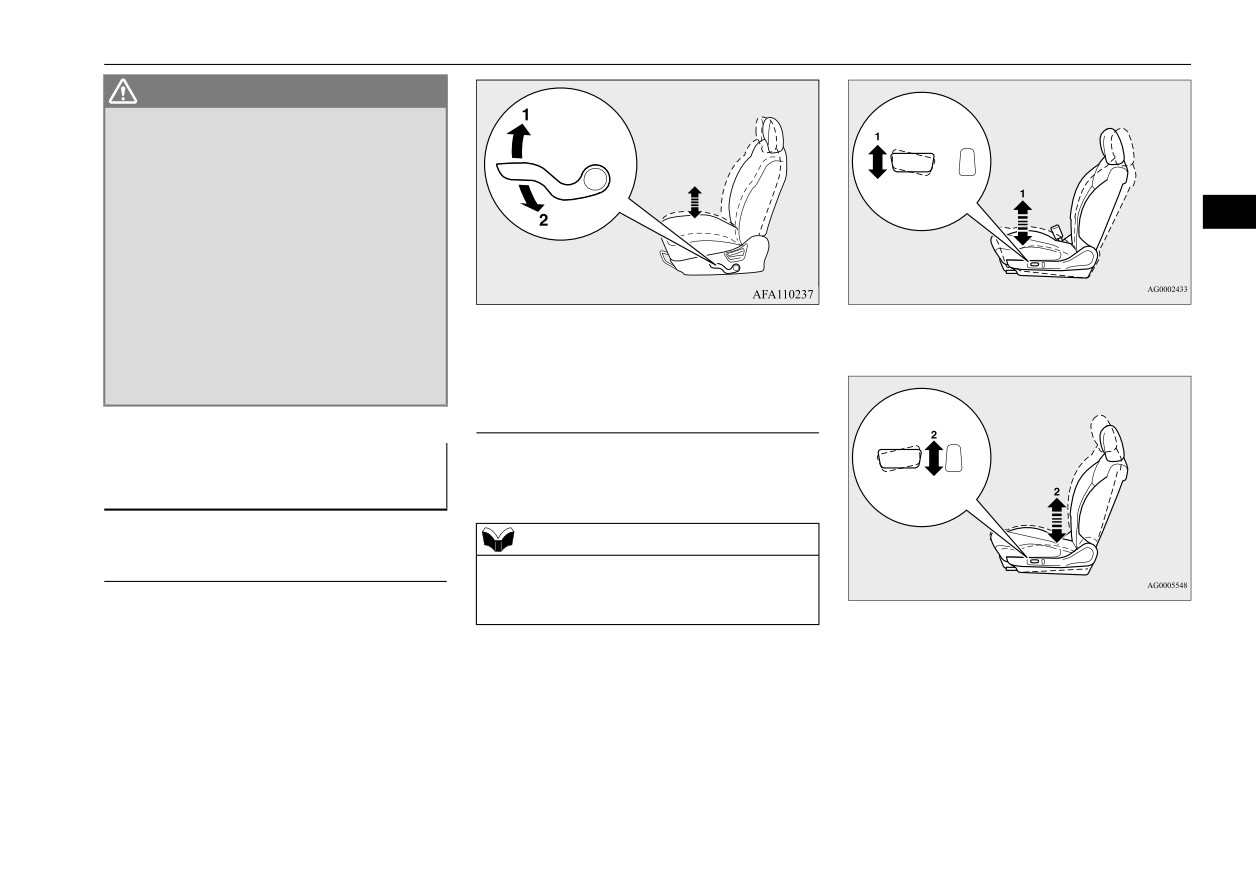
1- Raise
1-
Raise or lower the front end of the seat
the body during an accident, there is
2- Lower
increased risk you will slide under the belt
and receive serious injury or death.
Power seat adjustment
To adjust the seat height
Operate the switch in the direction of the
(Driver’s seat only)
arrows to raise or lower the seat.
N00402101282
NOTE
Manual seat adjustment
z To prevent the battery from going dead,
operate the power seat with the engine run-
Operate the lever repeatedly to raise or lower
ning.
2- Raise or lower the back end of the seat
the seat.
Seat and restraint systems
4-5
Front seats
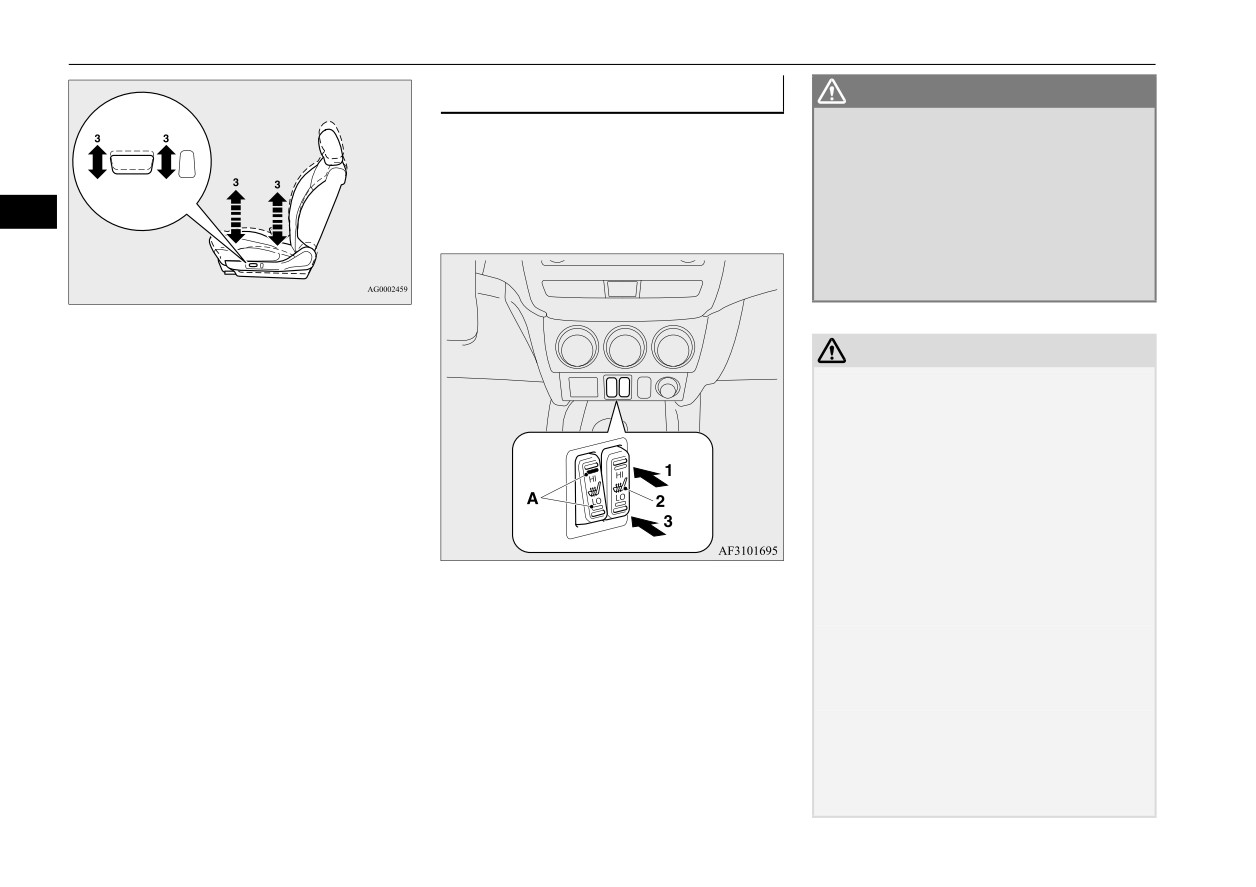
Heated seat (if so equipped)
WARNING
N00435601489
z
Persons who are unable to feel tempera-
ture change or skin pain due to age, ill-
The heated seats can be operated by pushing
ness, injury, medication, alcohol use,
the switch when the ignition switch or the
fatigue or other physical conditions or
operation
mode is in ON. The indicator light
who have sensitive skin may suffer burns
4
(A) will illuminate while the heater is on.
when using the heated seat even at low
temperatures. To reduce the risk of burns,
people with such conditions must use care
when using the heated seat.
3-
Raise or lower the entire seat
CAUTION
z
Switch off the heated seats when not in use.
Operate the heaters at the “HI” position for
quick heating. After the seat has become
warm, set the heater switch to the “LO” posi-
tion to keep it warm. Slight variations in the
seat temperature may be felt while using the
heated seats. This is caused by the operation
of the heater’s internal thermostat and does
not indicate a malfunction.
z
Do not place heavy objects on the seat or
1 (HI)
- Heater high (for quick heating)
stick pins, needles, or other pointed objects
2
- Heater off
into the seat.
3 (LO)
- Heater low (to keep the seat warm)
z
Do not place a blanket, cushion, or other
insulating material on the seat while using
the heater; doing so can cause the heater ele-
ment to overheat.
z
When cleaning the seat, do not use benzine,
kerosene, gasoline, alcohol, or other organic
solvents; doing so can cause damage not
only to the surface of the seat, but also to the
heater.
4-6
Seat and restraint systems
Rear seats
CAUTION
Head restraints
WARNING
z If water or any other liquid is spilled on the
N00404300542
z
Driving without the head restraints in
seat, allow it to dry thoroughly before
place can cause you and your passengers
Padded head restraints for the seats can
attempting to use the heater. Turn the heater
serious injury or death in an accident. To
reduce the risk of a whiplash injury if your
off immediately if it appears to be malfunc-
reduce the risk of injury in an accident,
vehicle is hit from the rear.
tioning during use.
always make sure the head restraints are
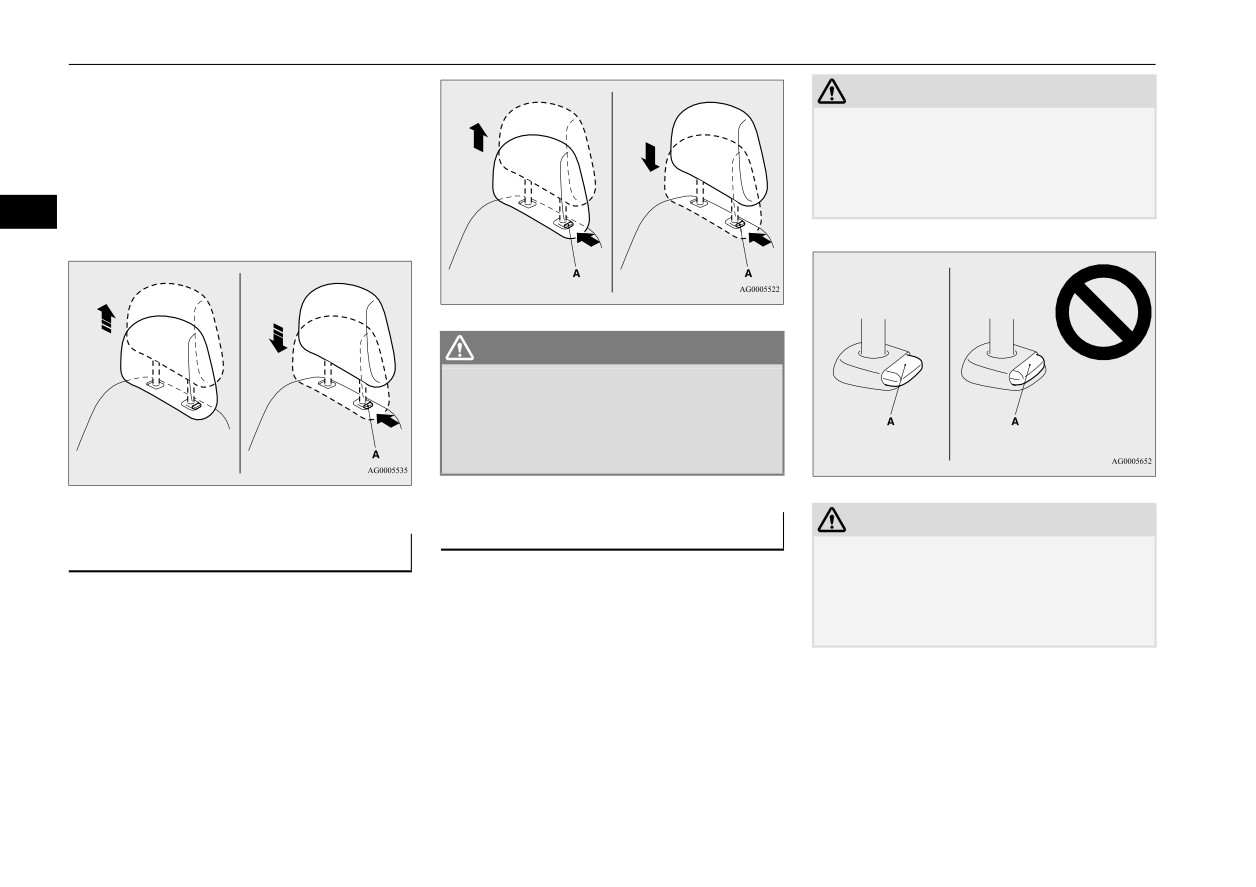
The head restraints are equipped in the illus-
4
installed and properly positioned when
trated position.
the seat is occupied.
Rear seats
To maximize the effectiveness of your head
z
In order to minimize the risk of a neck
N00402500191
restraint, adjust the front seatback to the
injury due to a rear impact, the front seat-
upright position, the rear seatback to the nor-
back must be adjusted to the upright posi-
Arm rest
mal seating position, and the head restraint to
tion, the rear seatback to the normal
seating position, and the head restraint to
N00403001363
the proper position. Sit back against the seat-
the proper position before vehicle opera-
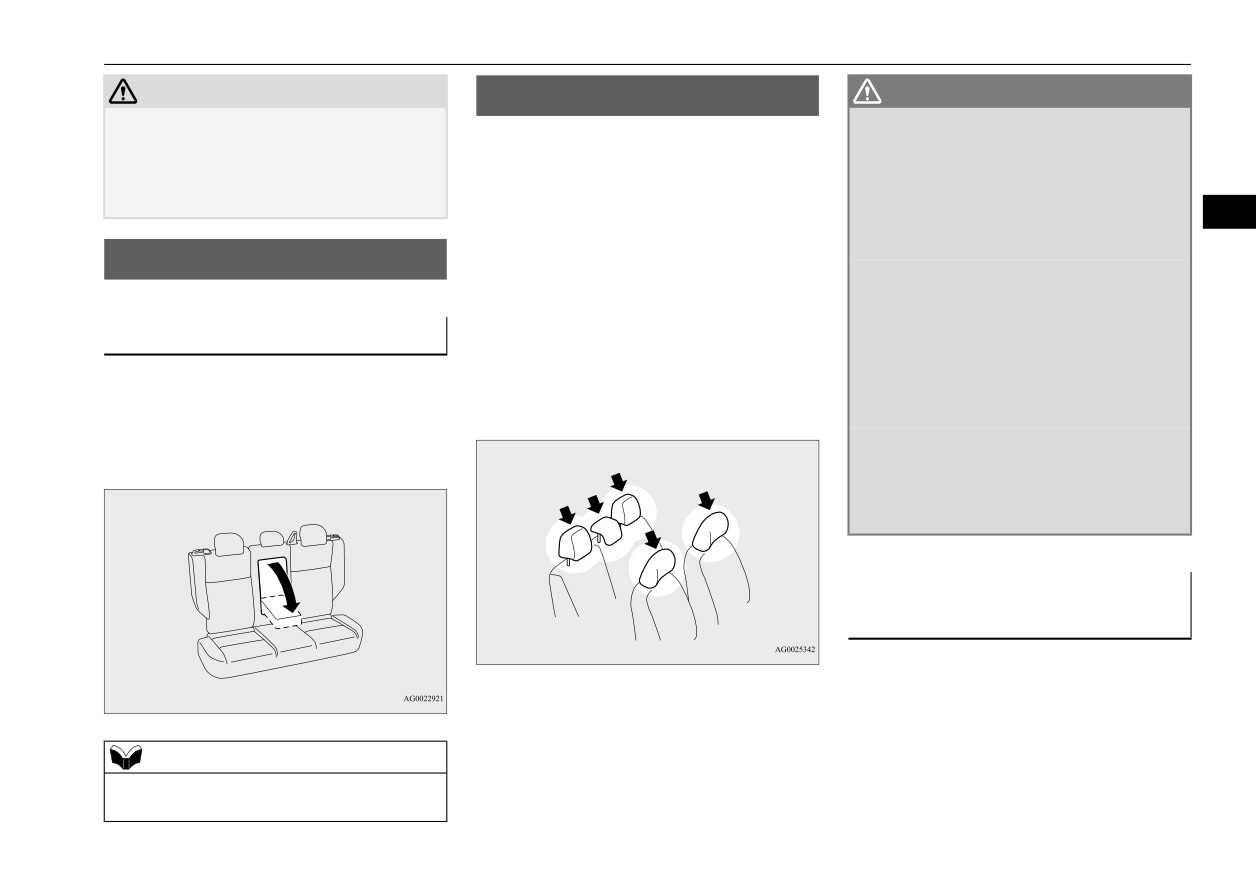
Tilt the arm rest down for use as shown.
back with your head close to the head
tion. The driver should never adjust the
The arm rest includes a cup holder. (Refer to
restraint.
seat while the vehicle is in motion.
“Cup holders: For the rear seat” on page
z
Never place a cushion or similar device on
5-178.)
the seatback. This can adversely affect
head restraint performance by increasing
the distance between your head and the
restraint.
Adjustment of the head
restraint height
To reduce the risk of injury in an accident,
adjust the head restraint height so that the
center of the restraint is at your eye level
when seated. Any person too tall for the
NOTE
restraint to reach their eye level when seated
z Never sit on the arm rest.
should raise the restraint to the highest locked
Doing so could damage the arm rest.
position.
Seat and restraint systems
4-7
Head restraints
z To raise the restraint, pull it straight up.
CAUTION
z To lower the restraint, push down on it
z Check that the lock knob (A) is extended out
while pressing the lock knob (A) in the
as shown in the illustration. Then pull the
direction shown by the arrow.
head restraint up to make sure that it is
z After adjusting the height, push down on
locked in place and will not come out of the
the restraint to make sure it is locked in
seatback.
4
position.
WARNING
z To help minimize the risk of neck injury in
the event of an accident, the head
restraints must be properly installed and
positioned to proper height before vehicle
operation.
CAUTION
To install
z The shape and size of the head restraint dif-
To remove
fers according to the seat. Always use the
First check that the head restraint is facing in
correct head restraint provided for the seat
Press the lock knob
(A) in the direction
the right direction as shown in the previous
and do not install the head restraint in the
shown by the arrows. Then pull the head
illustration, and then insert it into the seat-
wrong direction.
restraint up and out of the seatback.
back. Push the head restraint down while
pressing the lock knob (A) until the restraint
locks into place.
4-8
Seat and restraint systems
///////////////////////////////////////