Mitsubishi Outlander PHEV (2022 year). Manual in english - page 21
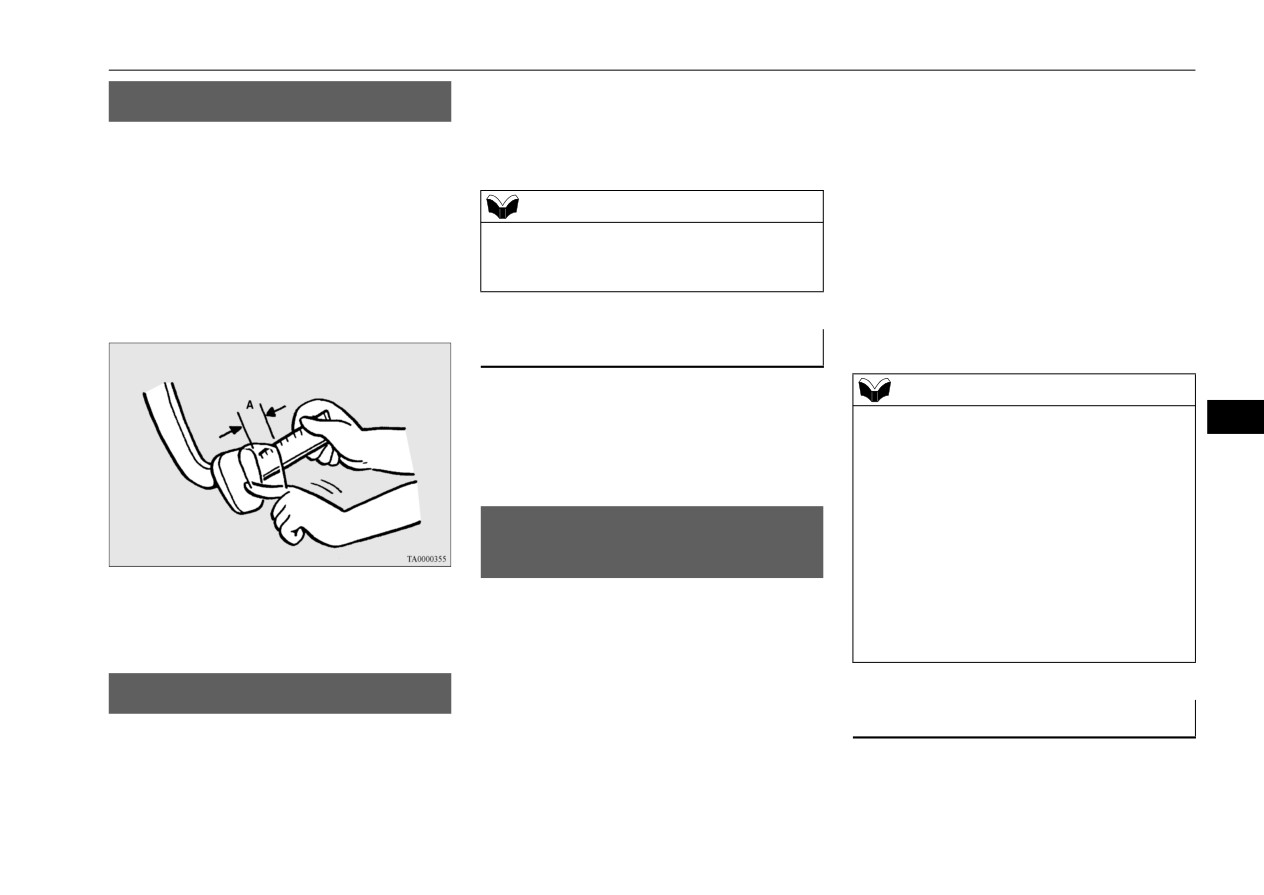
Brake pedal free play
detergent or non-abrasive cleaner to clean the
To be sure the emission-control system works
%UDNH SHGDO IUHH SOD\
blades and glass areas.
properly, have your vehicle inspected and
N00940301359
Replace the blades if they continue to streak
maintained by a certified Mitsubishi EV
To check the brake pedal free play (A), turn
or smear.
dealer. This should be done at the time or
off the Plug-in Hybrid EV system and press
mileage specified in the “WARRANTY AND
the brake pedal several times with your foot.
MAINTENANCE MANUAL”.
NOTE
Then press the pedal down with your fingers
These, and all the other “general” mainte-
z Do not run the wipers on dry glass for a long
until you first feel resistance.
nance services listed in this manual, need to
time. This wears out the rubber and can
be performed to keep your vehicle running
Brake pedal free play:
scratch the glass.
properly and reliably.
WR LQFK WR PP
You should also have an inspection and ser-
vice any time you suspect a malfunction.
'XULQJ FROG ZHDWKHU
NOTE
If the blades are frozen to the windshield or
rear window, do not operate the wipers until
z
To meet government regulations and pro-
9
mote cleaner air, your vehicle is equipped
the ice has melted and the blades are freed,
with an onboard diagnostic system (OBD).
otherwise the wiper motor may be damaged.
The engine electronic control module that
controls OBD functions stores various data
(especially about the exhaust emissions).
(PLVVLRQ FRQWURO V\VWHP
This data will be erased if the battery cable is
PDLQWHQDQFH
disconnected, which could make a rapid
N00940801338
diagnosis difficult. Do not disconnect the
If the free play is not within these limits, take
battery cable when the engine malfunction
your vehicle to a certified Mitsubishi EV
Your vehicle is equipped with an emission-
indicator
(“SERVICE ENGINE SOON” or
dealer for adjustment.
control system that meets all the requirements
“Check engine light”) is ON.
of the U.S. Environmental Protection Agency
and Environment Canada. The emission-con-
:LSHU EODGHV
trol system is made of:
N00940700138
6SDUN SOXJV
Check the wiper blades occasionally. Clean
z a positive crankcase ventilation system
N00940900231
them regularly to remove deposits of salt and
z an evaporative emission-control system
Spark plugs must fire properly to ensure
road film. Use a sponge or cloth and a mild
z an exhaust emission-control system
proper engine performance and emission-
control.
Vehicle care and maintenance
9-21
General maintenance
Do not reuse spark plugs by cleaning or
If the engine sounds abnormally loud, have
(YDSRUDWLYH HPLVVLRQ FRQWURO
regapping. Spark plugs should be replaced at
adjustments made by a certified Mitsubishi
the mileage specified in the “WARRANTY
EV dealer.
V\VWHP H[FHSW HYDSRUDWLYH
AND MAINTENANCE MANUAL”.
HPLVVLRQ FDQLVWHU
N00941401197
)XHO V\VWHP WDQN SLSH OLQH DQG
NOTE
If the fuel-vapor vent line is clogged or dam-
FRQQHFWLRQ DQG IXHO WDQN ILOOHU
z Use the recommended or equivalent spark
aged, the fuel-vapor mixture will escape, pol-
FDS
plugs listed under “Engine specifications” on
luting the air.
page 11-6. Use of other plugs could cause
N00941301196
Have the system checked at a certified Mit-
engine damage, loss of performance or radio
Check these regularly for damage or leaks in
subishi EV dealer at the mileage specified in
noise.
the fuel lines and connections. Check the fuel
the “WARRANTY AND MAINTENANCE
tank filler cap for damage or looseness. Pay
MANUAL”.
special attention to the fuel lines closest to
)XHO KRVHV
high heat sources such as the exhaust mani-
NOTE
N00941000040
fold.
9
z Approximately
6 hours after the Plug-in
Check the hose surfaces for any heat and
Hybrid EV system is turned off, you may
mechanical damage, hard and brittle rubber,
WARNING
hear operating sounds from under the vehicle
cracking, tears, cuts and abrasions. Pay spe-
for several minutes.
z
,I \RX VHH D IXHO OHDN RU LI \RX VPHOO IXHO
cial attention to the hoses closest to high heat
GR QRW VWDUW WKH 3OXJ LQ +\EULG (9 V\V
This is the sound checking the fuel evapora-
sources such as the exhaust manifold. Check
WHP $Q\ VSDUN LQFOXGLQJ IURP WKH LJQL
tion leakage.
all the hose connections, such as clamps and
WLRQ IODPH RU VPRNLQJ PDWHULDO FRXOG
This is normal.
couplings, to make sure they are secure and
FDXVH DQ H[SORVLRQ RU ILUH &DOO D FHUWLILHG
that there are no leaks. If you see any wear or
0LWVXELVKL (9 GHDOHU IRU DVVLVWDQFH
damage, replace the hoses immediately.
*HQHUDO PDLQWHQDQFH
N00941501303
,QWDNH YDOYH FOHDUDQFH
The next pages list the maintenance service
N00950101060
recommended by Mitsubishi Motors Corpo-
ration. In addition to the general maintenance
Have the valve clearance checked at a certi-
that needs to be performed at the times listed,
fied Mitsubishi EV dealer at the mileage
there are other parts which do not usually
specified in the “WARRANTY AND MAIN-
need regular maintenance.
TENANCE MANUAL”.
9-22
Vehicle care and maintenance
General maintenance
But, if any of these parts stops working prop-
z The underside or rear of the vehicle is
%DOO MRLQW VWHHULQJ OLQNDJH
erly, your vehicle performance could suffer.
damaged
Have these items checked if you notice a
VHDOV GULYH VKDIW ERRWV
problem with them.
N00941800093
Also check the exhaust system each time the
Check the following parts for damage and
vehicle is raised for lubrication, oil changes,
If you have any questions, see a certified Mit-
or required service. Any open seams or loose
grease leaks:
subishi EV dealer for assistance.
connections could let dangerous exhaust
z Ball joint boots of the suspension and
fumes seep into the luggage and passenger
steering linkage
compartments.
'LVF EUDNH SDGV
z Bellows on both ends of the drive shaft
N00941600059
&KHFN IRU DQ\ RI WKH IROORZLQJ
Good brakes are essential for safe driving.
Check the brake pads for wear. For good
([KDXVW V\VWHP
FRQGLWLRQV
braking performance, replace the brake pads
N00942201118
z Check for holes or exhaust gas leaks
with the same type pads as the originals.
WARNING
caused by corrosion or damage.
9
z &DUERQ PRQR[LGH JDV IURP \RXU YHKLFOH¶V
z Check the joints and connections for
%UDNH KRVHV
H[KDXVW LV SRLVRQRXV
%UHDWKLQJ WKHVH
looseness or exhaust gas leaks.
N00941700076
IXPHV FDQ FDXVH XQFRQVFLRXVQHVV RU GHDWK
z Check the rubber hangers and brackets for
Brake hoses and tubing should be checked
damage.
for:
The best way to keep carbon monoxide gas
from entering inside your vehicle is to have
7LPLQJ EHOW
z Severe surface cracking, scuffing or worn
the engine exhaust system properly serviced.
N00942300079
spots. If the fabric casing of the hose is
Have a competent mechanic inspect the com-
showing through any cracks or worn spots
The timing belt should be replaced with a
plete exhaust system and nearby body areas
in the rubber hose cover, the hose should
new one at the mileage listed in the “WAR-
for broken, damaged, deteriorated, or mispo-
be replaced. The brakes can fail if the
RANTY AND MAINTENANCE MAN-
sitioned parts if you notice any of the follow-
hose wears through.
UAL”.
ing:
z Improper installation may cause twisting,
or wheel, tire or chassis interference.
z A change in the sound of the exhaust sys-
tem
z The smell of exhaust fumes inside the
vehicle
Vehicle care and maintenance
9-23
For cold and snowy weather
+RRG ORFN UHOHDVH PHFKDQLVP
:HDWKHUVWULSSLQJ
WARNING
DQG VDIHW\ FDWFK
z )XVLEOH OLQNV PXVW QRW EH UHSODFHG E\ DQ\
RWKHU GHYLFH
)DLOLQJ WR ILW WKH FRUUHFW IXV
N00942501124
To prevent freezing of the weatherstripping
LEOH OLQN PD\ UHVXOW LQ ILUH LQ WKH YHKLFOH
on the doors, engine hood, etc., they should
The hood lock release mechanism and hood
SURSHUW\ GHVWUXFWLRQ DQG VHULRXV RU IDWDO
be treated with silicone grease.
safety catch should be checked, cleaned, and
LQMXULHV DW DQ\ WLPH
oiled when needed for easy movement and to
prevent rust and wear. Use Multipurpose
$GGLWLRQDO HTXLSPHQW )RU
Grease NLGI Grade 2 sparingly for all sliding
UHJLRQV ZKHUH VQRZ LV HQFRXQ
)XVHV
parts of the hood latch and release lever.
WHUHG
N00942801938
Work the grease into the hood lock mecha-
nism until all the movable surfaces are cov-
)XVH EORFN ORFDWLRQ
ered.
It is a good idea to carry a shovel or a short-
Also, put a light coat of the same grease on
handled spade in the vehicle during the win-
the safety catch wherever moving parts touch.
ter so that you can clear away snow if you get
To prevent damage to the electrical system
9
stranded. A small hand-brush for sweeping
from short-circuiting or overloading, each
snow off the vehicle and a plastic scraper for
individual circuit is equipped with a fuse. The
)RU FROG DQG VQRZ\ ZHDWKHU
the windshield, side and rear window are also
fuse blocks are located in the passenger com-
N00942600102
useful.
partment and in the engine compartment.
9HQWLODWLRQ VORWV
)XVLEOH OLQNV
N00942701331
The ventilation slots in front of the wind-
The fusible links will melt to prevent a fire if
shield should be brushed clear after a heavy
a large current attempts to flow through cer-
snowfall so that the operation of the heating
tain electrical systems.
and ventilation systems will not be impaired.
In case of a melted fusible link, see a certified
Mitsubishi EV dealer for inspection and
replacement.
For the fusible links, please refer to “Fuse
load capacities” on page 9-26.
9-24
Vehicle care and maintenance
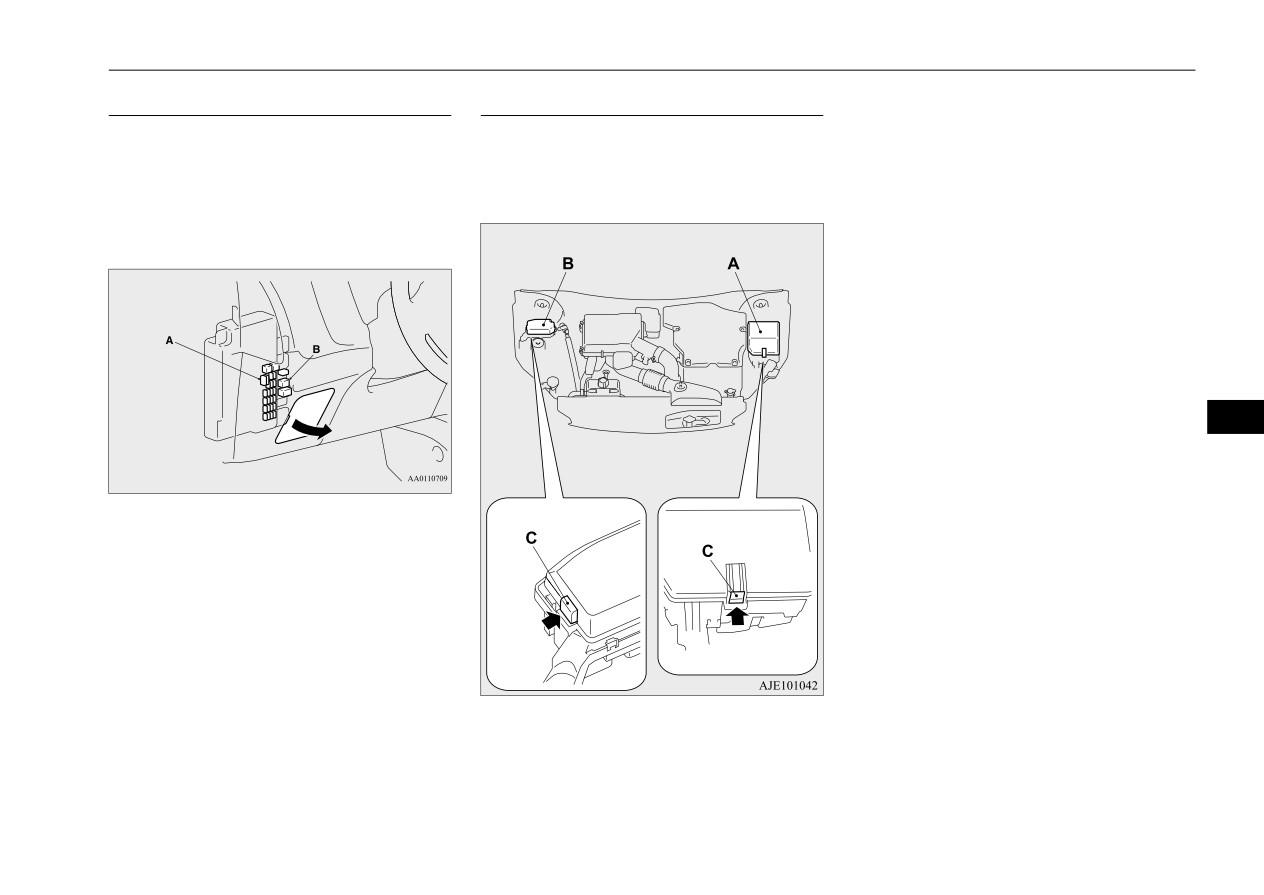
Fuses
3DVVHQJHU FRPSDUWPHQW
(QJLQH FRPSDUWPHQW
The fuse blocks in the passenger compart-
In the engine compartment, the fuse blocks
ment are located behind the fuse lid in front
are located as shown in the illustration. While
of the driver’s seat at the position shown in
pressing the tab (C), pull up the cover.
the illustration.
Pull the fuse lid to remove it.
9
A- Main fuse block
B- Sub fuse block
A- Main fuse block
B- Sub fuse block
Vehicle care and maintenance
9-25
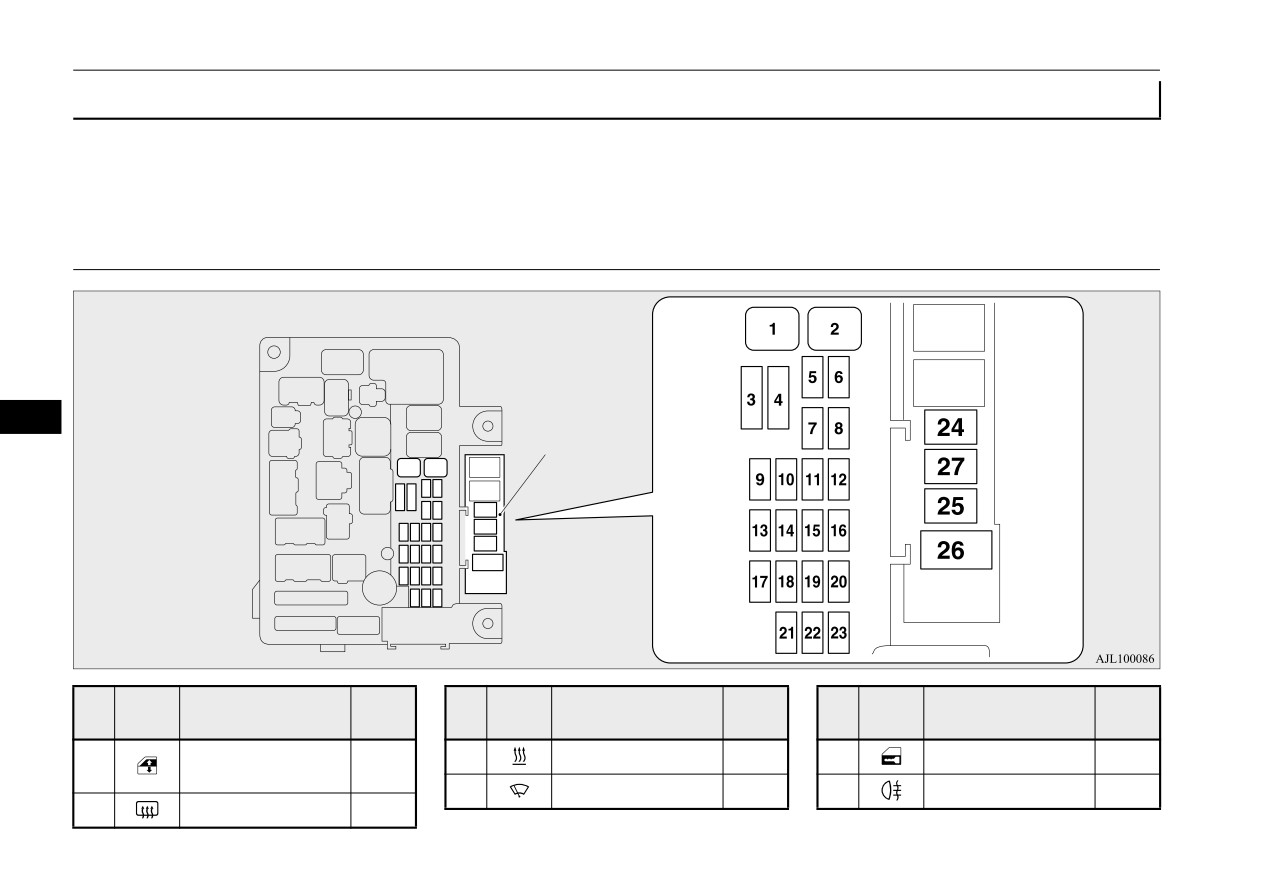
Fuses
)XVH ORDG FDSDFLWLHV
N00954801472
This fuse list shows the names of the electrical systems and their fuse capacities.
There are spare fuses in the main fuse block cover in the engine compartment. Always replace a blown fuse with one of the same capacity as the
original.
3DVVHQJHU FRPSDUWPHQW IXVH ORFDWLRQ WDEOH
Main fuse block
9
Sub fuse block
6\P
&DSDF
6\P
&DSDF
6\P
&DSDF
1R
(OHFWULFDO V\VWHP
1R
(OHFWULFDO V\VWHP
1R
(OHFWULFDO V\VWHP
ERO
LW\
ERO
LW\
ERO
LW\
Power window con-
3
Heater
30 A
5
Door locks
20 A
1
30 A*
trol
4
Windshield wipers
30 A
6
Rear fog light
10 A
2
Defogger
30 A*
9-26
Vehicle care and maintenance
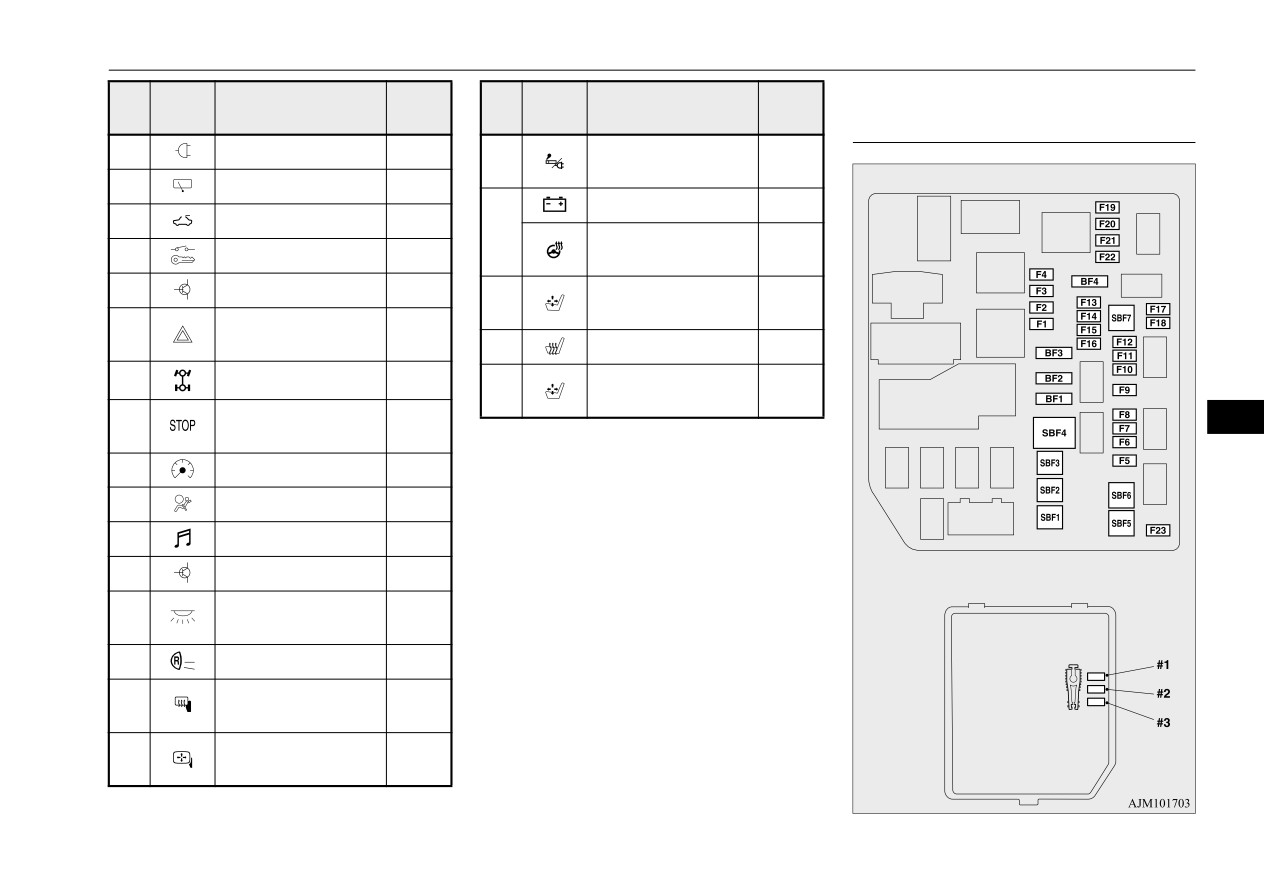
Fuses
6\P
&DSDF
6\P
&DSDF
(QJLQH FRPSDUWPHQW IXVH ORFDWLRQ
1R
(OHFWULFDO V\VWHP
1R
(OHFWULFDO V\VWHP
ERO
LW\
ERO
LW\
WDEOH
7
12 V power outlet
15 A
Cigarette lighter/
23
15 A
12 V power outlet
8
Rear window wiper
15 A
Main fuse block
Charge
7.5 A
9
Sunroof
20 A
24
Heated steering
15 A
10
Power switch
10 A
wheel
11
Option
10 A
Power seat
25
30 A*
(Driver seat)
Hazard warning
12
15 A
flasher
26
Heated seats
30 A
13
4-wheel drive system
10 A
Power seat
27
30 A*
(Passenger seat)
Stop lights
14
15 A
9
(Brake lights)
*: Fusible link
15
Gauges
10 A
z Some fuses may not be installed on your
16
SRS airbag
7.5 A
vehicle, depending on the vehicle model
or specifications.
17
Radio
15 A
z The table above shows the main equip-
18
Control unit relay
7.5 A
ment corresponding to each fuse.
Behind the fuse block cover
Interior lights
19
15 A
(Room lights)
20
Back-up lights
7.5 A
Heated outside
21
7.5 A
rearview mirrors
Outside rearview
22
10 A
mirrors
Vehicle care and maintenance
9-27
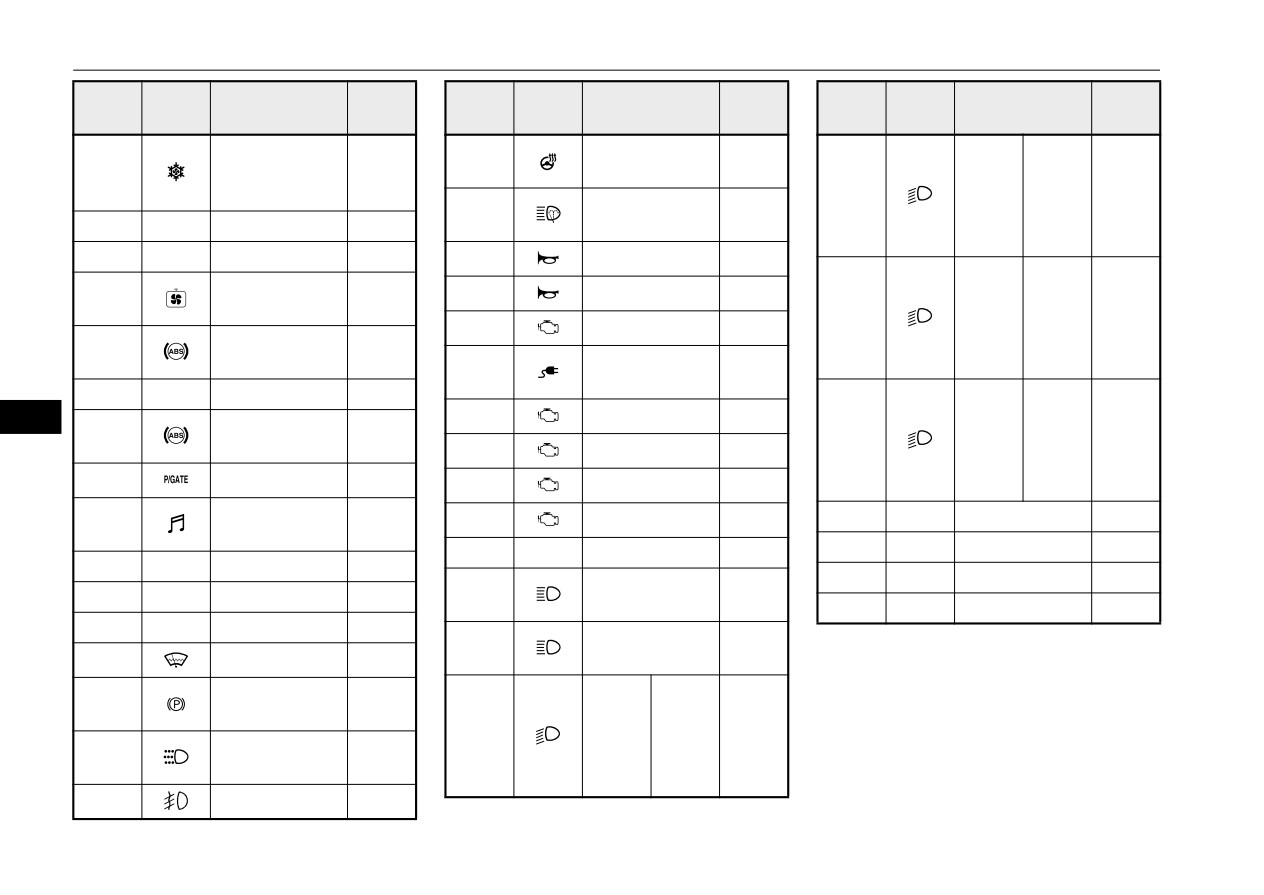
Fuses
6\P
(OHFWULFDO V\V
&DSDFL
6\P
(OHFWULFDO V\V
&DSDFL
6\P
(OHFWULFDO V\V
&DSDFL
1R
1R
1R
ERO
WHP
W\
ERO
WHP
W\
ERO
WHP
W\
Air condition-
Heated steering
Head-
F6
15 A
SBF1
ing condenser
30 A*
wheel
light
fan motor
F20
(low
LED
20 A
Headlight
F7
20 A
beam)
SBF2
—
—
—
washer
(right)
SBF3
—
—
—
F8
Security horn
20 A
Head-
Radiator fan
SBF4
40 A*
F9
Horn
10 A
light
motor
Halo-
F21
(low
10 A
F10
ETV
15 A
gen
Anti-lock brak-
beam)
SBF5
40 A*
ing system
Charging lid
(left)
F11
15 A
lock
SBF6
—
—
—
Head-
F12
Engine
7.5 A
light
9
Anti-lock brak-
Halo-
SBF7
30 A*
F22
(low
10 A
ing system
F13
ENG/POWER
20 A
gen
beam)
BF1
Power liftgate
30 A
F14
Fuel pump
15 A
(right)
Audio system
F23
—
—
—
BF2
30 A
F15
Ignition coil
10 A
amplifier
F16
—
—
—
#1
—
Spare fuse
10 A
BF3
IOD
IOD
30 A
#2
—
Spare fuse
15 A
Headlight (high
BF4
—
—
—
F17
10 A
beam) (left)
#3
—
Spare fuse
20 A
F1
—
—
—
Headlight (high
F18
10 A
*: Fusible link
F2
Wiper deicer
15 A
beam) (right)
Electric parking
Head-
z Some fuses may not be installed on your
F3
7.5 A
brake
light
vehicle, depending on the vehicle model
F19
(low
LED
20 A
or specifications.
Daytime run-
F4
10 A
beam)
z The table above shows the main equip-
ning lights
(left)
ment corresponding to each fuse.
F5
Front fog lights
15 A
9-28
Vehicle care and maintenance
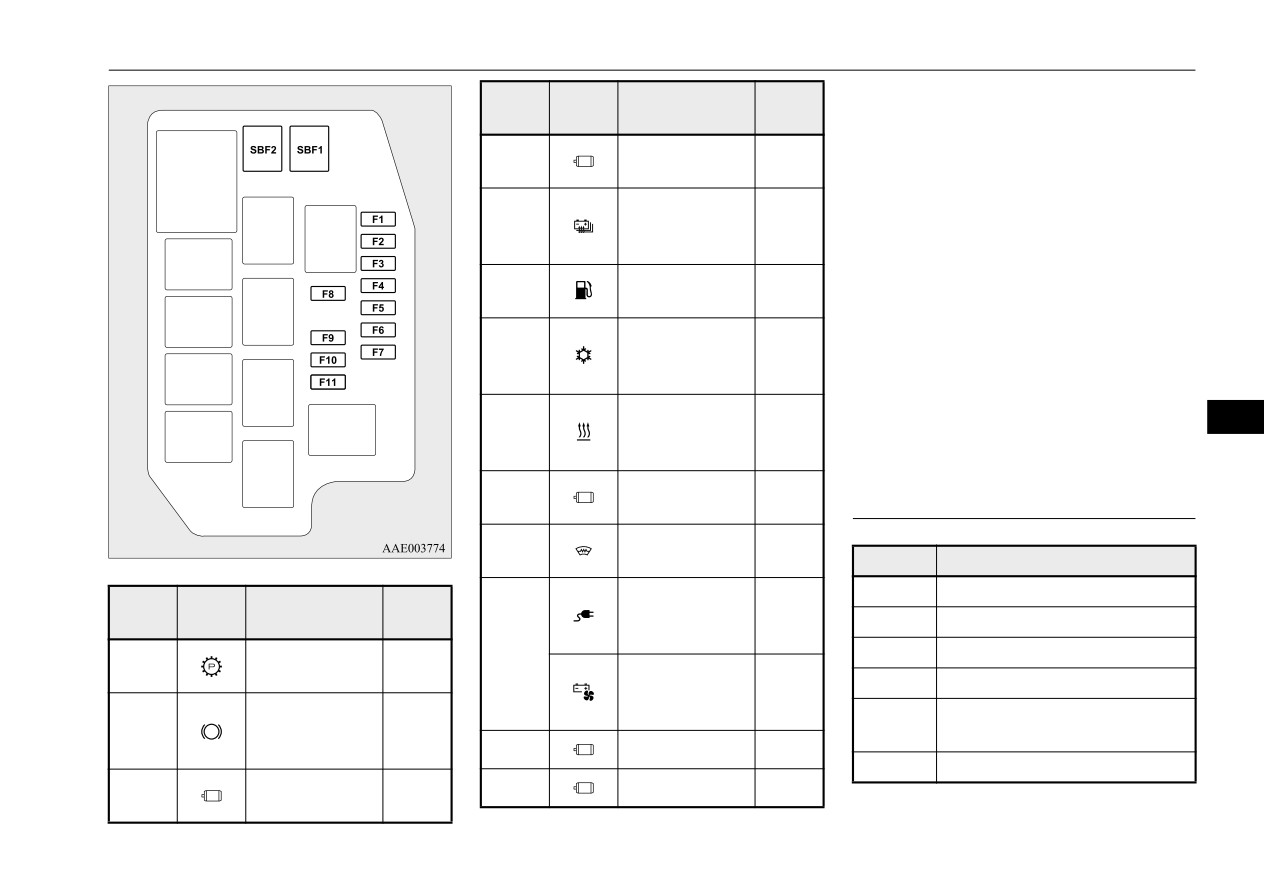
Fuses
*: Fusible link
Sub fuse block
6\P
(OHFWULFDO V\V
&DSDFL
1R
ERO
WHP
W\
z Some fuses may not be installed on your
Battery manage-
vehicle, depending on the vehicle model
F2
7.5 A
ment unit
or specifications.
Main drive lith-
z The table above shows the main equip-
F3
ium-ion battery
15 A
ment corresponding to each fuse.
PTC heater
The fuse block does not contain spare 7.5 A,
Fuel tank filler
F4
7.5 A
25 A or 30 A fuses. If one of these fuses
door
burns out, substitute with the following fuse.
Solenoid valve
$
$ VSDUH IXVH
F5
(Air condition-
7.5 A
$
$ VSDUH IXVH
ing)
$
$ DXGLR V\VWHP DPSOLILHU IXVH
When using a substitute fuse, replace with a
Water pump
fuse of the correct capacity as soon as possi-
9
F6
(Air condition-
7.5 A
ble.
ing)
Electric motor
F7
10 A
unit control
,GHQWLILFDWLRQ RI IXVH
Heated wind-
F8
7.5 A
shield
&DSDFLW\
&RORU
Power feeder
7.5 A
Brown
6\P
(OHFWULFDO V\V
&DSDFL
1R
and charger con-
10 A
ERO
WHP
W\
10 A
Red
nector (12V)
Electrical Park-
F9
15 A
Blue
SBF1
30 A*
Main drive lith-
ing Lock
20 A
Yellow
ium-ion battery
15 A
Vacuum pump
fan motor
Green (fuse type) /
30 A
SBF2
(Regenerative
30 A*
Pink (fusible link type)
brake)
F10
Ignition control
15 A
40 A
Green (fusible link type)
Water pump
F11
Ignition control
7.5 A
F1
20 A
(Electric motor)
Vehicle care and maintenance
9-29
Replacement of light bulbs
4. Use the fuse location diagrams and the
)XVH UHSODFHPHQW
5HSODFHPHQW RI OLJKW EXOEV
matching tables, to check the fuse that is
N00954901154
N00942901388
related to the problem. If the fuse is not
1. Before replacing a fuse, always turn off
blown, something else must be causing
Before replacing the bulb, be sure the light is
the electrical item connected to the fuse
the problem. Have the system inspected
off. Do not touch the glass part of the new
and put the operation mode of the power
by a certified Mitsubishi EV dealer.
bulb with your bare fingers; the oil from your
switch in OFF.
skin will stay on the glass and dim or destroy
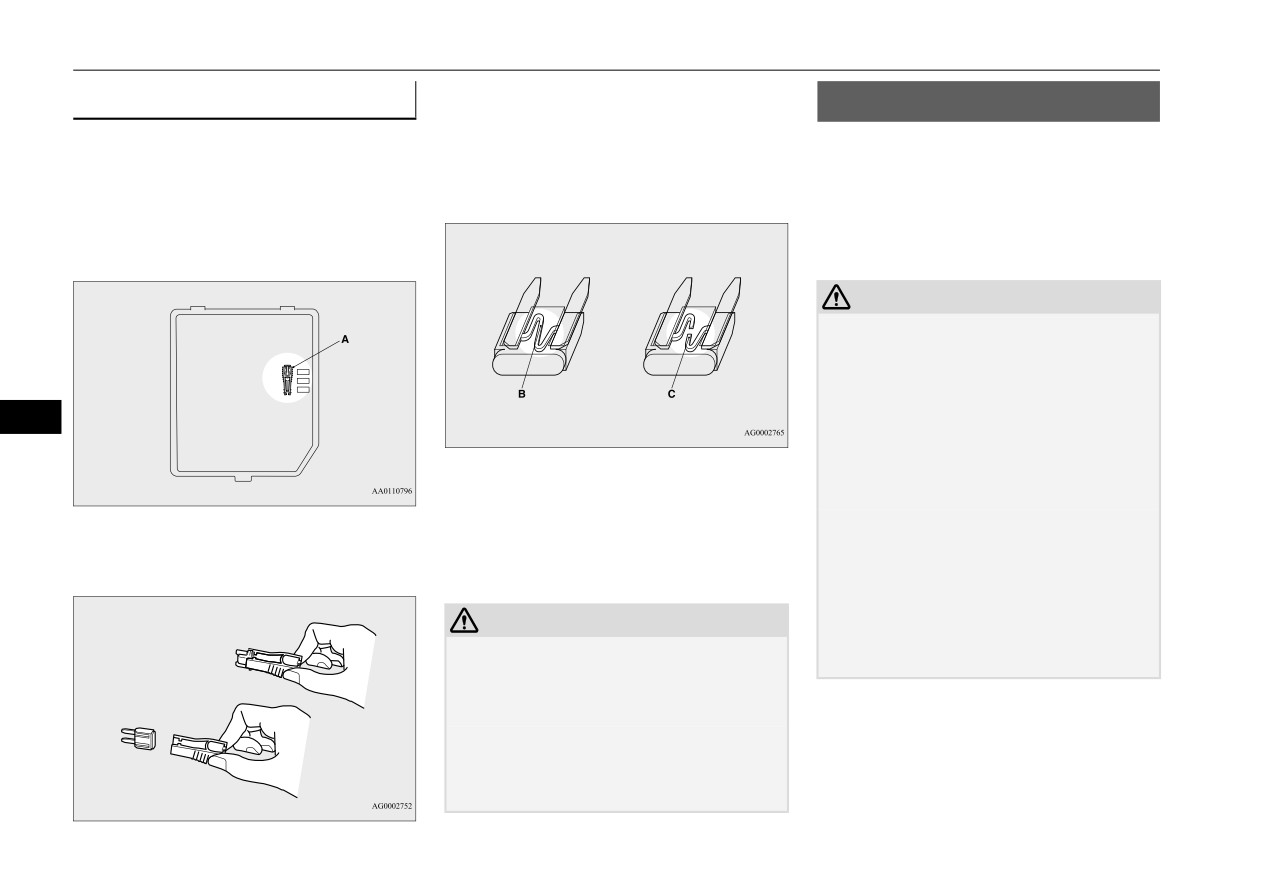
2. There is a fuse remover (A) in the engine
the bulb when it gets hot.
compartment fuse block.
CAUTION
z
Bulbs are extremely hot immediately after
being turned off.
When replacing the bulb, wait for it to cool
sufficiently before touching it. You could
otherwise be burned.
9
z
Handle halogen light bulb with care. The gas
inside a halogen light bulb is highly pressur-
B- Fuse is OK
ized, so dropping, knocking, or scratching a
C- Blown fuse
halogen light bulb can cause it to shatter.
z
Never hold the halogen light bulb with a bare
3. Clamp it on the fuse you wish to remove,
hand, dirty glove, etc.
5. Insert a new fuse of the same capacity
and pull the fuse straight out from the fuse
The oil from your hand could cause the bulb
securely into the appropriate slot.
block.
to break the next time the headlights are
used.
CAUTION
If the glass surface is dirty, clean it with
alcohol and let it dry completely before
z Never use a fuse with a capacity greater than
installing the bulb.
the one listed or any substitute, such as wire,
foil etc. This would cause the circuit wiring
to heat up and could cause a fire.
z If the replacement fuse blows again after a
short time, have the electrical system
checked by a certified Mitsubishi EV dealer
to find and correct the cause.
9-30
Vehicle care and maintenance
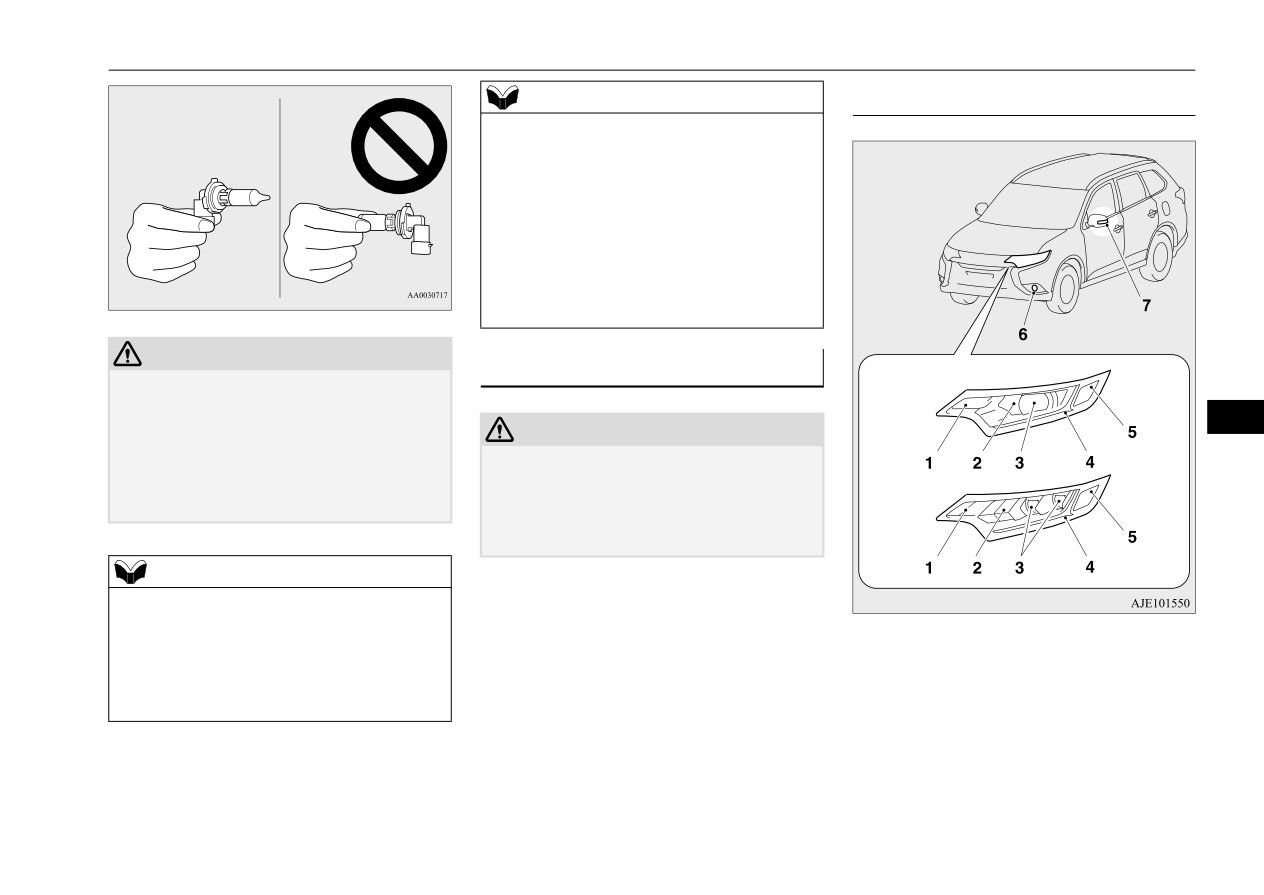
Replacement of light bulbs
NOTE
2XWVLGH
z When it rains, or when the vehicle has been
N00950302160
washed, the inside of the lens sometimes
Front
becomes temporarily foggy. This is the same
phenomenon as when window glass mists up
on a humid day, and does not indicate a func-
tional problem.
When the light is switched on, the heat will
remove the fog. However, if water gathers
inside the light, please have it checked by a
certified Mitsubishi EV dealer.
CAUTION
%XOE ORFDWLRQ DQG FDSDFLW\
Type A
z
Do not install commercially available LED-
N00943001201
type bulbs.
Commercially available LED-type bulbs
9
CAUTION
could adversely affect the operation of the
z
When replacing a bulb, be sure to use a new
vehicle, such as by preventing the lights and
bulb of the same type, wattage, and color.
other vehicle equipment from operating
Type B
If you install a different bulb, the bulb could
properly.
malfunction or fail to come on and could
lead to a vehicle fire.
NOTE
z
If you are unsure of how to carry out the
work as required, it is recommended that
Type A: Halogen headlights type
these procedures be carried out by a certified
Type B: LED headlights type
Mitsubishi EV dealer.
z
Be careful not to scratch the vehicle body
when removing a light and lens.
Vehicle care and maintenance
9-31
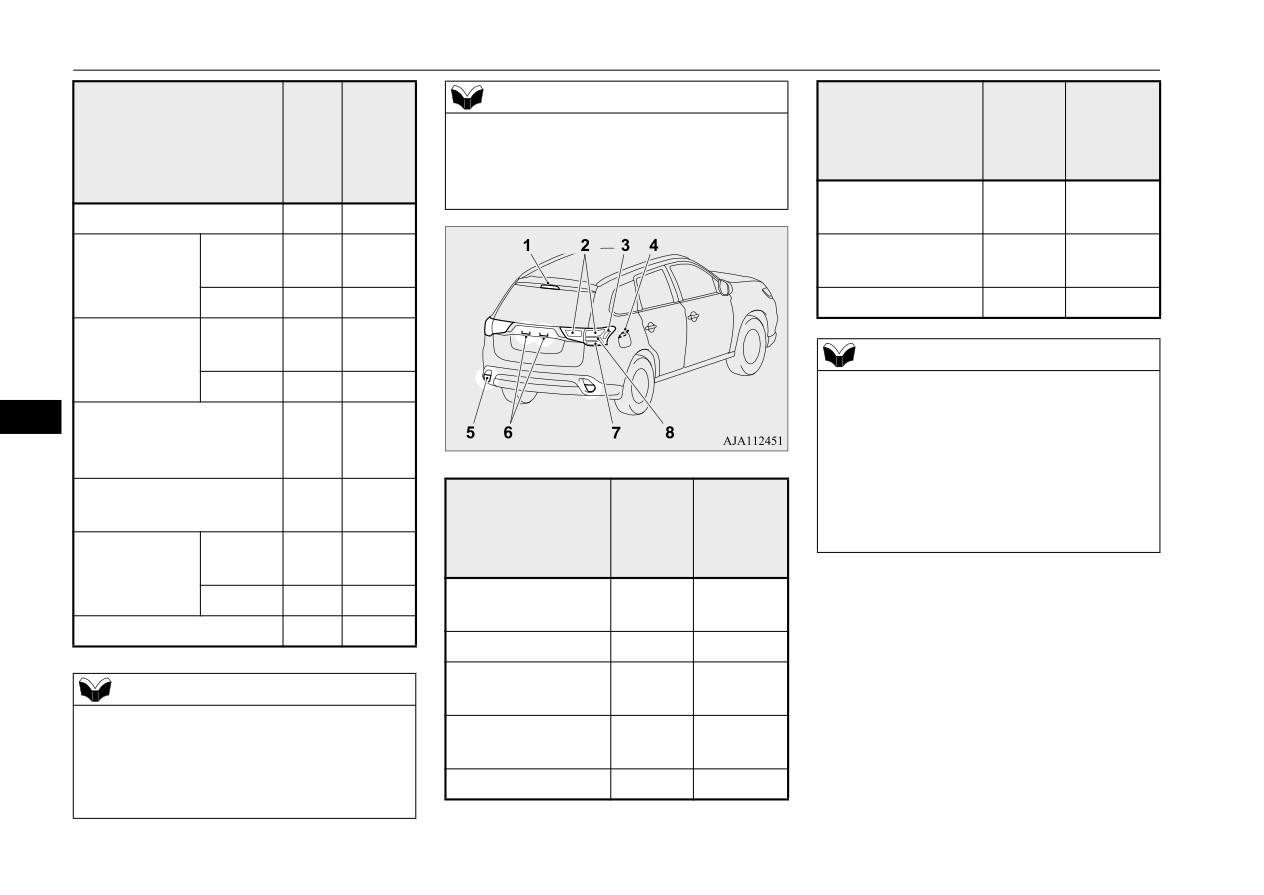
Replacement of light bulbs
$16,
$16,
NOTE
7UDGH
WUDGH 1R
:DWW
• Parking light
,WHP
:DWWDJH
,WHP
1R RU
RU %XOE
DJH
• Daytime running light
%XOE
W\SH
• Front fog light (LED type)
W\SH
• Side turn signal light
6 - License plate
5 W
W5W
1 -
Front turn signal light
21 W
PY21W
light
Head-
Halogen
9005
Rear
7 - Rear turn sig-
21 W
WY21W
60 W
2 -
light, high
bulb
HB3
nal light
beam
LED
—
—
8 - Stop light
—
—
3 -
Head-
Halogen
55 W
H7
light, low
bulb
NOTE
beam
LED
—
—
z
The following lights use an LED-type bulb.
Check with a certified Mitsubishi EV dealer
4 -
Parking light/
9
when either light needs to be repaired or
Daytime running
—
—
replaced.
light
• Rear side-marker light
5 -
Front side-marker
$16,
• High-mounted stop light
5 W
W5W
light
WUDGH 1R
• Tail light
,WHP
:DWWDJH
RU %XOE
• Stop light
6 -
Halogen
Front fog
19 W
H16
W\SH
bulb
light
1 -
High-mounted
—
—
LED
—
—
stop light
7 -
Side turn signal light
—
—
2 -
Tail light
—
—
3 -
Rear side-
—
—
NOTE
marker light
z The following lights use an LED-type bulb.
4 -
Charging port
5 W
W5W
Check with a certified Mitsubishi EV dealer
courtesy light
when either light needs to be repaired or
replaced.
5 -
Back-up light
16 W
W16W
• Headlight, high beam/low beam (LED type)
9-32
Vehicle care and maintenance
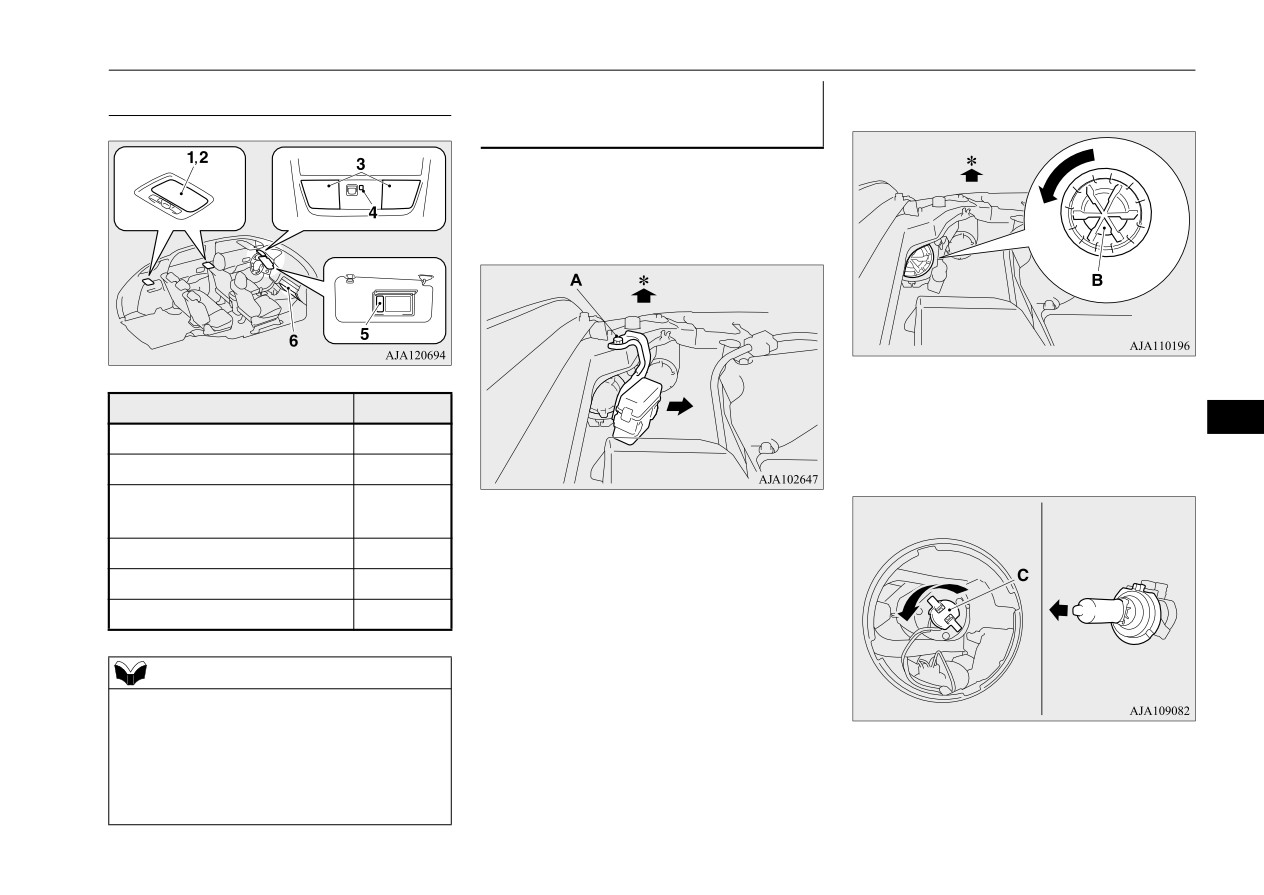
Replacement of light bulbs
2. Turn the cap
(B) counterclockwise to
,QVLGH
+HDGOLJKWV ORZ EHDP KDORJHQ
remove it.
N00950401845
EXOE W\SH
N00901801258
1. When replacing the bulb on the left side
of the vehicle, remove the bolt (A) hold-
ing down the relay box and move the
relay box.
*: Front of the vehicle
,WHP
:DWWDJH
9
3. Turn the socket (C) counterclockwise to
1 - Cargo room light
8 W
remove it, and then pull the bulb out of
2 - Dome light (rear)
8 W
the socket.
Dome light (front)/Read-
3 -
8 W
*: Front of the vehicle
ing light
4 - Downlight
-
5 - Vanity mirror lights
2 W
6 - Glove compartment light
1.4 W
NOTE
z The following lights use an LED-type bulb.
Check with a certified Mitsubishi EV dealer
when the light needs to be repaired or
replaced.
• Downlight
• Front foot lights
Vehicle care and maintenance
9-33
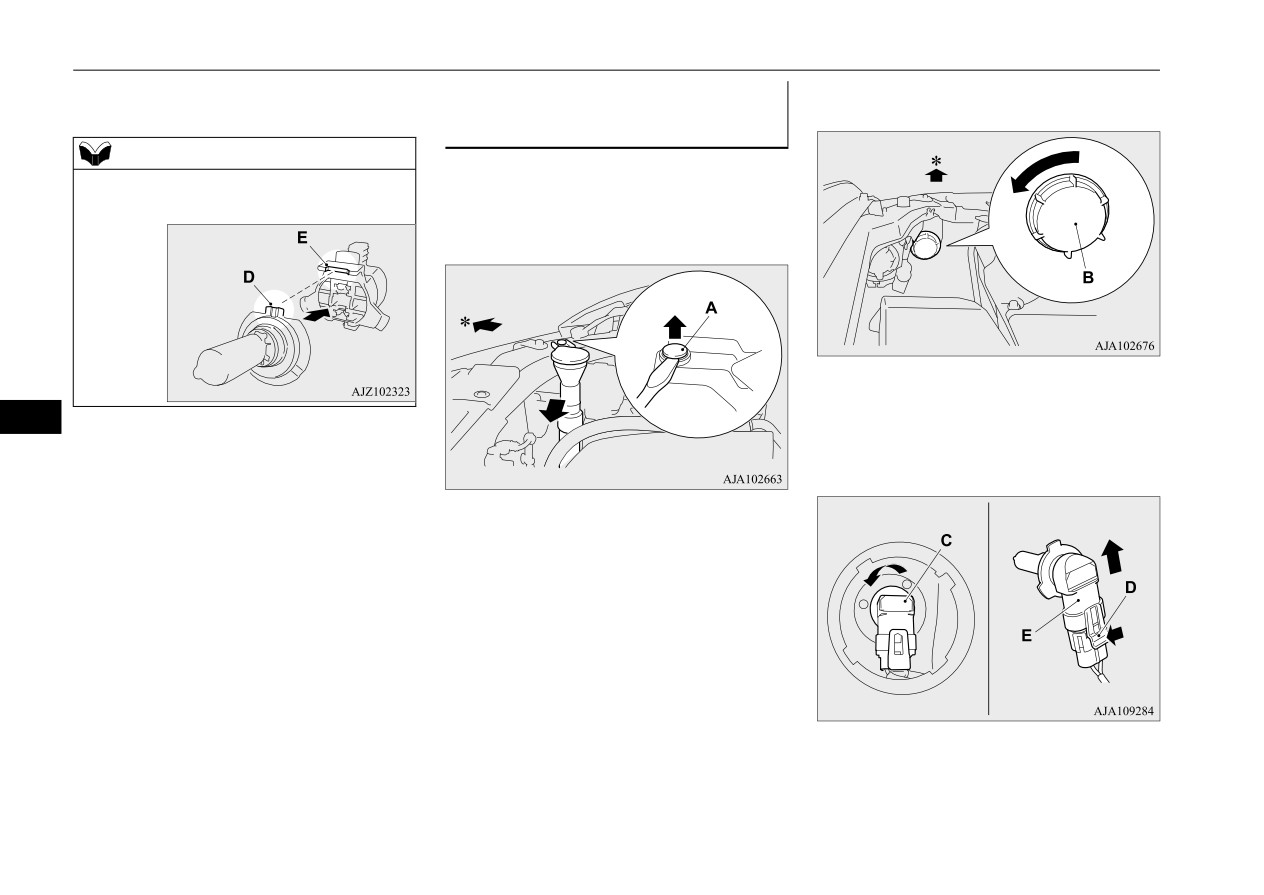
Replacement of light bulbs
4. To install the bulb, perform the removal
2. Turn the cap
(B) counterclockwise to
+HDGOLJKWV KLJK EHDP KDOR
steps in reverse.
remove it.
JHQ EXOE W\SH
NOTE
N00901901187
1. When replacing the bulb on the right side
z When installing the bulb, align the tab (D)
of the vehicle, remove the clip (A) hold-
with the notch (E) of the socket.
ing down the washer tank spout and then
move it.
*: Front of the vehicle
9
3. Turn the bulb
(C) counterclockwise to
remove it and then while holding down
the tab (D), pull out the bulb (E).
*: Front of the vehicle
4. To install the bulb, perform the removal
steps in reverse.
9-34
Vehicle care and maintenance
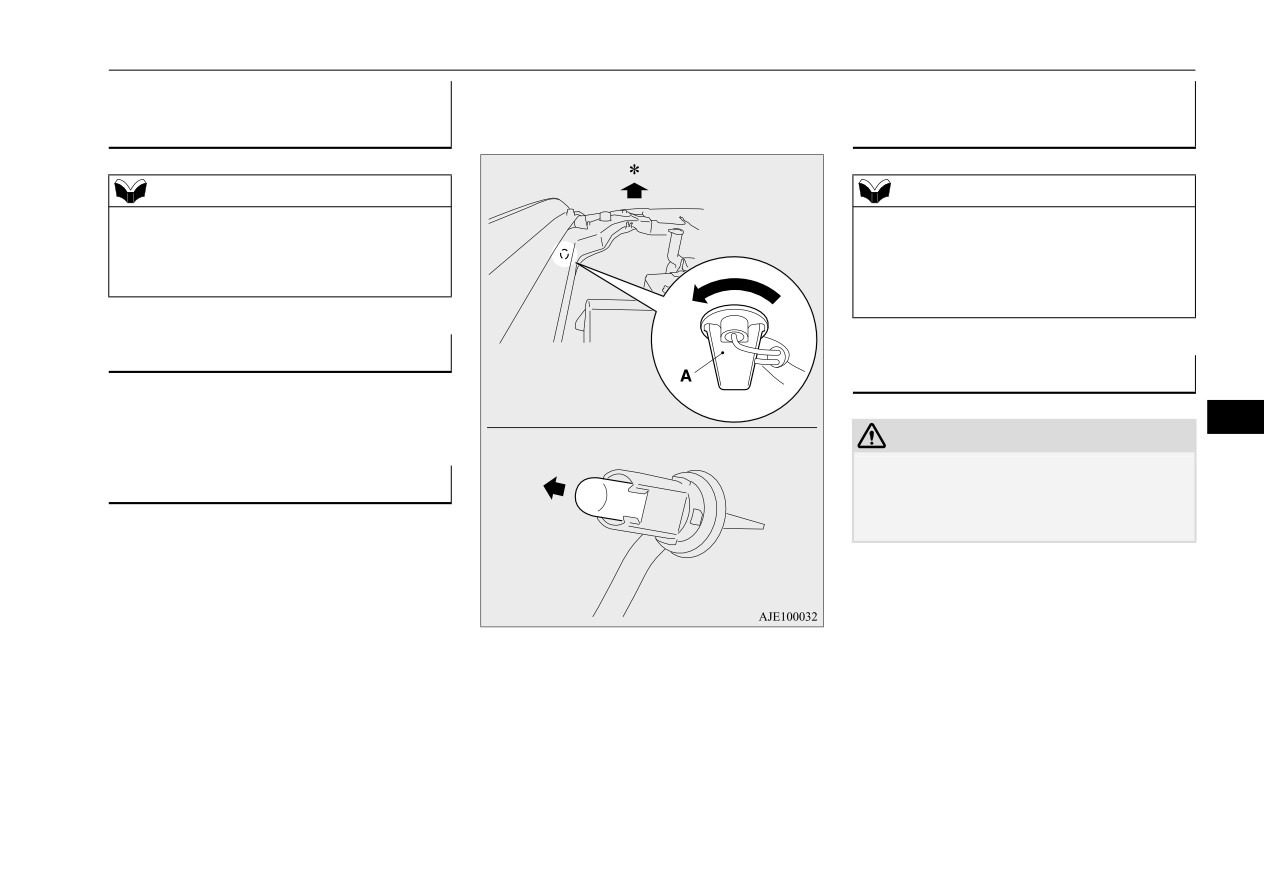
Replacement of light bulbs
2. Turn the socket (A) counterclockwise to
+HDGOLJKWV KLJK EHDP ORZ
3DUNLQJ OLJKWV 'D\WLPH UXQQLQJ
remove it, and then pull the bulb out of
EHDP /(' W\SH
the socket.
OLJKWV
N00943101909
N00917301782
NOTE
NOTE
z The headlights use an LED-type bulb.
z The parking lights and daytime running
Check with a certified Mitsubishi EV dealer
lights use an LED-type bulb.
when the light needs to be repaired or
Check with a certified Mitsubishi EV dealer
replaced.
when the light needs to be repaired or
replaced.
+HDGOLJKW DLP DGMXVWPHQW
N00943201375
)URQW WXUQ VLJQDO OLJKWV
N00943401449
The alignment of the headlights should be
9
checked by a certified Mitsubishi EV dealer.
CAUTION
z Make sure that the Plug-in Hybrid EV sys-
)URQW VLGH PDUNHU OLJKWV
tem have cooled down before replacing the
N00915501230
bulb on the right side of the vehicle, other-
1. When replacing the bulb on the left side
wise you could be burnt by the radiator hose.
of the vehicle, move the relay box.
(Refer to “Headlight (low beam, halogen
bulb type): Step 1” on page 9-33.
*: Front of the vehicle
3. To install the bulb, perform the removal
steps in reverse.
Vehicle care and maintenance
9-35
Replacement of light bulbs
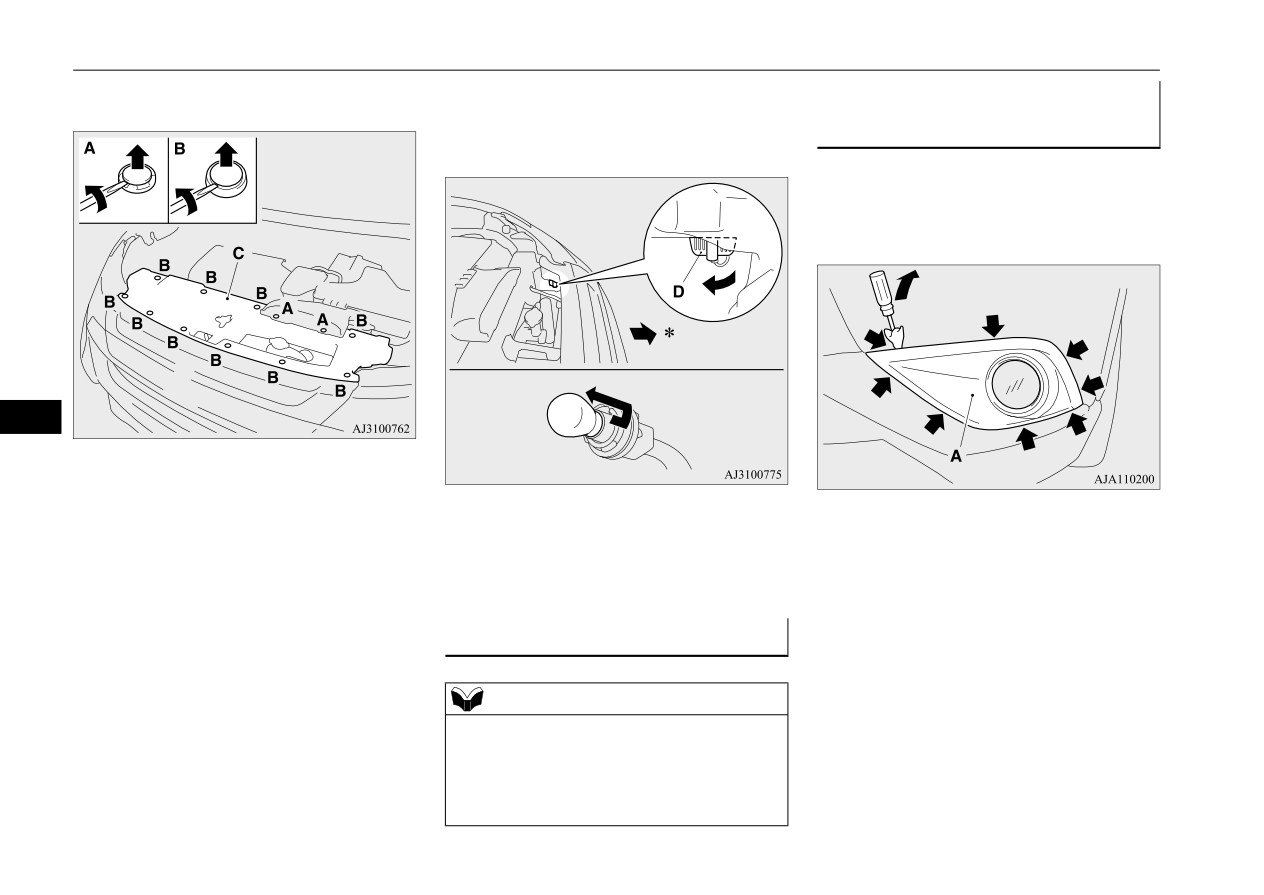
1. Remove the 12 clips (A, B), and then
2. Turn the socket (D) counterclockwise to
)URQW IRJ OLJKWV
+DORJHQ EXOE
remove the cover (C).
remove it, then remove the bulb from the
socket by turning it counterclockwise
W\SH
while pressing in.
N00943601887
1. Insert a straight blade (or minus) screw-
driver with a cloth over its tip at the points
indicated by arrows and pry gently to
remove the cover (A).
9
*: Front of the vehicle
3. To install the bulb, perform the removal
steps in reverse.
6LGH WXUQ VLJQDO OLJKWV
N00943501219
NOTE
z The side turn signal lights use an LED-type
bulb.
Check with a certified Mitsubishi EV dealer
when the light needs to be repaired or
replaced.
9-36
Vehicle care and maintenance
Replacement of light bulbs
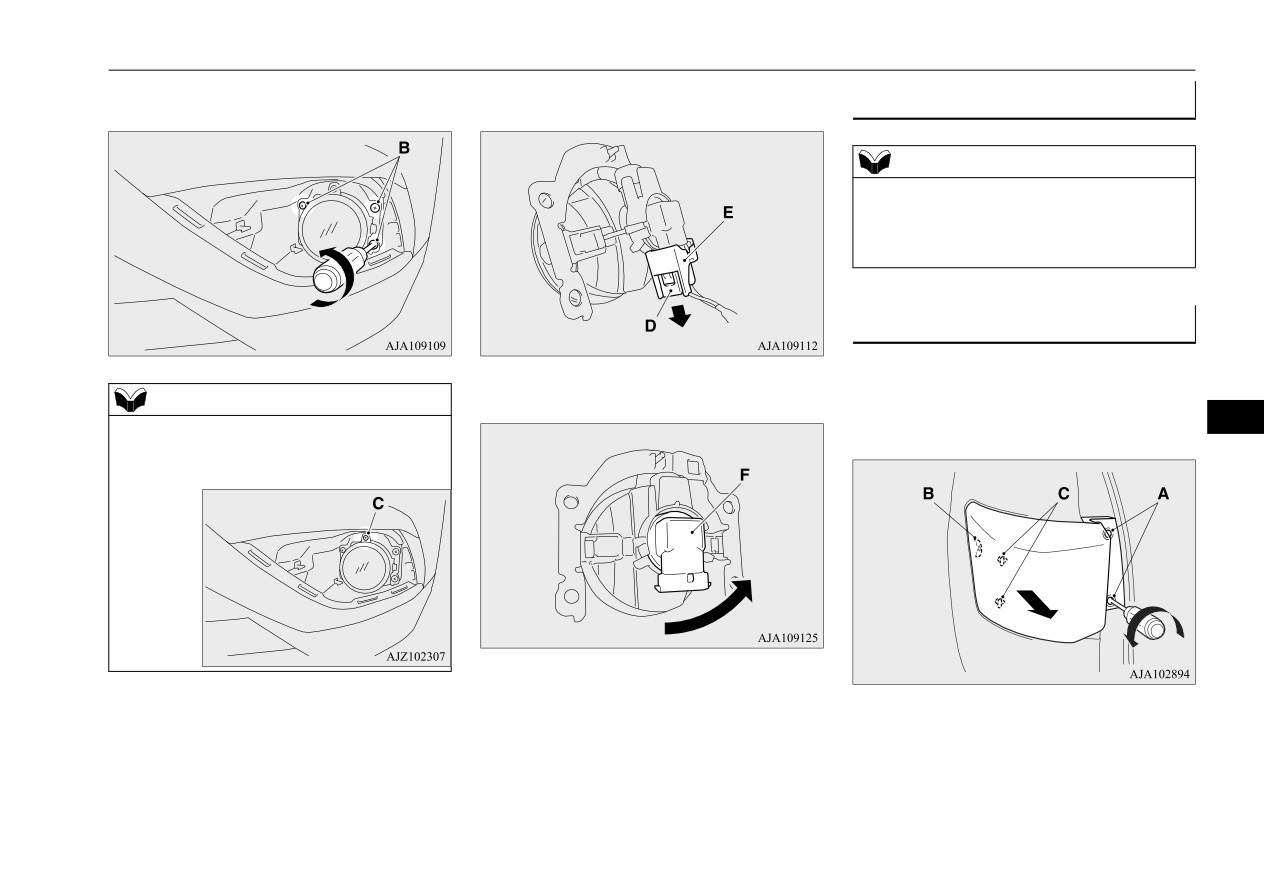
2. Remove the 3 screws (B) and remove the
3. While holding down the tab (D), pull out
)URQW IRJ OLJKWV
/(' W\SH
light unit.
the socket (E).
N00943602015
NOTE
z The fog lights use an LED-type bulb.
Check with a certified Mitsubishi EV dealer
when the light needs to be repaired or
replaced.
5HDU FRPELQDWLRQ OLJKWV
N00943701644
1. Open the liftgate.
4. Turn the bulb
(F) counterclockwise to
2. Remove the screws (A), and then move
NOTE
remove it.
the light unit toward the rear of the vehi-
9
z When unfastening the screws or the fog
cle to unfix the notch (B) and pins (C).
light, be careful not to move the beam posi-
tion adjustment screw (C).
5. To install the bulb, perform the removal
steps in reverse.
Vehicle care and maintenance
9-37
Replacement of light bulbs
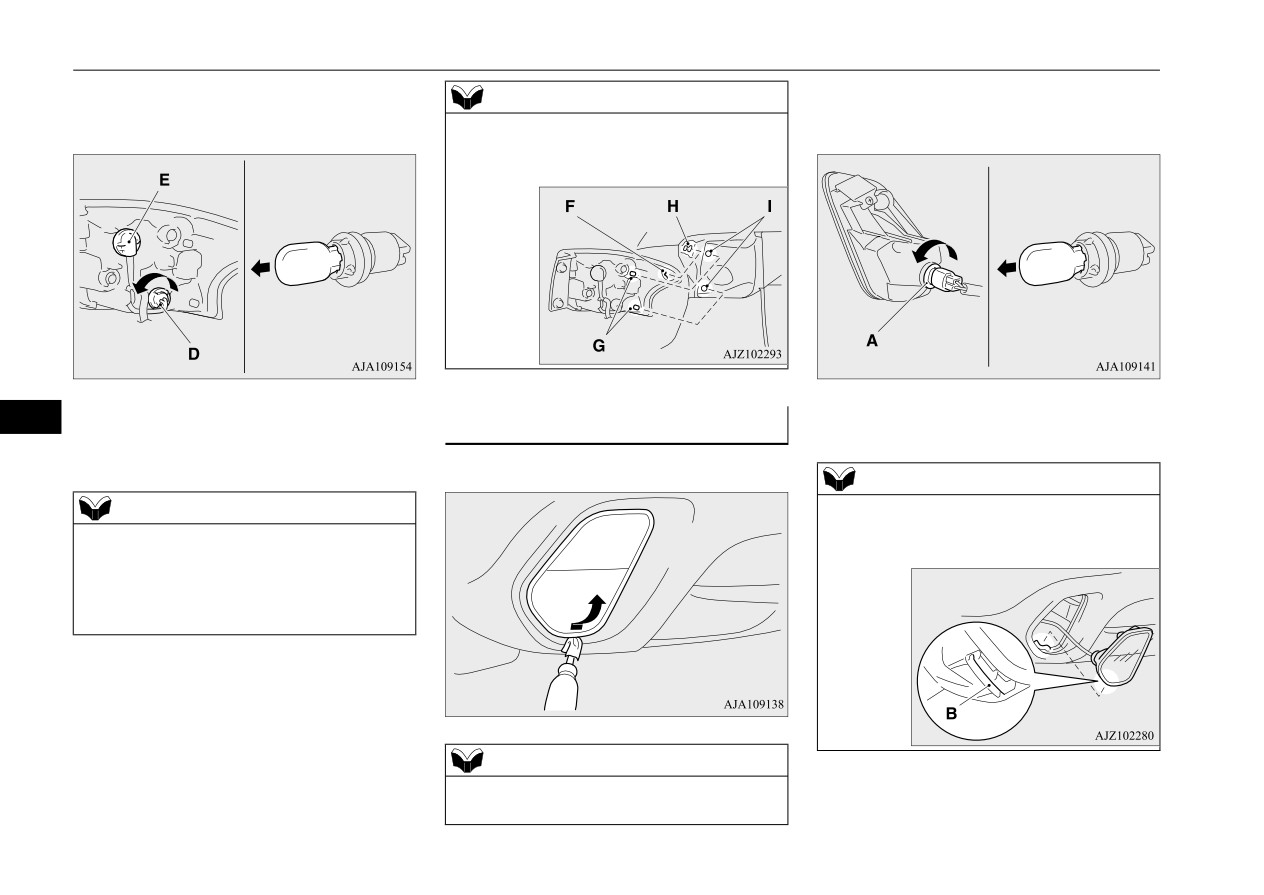
3. Turn the socket counterclockwise and
2. Turn the socket (A) counterclockwise to
NOTE
remove it, and then pull the bulb out of
remove it, and then pull the bulb out of
z When mounting the light unit, align the
the socket.
the socket.
notch (F) and pin (G) on the light unit with
the clip (H) and hole (I) in the body.
D- Rear turn signal light
3. To install the bulb, perform the removal
9
E- Tail light and stop light (LED) - cannot
steps in reverse.
%DFN XS OLJKWV
be replaced
N00929101080
1. Push the light unit upward to remove it.
NOTE
z When installing the light unit, first insert the
NOTE
notch (B) into the hole on the body, and then
z The rear side-marker light, tail light and stop
push on the light unit to fit it into place.
light use an LED-type bulb.
Check with a certified Mitsubishi EV dealer
when the light needs to be repaired or
replaced.
4. To install the bulb, perform the removal
steps in reverse.
NOTE
z Wrap a cloth around the tip of the screw-
driver to keep from scratching the lens.
9-38
Vehicle care and maintenance
Vehicle care precautions
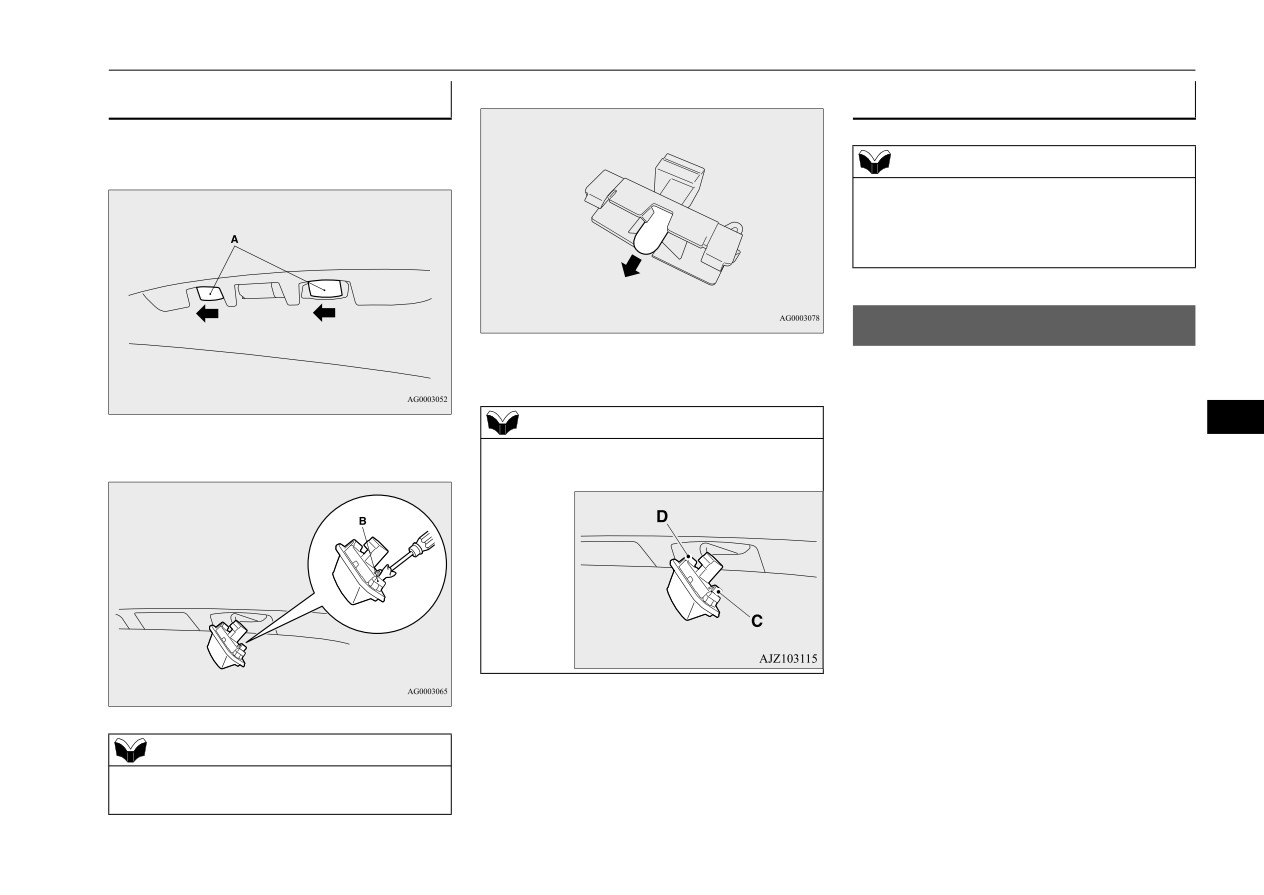
3. Pull the bulb out of the socket.
/LFHQVH SODWH OLJKWV
+LJK PRXQWHG VWRS OLJKW
N00944001468
N00943901170
1. When removing the light unit (A), push it
toward the left side of the vehicle body.
NOTE
z The high-mounted stop light uses an LED-
type bulb. Check with a certified Mitsubishi
EV dealer when the light needs to be
repaired or replaced.
9HKLFOH FDUH SUHFDXWLRQV
N00945101206
4. To install the bulb, perform the removal
steps in reverse.
In order to maintain the value of your vehicle,
perform regular maintenance using the proper
NOTE
materials and procedures. Be sure to use only
9
2. Use a screw driver to gently pry up the tab
z When mounting the light unit, insert tab (C)
those materials and procedures that meet your
(B) and remove the lens.
first then align tab (D) with its hole.
local environmental pollution control regula-
tions. Choose the materials you will use care-
fully, to be sure that they do not contain
corrosives. If you are not sure, contact a certi-
fied Mitsubishi EV dealer for help in choos-
ing these materials.
NOTE
z Wrap a cloth around the tip of the screw-
driver to keep from scratching the lens.
Vehicle care and maintenance
9-39
Cleaning the inside of your vehicle
CAUTION
CAUTION
NOTE
z
Cleaning products can be dangerous. Some
z
Do not use organic substances
(solvents,
z
Do not use cleaners, conditioners, and pro-
are poisonous and others are highly flamma-
benzine, kerosene, alcohol, gasoline, etc.) or
tectants containing silicones or wax.
ble. Some are dangerous if you breathe their
alkaline or acidic solutions.
Such products, when applied to the instru-
fumes in a closed space. When you use any-
These chemicals can cause discoloring,
ment panels or other parts, may cause reflec-
thing in a container to clean your vehicle, be
staining or cracking of the surface.
tions on the windshield and obscure vision.
sure to follow the instructions. Always open
If you use cleaners or polishing agents, make
Also, if such products get on the switches of
your vehicle doors or windows when you’re
sure their ingredients do not include the sub-
the electrical accessories, it may lead to fail-
cleaning the inside. Never use the following
stances mentioned above.
ure of these accessories.
chemicals to clean your vehicle:
z
When cleaning the meter cluster panel, use a
z
Do not use synthetic fiber or dry cloth. They
• Gasoline
cloth and be careful not to injure your hands.
can cause discolouring or damaging the sur-
• Carbon Tetrachloride
face.
• Benzine
z
Do not place a deodorizer on the instrument
• Kerosene
NOTE
panel or near lights and instruments. The
ingredients for deodorizer can cause discol-
• Naphtha
z
Always read the instructions on the cleaner
9
ouring or cracking.
• Acetone
label.
• Turpentine
• Paint Thinner
• Lacquer Thinner
8SKROVWHU\
3ODVWLF YLQ\O OHDWKHU IDEULF DQG
• Nail Polish Remover
N00945500128
IORFNHG SDUWV
1. To maintain the value of your new vehi-
N00945301224
cle, maintain the upholstery carefully and
These can all be dangerous, and they all can
1. Lightly wipe these off with a soft cloth
keep the interior clean.
damage your vehicle.
soaked in a 3% solution of gentle soap
Use a vacuum cleaner and brush to clean
and water.
the seats. If stained, vinyl and synthetic
2. To rinse, dip the cloth in fresh water,
&OHDQLQJ WKH LQVLGH RI \RXU
leather should be cleaned with an appro-
wring it out well, and wipe off all the
priate cleaner. Cloth fabrics can be
YHKLFOH
soap.
cleaned with either upholstery cleaner or a
N00945201119
3% solution of gentle soap in lukewarm
After washing the inside of your vehicle with
water.
any cleaner, wipe it dry in a shady, well venti-
lated area.
9-40
Vehicle care and maintenance
Cleaning the outside of your vehicle
2. Clean the carpeting with a vacuum
Wash your vehicle as soon as possible when-
NOTE
cleaner and remove any stains with carpet
ever the finish gets soiled.
z
Organic solvents such as benzine, kerosene,
cleaner. Oil and grease can be removed by
alcohol, gasoline, or acid or alkaline solvents
lightly dabbing with a clean white cloth
can discolor the genuine leather surface and
:DVKLQJ
and spot remover.
should not be used.
N00945901741
z
Genuine leather can mildew if not kept
Chemicals contained in the dirt and dust
clean. Clean up any oil stains immediately.
NOTE
picked up from air, rain, snow, or road sur-
z
The genuine leather surface may harden and
z If fuzzing is difficult to remove from the seat
faces can damage the paint and body of your
shrink if it is exposed to the direct sunlight
upholstery, draw a suitable defuzzing brush
vehicle if left on.
for long hours. When your vehicle is parked,
over the surface in one direction.
Frequent washing and waxing is the best way
place it in the shade as much as possible.
to protect your vehicle from this damage.
z
When the temperature of the vehicle interior
rises in summer, vinyl products left on the
Do not wash the vehicle in direct sunlight.
*HQXLQH OHDWKHU
LI VR HTXLSSHG
genuine leather seat may deteriorate and
Park the vehicle in the shade and spray it with
N00945600187
stick to the seat.
water to remove dust. Next, using plenty of
1. To clean, lightly wipe the leather with a
clean water and a car washing mitt or sponge,
9
soft cloth soaked in a 5% solution of gen-
wash the vehicle from top to bottom.
&OHDQLQJ WKH RXWVLGH RI \RXU
tle soap and water.
Use a mild car washing soap if necessary.
2. To rinse, dip the cloth in fresh water,
YHKLFOH
Rinse thoroughly and wipe dry with a cham-
wring it out well, and wipe off all the
N00945700058
ois or soft cloth. After washing the vehicle,
soap.
To protect your vehicle’s finish, wash it often
carefully clean the joints and flanges of the
3. To preserve and protect, use a leather pro-
and thoroughly. If desired, you may wax your
doors, hood, etc., where dirt is likely to
tecting agent on the genuine leather sur-
vehicle using a nonabrasive automobile wax.
remain.
face.
WARNING
)RUHLJQ PDWHULDO
NOTE
z 'R QRW ZDVK WKH YHKLFOH ZKLOH FKDUJLQJ WKH
N00945800033
PDLQ GULYH OLWKLXP LRQ EDWWHU\ 'RLQJ VR
z If genuine leather is wet with water, wipe it
Industrial pollution, road tar, bird droppings,
FRXOG FDXVH D ILUH RU DQ HOHFWULF VKRFN
with a dry, soft cloth. If left damp, mildew
tree sap, insect remains, sea water and other
may grow.
z %HIRUH ZDVKLQJ WKH YHKLFOH PDNH VXUH
foreign matters can damage the finish on your
WKDW WKH FKDUJLQJ OLG DQG WKH LQQHU OLG DUH
z The genuine leather surface can be damaged
vehicle.
FRPSOHWHO\ FORVHG
,I WKH OLG LV RSHQ WKH
if brushed with a nylon or synthetic fiber
Generally, the longer any foreign material
FKDUJLQJ XQLW LV H[SRVHG WR ZDWHU UHVXOW
brush.
stays on the finish, the worse the damage.
LQJ LQ D ILUH RU DQ HOHFWULF VKRFN
Vehicle care and maintenance
9-41