Mitsubishi ASX (2020 year). Manual in english - page 15
Bluetooth® 2.0 interface*
4. The voice guide will say “Dialing <num-
2. Say “Call.”
NOTE
ber recognised>.”
z
If you say “No” to all names read by the sys-
The Bluetooth® 2.0 interface will then
NOTE
tem, the voice guide will say “Name not
make the call.
found, returning to main menu” and the sys-
z
If you say “Call” when the vehicle phone
When the confirmation function is on,
tem will return to the main menu.
book and the mobile phone book are empty,
the system will confirm again the tele-
the voice guide will say “The vehicle phone
phone number. To continue with that
book is empty. Would you like to add a new
5. If only one telephone number is regis-
number, answer “Yes.”
entry now?”
tered under the name you just said, the
To change the telephone number, answer
Answer “Yes,” and the voice guide will say
voice guide proceeds to Step 6.
“No.” The system will say
“Number
“Entering the phone book
- new entry
If two or more telephone numbers are
please” then say the telephone number
menu.” You can now create data in the vehi-
cle phone book.
registered that match the name you just
7
again.
Answer “No,” to return to the main menu.
said, the voice guide will say “Would
you like to call
<name> at
[home],
NOTE
[work], [mobile], or [other]?” Select the
3. After the voice guide says
“Name
In the case of English, the system will recog-
location to call.
z
please,” say the name you want to call,
nise both “zero” and “oh” (Letter “o”) for
from those registered in the phone book.
the number “0.”
4. If there is only one match, the system
NOTE
z
The Bluetooth® 2.0 interface supports num-
proceeds to Step 5.
bers (0 to 9) and characters (+, # and *).
z
If the name you selected has matching data
If there are two or more matches, the
The maximum supported telephone number
in the vehicle phone book but no telephone
z
voice guide will say
“More than one
number is registered under the selected loca-
length is as follows:
match was found, would you like to call
tion, the voice guide will say “{home/work/
• International telephone number: + and tel-
ephone numbers (to 18 digits).
<returned name>.” If that person is the
mobile/other} not found for <name>. Would
• Except for international telephone num-
one you want to call, answer “Yes.”
you like to add location or try again?”
ber: telephone numbers (to 19 digits).
Answer “No,” and the name of the next
Say “Try again,” and the system will return
to Step 3.
matching person will be uttered by the
Say “Add location” and you can register an
Making a call using a phone book
voice guide.
additional telephone number under the selec-
You can make calls using the vehicle phone
ted location.
book or mobile phone book of the Blue-
tooth® 2.0 interface.
For details on the phone books, refer to
“Phone book function” on page 7-59.
1. Press the SPEECH button.
7-58
For pleasant driving
Bluetooth® 2.0 interface*
NOTE
SEND function
MUTE function
During a call, press the SPEECH button to
At any time during a call, you can mute the
z
If the name you selected has matching data
in the mobile phone book but no telephone
enter voice recognition mode, then say
vehicle microphone.
number is registered under the selected loca-
“<numbers> SEND” to generate DTMF
Pressing the SPEECH button and then saying
tion, the voice guide will say “{home/work/
tones.
“Mute” during a call will turn ON the MUTE
mobile/other} not found for <name>. Would
For example, if during a call you need to sim-
function and mute the microphone.
you like to try again?”
ulate the press of a phone button as a re-
Saying “Mute off” in the same way will turn
Answer “Yes,” and the system will return to
sponse to an automated system, press the
off the MUTE function and cancel the mute
Step 3.
SPEECH button and speak “1 2 3 4 pound
on the microphone.
Answer “No,” and the call will be cancelled.
SEND” and the 1234# will be sent on your
Start over again from Step 1.
cellular phone.
Switching between hands-free
7
6. The voice guide will say
“Calling
mode and private mode
Receiving calls
<name> <location>” and then the sys-
The Bluetooth® 2.0 interface can switch be-
If an incoming phone call is received while
tem will dial the telephone number.
tween Hands-free mode
(Hands-free calls)
the ignition switch or the operation mode is
and private mode (calls using cellular phone).
in ON or ACC, the audio system will be au-
If you press the SPEECH button and say
NOTE
tomatically turned on and switched to the in-
“Transfer call” during a Hands-free call, you
coming call, even when the audio system was
z
When the confirmation function is on, the
can stop the Hands-free mode and talk in pri-
originally off.
system will ask if the name and location of
vate mode.
the receiver are correct.
The voice guide announcement for the in-
To return to Hands-free mode, press the
If the name is correct, answer “Yes.”
coming call will be output from the front pas-
If you want to change the name or location
SPEECH button again and say
“Transfer
senger’s seat speaker.
to call, answer “No.” The system will return
call”.
If the CD player or radio was playing when
to Step 3.
the incoming call was received, the audio
Phone book function
system will mute the sound from the CD
Redialing
player or radio and output only the incoming
The Bluetooth® 2.0 interface has 2 types of
You can redial the last number called, based
call.
unique phone books that are different from
on the history of dialed calls in the paired cel-
To receive the call, press the PICK-UP button
the phone book stored in the cellular phone.
lular phone.
on the steering wheel control switch.
They are the vehicle phone book and the mo-
Use the following procedure to redial.
When the call is over, the audio system will
bile phone book.
1. Press the SPEECH button.
return to its previous state.
These phone books are used to register tele-
2. Say “Redial.”
phone numbers and to make calls to desired
numbers via the voice recognition function.
For pleasant driving
7-59
Bluetooth® 2.0 interface*
NOTE
To register by reading out a telephone
NOTE
number
z Disconnecting the battery cable will not de-
z
When the confirmation function is on, the
lete information registered in the phone
1. Press the SPEECH button.
voice guide will say
“<Location>. Is this
book.
2. Say “Phone book.”
correct?” Answer “Yes.”
If a telephone number has been registered
3. The voice guide will say “Select one of
for the selected location, the voice guide will
the following: new entry, edit number,
Vehicle phone book
say “The current number is <telephone num-
edit name, list names, delete, erase all, or
This phone book is used when making calls
ber>, number please.”
import contact.” Say “New entry.”
If you do not want to change the telephone
with the voice recognition function.
4. The voice guide will say “Name please.”
number, say “cancel” or the original number
Up to 32 names can be registered in the vehi-
Say your preferred name to register it.
to keep it registered.
cle phone book per language.
7
Also, each entry has 4 locations associated
6. The voice guide will say
“Number
with: home, work, mobile and other. You can
NOTE
please.” Say the telephone number to
register one telephone number for each loca-
If the maximum number of entries are al-
z
tion.
register it.
ready registered, the voice guide will say
“The phone book is full. Would you like to
You can register a desired name as a name for
delete a name?” Say “Yes” if you want to
NOTE
delete a registered name.
any phone book entry registered in the vehi-
Say “No,” to return to the main menu.
z
In the case of English, the system will recog-
cle phone book.
nise both “zero” and “oh” (Letter “o”) for
Names and telephone numbers can be
the number “0.”
changed later on.
5. When the name has been registered, the
voice guide will say “home, work, mo-
7. The voice guide will repeat the tele-
The vehicle phone book can be used with all
bile, or other?” Say the location for
phone number you have just read, and
paired cellular phones.
which you want to register a telephone
then register the number.
number.
When the telephone number has been
To register a telephone number in the vehi-
registered, the voice guide will say
cle phone book
“Number saved. Would you like to add
You can register a telephone number in the
another number for this entry?”
vehicle phone book in the following 2 ways:
To add another telephone number for a
Reading out a telephone number, and select-
new location for the current entry, an-
ing and transferring 1 phone book entry from
swer “Yes.” The system will return to lo-
the phone book of the cellular phone.
cation selection in Step 5.
7-60
For pleasant driving
Bluetooth® 2.0 interface*
Answer
“No” to end the registration
5. After the voice guide says “Ready to re-
NOTE
process and return to the main menu.
ceive a contact from the phone. Only a
z
If telephone numbers contain characters oth-
home, a work, and a mobile number can
er than 0 to 9, *, # or +, these characters are
be imported,” the Bluetooth® 2.0 inter-
NOTE
deleted before the transfer.
face will receive the phone book data
z
For the connection settings on the cellular
z When the confirmation function is on, after
phone side, refer to the instructions for the
from the Bluetooth® compatible cellular
repeating the telephone number you have
cellular phone.
phone.
read, the voice guide will ask “Is this cor-
rect?” Answer “Yes.”
6.
Operate the Bluetooth® compatible cel-
Answer “No” to return to telephone number
1. Press the SPEECH button.
lular phone to set it up so that the phone
registration in step 6.
2. Say “Phone book.”
book entry you want to register in the
3. The voice guide will say “Select one of
vehicle phone book can be transferred to
7
the following: new entry, edit number,
the Bluetooth® 2.0 interface.
To select and transfer one phone book en-
edit name, list names, delete, erase all, or
try from the phone book of the cellular
import contact.” Say “Import contact.”
phone
NOTE
4. The voice guide will say “Would you
You can select 1 phone book entry from the
like to import a single entry or all con-
z
If the Bluetooth® 2.0 interface cannot recog-
phone book of the cellular phone and register
tacts?” Say “Single entry.”
nise the Bluetooth® compatible cellular
it in the vehicle phone book.
phone or the connection takes too much
The Bluetooth® 2.0 interface will be-
time, the voice guide will say “Import con-
come ready to receive transferred phone
tact has timed out” and then the system will
NOTE
book data.
cancel the registration. In such case, start
over again from Step 1.
z Transfer is not permitted unless the vehicle
is parked. Before transferring, make sure
Pressing the HANG-UP button or pressing
NOTE
z
that the vehicle is parked in a safe location.
and holding the SPEECH button will cancel
z
If the maximum number of entries are al-
the registration.
z All or part of data may not be transferred,
even when the cellular phone supports Blue-
ready registered, the voice guide will say
“The phone book is full. Would you like to
tooth®, depending on the compatibility of
7. When the reception is complete, the
delete a name?” Say “Yes” if you want to
the device.
delete a registered name.
voice guide will say “<Number of tele-
z The maximum supported telephone number
Say “No,” to return to the main menu.
phone numbers that had been registered
length is 19 digits. Any telephone number of
20 digits or more will be truncated to the
in the import source> numbers have
first 19 digits.
been imported. What name would you
like to use for these numbers?”
For pleasant driving
7-61
Bluetooth® 2.0 interface*
Say the name you want to register for
5. The voice guide will say “Home, work,
To change the content registered in the ve-
this phone book entry.
mobile or other?” Select and say the lo-
hicle phone book
cation where the telephone number you
You can change or delete a name or tele-
want to change or add is registered.
NOTE
phone number registered in the vehicle phone
When the confirmation function is on,
If the entered name is already used for other
book.
z
the system will check the target name
phone book entry or similar to a name used
You can also listen to the list of names regis-
and location again. Answer “Yes” if you
for other phone book entry, that name cannot
tered in the vehicle phone book.
want to continue with the editing.
be registered.
Answer “No” to return to Step 3.
NOTE
6. The voice guide will say
“Number
8. The voice guide will say
“Adding
please.” Say the telephone number you
<name>.”
z The system must have at least one entry.
7
want to register.
When the confirmation function is on,
the system will ask if the name is cor-
Editing a telephone number
rect. Answer “Yes.”
NOTE
Answer “No,” and the voice guide will
1. Press the SPEECH button.
If the telephone number is already registered
z
say “Name please.” Register a different
2. Say “Phone book.”
in the selected location, the voice guide will
name.
3. The voice guide will say “Select one of
say “The current number is <current num-
the following: new entry, edit number,
ber>. New number, please.” Say a new tele-
9. The voice guide will say
“Numbers
edit name, list names, delete, erase all, or
phone number to change the current number.
saved.”
10. The voice guide will say “Would you
import contact.” Say “Edit number.”
like to import another contact?”
4. The voice guide will say “Please say the
7. The voice guide will repeat the tele-
Answer “Yes” if you want to continue
name of the entry you would like to edit,
phone number.
with the registration. You can continue
or say list names.” Say the name of the
When the confirmation function is on,
to register a new phone book entry from
phone book entry you want to edit.
the system will ask if the number is cor-
Step 5.
rect. Answer “Yes.”
Answer “No,” to return to the main
Answer “No” to return to Step 3.
NOTE
menu.
8. Once the telephone number is registered,
z Say “List names,” and the names registered
the voice guide will say “Number saved”
in the phone book will be read out in order.
and then the system will return to the
Refer to “Vehicle phone book: Listening to
main menu.
the list of registered names” on page 7-63.
7-62
For pleasant driving
Bluetooth® 2.0 interface*
5. The voice guide will say
“Changing
NOTE
NOTE
<name>.”
z If the location where a telephone number
When the confirmation function is on,
z You can call, edit or delete a name that is be-
was already registered has been overwritten
ing read out.
the system will ask if the name is cor-
with a new number, the voice guide will say
Press the SPEECH button and say “Call” to
rect. Answer “Yes” if you want to con-
“Number changed” and then the system will
call the name, “Edit name” to edit it, or “De-
return to the main menu.
tinue with the editing based on this in-
lete” to delete it.
formation.
The system will beep and then execute your
Answer “No” to return to Step 4.
command.
Editing a name
6. The voice guide will say “Name please.”
z If you press the SPEECH button and say
“Continue” or “Previous” while the list is
1. Press the SPEECH button.
Say the new name you want to register.
being read, the system will advance or re-
2. Say “Phone book.”
7. The registered name will be changed.
wind the list. Say “Continue” to proceed to
3. The voice guide will say “Select one of
When the change is complete, the sys-
7
the next entry or “Previous” to return to the
the following: new entry, edit number,
tem will return to the main menu.
previous entry.
edit name, list names, delete, erase all, or
import contact.” Say “Edit name.”
Listening to the list of registered names
Deleting a telephone number
4. The voice guide will say “Please say the
1. Press the SPEECH button.
name of the entry you would like to edit,
1. Press the SPEECH button.
2. Say “Phone book.”
or say list names.” Say the name you
2. Say “Phone book.”
3. The voice guide will say “Select one of
want to edit.
3. The voice guide will say “Select one of
the following: new entry, edit number,
the following: new entry, edit number,
edit name, list names, delete, erase all, or
edit name, list names, delete, erase all, or
NOTE
import contact.” Say “List names.”
import contact.” Say “Delete.”
Say “List names,” and the names registered
4.Bluetooth® 2.0 interface will read out
z
4. The voice guide will say “Please say the
in the phone book will be read out in order.
the entries in the phone book in order.
name of the entry you would like to de-
Refer to “Vehicle phone book: Listening to
5. When the voice guide is done reading
lete, or say list names.” Say the name of
the list of registered names” on page 7-63.
the list, it will say “End of list, would
the phone book entry in which the tele-
you like to start from the beginning?”
phone number you want to delete is reg-
When you want to check the list again
istered.
from the beginning, answer “Yes.”
When you are done, answer “No” to re-
turn to the previous or main menu.
For pleasant driving
7-63
Bluetooth® 2.0 interface*
7. When the deletion of the telephone num-
5. The voice guide will say “You are about
NOTE
ber is completed, the voice guide will
to delete everything from your hands-
z
Say “List names,” and the names registered
say
“<name> <location> deleted” and
free system phone book. Do you want to
in the phone book will be read out in order.
then the system will return to the main
continue?” Answer “Yes” to continue.
Refer to “Vehicle phone book: Listening to
menu.
Answer “No” to cancel the deletion of
the list of registered names” on page 7-63.
If all locations are deleted, the system
all registered information in the phone
will say “<name> and all locations de-
book and return to the main menu.
5. If only one telephone number is regis-
leted” and the name will be removed
6. The voice guide will say “Please wait,
tered in the selected phone book entry,
from the phone book. If numbers still re-
erasing the handsfree system phone
the voice guide will say
“Deleting
main under the entry, the name will re-
book” and then the system will delete all
<name> <location>.”
tain the other associated numbers.
data in the phone book.
If multiple telephone numbers are regis-
7
When the deletion is complete, the voice
tered in the selected phone book entry,
guide will say “Hands-free system phone
Erasing the phone book
the voice guide will say “Would you like
book erased” and then the system will
to delete [home], [work], [mobile], [oth-
You can delete all registered information
return to the main menu.
er], or all?”
from the vehicle phone book.
Select the location to delete, and the
1. Press the SPEECH button.
Mobile phone book
voice guide will say “Deleting <name>
2. Say “Phone book.”
<location>.”
3. The voice guide will say “Select one of
All entries in the phone book stored in the
cellular phone can be transferred in a batch
the following: new entry, edit number,
edit name, list names, delete, erase all, or
and registered in the mobile phone book.
NOTE
import contact.” Say “Erase all.”
Up to 7 mobile phone books, each containing
z
To delete the telephone numbers from all lo-
up to 1,000 names, can be registered.
4. For confirmation purposes, the voice
cations, say “All.”
guide will ask “Are you sure you want to
erase everything from your hands-free
The Bluetooth® 2.0 interface automatically
6. The system will ask if you really want to
system phone book?” Answer “Yes.”
converts from text to voice the names regis-
delete the selected telephone number(s)
Answer “No” to cancel the deletion of
tered in the transferred phone book entries,
to go ahead with the deletion, answer
all registered information in the phone
and creates names.
“Yes.”
book and return to the main menu.
Answer “No,” the system will cancel de-
leting the telephone number(s) and then
return to Step 4.
7-64
For pleasant driving
Bluetooth® 2.0 interface*
NOTE
NOTE
NOTE
z Only the mobile phone book transferred
z
Only a home, a work, and a mobile number
z
The transfer may take some time to com-
from the connected cellular phone can be
can be imported.
plete depending on the number of contacts.
used with that cellular phone.
z
The maximum supported telephone number
z
If the Bluetooth® 2.0 interface could not be
z You cannot change the names and telephone
length is 19 digits. Any telephone number of
connected to the Bluetooth® compatible cel-
numbers in the phone book entries registered
20 digits or more will be truncated to the
lular phone, the voice guide will say “Un-
in the mobile phone book. You cannot select
first 19 digits.
able to transfer contact list from phone” and
and delete specific phone book entries, ei-
z
If telephone numbers contain characters oth-
then the system will return to the main
ther.
er than 0 to 9, *, # or +, these characters are
menu.
To change or delete any of the above, change
deleted before the transfer.
If you press the HANG-UP button or press
z
the applicable information in the source
z
For the connection settings on the cellular
and hold the SPEECH button during the data
phone book of the cellular phone and then
phone side, refer to the instructions for the
transfer, the transfer will be cancelled and
7
transfer the phone book again.
cellular phone.
the system will return to the main menu.
z
If an error occurs during the data transfer, all
To import a devices phone book
transfer will be cancelled and the voice
1. Press the SPEECH button.
guide will say
“Unable to complete the
Follow the steps below to transfer to the mo-
2. Say “Phone book.”
phone book import” and then the system will
bile phone book the phone book stored in the
3. The voice guide will say “Select one of
return to the main menu.
cellular phone.
the following: new entry, edit number,
If there are no contacts in the phone book,
z
edit name, list names, delete, erase all, or
the voice guide will say “There are no con-
import contact.” Say “Import contact.”
tacts on the connected phone.”
NOTE
4. The voice guide will say “Would you
z Transfer should be completed while the ve-
like to import a single entry or all con-
6. When the transfer is complete, the voice
hicle is parked.
tacts?” Say “All contacts.”
guide will say “Import complete” and
Before transferring, make sure that the vehi-
5. The voice guide will say “Importing the
then the system will return to the main
cle is parked in a safe location.
contact list from the mobile phone book.
menu.
z The already stored phone book in the mobile
This may take several minutes to com-
phone book is overwritten by the stored
phone book in the cellular phone.
plete. Would you like to continue?” An-
z All or part of data may not be transferred,
swer “Yes,” transferring to the mobile
even when the cellular phone supports Blue-
phone book the phone book stored in the
tooth®, depending on the compatibility of
cellular phone will start.
the device.
Answer “No,” to return to the main
menu.
For pleasant driving
7-65
USB input terminal*
Enrollment commands
Phrase
English
French
Spanish
Italian
German
Dutch
Portuguese
Russian
1
0123456789
0123456789
0123456789
0123456789
0123456789
0123456789
0123456789
123456789
2
888 555 1212
888 555 1212
888 555 1212
888 555 1212
888 555 1212
888 555 1212
888 555 1212
888 555 1212
3
Call
Appeler
Llamar
Chiama
Anrufen
Bellen
Ligar
Вызов
4
Dial
Composer
Marcar
Componi
Wählen
Nummer keuze
Marcar
Набор
5
Setup
Configurer
Configuración
Configura
Einrichtung
Setup
Configurar
Настройка
6
Cancel
Annuler
Cancelar
Annulla
Abbrechen
Annuleren
Cancelar
Отмена
7
7
Continue
Continuer
Continuar
Continua
Weiter
Doorgaan
Continuar
Продолжить
8
Help
Aide
Ayuda
Aiuto
Hilfe
Help
Ajuda
Справка
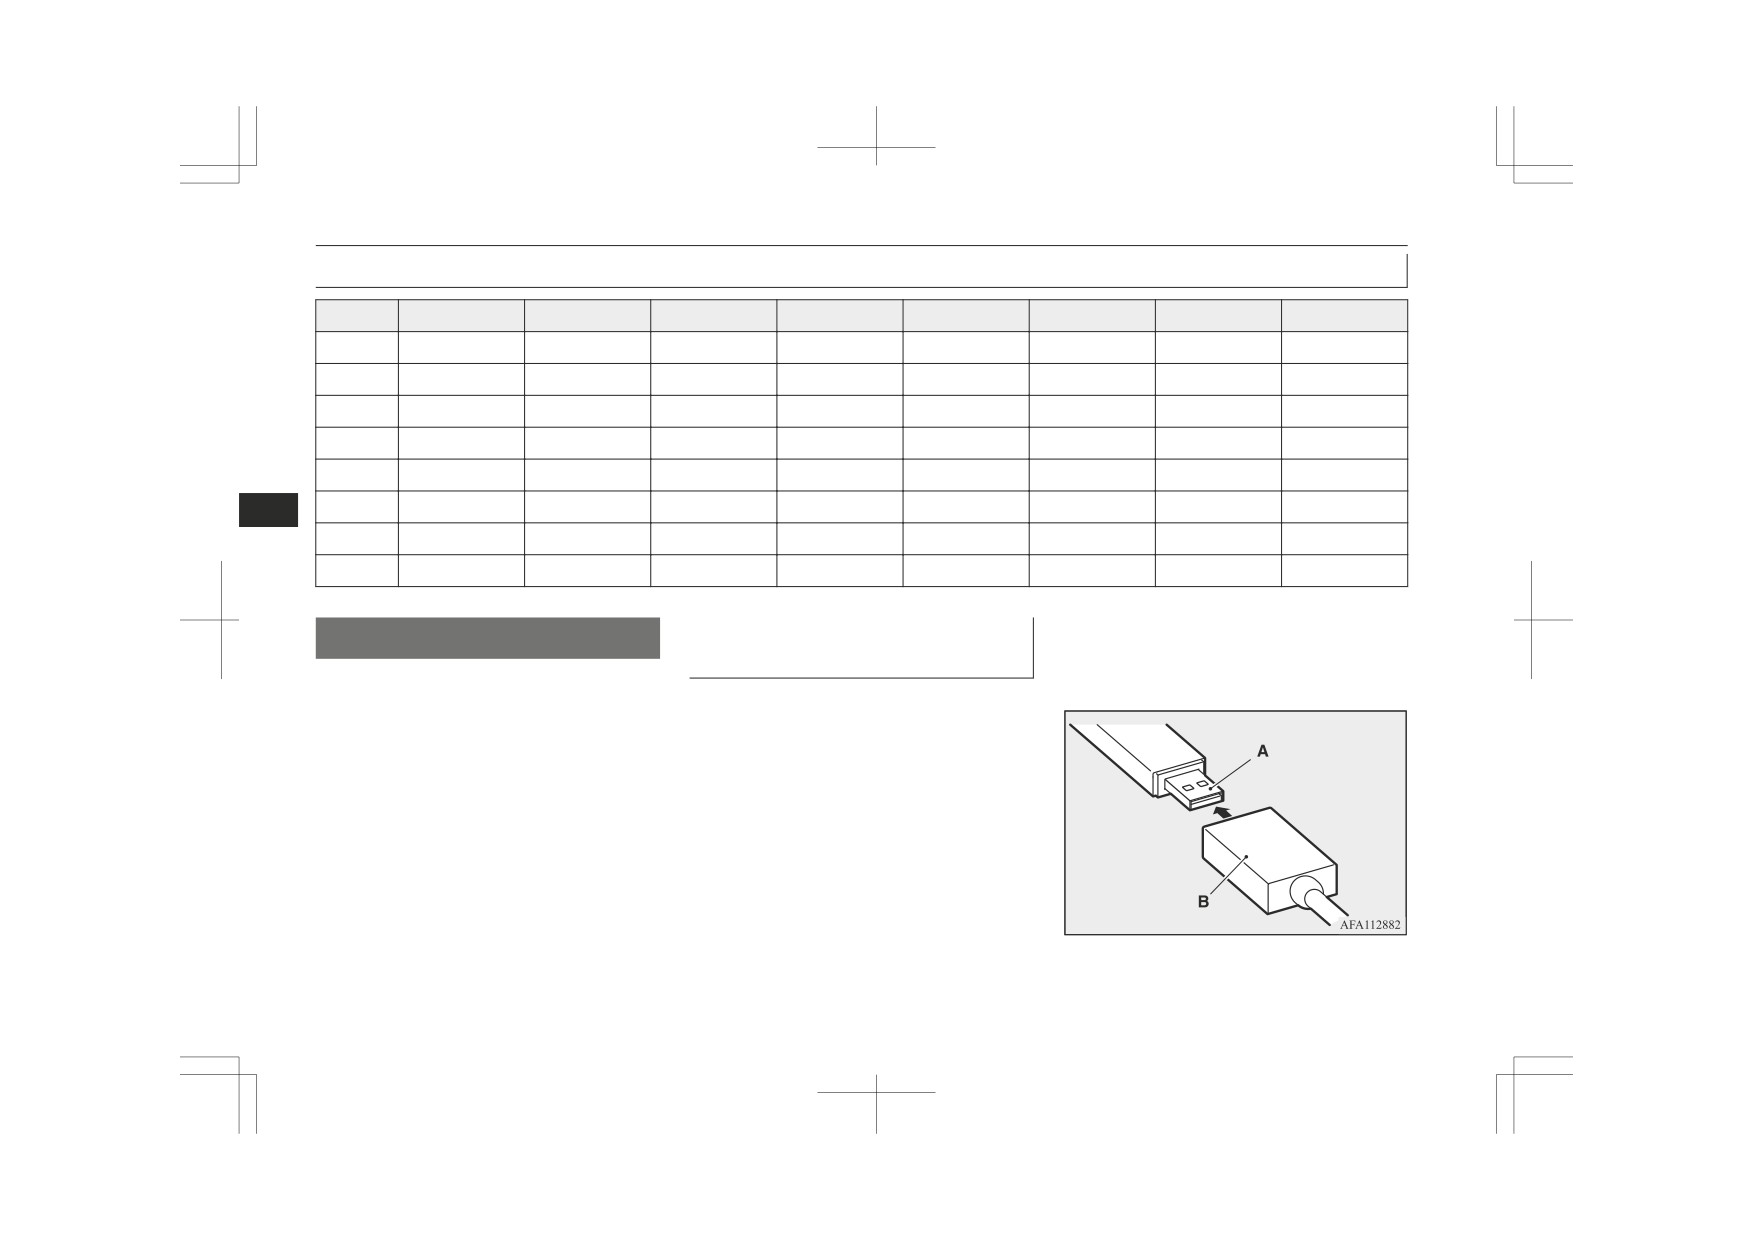
How to connect a USB memory
2. Connect a commercially available USB
USB input terminal*
connector cable (B) to the USB memory
device
device (A).
You can connect your USB memory device
1. Park your vehicle in a safe place and
or iPod* to play music files stored in the
turn the ignition switch to the “LOCK”
USB memory device or iPod.
position or put the operation mode in
This section explains how to connect and re-
OFF.
move a USB memory device or iPod.
See the following section for details on how
to play music files.
Refer to “Listen to an iPod” on page 7-28.
Refer to “Listen to Audio Files on a USB De-
vice” on page 7-30.
Refer to “To play iPod/USB memory device
tracks via voice operation” on page 7-32.
*: “iPod” is a registered trademark of Apple
Inc. in the United States and other countries.
7-66
For pleasant driving
USB input terminal*
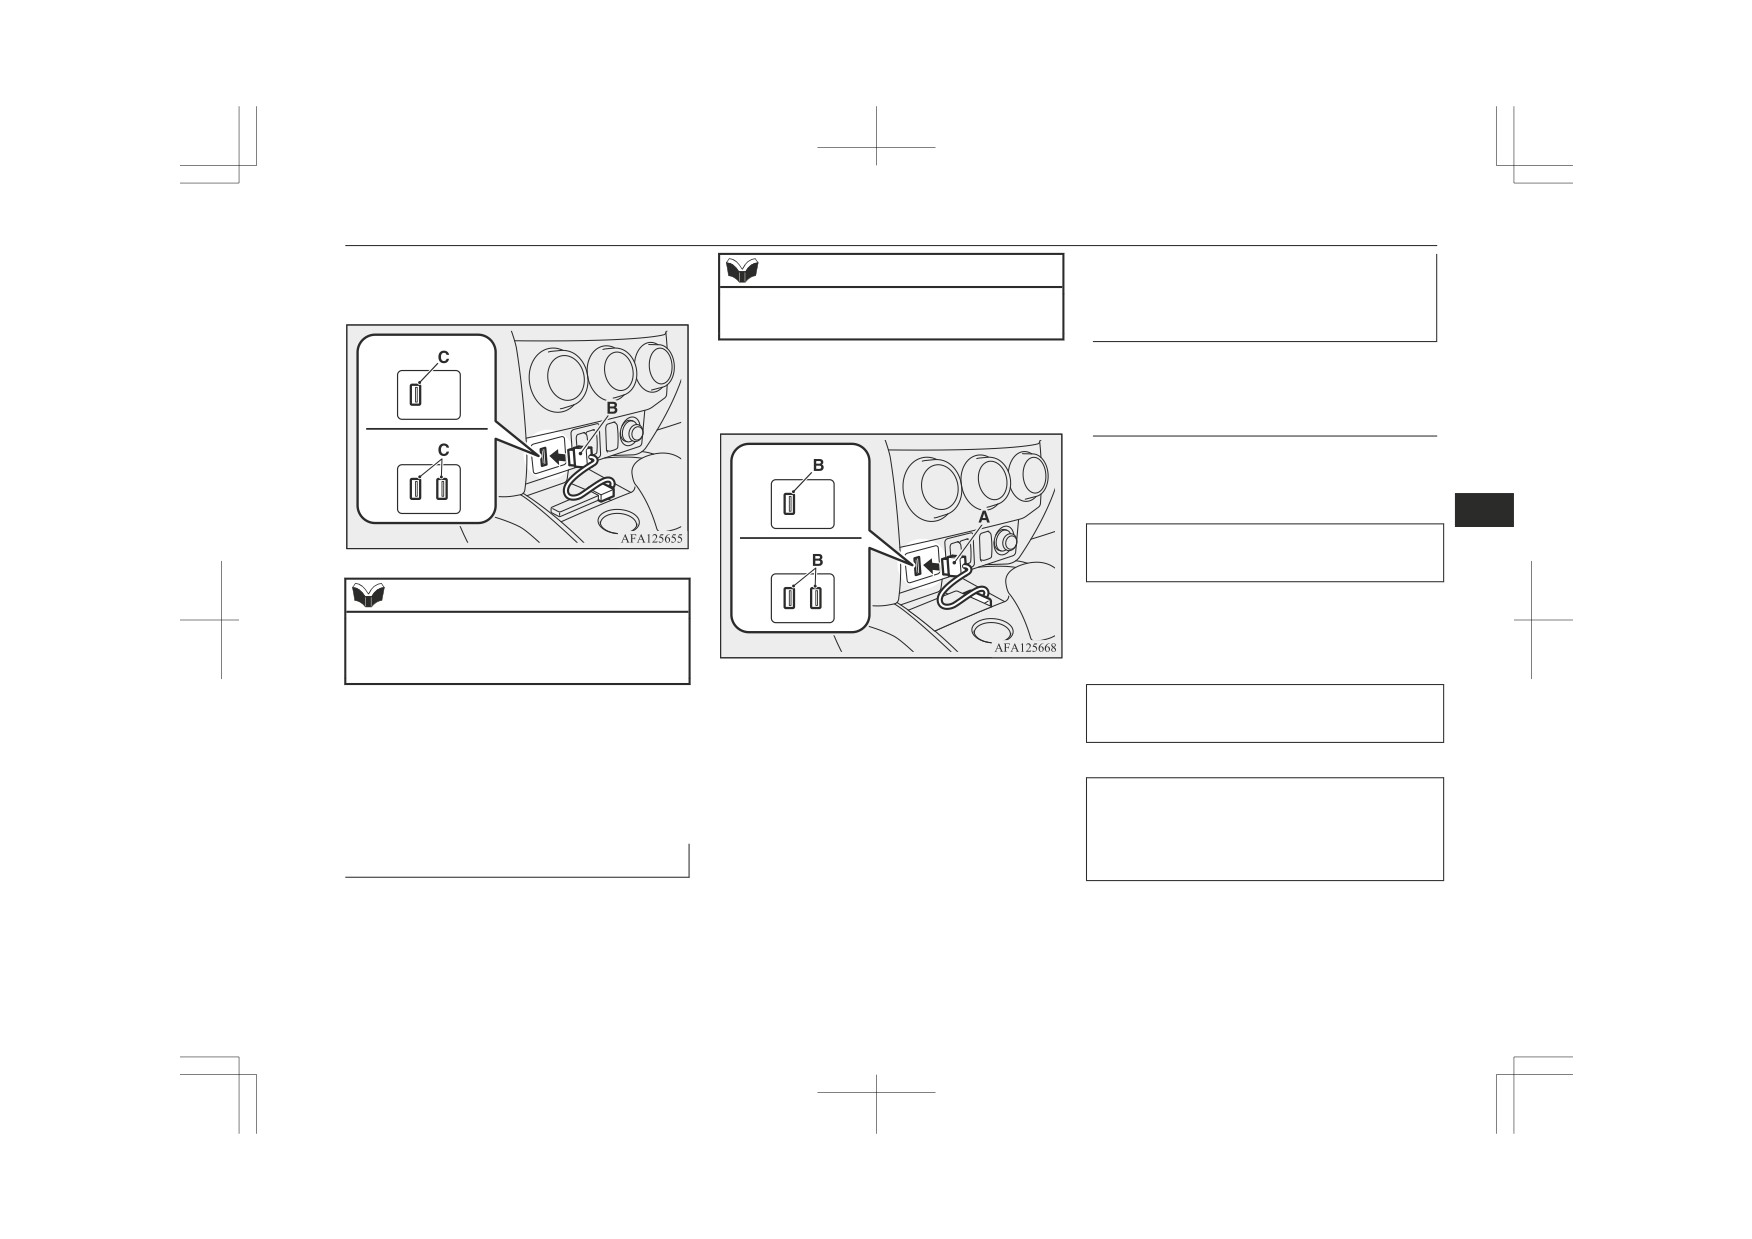
3. Connect the USB connector cable (B) to
Types of connectable devices
NOTE
the USB input terminal (C).
and supported file specifica-
z Use a genuine connector cable from Apple
Inc.
tions
Type 1
Except for vehicles equipped
3. Connect the connector cable (A) to the
USB input terminal (B).
with the Bluetooth® 2.0 inter-
face
Type 2
For details about the types of connectable de-
Type 1
vices and supported file specifications, refer
to the following pages and manuals.
7
For vehicles equipped with the
Type 2
LW/MW/FM radio/CD player
NOTE
Refer to “Listen to an iPod” on page 7-28,
“Listen to Audio Files on a USB Device” on
z Do not connect the USB memory device to
page 7-30 and “Audio Files
(MP3/WMA/
the USB input terminal directly. The USB
AAC)” on page 7-15.
memory device may be damaged.
4. To remove the connector cable, turn the
For vehicles equipped with the DISPLAY
4. To remove the USB connector cable,
ignition switch to the “LOCK” position
AUDIO
turn the ignition switch to the “LOCK”
or put the operation mode in OFF first
Refer to the separate owner’s manual.
position or put the operation mode in
and perform the installation steps in re-
OFF first and perform the installation
verse.
For vehicles equipped with the Smart-
steps in reverse.
phone-link Display Audio
(SDA) or the
Smartphone-link Display Audio
(SDA)
How to connect an iPod
navigation system
1. Park your vehicle in a safe place and
Refer to the separate owner’s manual.
turn the ignition switch to the “LOCK”
position or put the operation mode in
OFF.
2. Connect the connector cable to the iPod.
For pleasant driving
7-67
Sun visors
*: “iPod,” “iPod classic,” “iPod nano,” “iPod
For vehicles equipped with the
File specifications
touch” and
“iPhone” are registered trade-
Bluetooth® 2.0 interface
You can play music files of the following
marks of Apple Inc. in the United States and
specifications that are saved in a USB memo-
For details about the types of connectable de-
other countries.
ry device or other device supporting mass
vices and supported file specifications, refer
to the following sections.
storage class. When you connect your iPod,
NOTE
playable file specifications depend on the
Device types
Depending on the type of the USB memory
connected iPod.
z
device or other device connected, the con-
Devices of the following types can be con-
nected device may not function properly or
Item
Condition
nected.
the available functions may be limited.
MP3, WMA,
AAC,
z
It is recommended to use an iPod with firm-
File format
Model name
Condition
WAV
7
ware updated to the latest version.
Storage capacity of
z
You can charge your iPod by connecting it to
Maximum number of
the USB input terminal when the ignition
256 Mbytes or more
levels
(including the
Level 8
USB memory device
switch or the operation mode is in ON or
(File
System is
root)
ACC.
FAT16/32)
z
Do not keep your USB memory device or
Number of folders
700
Models other than
Digital audio player
iPod in your vehicle.
Number of files
65,535
USB memory devi-
supporting mass stor-
z
It is recommended that you back up files in
case of data damage.
ces and iPods
age class
z
Do not connect to the USB input terminal
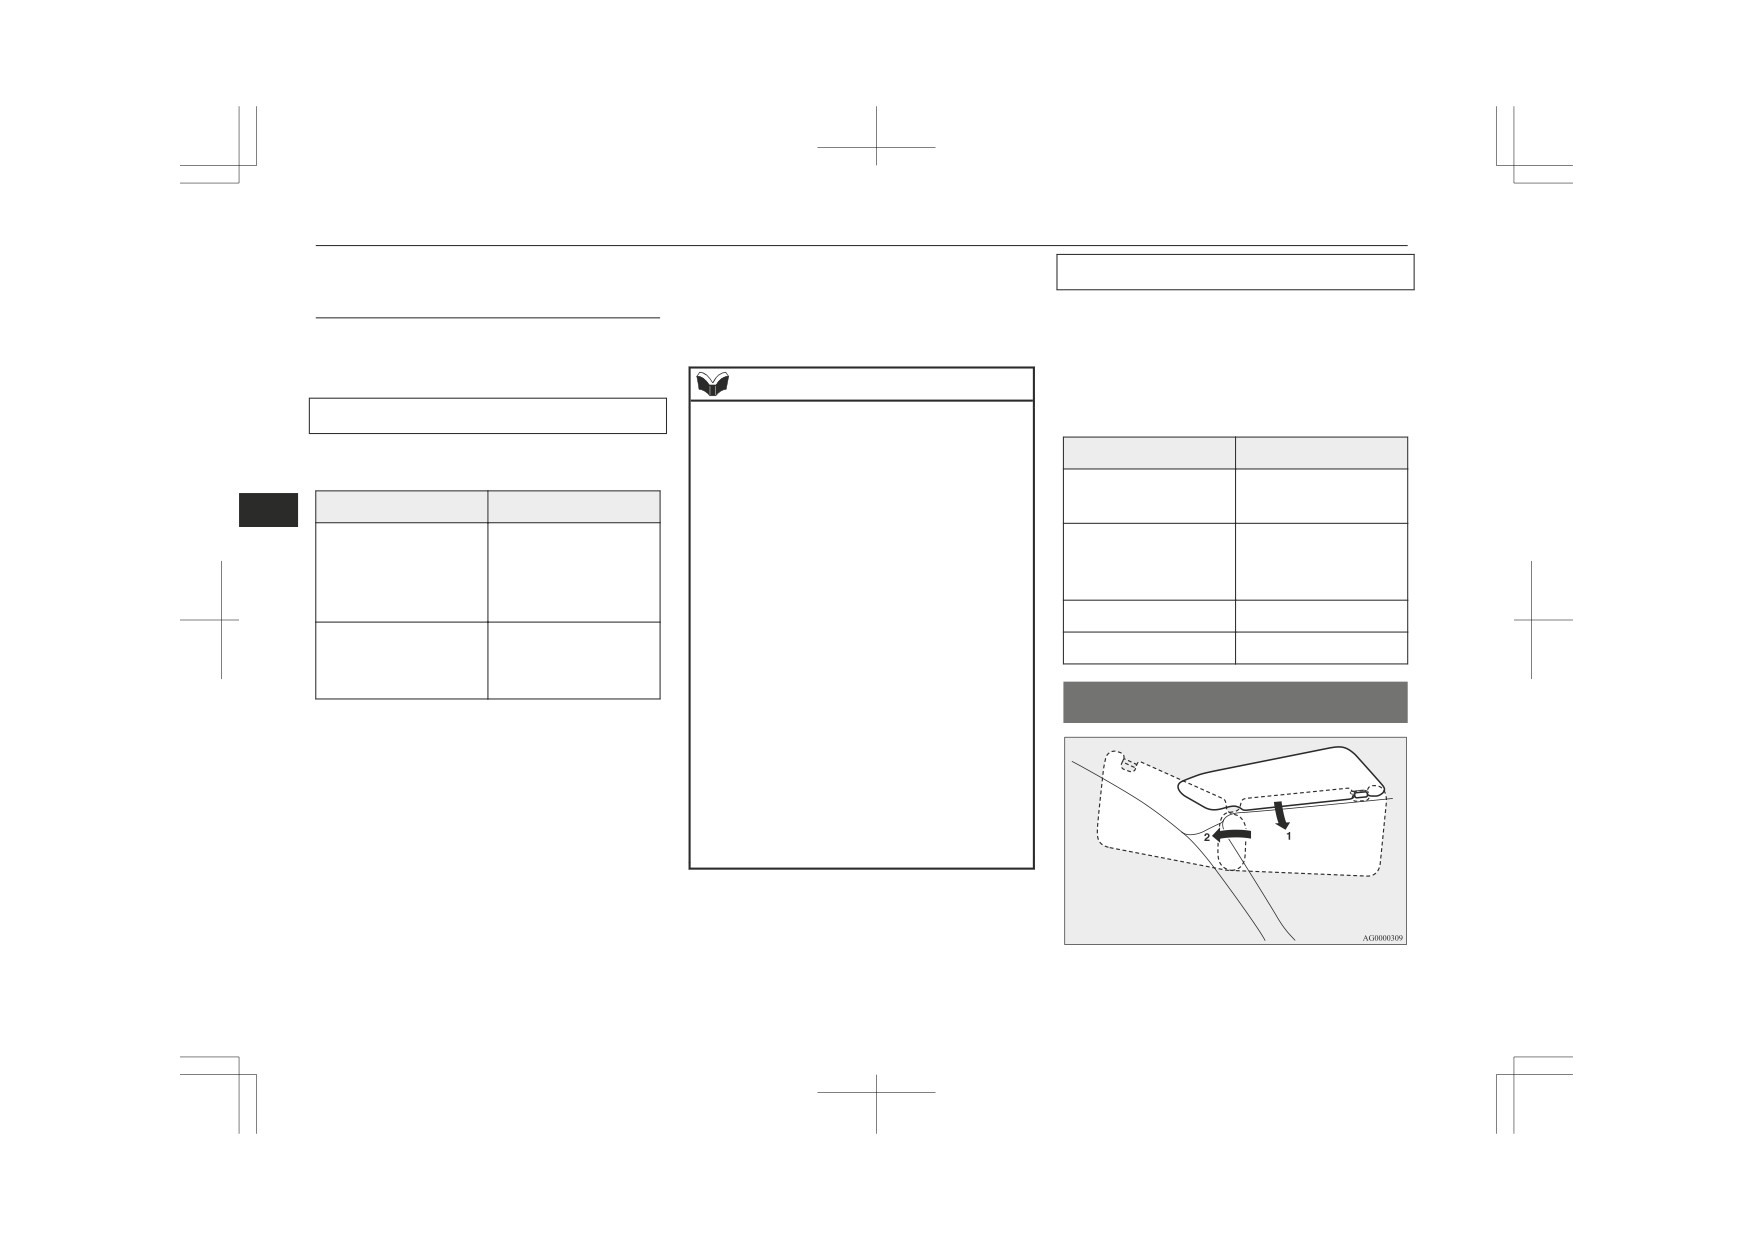
Sun visors
For connectable device types for
“iPod*,”
any device (hard disk, card reader, memory
“iPod classic*,” “iPod nano*,” “iPod touch*”
reader, etc.) other than the connectable devi-
ces specified in the previous section.
and
“iPhone*,” access the MITSUBISHI
The device and/or data may be damaged. If
MOTORS website.
any of these devices was connected by mis-
Please read and agree to the “Warning about
take, remove it after turning the ignition
Links to the Web Sites of Other Companies”.
switch to the “LOCK” position or putting
The websites mentioned above may connect
the operation mode in OFF.
you to websites other than the MITSUBISHI
MOTORS website.
ucts/index.html
1- To eliminate front glare
2- To eliminate side glare
7-68
For pleasant driving
Ashtray*
Vanity mirror
Type 2
CAUTION
A vanity mirror is fitted to the back of the
z Do not leave plastic cards in the ticket hold-
sun visor.
er. Because the inside of the vehicle will be-
Type 1
come hot if the vehicle is parked in strong
A vanity mirror is fitted to the back of the
sunlight, the cards could deform or crack.
sun visor.
Operating the lid of the vanity mirror will au-
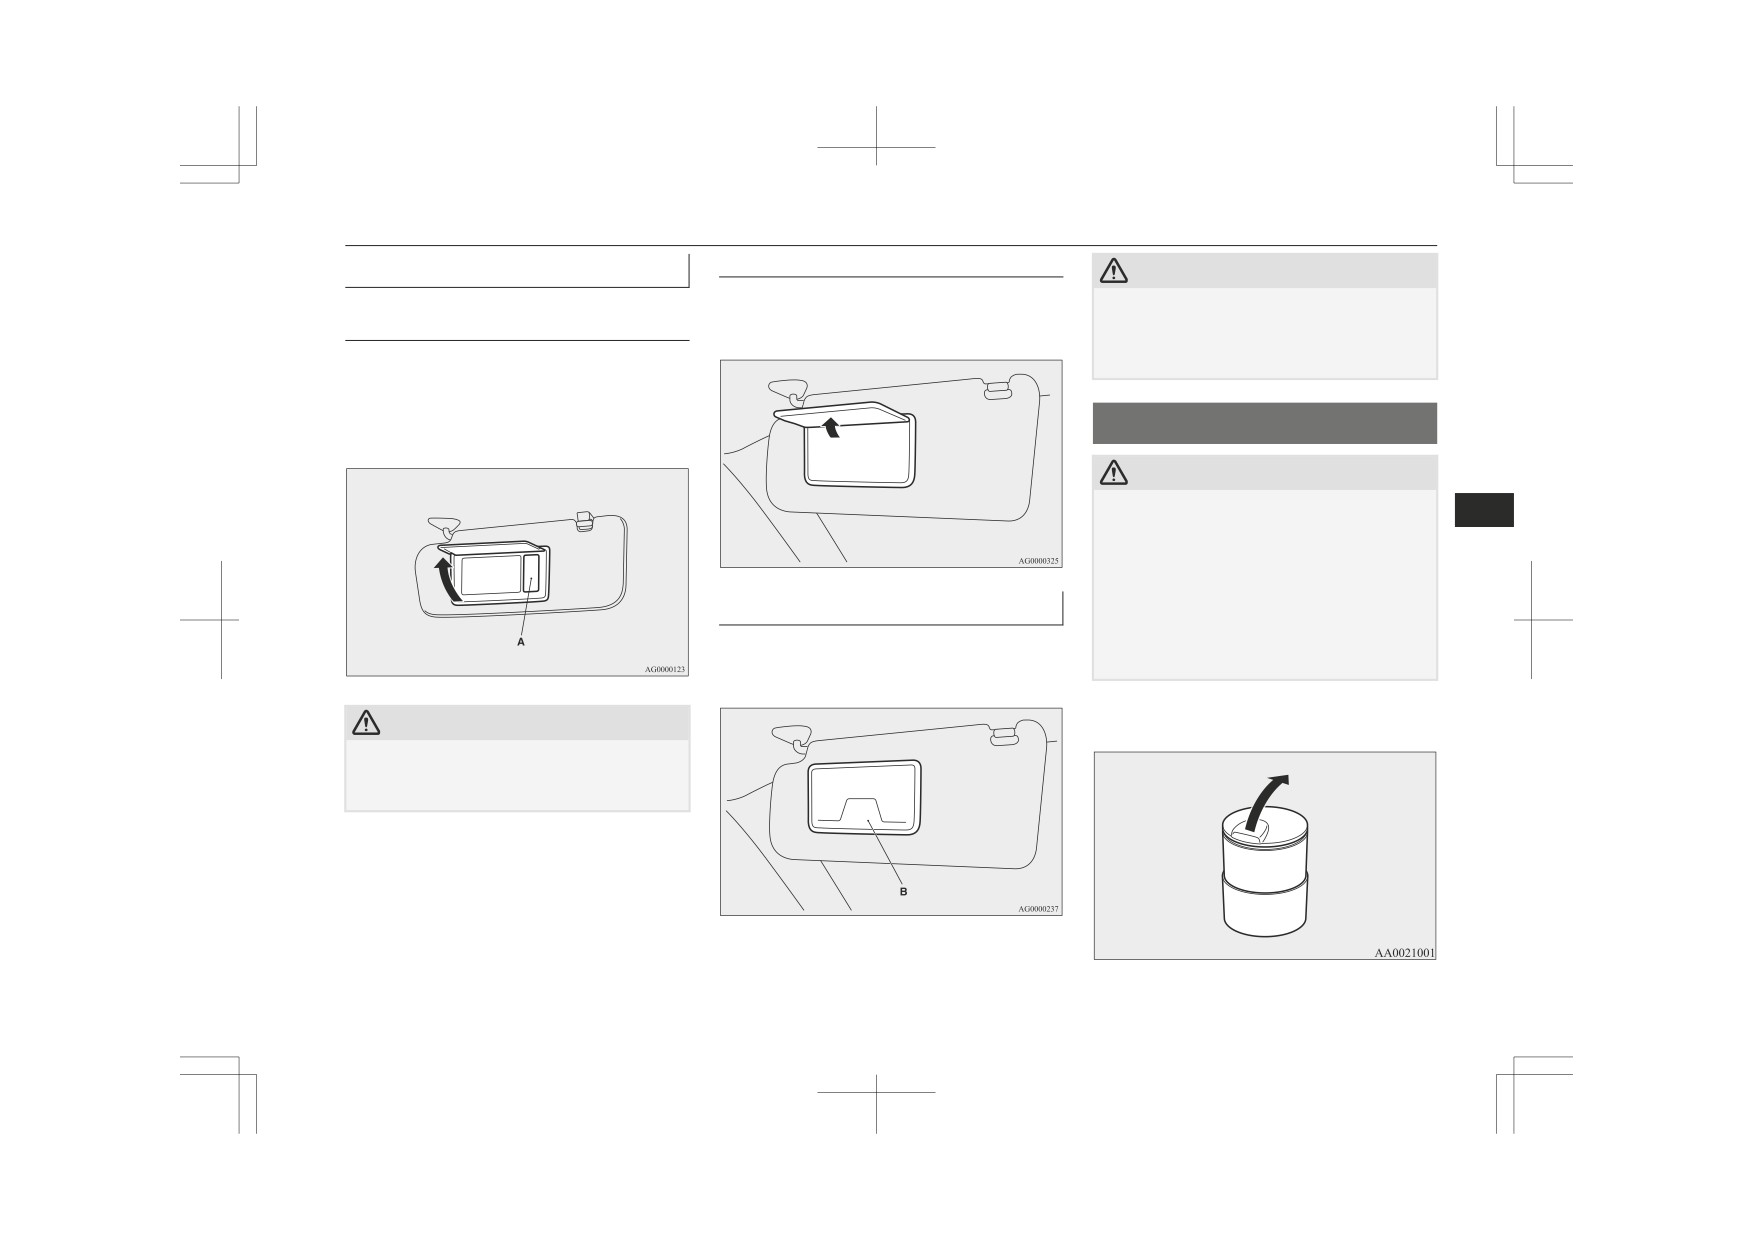
Ashtray*
tomatically turn on the mirror lamp (A).
CAUTION
z Put out matches and cigarettes before they
7
are placed in the ashtray.
z Don’t put papers and other things that burn
into your ashtrays. If you do, cigarettes or
other smoking materials could set them on
Ticket holder
fire, causing damage.
z
Always close the ashtray. If left open, other
The holder (B) is located on the back of the
cigarette butts in the ashtray may be rekin-
dled.
sun visor.
To use the ashtray, open the lid.
CAUTION
z If the lid of vanity mirror with lamp is kept
open for prolonged periods of time, the vehi-
cle’s battery will be discharged.
For pleasant driving
7-69
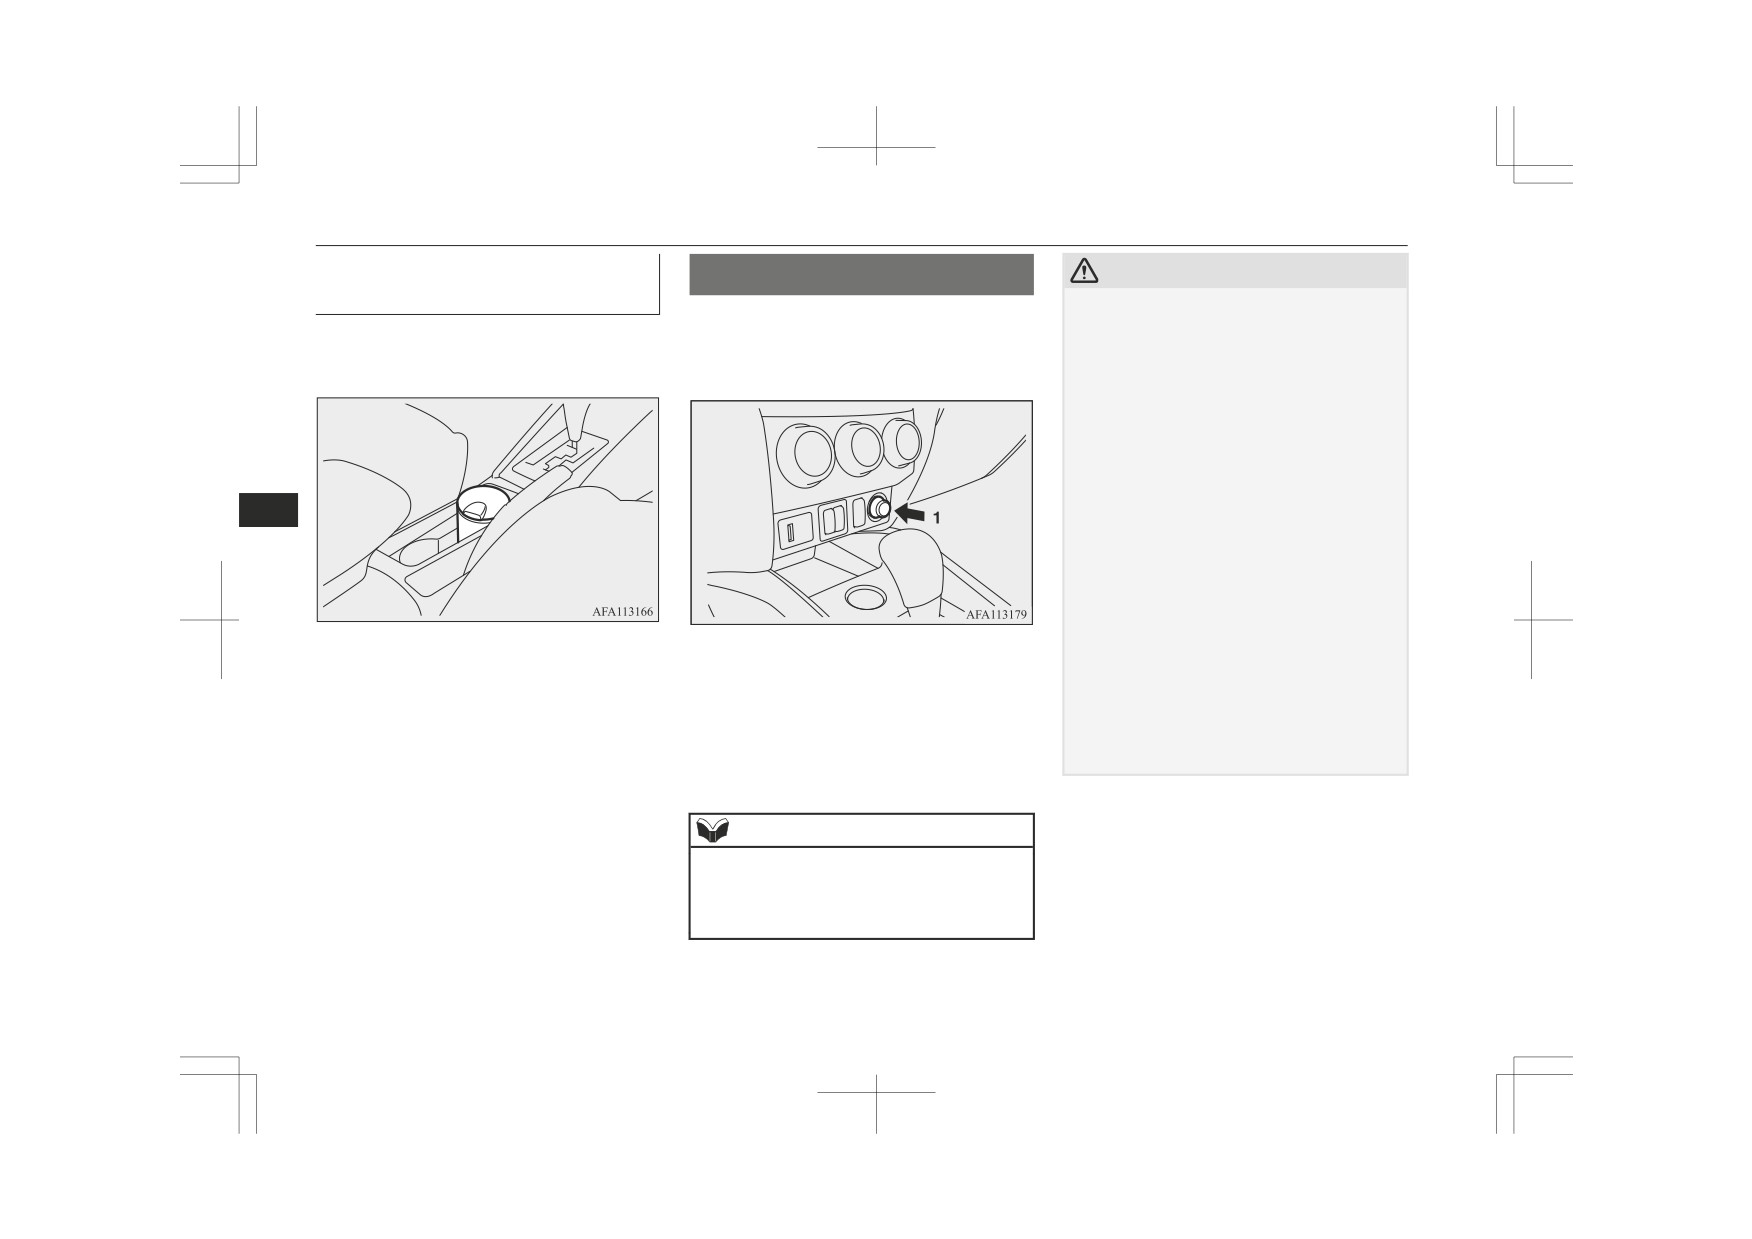
Cigarette lighter*
Moveable ashtray secure hold-
Cigarette lighter*
CAUTION
er
z
Do not touch the heating element or the cig-
The cigarette lighter can be used while the ig-
arette lighter housing, hold the knob only to
The moveable ashtray can be installed in the
nition switch or the operation mode is in ON
prevent burns.
cup holder.
or ACC.
Do not allow children to operate or play with
z
the cigarette lighter as burns may occur.
z
Something is wrong with the cigarette light-
er if it does not pop back out within approxi-
mately 30 seconds of being pushed in.
Pull it out and have the problem corrected at
MITSUBISHI MOTORS Authorized Serv-
ice Point.
7
z
Do not use any electric appliance that is not
approved by MITSUBISHI MOTORS. Do-
ing so could damage the socket. If you used
the cigarette lighter after damaging the sock-
et, the cigarette lighter might pop out or fail
to come out after being pushed in.
1- Push all the way in.
z
When the cigarette lighter socket is used as a
power source for an electric appliance, be
sure that the electric appliance operates at
The cigarette lighter will automatically return
12 V and has an electric capacity of 120 W
to its original position with a “click” when
or less. In addition, long use of the electric
ready. Pull it out for use.
appliance without running the engine may
After use, insert the cigarette lighter to its
run down the battery.
original position in the socket.
NOTE
z Do not leave the cigarette lighter removed
from its socket, because the socket might be-
come clogged by foreign material and be
short-circuited.
7-70
For pleasant driving
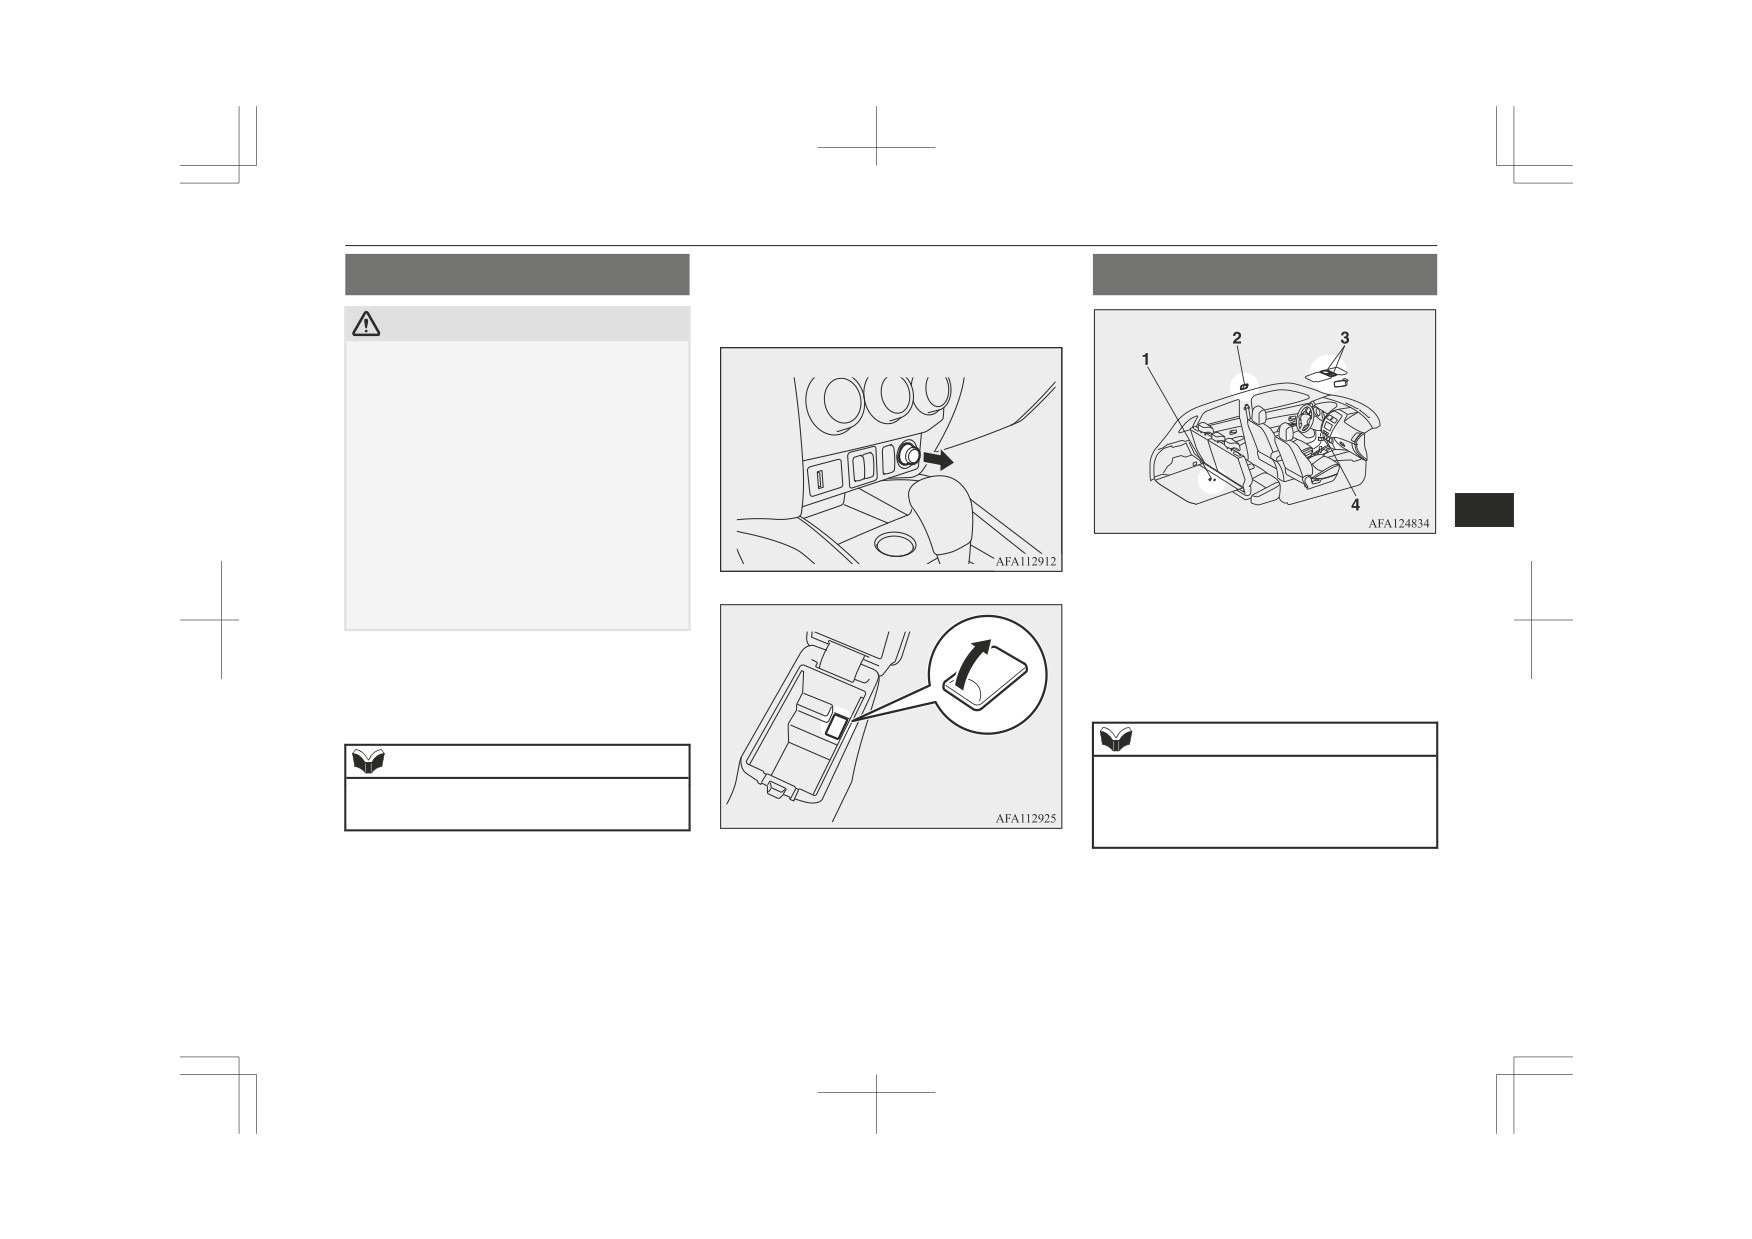
Accessory socket*
The accessory socket can be used while the
Accessory socket*
Interior lamps
ignition switch or the operation mode is in
ON or ACC.
CAUTION
z Be sure to use a “plug-in” type accessory op-
Centre console
erating at 12 V and at 120 W or less.
When using more than one socket at the
same time, make sure that the electrical ac-
cessories are 12 V accessories and that the
total power consumption does not exceed
120 W.
z Long use of the electric appliance without
running the engine may run down the bat-
7
tery.
z When the accessory socket is not in use, be
sure to close the lid or install the cap, be-
1- Luggage room lamp
cause the socket might become clogged by
2- Room lamp (rear)*
foreign material and be short-circuited.
Floor console box
3- Map & room lamps (front)
Sunshade illumination dimming control
To use a plug-in type accessory, open the lid
switch*
or remove the cap, and insert the plug in the
4- Centre console down lamp
accessory socket.
NOTE
NOTE
z
If you leave the lamps on without running
the engine, you will run down the battery.
z Accessory sockets in 2 locations can be used
at the same time.
Before you leave the vehicle, make sure that
the lamps are turned off.
For pleasant driving
7-71
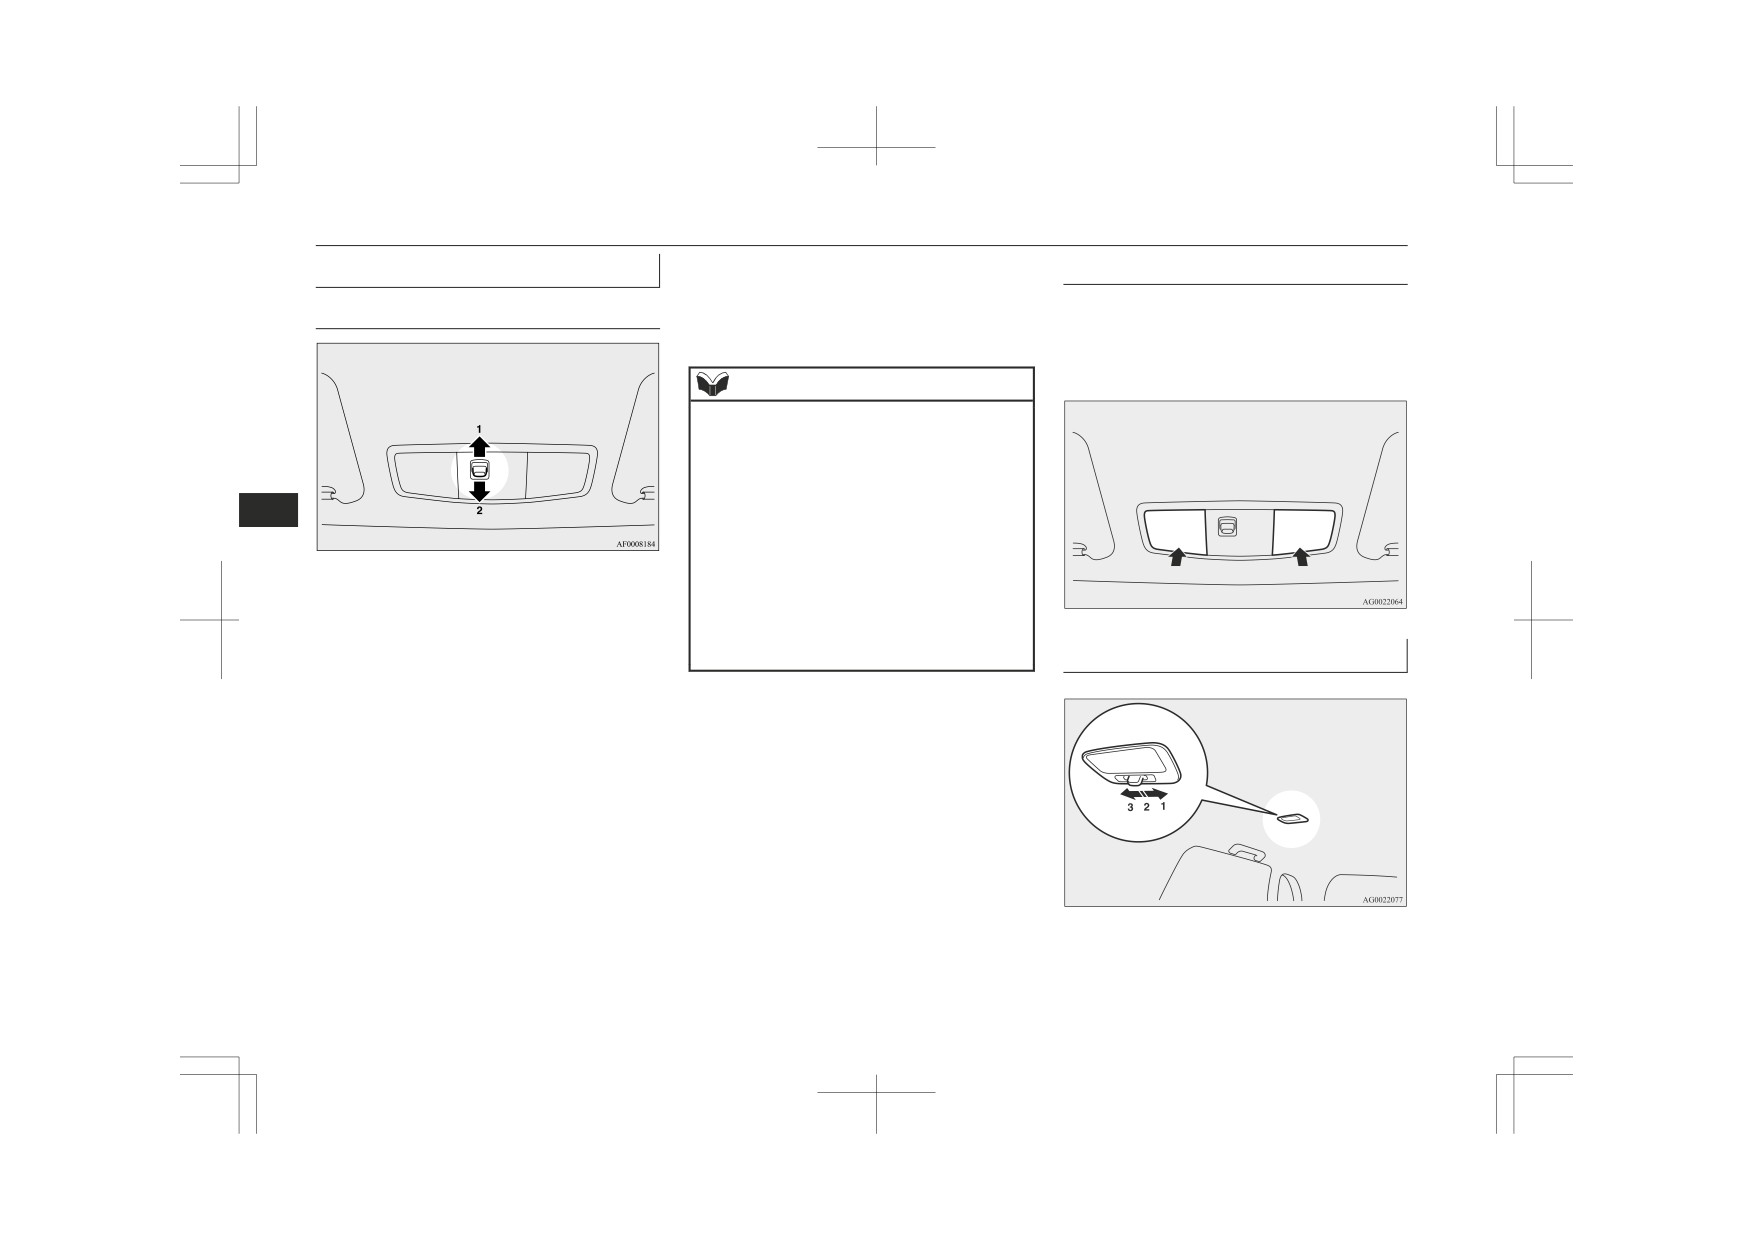
Interior lamps
Map & room lamps (front)
• If the vehicle is equipped with the
Map lamps
keyless operation system, when the
Regardless of the position of the room lamp
keyless operation function is used to
Room lamp
switch, when the lens is pressed, the lamp on
lock the vehicle.
the side that was pressed will illuminate.
Press the lens again to turn off the lamp.
NOTE
z When the key was used to start the engine, if
the key is removed while the doors and tail-
gate are closed, the lamp is illuminated and
after about 15 seconds it goes off.
z When the keyless operation function was
7
used to start the engine, if the operation
mode is put in OFF while the doors and tail-
gate are closed, the lamp illuminates and af-
ter about 15 seconds it goes off.
1- (DOOR)
z The time until the lamp goes off can be ad-
The lamp illuminates when a door or the
justed. For details, please consult a
tailgate is opened. It goes off about 15
MITSUBISHI MOTORS Authorized Serv-
seconds after the door or tailgate is
ice Point.
Room lamp (rear)*
closed.
However, the lamp goes off immediately
2-
in the following cases:
The lamp stays off regardless of whether
• When the ignition switch is turned
the doors and tailgate are open or closed.
to the “ON” position or the opera-
tion mode is put in ON.
• When the central door lock function
is used to lock the vehicle.
• When the remote control switch of
the keyless entry system or the key-
less operation system is used to lock
the vehicle.
7-72
For pleasant driving
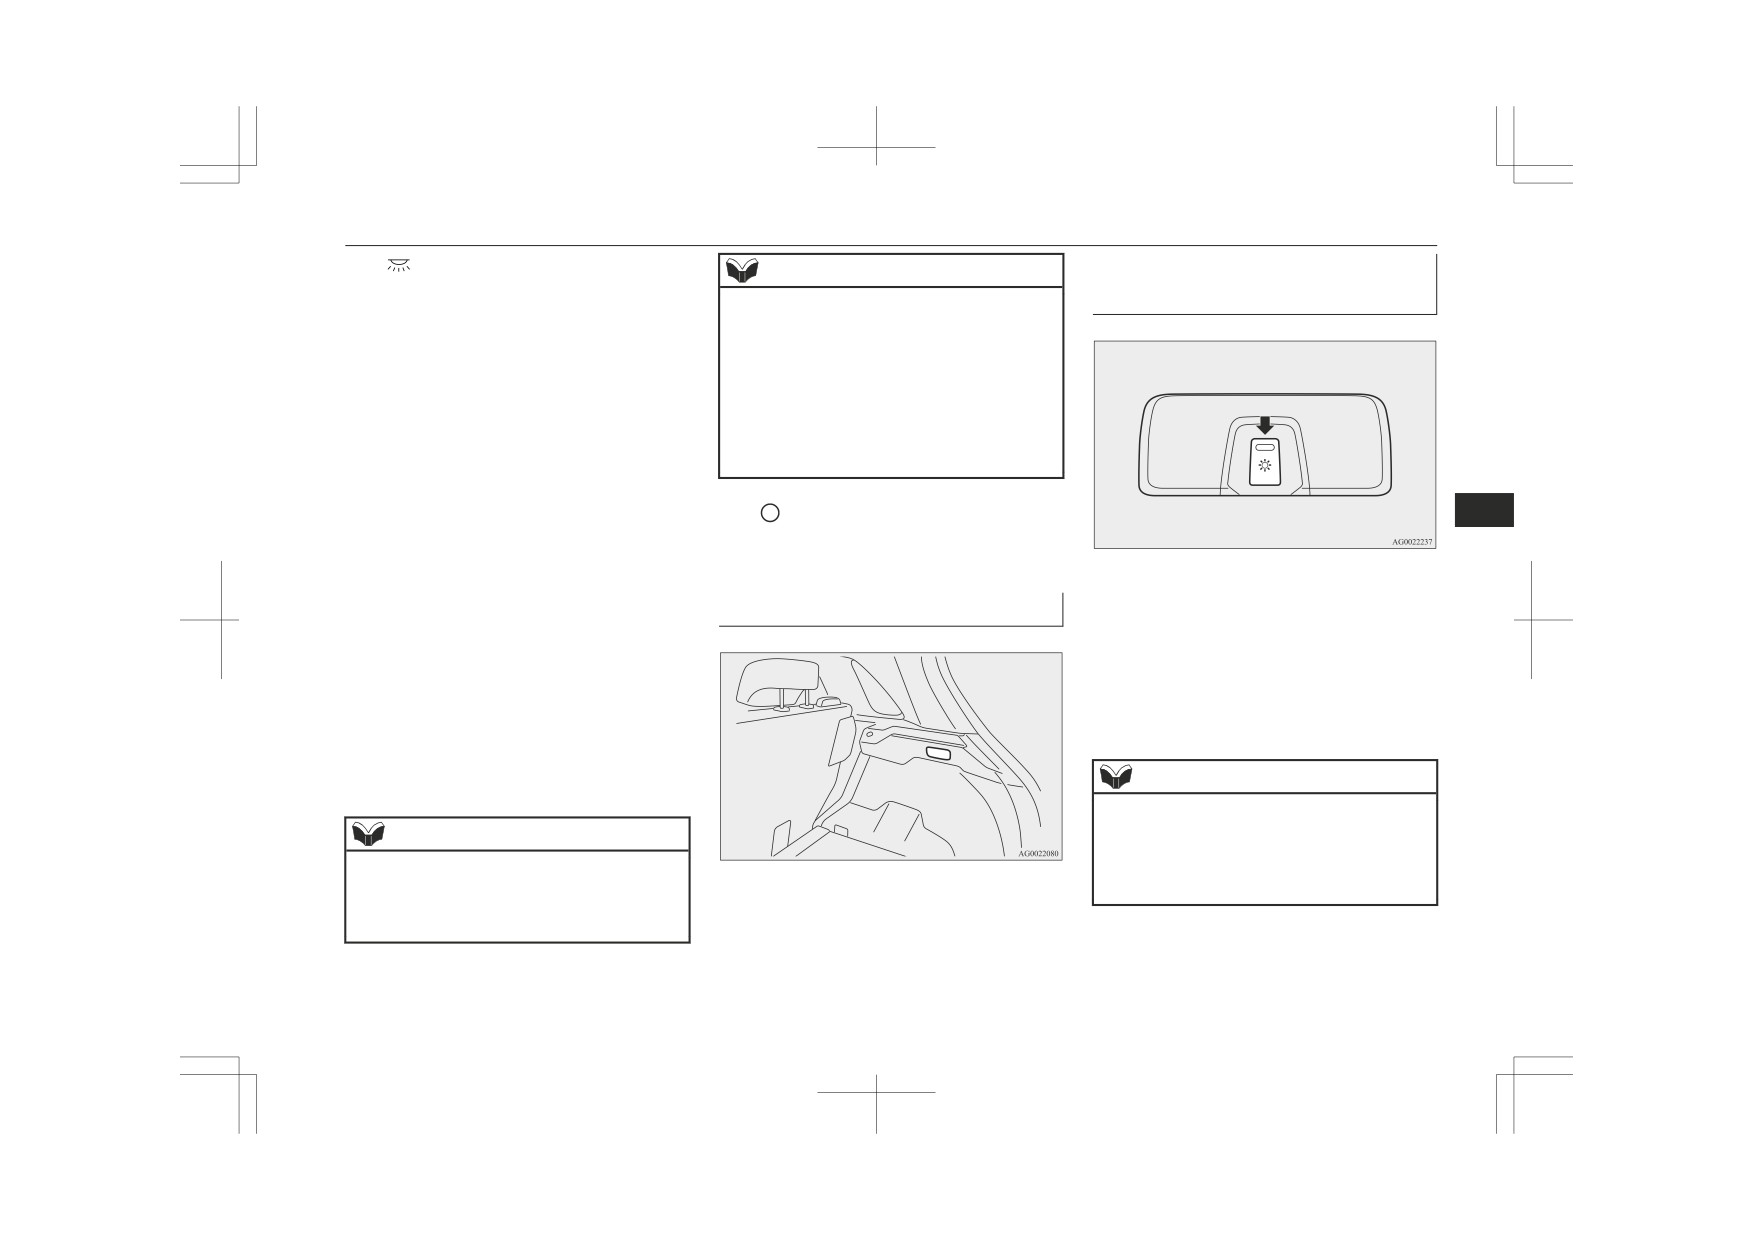
Interior lamps
1- (
)
Sunshade illumination dim-
NOTE
The lamp illuminates regardless of
ming control switch*
whether the doors and tailgate are open
z When the keyless operation function was
used to start the engine, if the operation
or closed.
mode is put in OFF while the doors and tail-
2- (•)
gate are closed, the lamp illuminates and af-
The lamp illuminates when a door or the
ter about 15 seconds it goes off.
tailgate is opened. It goes off about 15
z The time until the lamp goes off can be ad-
seconds after the door or tailgate is
justed. For details, please consult a
closed.
MITSUBISHI MOTORS Authorized Serv-
ice Point.
However, the lamp goes off immediately
in the following cases:
• When the ignition switch is turned
3- (
)
7
to the “ON” position or the opera-
The lamp goes off regardless of whether
tion mode is put in ON.
the doors and tailgate are open or closed.
• When the central door lock function
The brightness of the sunshade illumination
is used to lock the vehicle.
Luggage room lamp
can be adjusted to 3 different levels when the
• When the remote control switch of
ignition switch or the operation mode is in
the keyless entry system or the key-
ON or ACC.
less operation system is used to lock
Each time you press the switch, the bright-
the vehicle.
ness switches in sequence from high → mid-
• If the vehicle is equipped with the
dle → low → off → high.
keyless operation system, when the
keyless operation function is used to
lock the vehicle.
NOTE
z
The brightness can be adjusted even when
the ignition switch is in the “LOCK” posi-
NOTE
tion or the operation mode is in OFF, provi-
z
When the key was used to start the engine, if
ded that the sunshade illumination is turned
the key is removed while the doors and tail-
on.
gate are closed, the lamp is illuminated and
The lamp illuminates when the tailgate is
after about 15 seconds it goes off.
opened, and goes out when the tailgate is
closed.
For pleasant driving
7-73
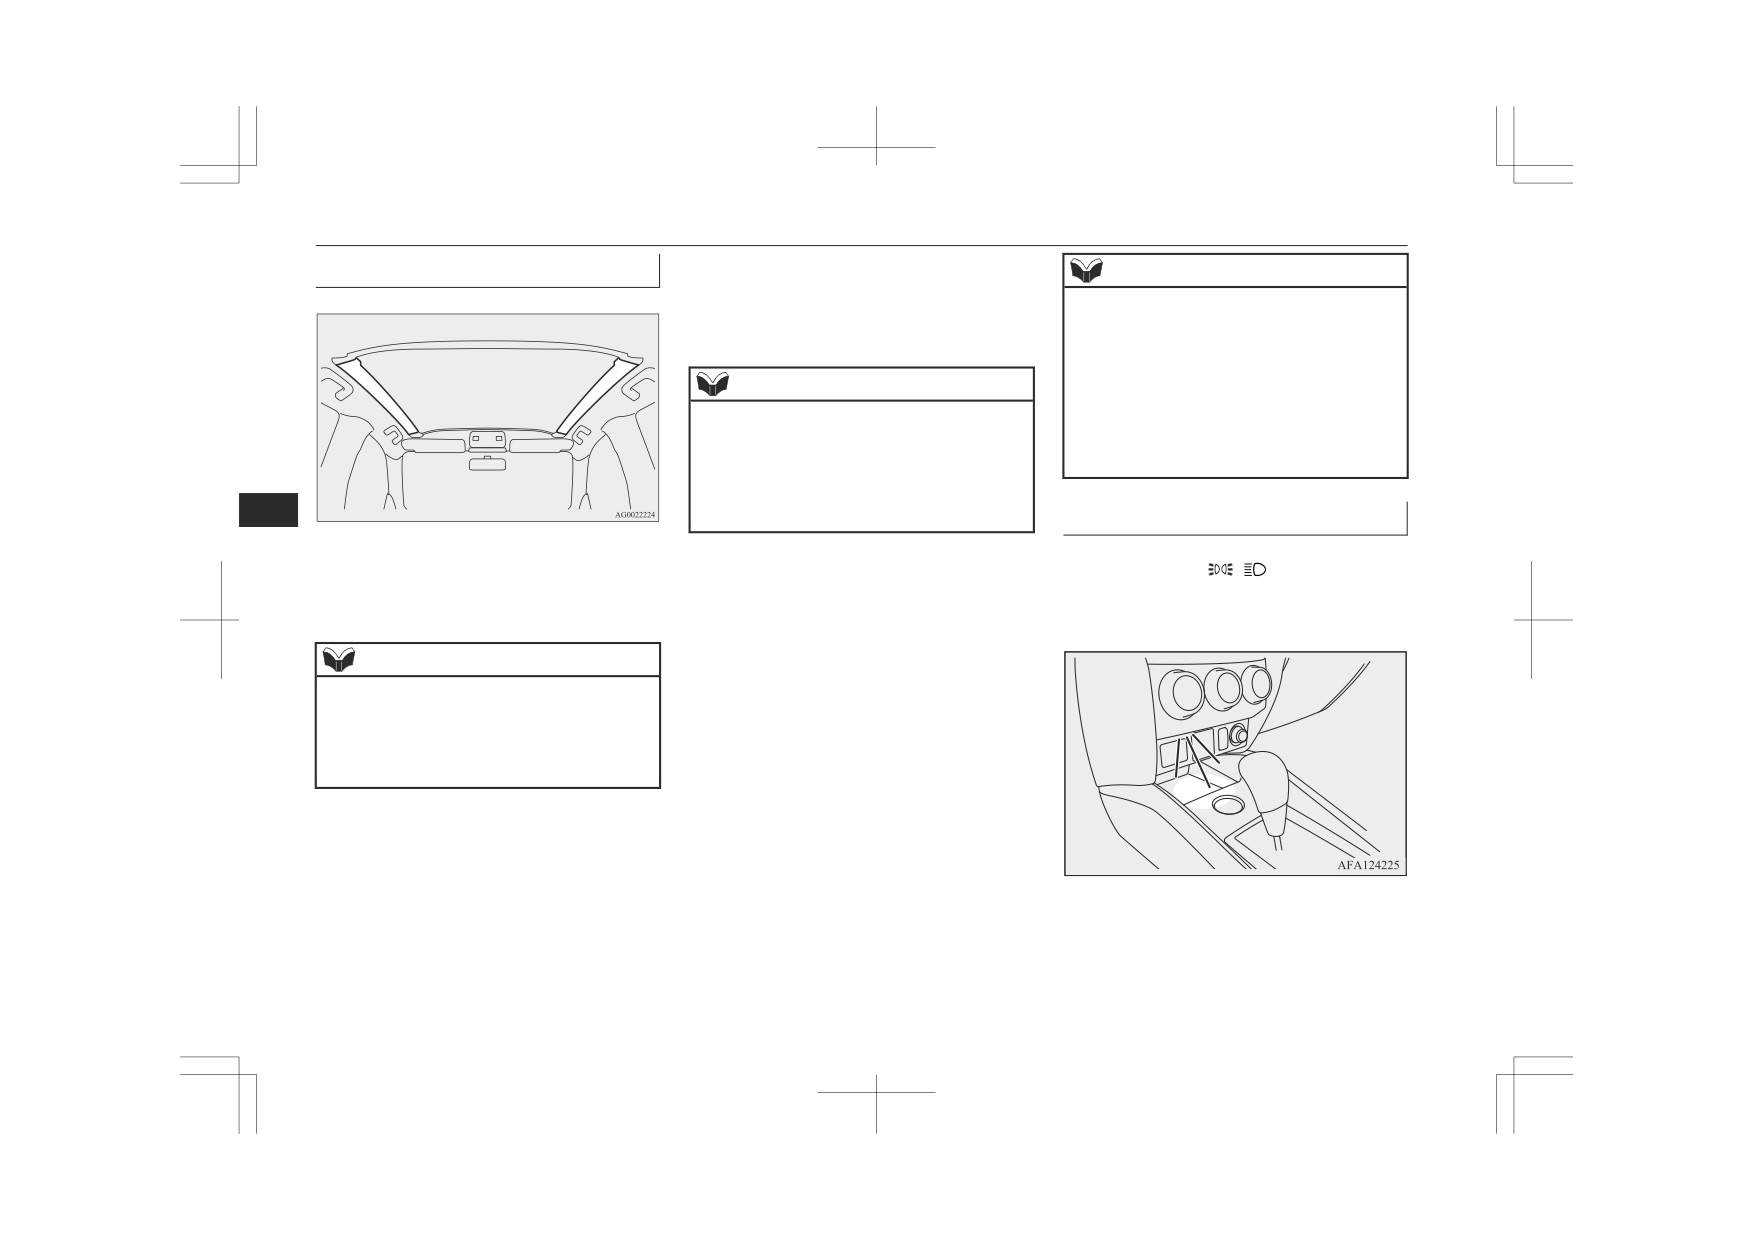
Interior lamps
Sunshade illumination*
z For vehicles equipped with the keyless
NOTE
operation system, the operation mode is
put in OFF while the engine is running
z The sunshade illumination does not turn on
if the sunshade illumination dimming con-
and the doors and the tailgate are closed.
trol switch is off.
z
The time until the sunshade illumination
NOTE
goes off can be adjusted. If it is adjusted, the
time until the room & map lamps go off is
z The time until the sunshade illumination
also adjusted automatically at the same time.
goes off can be adjusted. If it is adjusted, the
For details, consult a MITSUBISHI
time until the room & map lamps go off is
MOTORS Authorized Service Point.
also adjusted automatically at the same time.
For details, consult a MITSUBISHI
7
MOTORS Authorized Service Point.
Centre console down lamp
When the lamps are illuminated with the
The sunshade illumination turns on when the
The sunshade illumination also turns on
lamp switch in the
,
, or “AUTO” posi-
ignition switch or the operation mode is in
when a door or the tailgate is opened, and
tion, the centre console down lamp illumi-
ON or ACC.
goes off 15 seconds after the door or the tail-
nates.
gate is closed, even when the engine switch is
in the
“LOCK” position or the operation
NOTE
mode is in OFF.
z The sunshade illumination does not turn on
However, the sunshade illumination immedi-
if the sunshade illumination dimming con-
ately goes off in the following cases:
trol switch is off.
Refer to
“Sunshade illumination dimming
z When the central door lock function is
control switch” on page 7-73.
used to lock the vehicle.
z When the remote control switch of the
keyless entry system or the keyless oper-
When the sunshade illumination is turned on,
ation system is used to lock the vehicle.
it will go off about 15 seconds after the fol-
z If the vehicle is equipped with the key-
lowing operation is performed.
less operation system, when the keyless
z When the key was used to start the en-
operation function is used to lock the ve-
gine, the key is removed while the doors
hicle.
and tailgate are closed.
7-74
For pleasant driving
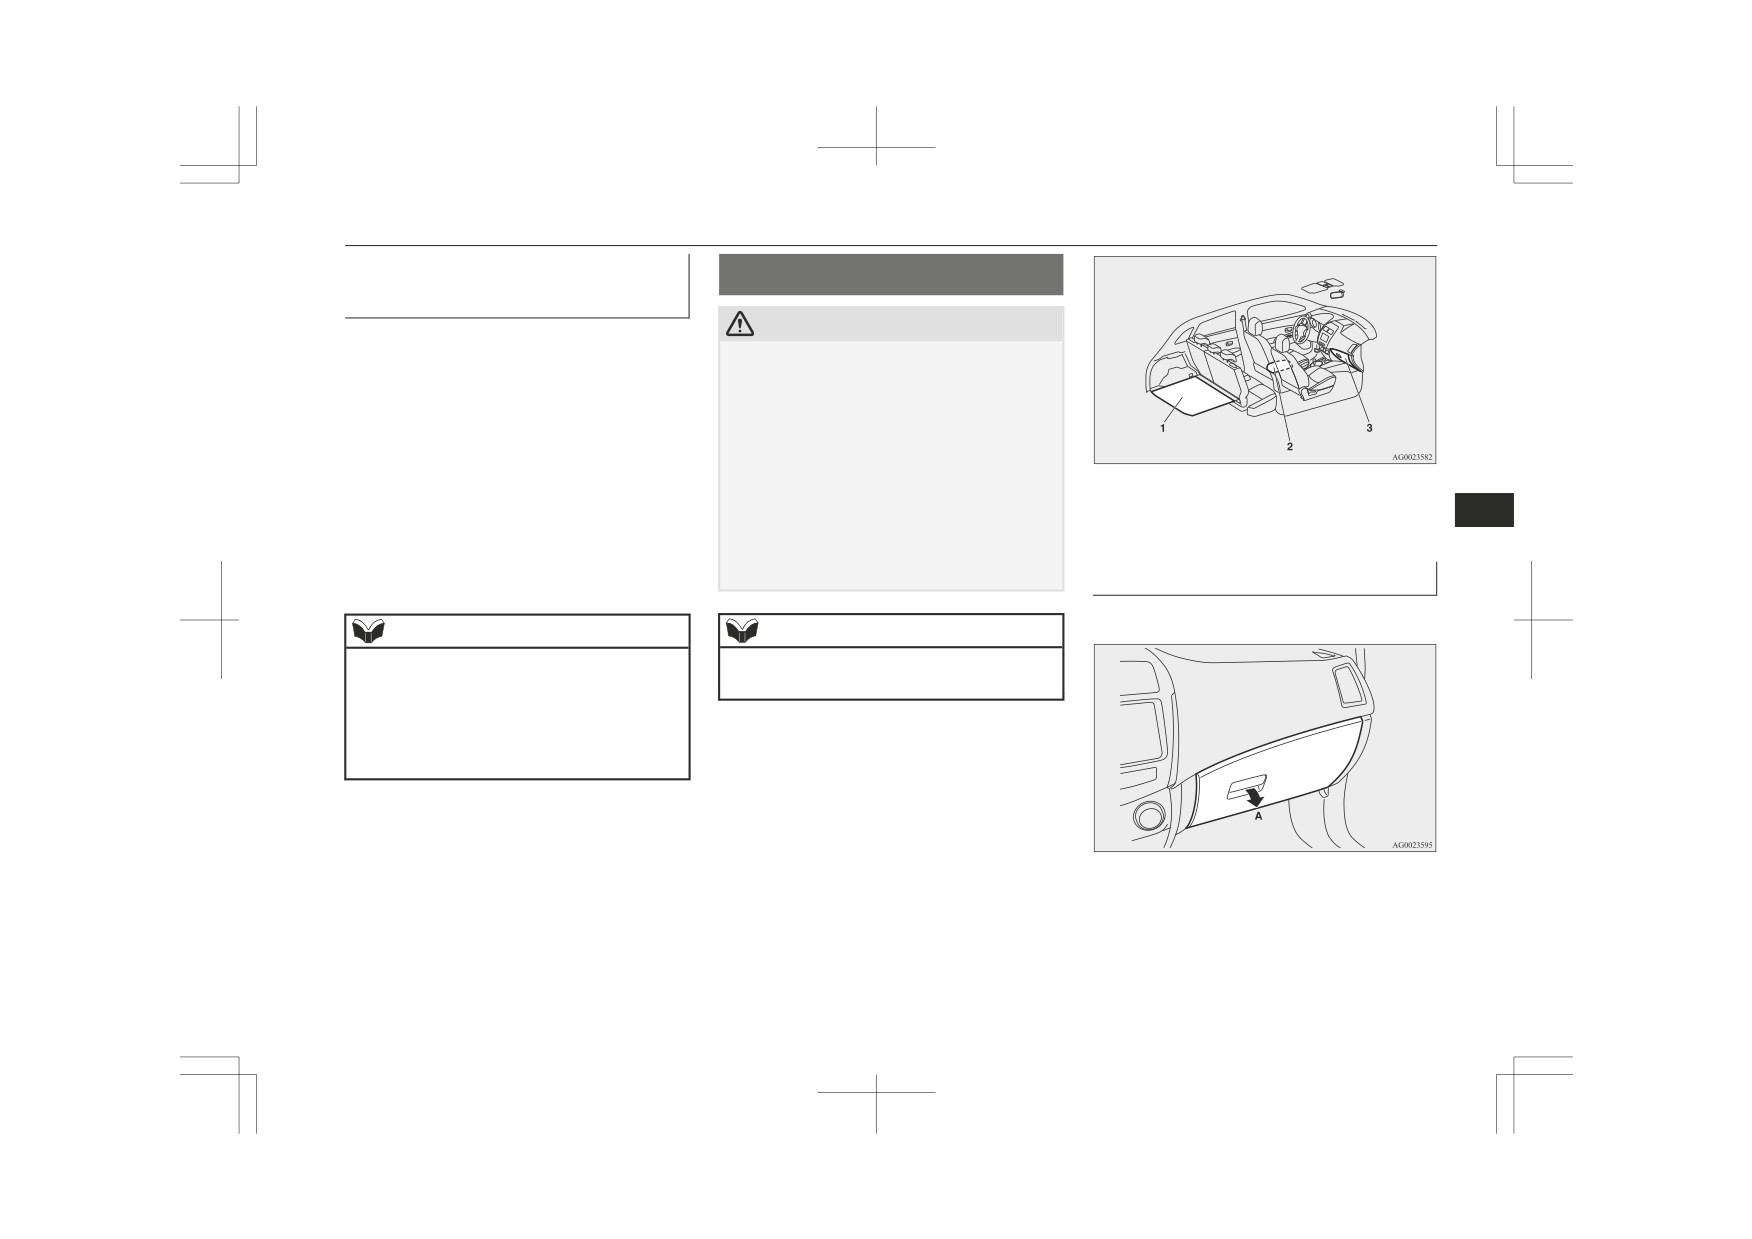
Storage spaces
Interior lamp*1 auto-cutout
Storage spaces
function
CAUTION
*1 Interior lamps, including the room and
map lamps
Never leave lighters, cans of carbonated
z
z If any of the interior lamps are left
drink, and spectacles in the cabin when park-
switched on with the ignition switch is in
ing the vehicle in hot sunshine. The cabin
will become extremely hot, so lighters and
the
“LOCK” position or the operation
other flammable items may catch fire and
mode is in OFF, it goes off automatically
unopened drink cans (including soft drink or
after approximately 30 minutes.
beer cans) may rupture. Also, spectacles
1- Luggage floor boxes
z The lamps will illuminate again after
with plastic lenses or materials could deform
2- Floor console box
they automatically go off if the ignition
or crack.
7
3- Glove box
switch or the engine switch is operated,
z
Keep the lids of storage spaces closed while
or if the keyless entry system or keyless
driving the vehicle. A lid or the contents of a
operation system is operated.
storage space could otherwise cause injuries.
Glove box
To open, pull the lever (A).
NOTE
NOTE
z The interior lamp auto cut-out function can
z
When leaving your vehicle, do not leave val-
be deactivated. The time until the lamps au-
uables in the storage spaces.
tomatically go off can be adjusted. For de-
tails and support, consult your nearest
MITSUBISHI MOTORS Authorized Serv-
ice Point.
For pleasant driving
7-75
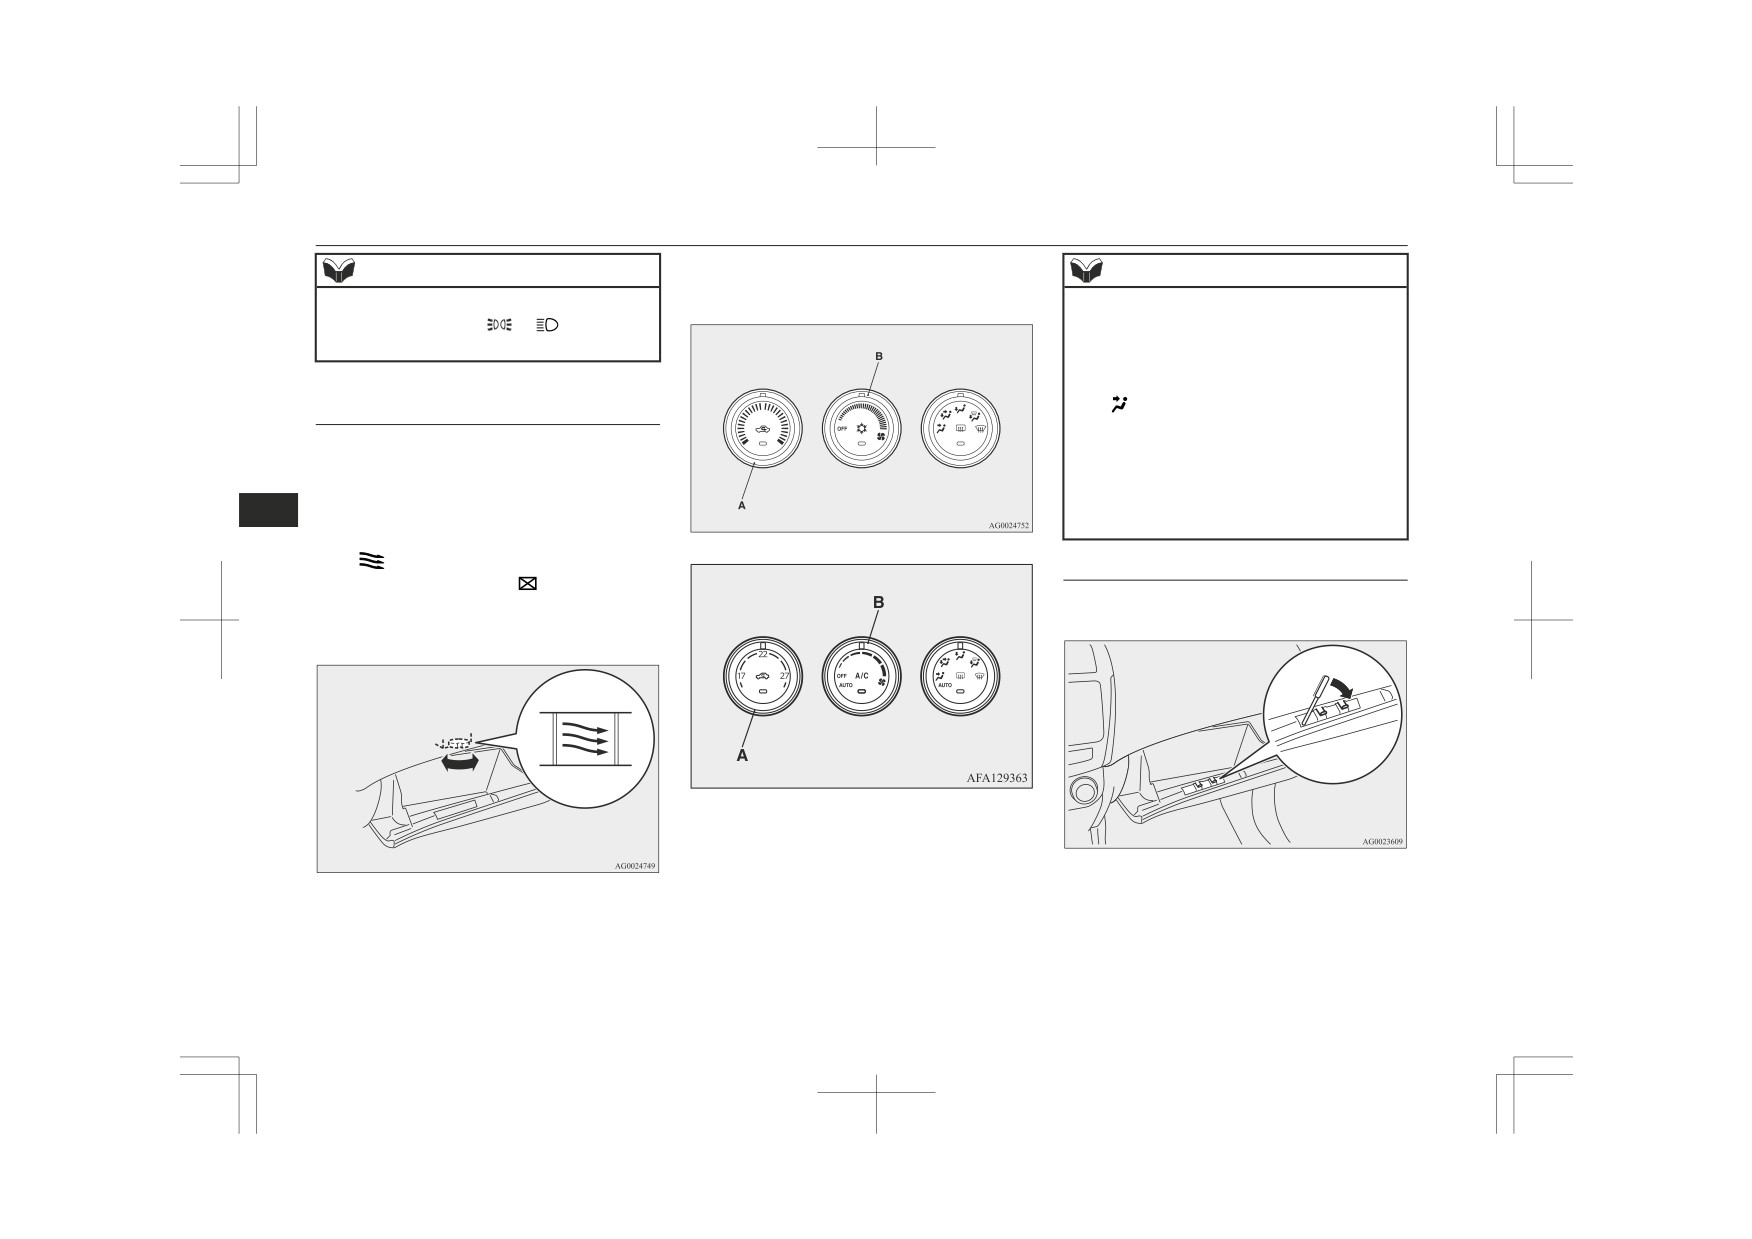
Storage spaces
3. Turn the air conditioning blower speed
NOTE
NOTE
selection dial (B) to the desired air flow.
z When the lamps are illuminated with the
z The glove box has the same temperature as
lamp switch in the “
”, “
”, or “AUTO”
the air that comes out of the air conditioning
Manual air conditioning
position, the glove box lamp illuminates.
ventilators, so it is not possible to greatly
heat or cool the contents.
For efficient warming or cooling, select the
To use the warming and cooling
“
” mode.
function*
Refer to “Mode selection dial” on page 7-03.
The glove box can be used to keep its con-
z When placing drinks in the glove box, read
the precautions on the container first.
tents (e.g. drink bottles) warm or cool with
the warm or cold air from the air condition-
z Do not place in the glove box chocolate,
sweets, or other items which are susceptible
7
ing.
to temperature changes or which may rot.
1. Turn the dial in the glove box to the
“
” position.
Pen holder
Automatic air conditioning
Turn the dial to the “
” position when
not using the warming and cooling func-
There is a pen holder inside the glove box.
tion.
For detailed information on how to use
the air conditioning, refer to “Air condi-
tioning” on page 7-03.
2. Turn the air conditioning temperature
control dial (A) to the desired tempera-
ture.
7-76
For pleasant driving
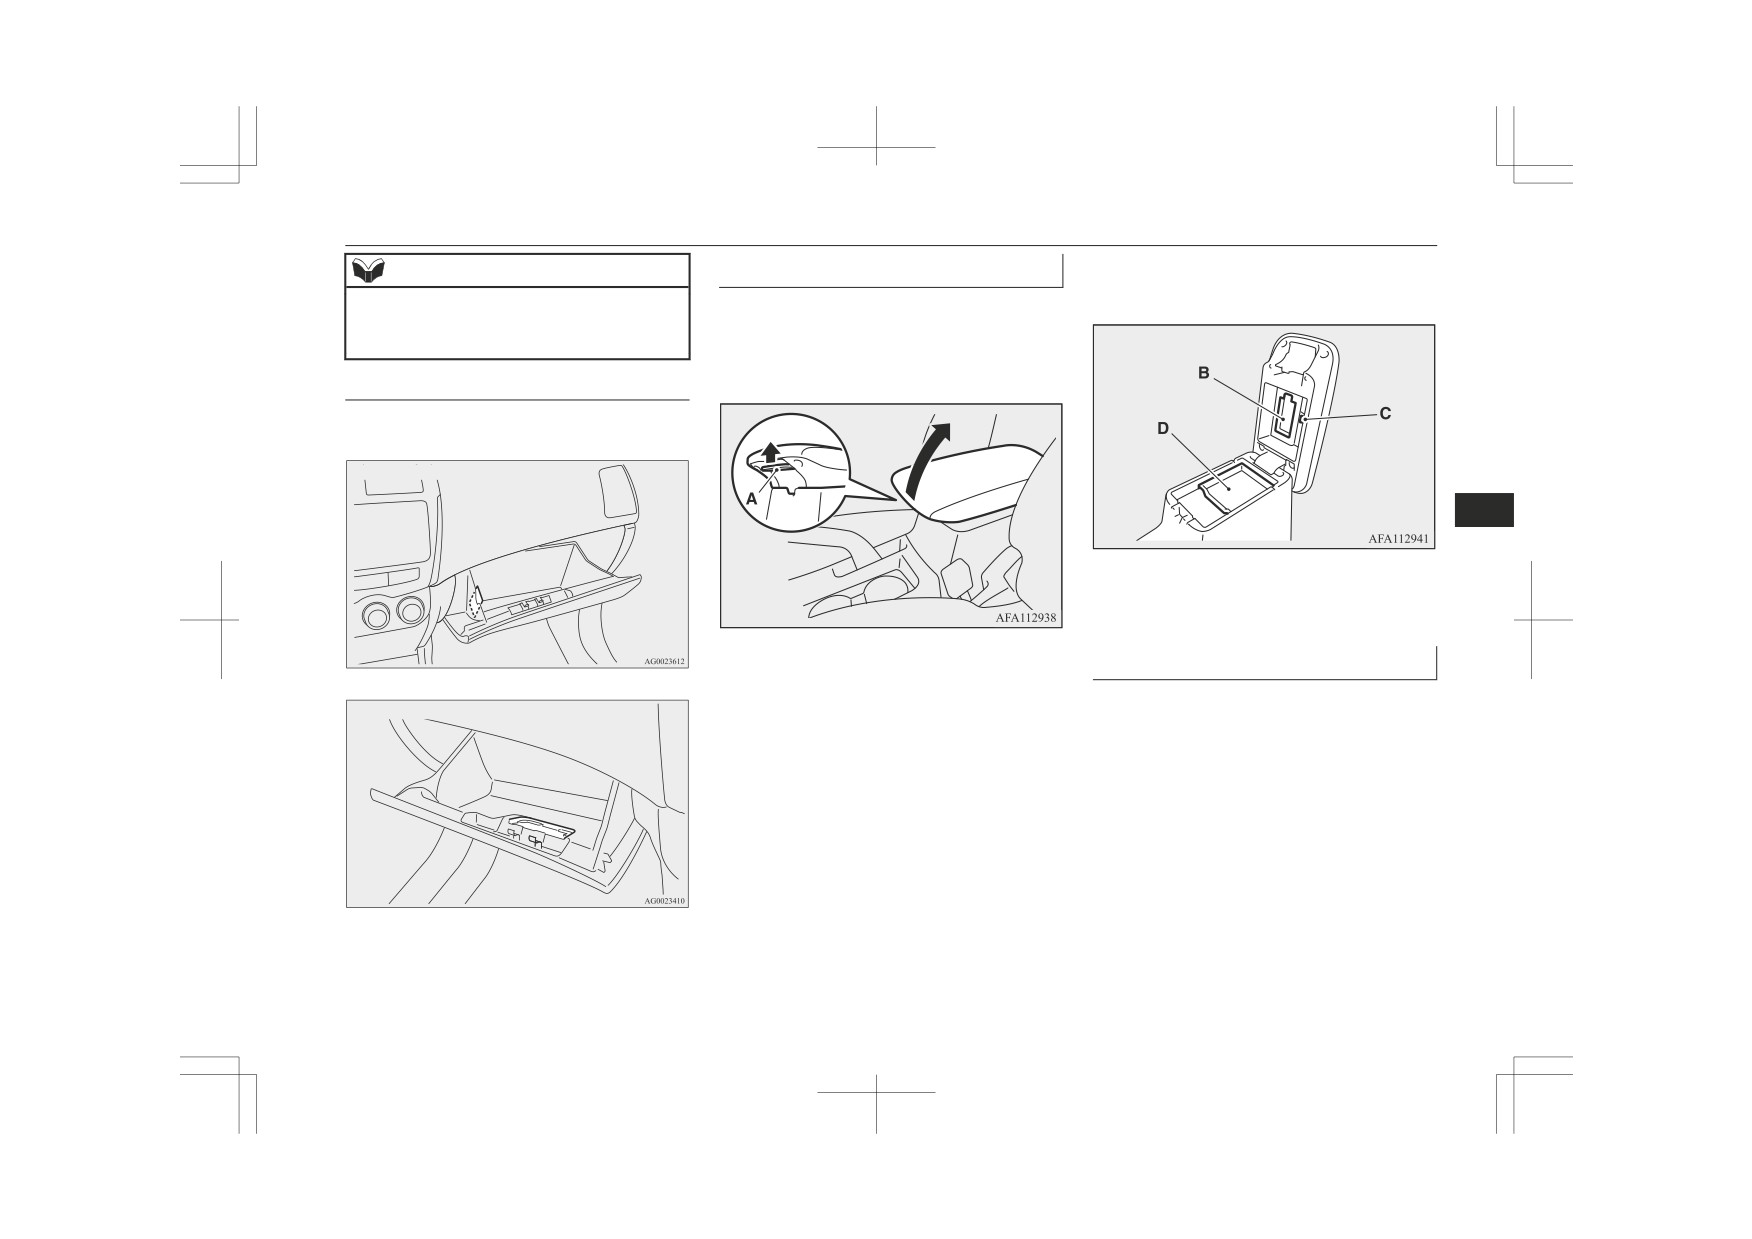
Storage spaces
Floor console box
The tissue holder and pen holder are located
NOTE
on the underside of the floor console box lid.
To open the console box, lift the release lever
z There is a limit to the size of pens that can
be stored in the holder. Forcibly inserting
(A) and raise the lid.
large pens could damage the holder.
The floor console box can also be used as an
armrest.
Card holder
There is a card holder inside the glove box.
LHD
7
B- Tissue holder
C- Pen holder
D- Tray
Luggage floor box*
The box for storing articles is located inside
RHD
the luggage compartment.
For pleasant driving
7-77
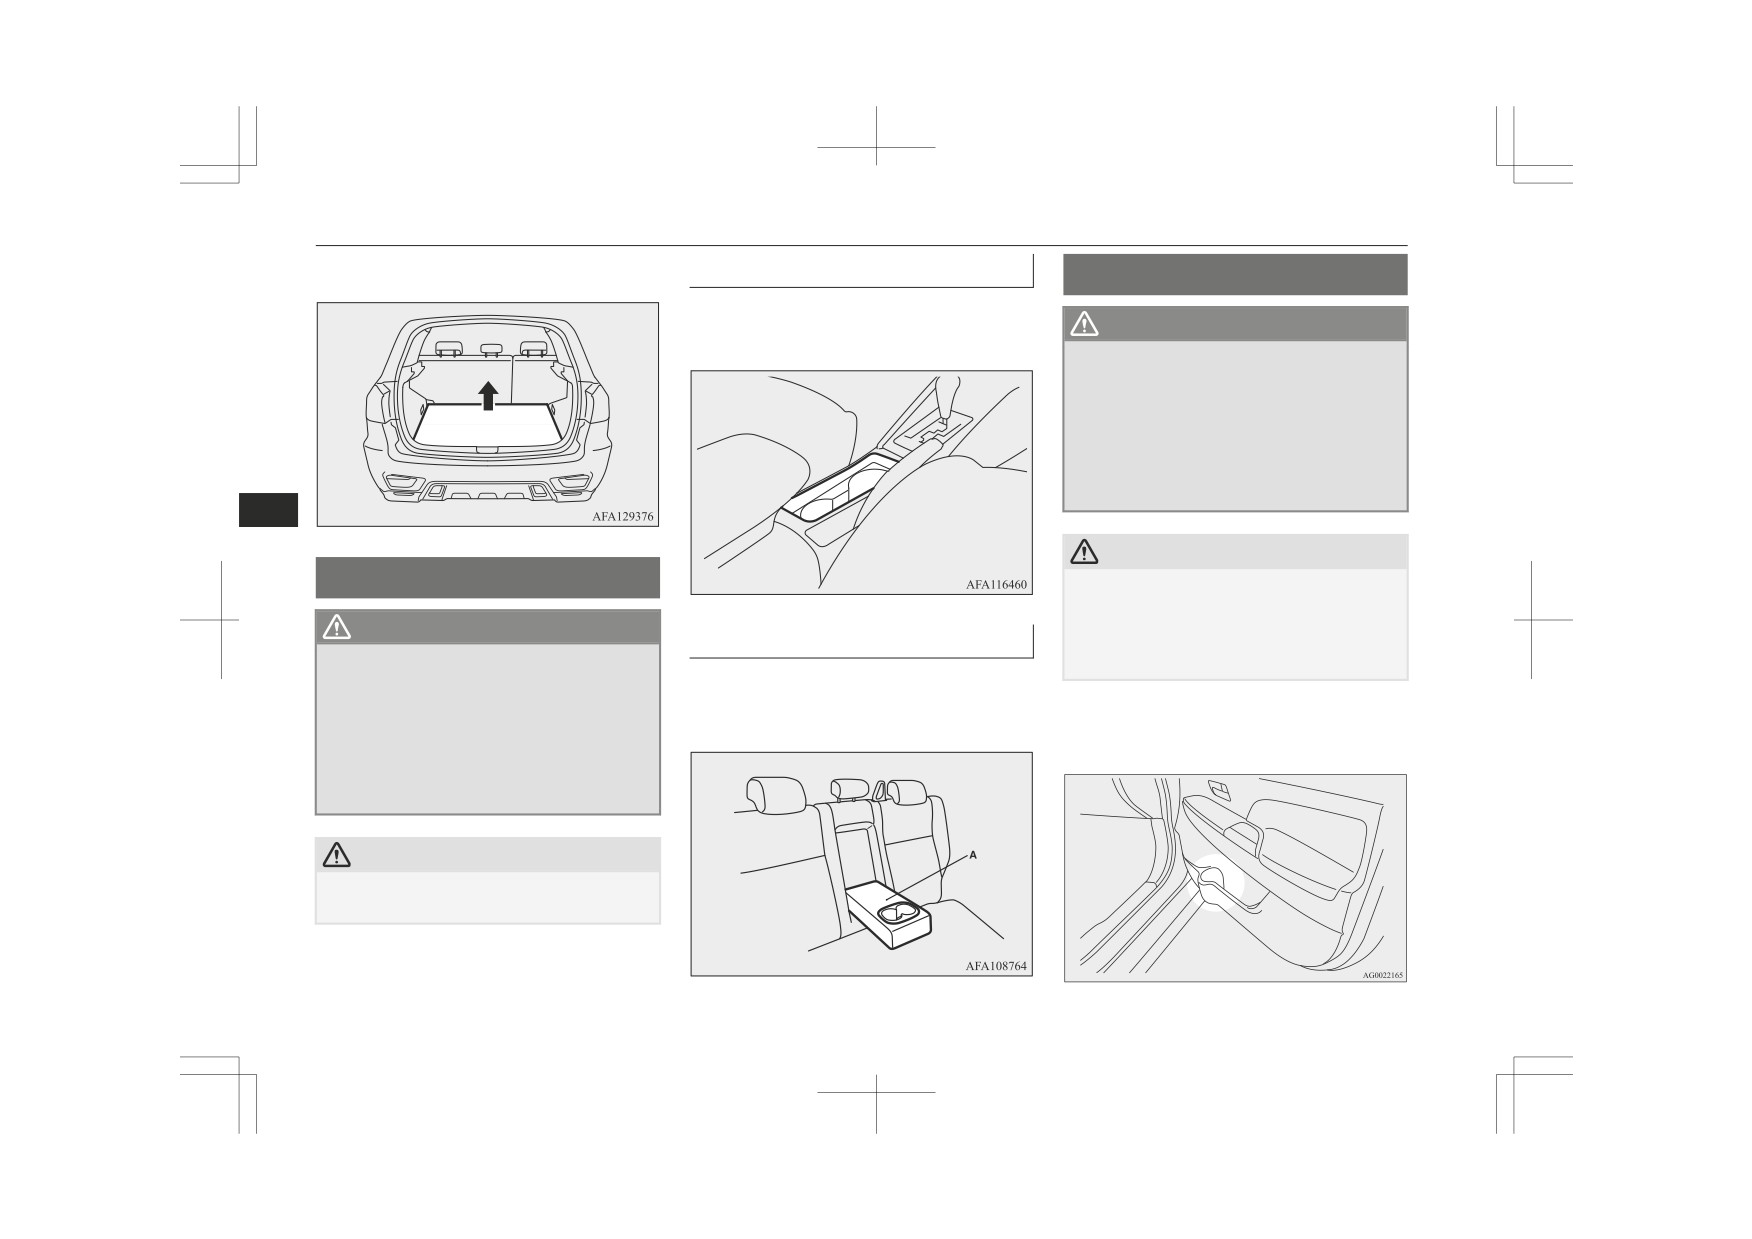
Cup holder
To use the box, raise the luggage floor board.
For the front seat
Bottle holder
The cup holders are located in front of the
WARNING
floor console box.
z Do not spray water or spill beverages in-
side the vehicle. If the switches, wires or
electrical components become wet, they
could malfunction or cause a vehicle fire.
If you accidentally spill a beverage, wipe
up as much liquid as possible and imme-
diately consult a MITSUBISHI MOTORS
Authorized Service Point.
7
CAUTION
Cup holder
z Do not drink beverages while driving. This
is distracting and could cause an accident.
WARNING
z Drinks could be spilled by the vibration and
For the rear seat*
jolts while driving. If the spilt drink is very
z Do not spray water or spill beverages in-
hot, you could be burnt.
In order to use the cup holder, allow the arm-
side the vehicle. If the switches, wires or
rest (A) to drop down.
electrical components become wet, they
could malfunction or cause a vehicle fire.
Refer to “Armrest” on page 4-06.
There are bottle holders located on the front
If you accidentally spill a beverage, wipe
doors.
up as much liquid as possible and imme-
diately consult a MITSUBISHI MOTORS
Authorized Service Point.
CAUTION
z Do not drink beverages while driving. This
is distracting and could cause an accident.
7-78
For pleasant driving