Mitsubishi Outlander GS45X. Manual - part 1645


  Index      Mitsubishi     Mitsubishi Outlander GS45X - service repair manual


Search            


Content   ..  1643  1644  1645  1646   ..


Mitsubishi Outlander GS45X. Manual - part 1645


ON-VEHICLE SERVICE

TSB Revision

CVT

23A-137

ON-VEHICLE SERVICE

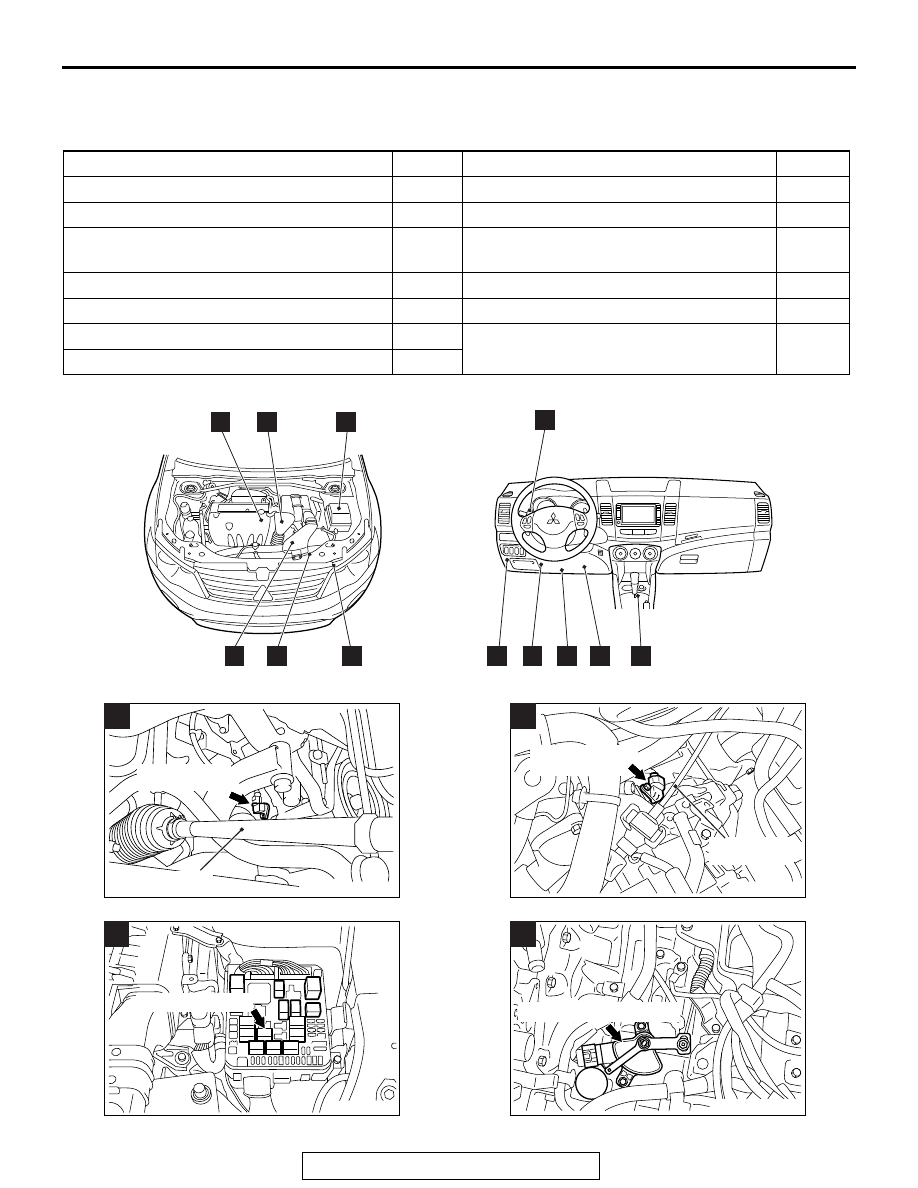
CONTROL SYSTEM COMPONENT PART CONFIGURATION DIAGRAM

M1231208600262

Name

Symbol Name

Symbol

Accelerator pedal position sensor

K

Secondary pulley speed sensor

B

Crankshaft position sensor

A

Shift lock solenoid

L

CVT assembly (Solenoid valve assembly, 
transmission fluid temperature sensor)

F

Shift switch assembly

L

CVT control relay

C

Stoplight switch

J

Data link connector

I

Transaxle control module (TCM)

H

Paddle shift switch

G

Transmission range switch

D

Primary pulley speed sensor

E

AC709705

G

H

J

I

K

L

A

B

C

D

E

F

AB

AC709718

AB

Tie rod

Crankshaft 
position sensor

A

AC709719

AB

Secondary pulley
speed sensor

Transaxle 
control cable

B

AC709650

AC

C

CVT control relay

AC709724

D

Transmission range switch

AB

ON-VEHICLE SERVICE

TSB Revision

CVT

23A-138

AC709720

AB

Primary pulley
speed sensor

Transaxle 
oil pan

E

AC709721

CVT assembly
(incorporating CVT
 control solenoid valve)

Front drive
shaft (LH)

CVT assembly
connector

AB

F

AC607737

G

AE

Paddle shift switch

AC709722

AB

Transaxle 
control module
(TCM)

H

ETACS-ECU

AC703008

Data link connector

Brake pedal

I

AC

AC703010 AC

J

Stoplight switch

Brake pedal

AC709723

AB

Accelerator pedal 
position sensor

K

ON-VEHICLE SERVICE

TSB Revision

CVT

23A-139

ESSENTIAL SERVICE

TRANSMISSION FLUID CHECK

M1231211700140

CAUTION

Replace the transmission fluid whenever the transaxle is 
replaced with a new one or the vehicle is driven in harsh 
conditions.
1. Drive the vehicle until the transmission fluid is warmed up to 

the normal operating temperature 70 

− 80°C (158 − 176°F).

NOTE: Use scan tool MB991958 to measure the transmis-
sion fluid temperature.
NOTE: When a certain amount of time is required to warm 
up the transmission fluid to the normal operating tempera-
ture 70 

 80

°

C (158 

 176

°

F), check the oil level referring to 

the characteristics chart.

2. Park the vehicle on a level surface.
3. Move the selector lever to every position to fill the torque 

converter and the hydraulic circuit with the transmission 
fluid, and then move the selector lever to P or N range.

4. Wipe clean the area around the oil level gauge, and then 

remove the oil level gauge to check the condition of the 
transmission fluid.
NOTE: If the transmission fluid smells burnt or is excessively 
deteriorated or dirty, the transmission fluid is contaminated 
with particles of the metal bushings and friction material. In 
these cases, the transaxle must be overhauled.

AC703011

L

Shift switch assembly

Shift lock solenoid

AC

AC508088

HOT

AB

40 (104)

60 (140)

80 (176)

-30 (-1.2)

-20 (-0.8)

-10 (-0.4)

0 (0)

10 (0.4)

Fluid temperature ˚C (˚F)

Dipstick

Fluid level mm (in)

ON-VEHICLE SERVICE

TSB Revision

CVT

23A-140

5. Check that the transmission fluid level is within the "H" area 

on the oil level gauge. If the fluid level is low, add the 
transmission fluid to the "H" level.

Transmission fluid: DIA QUEEN CVTF-J1

NOTE: When the transmission fluid level is low, the oil pump 
sucks air together with the transmission fluid, and produces 
air bubbles in the hydraulic circuit. The air bubbles in the 
hydraulic circuit decreases the hydraulic pressure, causing 
the delayed gearshift or slippage of the belt, clutch, and 
brake. When the transmission fluid level is too high, the fluid 
is stirred by the gear and foams up, and the problems similar 
to those when the transmission fluid level is low will occur. In 
either case, air bubbles cause the overheat and oxidation of 
the transmission fluid, which prevents normal operation of 
the valve, clutch, and brake. Beside, when the transmission 
fluid is foamy, it flows out of the transaxle vent hole. This 
may be taken as the fluid leakage by mistake.

6. Insert the oil level gauge securely.

TRANSMISSION FLUID REPLACEMENT

M1231211800589

1. Remove the drain plug on the bottom of the transaxle case 

to drain the transmission fluid.

Draining amount: Approximately 5.5 dm

3

 (5.81 qt)

2. Install the drain plug with a new gasket to the transaxle 

case, and tighten it to the specified torque.

Tightening torque: 34 

± 2 Nm (25 ± 1 ft-lb)

CAUTION

If the transaxle case becomes full before filling 5.5 dm

3


(5.81 qt) of transmission fluid, stop filling the transmission 
fluid. 
3. Fill in the new transmission fluid through the oil filler tube.

Filling amount: Approximately 5.5 dm

3

 (5.81 qt)

Transmission fluid: DIA QUEEN CVTF-J1

4. Start up the engine and let it idle for 1 to 2 minutes.
5. Move the selector lever to every position, and then move it 

to the P or N range.

6. Stop the engine and perform the above steps 1 to 5 again.
7. Stop the engine, and discharge a small amount of 

transmission fluid to check for fouling. If fouling is found, 
repeat steps 1 to 5 until clean transmission fluid comes out.

AC805082

AC506482

AB


Content   ..  1643  1644  1645  1646   ..