Mitsubishi Outlander (2013+). Manual - part 499
 

  Index      Mitsubishi     Mitsubishi Outlander - service repair manual 2013 year


Search            


Content   ..  497  498  499  500   ..


Mitsubishi Outlander (2013+). Manual - part 499


ACB06029

AB

8.4

6.8 ± 0.5

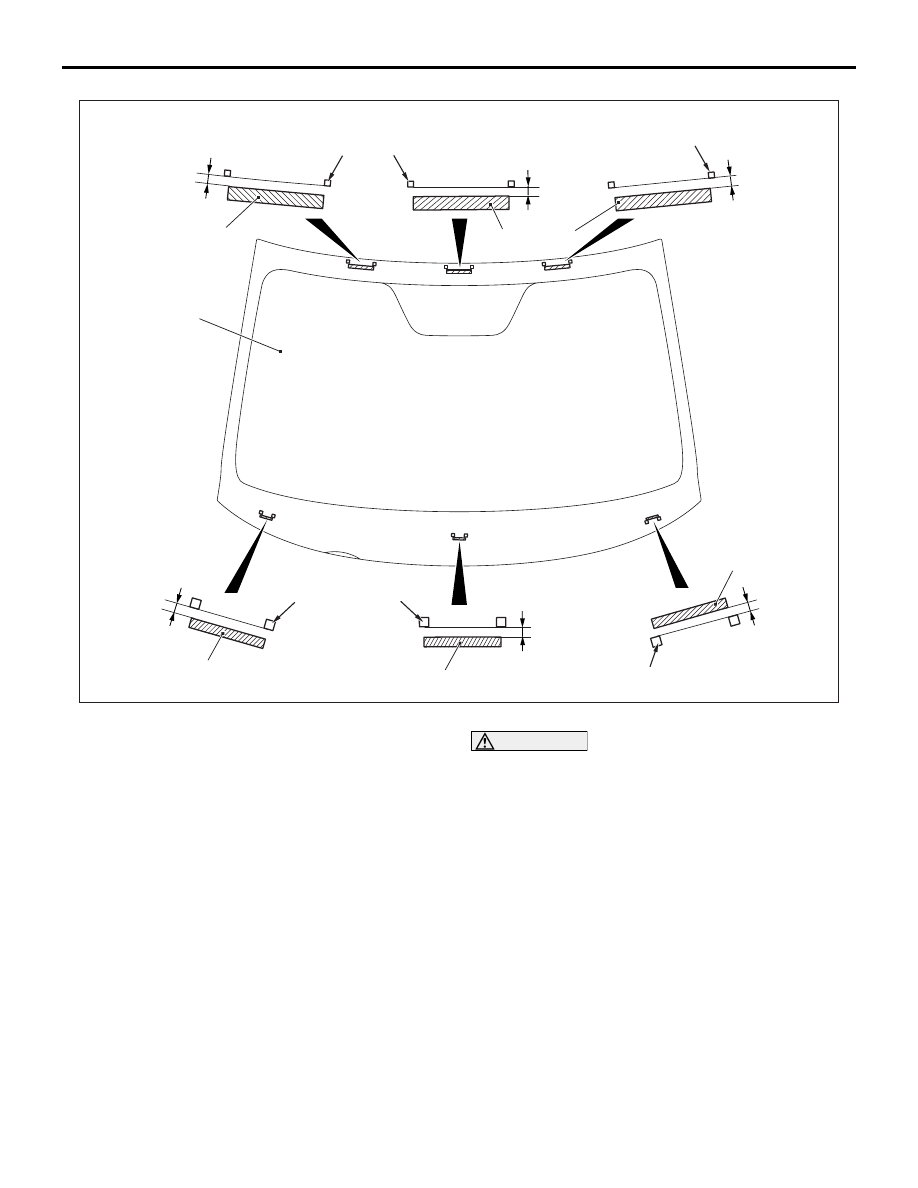
Windshield spacer

Windshield glass

Marking for glass stopper

Windshield spacer and glass stopper installation positions

Glass stopper

Unit: mm

Marking for windshield spacer

5.0

Windshield spacer

Marking for windshield spacer

7.0 ± 0.5

7.0 ± 0.5

Marking for glass stopper

Glass stopper

6.5

Windshield spacer

WINDOW GLASS

BODY

42A-16

2. Position the windshield spacer, ensuring that 

there are no bends or looseness inside the 
windshield glass.

3. Secure the glass stoppers to the specified 

positions on the windshield glass.

>>B<<WINDSHIELD GLASS 
INSTALLATION

1. Install the windshield moulding to the windshield 

glass.

2. To replace the windshield glass, temporarily set 

the windshield glass against the body, and place 
mating marks on the body and windshield glass.

CAUTION

• The primer strengthens the adhesive, so be 

sure to apply it. However, too thick applica-
tion will weaken the adhesive.

• Do not touch the coated surface.
• Do not apply the primer on the remaining 

adhesive. The adhesive strength may be 
weakened.

3. Soak a sponge in the primer, and apply evenly to 

the windshield glass and the body in the specified 
places.

4. After applying the primer, let it dry for 3 minutes or 

more.

ACX00480

10 mm

15 mm

AC

WINDOW GLASS

BODY

42A-17

5. Fill a sealant gun with adhesive. Then apply the 

adhesive evenly around the windshield glass 
within 30 minutes after the primer application.

NOTE: Cut the tip of the sealant gun nozzle into a 
V-shape to simplify adhesive application.

6. After applying the adhesive, align the mating 

marks on the windshield glass and the body, and 
then press the windshield glass gently to seat it.

7. Use spatula or the like to remove any excessive 

adhesive. Then clean the surface with parts 
cleaner (MZ100387 or equivalent). Leave the 
vehicle stationary until the adhesive sets (Refer to 
Window Glass Installation 

P.42A-11

).

CAUTION

• Move the vehicle carefully.
• When testing for water leakage, do not pinch 

the end of the hose to spray the water.

8. Wait 30 minutes or more, and then test for water 

leakage.

INSPECTION EMBLEM REMOVAL AND 
INSTALLATION

1. Use your hands or a plastic spatula to remove the 

inspection emblem.

2. Remove the remaining adhesive using diluted 

mild detergent for home use or inorganic solution 
(alcohol).

3. Attach the new inspection emblem to the specified 

position.

QUARTER WINDOW GLASS

REMOVAL AND INSTALLATION

M1422002501024

Pre-removal and post-installation operation
• Quarter trim upper removal and installation (Refer to 

GROUP 52A 

− Interior Trim .)

ACB05658

N

1

2

3

N

AB

2

N

2

N

4

1

ACC00226

ACB05659

ACB05664

ACB05672

ACB05674

ACB05675

ACB05673

AB

4

15

12

15

12

15

12

4

12

15

B

B

A

A

D

D

Apply the primer and adhesive along the fictitious lines
(seal line) between each of the marks

Section A – A

Section B – B

Section C – C

Unit: mm

Section D – D

Ceramic line

Seal line centre

Primer

Primer

Primer

Adhesive: 3M ATD Part No. 8609 Super Fast Urethane Auto Glass Sealant or equivalent and 
3M ATD Part No. 8608 Super Fast Urethane Primer or equivalent

Primer

Seal line

Mark

Seal line centre

4

Seal line centre

4

C

C

5

5

5

Seal line

Seal line

Mark

Overlap:
min. 30

Removal steps 

<<

A

>>

>>

B

<<

1.

Quarter window glass assembly

>>

A

<<

2.

Clip

>>

A

<<

3.

Fastener

4.

Quarter window glass

WINDOW GLASS

BODY

42A-18

REMOVAL SERVICE POINTS

<<A>> QUARTER WINDOW GLASS 
ASSEMBLY REMOVAL

1. In order to protect the body (paint surface), apply 

the protective tapes to body area around the 
installed quarter window glass assembly.

ACB05803AB

Protective tapes

2. Stick the protective tapes to avoid the quarter 

window glass assembly from dropping.

AC002060

3. Using glass adhesive knife

AC206381AB

Glass adhesive knife

WINDOW GLASS

BODY

42A-19

4. Working inside the vehicle, insert the tip of a 

windshield knife into the sealed part of the quarter 
window glass assembly.

CAUTION

If you lever the windshield knife, the quarter win-
dow glass assembly may be damaged.

5. Holding the tip of the glass adhesive knife and the 

body flange at right angles, align the blade of the 
windshield knife with the body flange, and pull the 
blade parallel to the body flange to separate the 
adhesive.

ACB05678AB

Clip

Seal line

Piano wire

6. Use a piano wire to separate the clips.

ACB05804AB

MB990480

Mating marks

7. Make mating marks on the quarter window glass 

assembly and body, and use special tool window 
glass holder (MB990480) to remove the quarter 
window glass assembly.

CAUTION

ACX00476

Be careful not to cut away more adhesive than is 

necessary.

• Be careful also not to damage the paintwork 

on the body surface with the knife. If the 
paintwork is damaged, repair the damaged 
area with touch-up paint or anti-rust agent.

8. Use a knife to cut away the remaining adhesive so 

that the thickness is within 2 mm around the entire 
circumference of the body flange.

9. Finish the flange surfaces so that they are 

smooth.

10.If the quarter window glass assembly is reused, 

scrape away all traces of old adhesive from the 
quarter window glass assembly.

INSTALLATION SERVICE POINTS

>>A<< FASTENER/CLIP INSTALLATION

1. If the quarter window glass assembly is reused, 

follow the procedures below:
(1) Engage the clip with the body.

AC103606 AB

Cut off these convex parts

(2) Cut off the convex portion of the quarter 

window glass assembly clip installation 
position.

NOTE: If the quarter window glass assembly is 
installed without cutting off the convex portion 
of the quarter window glass assembly clip 
installation position, improper installation may 
result.


Content   ..  497  498  499  500   ..