Mitsubishi Montero (2004+). Manual - part 992
 

  Index      Mitsubishi     Mitsubishi Montero - service repair manual 2004 year


Search            


Content   ..  990  991  992  993   ..


Mitsubishi Montero (2004+). Manual - part 992


ON-VEHICLE SERVICE

TSB Revision

AUTOMATIC TRANSMISSION

23A-543

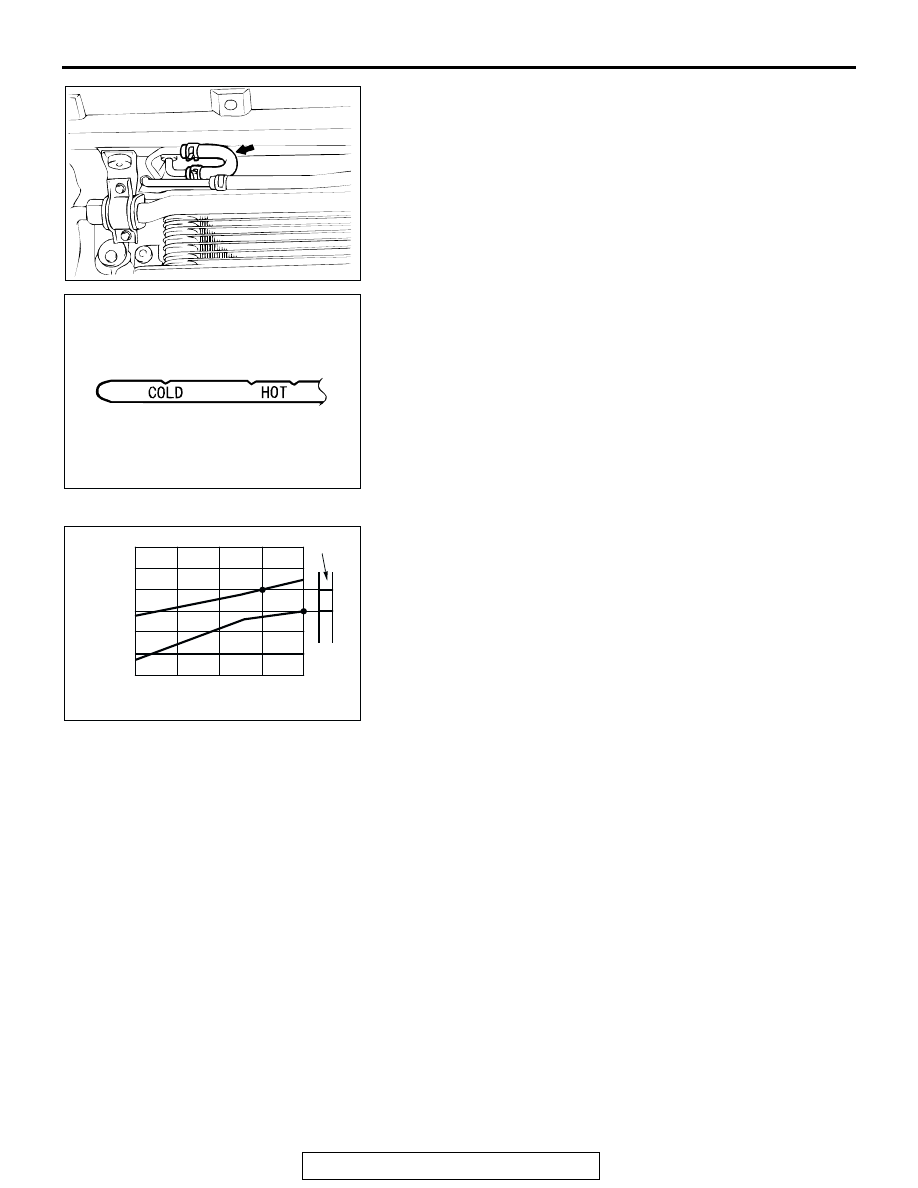
8. Reconnect the hose which was disconnected in step 1 

above, and firmly replace the dipstick.

9. Start the engine and run it at idle for one to two minutes.
10.Move the selector lever through all positions, and then move 

it to the "N" position.

11.Check that the transmission fluid level is at the "COLD" 

mark on the dipstick. If the level is less than this, add 
transmission fluid.

12.Drive the vehicle until the transmission fluid temperature 

rises to the normal operating temperature [70 

− 80°C (158 − 

176

°F)], and then check the transmission fluid level again. 

The transmission fluid level must be at the "HOT" mark.
NOTE: The transmission fluid temperature is measured with 
scan tool MB991958.
NOTE: The "COLD" level is for reference only; the "HOT" 
level should be regarded as the standard level.
NOTE: If it takes some amount of time until the transmission 
fluid reaches its normal operating temperature [70 

 80 

°

(158 

 176

°

F)], check the transmission fluid level by refer-

ring to the left diagram.

13.When the transmission fluid is less than the specified level, 

add transmission fluid.
When the transmission fluid is greater than the specified 
level, drain the excess fluid through the drain plug to adjust 
the transmission fluid to the specified level.

14.Firmly insert the dipstick into the oil filler tube.

ACX01184

AB

AC000846AC

AC100600

HO

T

AB

FLUID LEVEL [mm (in)]

10 (0.4)

0 (0)

–10 (–0.4)

–20 (–0.8)

20 (0.8)

–30 (–1.2)

–40 (–1.6)

40
(104)

60
(140)

80
(176)

FLUID TEMPERATURE [˚C (˚F)]

DIPSTICK

ON-VEHICLE SERVICE

TSB Revision

AUTOMATIC TRANSMISSION

23A-544

FLUSHING COOLERS AND TUBES

M1231104800160

Required Special Tool:

• MB995062: Flushing Tool

WARNING

Wear protective eyewear that meets the require-
ments of and ANSI Z87.1 

 1968 and OSHA. Wear 

standard industrial rubber gloves.

Keep lighted cigarettes, sparks, flames, and other 
ignition sources away from the area to prevent the 
ignition of combustible liquids and gases. Keep a 
class B fire extinguisher in the area where the 
flushing tool will be used. Keep the area well venti-
lated. Do not let flushing solvent come in contact 
with eyes or skin. If it does, flush with water for 15 
to 20 seconds. Remove contaminated clothing and 
wash affected skin with soap and water. Seek med-
ical attention.

When a transmission failure has contaminated the transmission 
fluid, the oil cooler(s) must be flushed. The cooler by-pass 
valve in the transmission must also be replaced. The torque 
converter must also be replaced with an exchange unit. This 
will ensure that metal particles or sludged transmission fluid are 
not later transferred back into the reconditioned (or replaced) 
transmission. There are two different procedures for flushing 
coolers and lines. The recommended procedure is to use spe-
cial tool MB995062 Flushing Tool. The other procedure is to 
use a hand suction gun and mineral spirits.
1. Remove the cover plate filler plug on special tool 

MB995062. Fill the reservoir 1/2 to 3/4 full with fresh flushing 
solution. Flushing solvents are petroleum based solutions 
generally used to clean transmission components. Do not 
use solvents containing acids, water, gasoline, or any other 
corrosive liquids.

2. Reinstall the filler plug on special tool MB995062.
3. Verify that the pump power switch is turned "OFF." Connect 

the red alligator clip to the positive battery terminal. Connect 
the black alligator clip to a good ground.

4. Disconnect the cooler lines at the transmission.

NOTE: When flushing the transmission cooler and lines, 
always reverse flush.

5. Connect the BLUE pressure line to the OUTLET (from 

cooler) cooler line.

6. Connect the CLEAR return line to the INLET (to cooler) 

cooler line.

7. Turn the pump "ON" for two to three minutes to flush the 

cooler(s) and lines. Monitor the pressure readings. Clear the 
return lines. Pressure readings should stabilize below 138 
kPa (20 psi) for vehicles equipped with a single cooler and 
208 kPa (30 psi) for vehicles equipped with dual coolers. If 
flow is intermittent or exceeds these pressures, replace the 
cooler(s).

ACX02073AB

FROM COOLER

TO COOLER

ON-VEHICLE SERVICE

TSB Revision

AUTOMATIC TRANSMISSION

23A-545

8. Turn the pump "OFF."
9. Disconnect the CLEAR suction line from the reservoir at the 

cover plate. Disconnect the CLEAR return line at the cover 
plate, and place it in a drain pan.

10.Turn the pump "ON" for 30 seconds to purge flushing 

solution from the cooler(s) and lines. Turn the pump "OFF."

11.Place the CLEAR suction line into a one quart container of 

DIAMOND ATF SP III transmission fluid.

12.Turn the pump "ON" until all transmission fluid is removed 

from the one quart container and lines. This purges any 
residual cleaning solvent from the transmission cooler(s) 
and lines. Turn the pump "OFF."

13.Disconnect the alligator clips from the battery. Reconnect 

the flusher lines to the cover plate, and remove the flushing 
adapters from the cooler lines. Reconnect the cooler lines.

OIL COOLER FLOW CHECK

M1231104900156

After the new or repaired transmission has been installed, fill to 
the proper level with DIAMOND ATF SP III transmission fluid. 
The flow should be checked using the following procedure:

CAUTION

With the fluid set at the proper level, transmission fluid 
collection should not exceed one quart or internal damage 
to the transmission may occur.
1. Disconnect the OUTLET line (from cooler) at the 

transmission and place a collecting container under the 
disconnected line.

2. Run the engine at curb idle speed with the shift selector in 

neutral.

3. If transmission fluid flow is intermittent or it takes more than 

20 seconds to collect one quart of transmission fluid, replace 
the cooler.

4. If flow is within acceptable limits, reconnect the cooler line. 

Then fill the transmission to the proper level, using 
DIAMOND ATF SP III transmission fluid.

ACCELERATOR PEDAL POSITION SENSOR 
ADJUSTMENT

M1231102600029

Refer to GROUP 13A 

− On-vehicle Service − Accelerator Pedal 

Position Sensor Check 

P.13A-994

.

ACX02073AB

FROM COOLER

TO COOLER

ON-VEHICLE SERVICE

TSB Revision

AUTOMATIC TRANSMISSION

23A-546

TRANSMISSION RANGE SWITCH CONTINUITY 
CHECK

M1231101900168

TRANSMISSION RANGE SWITCH AND CONTROL 
CABLE ADJUSTMENT

M1231109700135

Required Special Tool:

• MB991958: Scan Tool (MUT-III Sub Assembly)

• MB991824: V.C.I.

• MB991827: MUT-III USB Cable

• MB991911: MUT-III Main Harness B

ITEM

TERMINAL 
CONNECTION OF 
TESTER

SPECIFIED 
CONDITION

P

− 7, 9 − 10

Less than 2 ohms

R

− 8

N

− 7, 9 − 10

D

− 7

ACX01186

TRANSMISSION
RANGE SWITCH

ACX01186AF

ACX01187AB

P

R

N

D

3
2

L


Content   ..  990  991  992  993   ..