Mitsubishi Montero (2002-2004). Manual - part 277
 

  Index      Mitsubishi     Mitsubishi Montero - service repair manual 2002-2004 year


Search            


Content   ..  275  276  277  278   ..


Mitsubishi Montero (2002-2004). Manual - part 277


SYMPTOM PROCEDURES

TSB Revision

SWS SYMPTOM PROCEDURES

54Bb-155

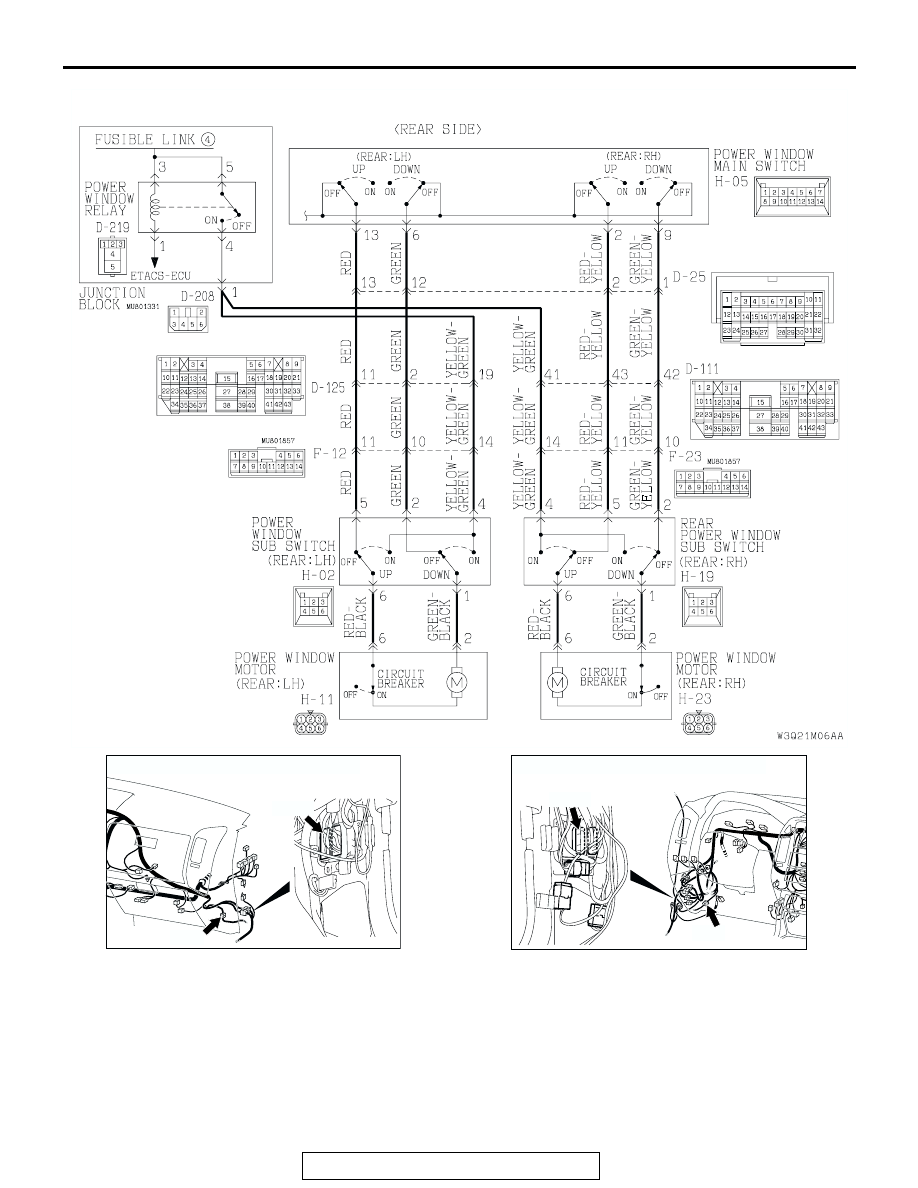
Power Window Sub Swich Circuit

AC000759

CONNECTORS: D-15, D-111

AB

D-15

D-111

AC000758

CONNECTORS: D-25, D-125

AI

D-25

D-125

SYMPTOM PROCEDURES

TSB Revision

SWS SYMPTOM PROCEDURES

54Bb-156

.

CIRCUIT OPERATION
Power window motors open or close the door win-
dows when the front passenger's or rear passenger's 
sub switch is moved to "UP" or "DOWN" position. 

.

TECHNICAL DESCRIPTION (COMMENT)
A power window sub-switch or power window motor 
may be defective. Alternatively, the power window 
lock switch (incorporated in the power window main 
switch) may remain pressed to "LOCK" position.

.

TROUBLESHOOTING HINTS

• The power window main switch may be defective

• The front power window sub-switch (RH) may be 

defective

• The rear power window sub-switch (LH) may be 

defective

• The rear power window sub-switch (RH) may be 

defective

• The front power window motor (RH) may be 

defective

• The rear power window motor (LH) may be 

defective

• The rear power window motor (RH) may be 

defective

• The wiring harness or connectors may have 

loose, corroded, or damaged terminals, or termi-
nals pushed back in the connector

.

DIAGNOSIS

Required Special Tool:

• MB991223: Harness Set

ACX02285

CONNECTORS: D-208, D-219

AH

D-208

D-219

JUNCTION BLOCK (FRONT VIEW)

POWER WINDOW
RELAY

AC204484

AD

F-12

CONNECTORS: F-12, F-23 

F-23

AC000237AH

H-02

H-11

CONNECTORS: H-02, H-11

REAR DOOR <LH>

AC000235

H-05

CONNECTOR: H-05

AC

<DRIVER'S SIDE>

AC000238

CONNECTORS: H-16, H-17

H-16

H-17

AI

FRONT DOOR <RH>

AC000316

H-19

H-23

AG

CONNECTORS: H-19, H-23 
REAR DOOR <RH>

SYMPTOM PROCEDURES

TSB Revision

SWS SYMPTOM PROCEDURES

54Bb-157

STEP 1. Check each switch on the power window main 
switch for continuity.
(1) Remove the power window main switch. Refer to 

P.42-30

.

(2) Check continuity when each switch on the power window 

main switch is operated to "UP" or "DOWN" position.

Q: Is the power window main switch normal?

YES : Go to Step 2.

SWITCHES 
TO BE 
CHECKED

SWITCH POSITION

TESTER 
CONNECTION

SPECIFIED 
CONDITION

Power 
window 
lock 
switch

Power 
window 
switches 
to be 
checked

Front 
power 
window 
(RH)

Lock

UP

− 14

Less than 
2 ohms

OFF

− 14

DOWN

− 5

Unlock

UP

− 3, 

− 14

OFF

− 3, 

− 14,

− 14

DOWN

− 5, 

− 14

Rear 
power 
window 
(LH)

Lock

UP

− 13

Less than 
2 ohms

OFF

− 13

DOWN

− 6

Unlock

UP

− 6, 

− 13

OFF

− 6,

− 13,

− 13

DOWN

− 13, 

− 6

Rear 
power 
window 
(RH)

Lock

UP

− 5

Less than 
2 ohms

OFF

− 9

DOWN

− 9

Unlock

UP

− 5, 

− 9

OFF

− 3,

− 9, 

− 9

DOWN

− 3, 

− 9

7

6

5

4

3

2

1

14

13

12

11

10

9

8

ACX02412 AC

SYMPTOM PROCEDURES

TSB Revision

SWS SYMPTOM PROCEDURES

54Bb-158

NO :  Replace the power window main switch. When the 

power window sub-switch is operated, the power 
windows should open or close normally.

STEP 2. Check the power window lock switch.
Q: Is the power window lock switch at the "UNLOCK" 

position?
YES : 
Go to Step 3.
NO :  Operate the power window lock switch to the 

"UNLOCK" position. When the power window sub-
switch is operated, the power windows should open or 
close normally.

STEP 3. Check which door window is not opened or closed
Q: Which door window is not opened or closed?

 Front passenger's side : Go to Step 4.
 Rear passenger (LH) : Go to Step 20.
 Rear passenger (RH) : Go to Step 37.

STEP 4. Check the front power window sub-switch (RH) for 
continuity.
(1) Remove the front power window sub-switch (RH). Refer to 

GROUP 42, Door-Door Trim and Waterproof Film 

P.42-30

.

(2) Check continuity when the front power window sub-switch 

(RH) is operated to "UP" or "DOWN" position.

Q: Is the front power window sub-switch (RH) normal?

YES : Go to Step 5.
NO :  Replace the front power window sub-switch (RH). 

Verify that the front power window sub-switch (RH) 
should now work normally.

SWITCH 
POSITION

TESTER 
CONNECTION

SPECIFIED 
CONDITION

UP

− 8, 6 − 10

Less than 2 ohms

OFF

− 8, 6 − 10

DOWN

− 8, 5 − 6

5

4

3

2

1

10

9

8

7

6

ACX02413AD


Content   ..  275  276  277  278   ..