Mitsubishi Lancer. Manual - part 217


  Index      Mitsubishi     Mitsubishi Lancer - service repair manual 2006 year


Search            


Content   ..  215  216  217  218   ..


Mitsubishi Lancer. Manual - part 217


EMISSION CONTROL <MPI>

ENGINE AND EMISSION CONTROL

17-16

5. Replace the gasket, and tighten to the specified 

torque.

Tightening torque:

<4G1> 21 

± 4 N⋅ m

<4G6> 20 

± 2 N⋅ m

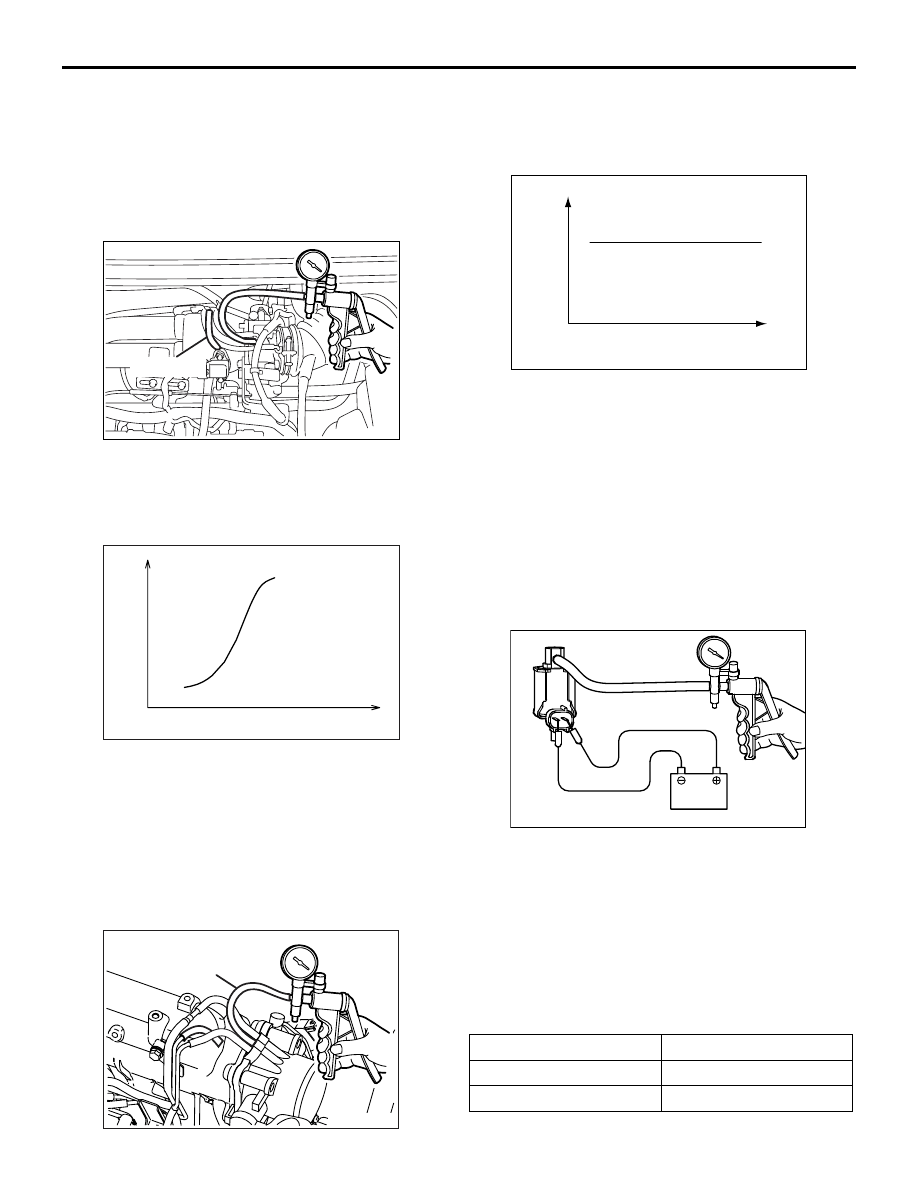
EGR PORT VACUUM CHECK <4G1>

M1173002900167

AK300784AB

Green strip

1. Disconnect the vacuum hose (Green stripe) from 

the throttle body EGR vacuum nipple and connect 
a hand vacuum pump to the nipple.

2. Plug the vacuum hose (Green stripe).

AK201224AB

Vac-
uum

Engine speed (r/min)

3. Start the engine and check that, after raising the 

engine speed by racing the engine, purge vacuum 
raises according to engine speed. 
NOTE: If there is a problem with change in vac-
uum, the throttle body purge port may be clogged 
and require cleaning.

EGR PORT VACUUM CHECK <4G6>

M1173002900156

AK300786AB

White stripe

1. Disconnect the vacuum hose (White stripe) from 

the throttle body EGR vacuum nipple and connect 
a hand vacuum pump to the nipple.

2. Plug the vacuum hose (White stripe).

AK100011

AC

Vac-
uum

Engine speed (r/min)

3. Start the engine.
4. Check that a fairly constant negative is generated 

regardless of the engine speed.

5. If no negative pressure is generated, the port is 

probably blocked and should be cleaned.

EGR CONTROL SOLENOID VALVE 
CHECK <4G1>

M1173003100238

NOTE: When disconnecting the vacuum hose, 
always make a mark so that it can be reconnected at 
original position.

AKX00351

A

B

AE

Battery

1. Disconnect the vacuum hose from the solenoid 

valve.

2. Disconnect the harness connector.
3. Connect a hand vacuum pump to nipple (A) of the 

solenoid valve (refer to the illustration at left).

4. Check air tightness by applying a vacuum with 

voltage applied directly from the battery to the 
EGR control solenoid valve and without applying 
voltage.

Battery voltage

Normal condition

Applied

Vacuum leaks

Not applied

Vacuum maintained

AKX00352

EMISSION CONTROL <MPI>

ENGINE AND EMISSION CONTROL

17-17

5. Measure the resistance between the terminals of 

the solenoid valve.

Standard value: 29 

 35  (at 20° C)

EGR CONTROL SOLENOID VALVE 
CHECK <4G6>

M1173003100249

NOTE: When disconnecting the vacuum hose, 
always make a mark so that it can be reconnected at 
original position.

AK201251AB

A

B

C

Battery

1. Disconnect the vacuum hose from the solenoid 

valve.

2. Disconnect the harness connector.
3. Connect a hand vacuum pump to nipple (A) of the 

solenoid valve (refer to the illustration at left).

4. Check air tightness by applying a vacuum with 

voltage applied directly from the battery to the 
EGR control solenoid valve and without applying 
voltage.

Battery 
voltage

B nipple 
condition

Normal condition

Not applied

Open

Vacuum 
maintained

Applied

Open

Vacuum leaks

Closed

Vacuum 
maintained

AK100016

5. Measure the resistance between the terminals of 

the solenoid valve.

Standard value: 29 

 35  (at 20° C)

EMISSION CONTROL <MPI>

ENGINE AND EMISSION CONTROL

17-18

EXHAUST GAS RECIRCULATION (EGR) 
VALVE REMOVAL AND INSTALLATION

M1173010500175

Pre-removal and Post-installation Operation
Air Cleaner Assembly Removal and Installation (Refer to 
GROUP 15 

P.15-3

).

AC208130

21 ± 4 N·m

2

1

3

N

AC

<4G1>

AC301219

20 ± 2 N·m

2

1

3

N

AB

Removal steps 

1.

Emission vacuum hose connection

2.

EGR valve

3.

EGR valve gasket

Removal steps (Continued)

EMISSION CONTROL <MPI>

ENGINE AND EMISSION CONTROL

17-19

CATALYTIC CONVERTER

REMOVAL AND INSTALLATION <4G1, 
4G6-M/T>

M1173003900773

Refer to GROUP 15 - Exhaust Pipe and Main Muffler 

P.15-10

.

REMOVAL AND INSTALLATION 
<4G6-A/T>

M1173003900784

AC504823

2

3

N

N

4

59 ± 10 N·m

50 ± 10 N·m

1

45 ± 5 N·m

AB

Removal steps 

<<

A

>>

>>

A

<<

1.

Oxygen sensor

2.

Catalytic converter

3.

Gasket

4.

Gasket

REMOVAL SERVICE POINT
<<A>> OXYGEN SENSOR REMOVAL

AC212566AB

MD998770

Oxygen sensor

Use special tool oxygen sensor wrench (MD998770) 
to remove the oxygen sensor.

INSTALLATION SERVICE POINT
>>A<< OXYGEN SENSOR INSTALLATION

AC212566AB

MD998770

Oxygen sensor

Use special tool oxygen sensor wrench (MD998770) 
to install the oxygen sensor.


Content   ..  215  216  217  218   ..