Mitsubishi Lancer. Manual - part 40
 

  Index      Mitsubishi     Mitsubishi Lancer - service repair manual 2006 year


Search            


Content   ..  38  39  40  41   ..


Mitsubishi Lancer. Manual - part 40


BOLTED PANEL FIT AND ADJUSTMENT

REFERENCE MATERIAL

8-2

BOLTED PANEL FIT AND ADJUSTMENT

HOOD

M4080005000123

 HOOD FIT ADJUSTMENT

AC005945

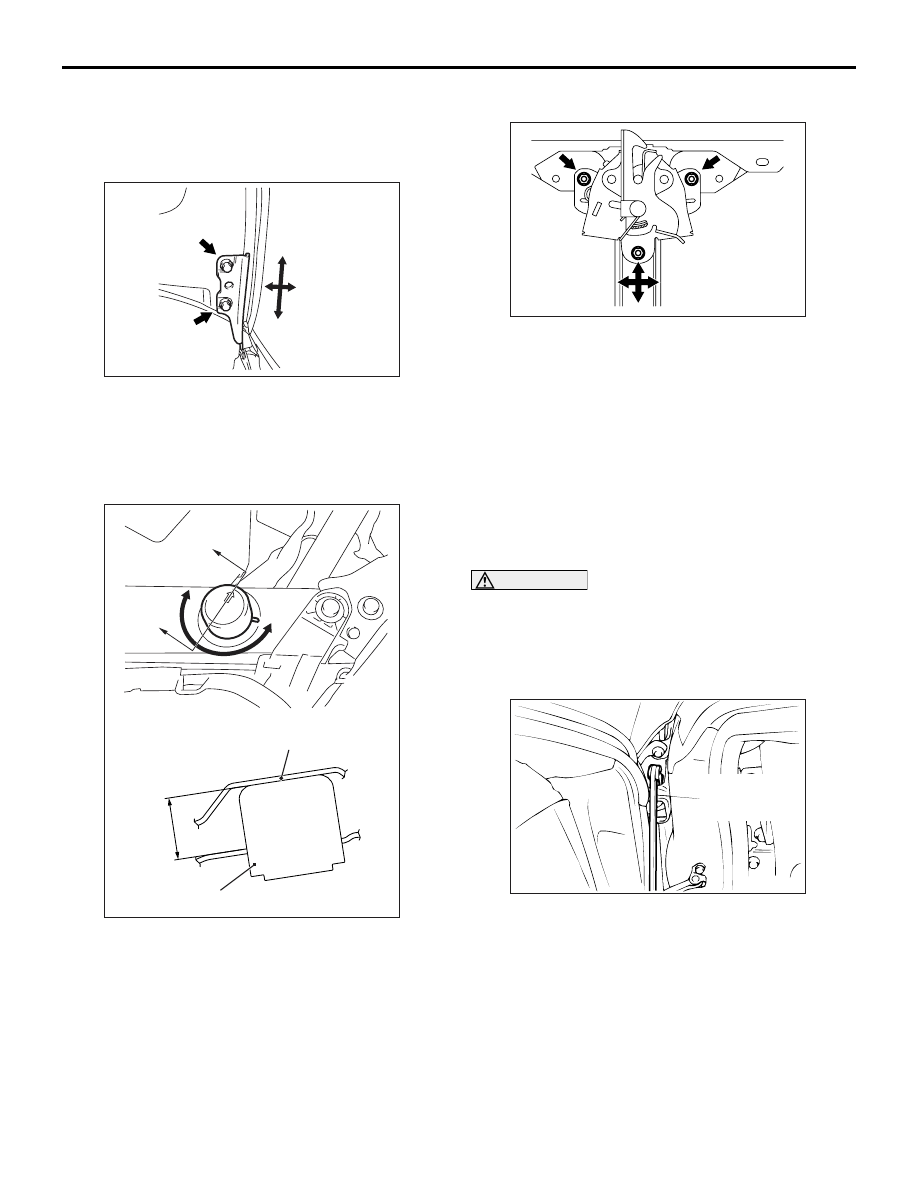
1. If the clearance between the hood and body panel 

is uneven, loosen the hood mounting bolts and 
adjust the clearance by moving the hood.

Hood mounting bolt tightening torque: 11 

± 2 

N

m

Y0215AU

X0424CA

AC005948AB

Section A – A

A

A

Hood

Hood bumper

17 mm

2. Rotate the hood bumper by using the arrow mark 

on the hood bumper as a guide to adjust the hood 
height. If the hood bumper is rotated just one turn, 
the hood height changes by approximately 3 mm. 

AC005947AF

3. If the hood is not flush with the surrounding 

panels, or the hood locking and/or unlocking is 
heavy, check the routing of the release cable. If 
the cable is properly routed, loosen the hood latch 
mounting bolts to move the hood latch so that it 
can be engaged with the hood striker properly.

Hood latch mounting bolt tightening torque: 
9.0 

± 2.0 Nm

DOOR

M4080006000159

DOOR FIT ADJUSTMENT

CAUTION

• Attach protection tape to the fender and door 

edges where the hinge is installed.

• Do not rotate special tool door adjusting 

wrench (MB991164) with a torque of over 98 
N

m.

AC000592

MB990900

or

MB991164

AB

1. Use special tool door edges where (MB990900 or 

MB991164) to loosen the hinge mounting bolts on 
the body side, and then adjust the clearance 
around the door so that it is uniform on all sides.

Door hinge mounting bolt tightening torque: 
27 

± 5 Nm

2. If a door is not flush with its surrounding panels, 

loosen the door-side door hinge mounting bolts 
and obtain the flushness by moving the door.

Door hinge mounting bolt tightening torque: 
21 

± 4 Nm

BOLTED PANEL FIT AND ADJUSTMENT

REFERENCE MATERIAL

8-3

NOTE: 

AC206498

Washer

Bolts

Washer

Door hinge

AF

Weld point

Weld point

If the door hinge mounting bolts washers are 
welded, grind off the welding according to the pro-
cedure below beforehand.
(1) Remove the door hinge.
(2) Use a chisel or grinder to release the door 

hinge mounting bolt washers, which are 
welded to the door hinge.

(3) On completion, paint the affected area with a 

suitable touch-in brush to prevent corrosion.

(4) Install the door hinge.

3. When the door is stiff to lock and unlock.

AC006109AD

Temporary

bolts

Striker

MB990939

(1) Adjustment by using the striker (toward the 

inside of the vehicle and vertical direction)
Install a temporary bolts instead of the striker 
mounting bolts, and use special tool brass bar 
(MB990939) and a hammer to tap the bolts to 
the desired direction.

AC006110

Striker

MB990211

MB990243

AB

(2) Adjustment by using the striker (toward the 

outside of the vehicle).
Use special tools slide hammer (MB990211) 
and body puller (MB990243) to pull the striker 
toward the outside of the vehicle.

AC006111AB

Shim

Striker

(3) Adjustment by using shims (forward and 

rearward)
Increase or decrease the number of shims so 
that the striker engages with the door latch 
properly.

Door striker mounting bolt tightening 
torque: 11 

± 2 Nm

TRUNK LID

M4080017000023

ADJUSTMENT OF CLEARANCE AROUND 
TRUNK LID

AC202897

Trunk lid panel
assembly

Trunk lid hinge

AB

Loosen the trunk lid panel assembly mounting bolts 
and move the trunk lid panel assembly to make the 
clearance around the trunk lid uniform.

BOLTED PANEL FIT AND ADJUSTMENT

REFERENCE MATERIAL

8-4

TRUNK LID FIT ADJUSTMENT

AC305144

Section A - A

Trunk lid bumper

Trunk lid panel assembly

A

A

Trunk lid bumper

Trunk lid panel assembly

AB

14 mm 

Turn each trunk lid bumper until the height shown in 
the illustration is reached. If the trunk lid panel height 
on one side is different from that on the other side 
(even after the trunk lid bumpers have been adjusted 
to the height indicated in the illustration), turn the 
trunk lid bumper(s) slightly to make fine adjustments 
to the trunk lid panel height.
NOTE: When the bumper is new, one full turn of the 
trunk lid bumper changes the height approximately 3 
mm. Turn it clockwise to reduce height. Turn it 
anti-clockwise to increase height.

TRUNK LID STRIKER ADJUSTMENT

AC202898

Trunk lid striker

AB

After checking the trunk lid release cable for proper 
routing, loosen the trunk lid striker mounting bolts. 
Change the position of the trunk lid striker relative to 
the trunk lid latch assembly so that trunk lid locking 
and unlocking effort is correct.

Trunk lid mounting bolt tightening torque: 
8.9 

± 1.9 Nm

TAILGATE

M4080007000129

TAILGATE FIT ADJUSTMENT

1. If the striker and latch mesh badly, replace the 

striker and striker mounting bolts with 

replacement parts (striker: MR523105, striker 

mounting bolts: MU000474).

AC203659

2. Move the replaced striker forward and backward 

or to the left and right to adjust, after bolt the 

striker temporarily.

3. After adjusting, tighten the bolts to the specified 

torque.

Tailgate striker mounting bolt tightening 

torque: 24 

± 4 Nm

NOTE: 

AC203660

AB

Grind here

When the bolts head interferes with the rear end 
trim, grind the interference area with a round file.

AC201556

4. If uneven clearance is present between tailgate 

and body, reposition the hinge to adjust the 
clearance.

Tailgate hinge mounting bolt tightening 
torque: 9.0 

± 2.0 Nm

INSTALLATION AND REMOVAL OF ADHESIVE COMPONENTS

REFERENCE MATERIAL

8-5

FUEL FILLER LID

M4080019000085

 FUEL FILLER LID FIT ADJUSTMENT

AB300142 AB

If the height and clearance of the fuel filler lid is une-
ven, loosen the fuel filler lid mounting bolts, then 
move and adjust the fuel filler lid.

Fuel filler lid mounting bolt tightening 
torque: 5.0 

± 1.0 Nm

INSTALLATION AND REMOVAL OF ADHESIVE 

COMPONENTS

MOULDING

M4080014000057

AB400090

Front fender moulding

Front door moulding

Rear door moulding

AB


Content   ..  38  39  40  41   ..