Mitsubishi Evolution X. Manual - part 884
 

  Index      Mitsubishi     Mitsubishi Evolution X - service repair manual 2008 year


Search            


Content   ..  882  883  884  885   ..


Mitsubishi Evolution X. Manual - part 884


PROPELLER SHAFT

TSB Revision

PROPELLER SHAFT

25-11

DISASSEMBLY SERVICE POINTS

.

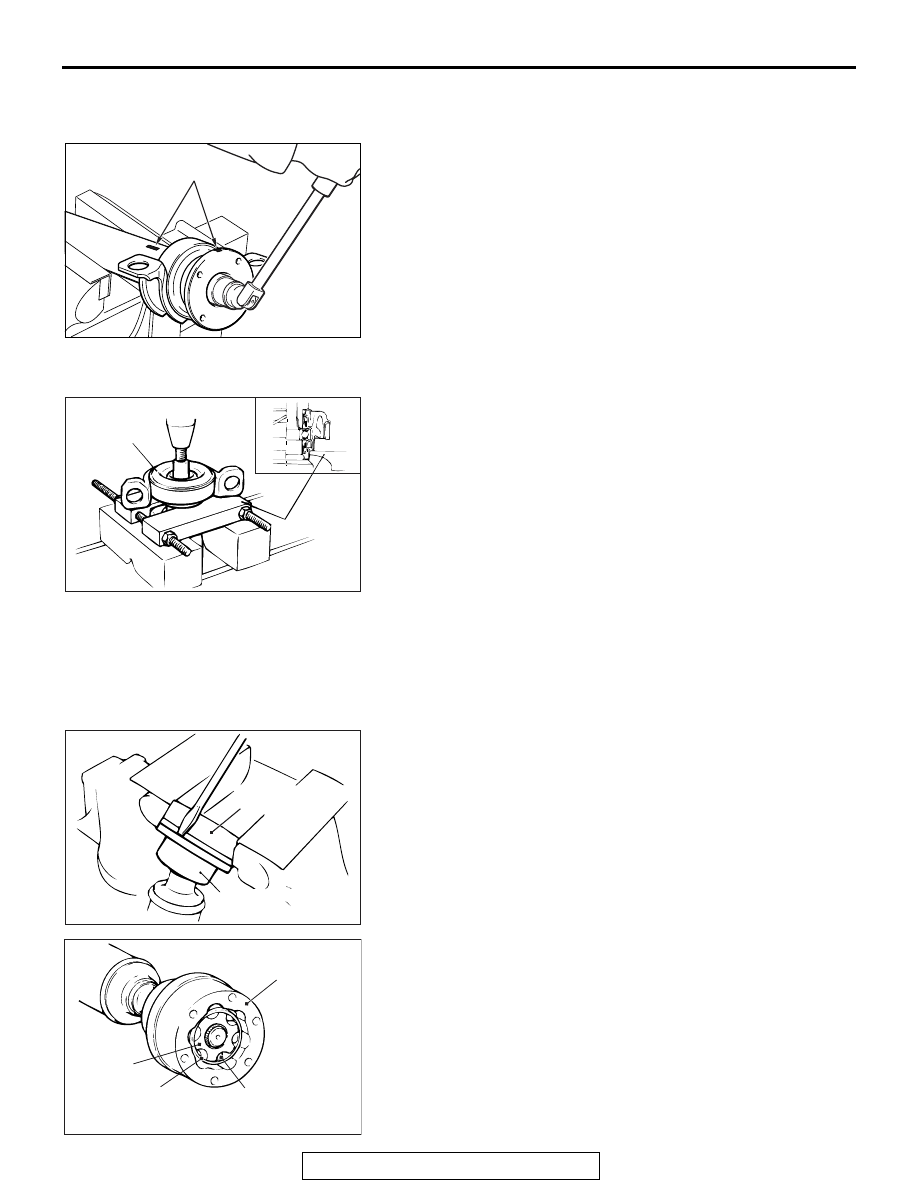
<<A>> COMPANION FLANGE REMOVAL

AC211610 AC

Mating marks

Make mating marks on the companion flange and center pro-
peller shaft, and then remove the companion flange.

.

<<B>>CENTER BEARING ASSEMBLY REMOVAL

AC101273

MD998801

AD

Center bearing
assembly

Use special tool MD998801 to remove the center bearing 
assembly from the center propeller shaft.

.

<<C>> BOLT REMOVAL

Make mating marks on the rear propeller shaft, LJ assembly 
and companion flange, and then remove the bolt.

.

<<D>>LJ ASSEMBLY REMOVAL

AC101274

LJ assembly

LJ boot

AE

1. Remove the LJ boot from the LJ assembly.

AC708561AC

Outer race

Ball

Cage

Inner
race

2. Make mating marks on the outer race, cage and inner race, 

and then remove the outer race and ball.
NOTE: Note the positions of the balls so that they can be 
reinstalled in their original positions. 

AC101276

Inner race

Puller

Cage

AC

PROPELLER SHAFT

TSB Revision

PROPELLER SHAFT

25-12

3. Remove the inner race with cage from the rear propeller 

shaft assembly by using a puller (commercially available).

4. Wipe off the grease and clean the outer race, inner race, 

cage and balls.

AC708562AC

LJ assembly

Puller

5. If it is not possible to disassemble the outer race of LJ 

assembly, remove the LJ assembly from the rear propeller 
shaft assembly by using a puller (commercially available).

.

<<E>> LJ BOOT REMOVAL

When the LJ boot is reused, tape the spline part on the rear 
propeller shaft and then remove the LJ boot.

ASSEMBLY SERVICE POINTS

.

>>A<< LJ BOOT INSTALLATION

1. Install the boot band.
2. Wrap a plastic tape around the spline part on the rear 

propeller shaft and then install the LJ boot.

.

>>B<< LJ ASSEMBLY INSTALLATION

AC708563 AC

Outer race

Cage

Inner
race

1. Apply a thin coat of the specified grease to the ball grooves 

of the inner and outer races.

Specified grease: Repair kit grease

2. Assemble the LJ assembly outer race, cage, balls, and inner 

race with their mating marks aligned.

AC101278 AC

PROPELLER SHAFT

TSB Revision

PROPELLER SHAFT

25-13

3. Apply specified grease to the LJ assembly.

Specified grease: Repair kit grease
Amount to use: 75 

± 5 g (2.6 ± 0.1 ounces)

AC101279AE

Rubber packing

LJ assembly

4. Apply a little of the specified sealant to the surface which 

has groove (for packing) of LJ assembly (shown by arrows 
in the illustration), fix the rubber packing.

Specified sealant: 3M

 AAD Part No. 8730, 8731 or 

equivalent

5. Set the groove side of LJ assembly (for packing) toward the 

LJ boot side and install them.

AC101280 AC

Socket wrench

6. Align the mating marks of LJ assembly and rear propeller 

shaft, then install the LJ assembly to rear propeller shaft 
using socket wrench.

AC101281AE

Bolt

LJ boot

7. Using the bolt, align the bolt holes of the LJ boot and the LJ 

assembly and install LJ boot to the LJ assembly.

8. Install the rubber packing of the companion flange side in 

the same manner as described in (4) above.

.

PROPELLER SHAFT

TSB Revision

PROPELLER SHAFT

25-14

>>C<< BOOT BAND INSTALLATION

CAUTION

AC101282 AB

Boot

Boot band mounting

Salient

Tighten the boot part in opposite direction of convex 
part for bleeding the boot.

• If there is grease in the convex part, wipe out the 

grease in order to bleed the boot.

.

>>D<< CENTER BEARING 
ASSEMBLY/COMPANION FLANGE/SELF 
LOCKING NUT INSTALLATION

AC101283 AD

Companion flange

Self locking
nut

Center bearing
assembly

1. Install the center bearing assembly to the center propeller 

shaft in the direction shown in the illustration.

2. After aligning the mating marks of the companion flange and 

center propeller shaft, install them.

3. Tightening the self locking nut, press fit the center bearing 

assembly using companion flange.

.

>>E<< CENTER BEARING 
ASSEMBLY/COMPANION FLANGE/SELF 
LOCKING NUT INSTALLATION

AC101284 AE

Rubber
mount

Dust seal

Companion
flange

Self
locking
nut

1. Install the center bearing assembly to the center propeller 

shaft in the direction shown in the illustration.

2. After aligning the mating marks of the companion flange and 

center propeller shaft, install them.

3. Tightening the self locking nut, press fit the center bearing 

assembly using companion flange.


Content   ..  882  883  884  885   ..