Mitsubishi Evolution X. Manual - part 203
 

  Index      Mitsubishi     Mitsubishi Evolution X - service repair manual 2008 year


Search            


Content   ..  201  202  203  204   ..


Mitsubishi Evolution X. Manual - part 203


OIL PUMP CHAIN

TSB Revision

ENGINE OVERHAUL

11B-59

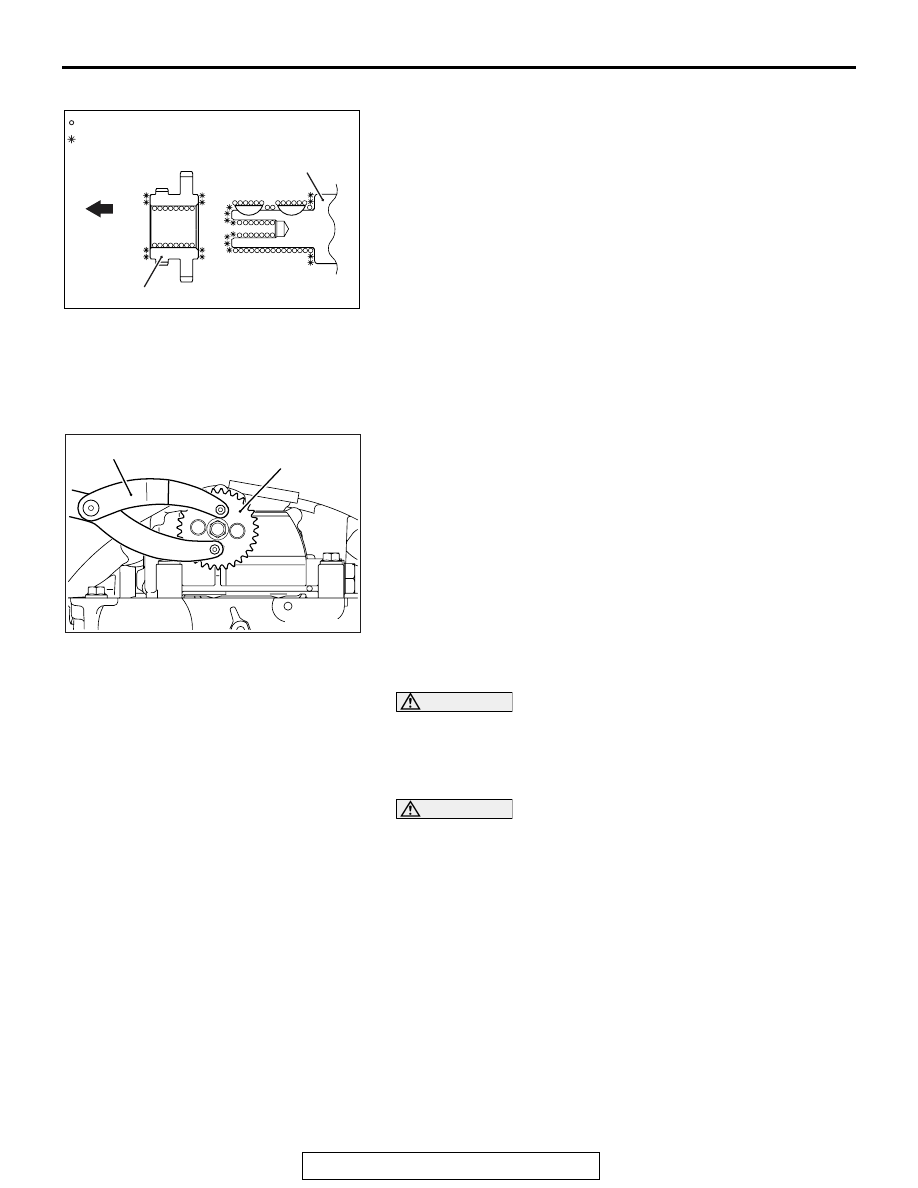
>>B<< CRANKSHAFT SPROCKET INSTALLATION

AK603521

Crankshaft sprocket

Crankshaft

AB

Engine
front

: Wipe clean with a rag.
: Wipe clean with a rag and degrease.

1. Wipe off the dirt on the crankshaft sprocket and the 

crankshaft using a rag, and then remove the grease from the 
portion shown in the illustration.
NOTE: Remove grease to prevent a drop in the coefficient 
of friction of the pressing portion caused by adhesion of oil.

2. Set the No. 1 piston at top dead center on the compression 

stroke.

3. Install the crankshaft sprocket to the crankshaft.

.

>>C<< OIL PUMP SPROCKET / OIL PUMP CHAIN 
INSTALLATION

1. Set the No. 1 piston at top dead center on the compression 

stroke.

AK703732AC

MB991346

Oil pump sprocket

2. Using the special tool MB991346, install the oil pump 

sprocket to the oil pump case.

3. Install the oil pump chain to the crankshaft sprocket.
4. Install the oil pump chain to the oil pump sprocket.

.

>>D<< REAR OIL SEAL CASE INSTALLATION

CAUTION

Be sure to remove liquid gasket that has entered mounting 
holes.
1. Completely remove liquid gasket adhering to the cylinder 

block, ladder frame and rear oil seal case.

CAUTION

Sufficiently check that there is no residual oil on the place 
where degreasing is performed. If fingerprints are left, do 
not touch it with bare hands after the degreasing, since the 
oils from your fingers will harm the seal ability.
2. Using white gasoline and so on, degrease the surface where 

the liquid gasket is applied and the contact surface between 
the cylinder block and ladder frame.

AK702200AC

B

-B

A

A

A

A

-A

B

B

B

B

A

1.0 mm (0.04 in)

0 – 2.0 mm
(0 – 0.08 in)

OIL PUMP CHAIN

TSB Revision

ENGINE OVERHAUL

11B-60

3. Apply a small amount of engine oil to the oil seal lip.

CAUTION

Install the timing chain case within three minutes after 
applying liquid gasket.
4. Squeeze liquid gasket (Three bond 1217G [Mitsubishi 

Genuine Part No.1000A923] or equivalent) of 

φ2.0 to 3.0 mm 

(0.08 to 0.12 inch) in thickness and apply it to the illustrated 
position of the cylinder block and ladder frame.

AK702202AC

Locating pin

5. Install the rear oil seal case aligned with the locating pin and 

tighten it to the specified torque.

Specified torque: 10 

± 2 N⋅ m (89 ± 17 ft-lb)

.

>>E<< FLYWHEEL BOLT INSTALLATION

1. Clean off sealant and oil of thread of crankshaft and flywheel 

bolt.

AK703299

MB991883

AC

2. Use special tool MB991883 to secure the flywheel.

AK600847AC

OIL PUMP CHAIN

TSB Revision

ENGINE OVERHAUL

11B-61

3. Apply engine oil to thread of crankshaft and bolt seat area of 

flywheel.

4. Apply the sealant (Three bond 1324 or equivalent) to the 

thread of flywheel bolt.

AK603576

1

2

3

4

5

6

7

AB

5. Tighten flywheel bolts to temporary torque 40 N

⋅ m (30 ft-lb) 

in the order shown to illustration.

6. Tighten flywheel bolts to specified torque in the order shown 

in the illustration.

Specified torque: 130 N

⋅ m (96 ft-lb)

INSPECTION

M1113033800030

.

OIL JET

AK703183

1. Check the oil jet and check valve for clogging
2. Check the oil jet for damage and deformation

.

OIL COOLER BY-PASS VALVE

AK703184

L

AC

Valve

1. Make sure that valve moves smoothly.
2. Ensure that the dimension L measures the standard value 

under normal temperature and humidity.

Standard value: 34.5 mm (1.358 inches)

3. The dimension must be the standard value when measured 

after the valve has been dipped in 97 to 103

° C (207 to 

217

° F) oil.

Standard value: 40.0 mm (1.575 inches) 

PISTON AND CONNECTING ROD

TSB Revision

ENGINE OVERHAUL

11B-62

PISTON AND CONNECTING ROD

REMOVAL AND INSTALLATION

M1113008402308

AK702224

5.0 N·m
44 in-lb

20 N·m
15 ft-lb

1

2

3

4

5

6

7

8

11

12

14

AC

9

10

13

Apply engine oil to
all moving parts
before installation.

→                → +90˚

Removal steps 

>>G<<

1. Connecting rod cap bolt

<<A>> >>F<<

2. Connecting rod cap

>>E<<

3. Connecting rod bearing

>>E<<

4. Connecting rod bearing

>>D<<

5. Piston connecting rod assembly

>>C<<

6. Piston ring No. 1

>>C<<

7. Piston ring No. 2

>>B<<

8. Oil ring

<<B>> >>A<<

9. Circlip

<<B>> >>A<<

10. Circlip

<<B>> >>A<<

11. Piston pin
12. Piston
13. Bushing
14. Connecting rod

Required Special Tools:

• MB992236: Circlip Installer

• MD998780: Piston Setting Tool

Removal steps (Continued)


Content   ..  201  202  203  204   ..