Mitsubishi Lancer Evolution IX. Manual - part 364
 

  Index      Mitsubishi     Mitsubishi Lancer Evolution IX - service repair manual


Search            


Content   ..  362  363  364  365   ..


Mitsubishi Lancer Evolution IX. Manual - part 364


WINDOW GLASS

BODY

42-17

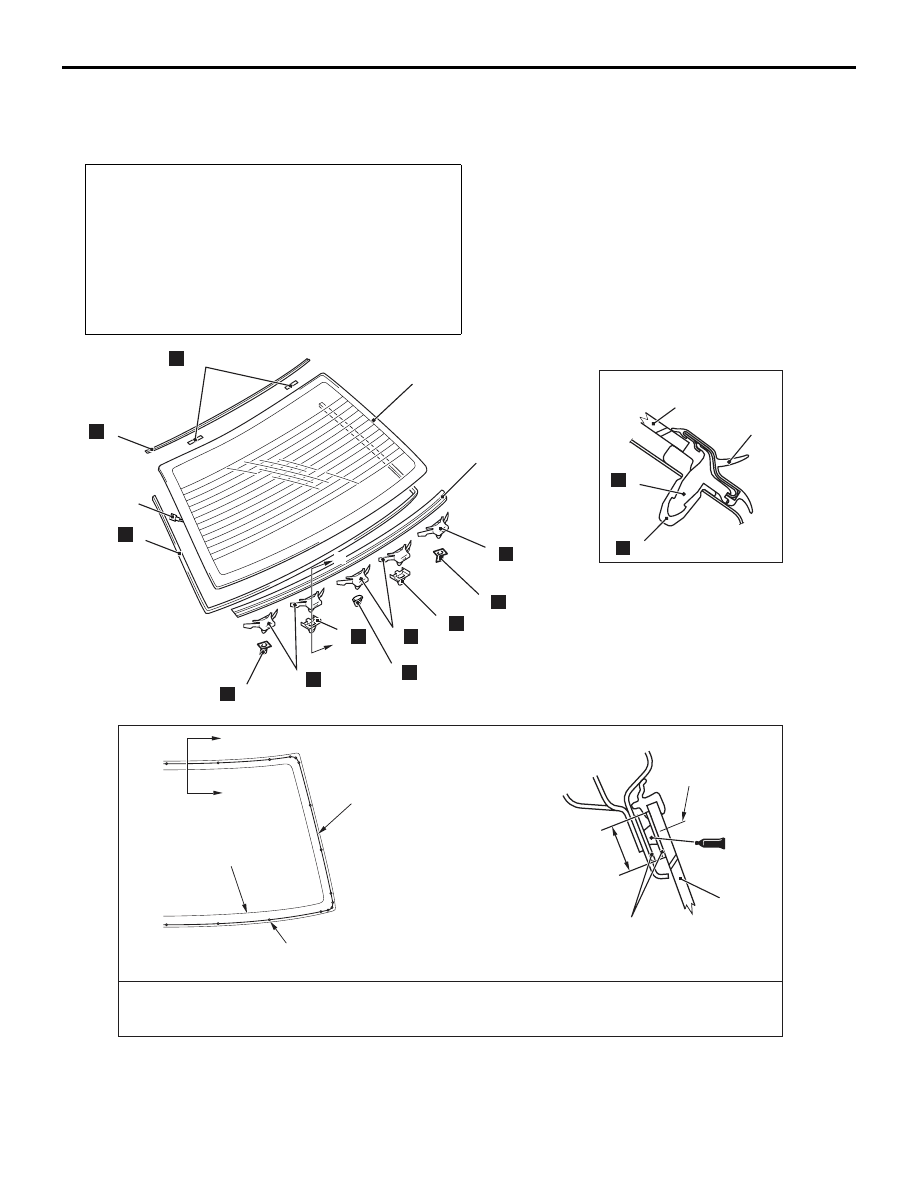
REAR WINDOW GLASS

REMOVAL AND INSTALLATION

M1422001600155

Pre-removal and Post-installation Operation
• Roof Drip Moulding Removal and Installation (Refer to 

GROUP 51, Garnish and Moulding 

P.51-10

).

• High-mounted Stop Lamp Assembly Removal and Instal-

lation <Rear Shelf Mounted Type> (Refer to GROUP 54A, 

High Mount Stop lamp 

P.54A-69

).

• Rear Pillar Trim and Rear Shelf Trim Removal and Instal-

lation (Refer to GROUP 52A, Trims 

P.52A-10

).

• Headlining Removal and Installation (Refer to GROUP 

52A, Headlining 

P.52A-17

).

Y0500AU

Y0502AU

Y0501AU

Y0564AU

AC006056

1

1

7

7

AB

6

2

5

4

9

7

3

N

2

N

2

N

N

4

N

N

3

N

3

N

N

N

2

N

Ceramic line

Mark

Apply the primer and
adhesive along the
fictitious lines (seal line)
between each of
the marks.

Section A – A

Section B – B

Seal line

centre

Primer

8

N

10

N

Adhesive: 3M ATD Part No. 8609 Super Fast Urethane Auto Glass Sealant or equivalent and 
3M ATD Part No. 8608 Super Fast Urethane Primer or equivalent

16 mm 

A

A

B

B

Removal steps 

<<

A

>> >>

B

<< 1. Rear window lower moulding

2. Clip
3. Grommet A

4. Grommet B
5. Grommet C
6. Connecting the harness connector

Removal steps (Continued)

WINDOW GLASS

BODY

42-18

REMOVAL SERVICE POINTS
<<A>> REAR WINDOW LOWER MOULD-
ING REMOVAL

CAUTION

If the drip moulding has become warped, it 
should not be reused.

AC006073AB

MB990784

Use special tool ornament remover (MB990784) to 
lever out the moulding.

<<B>> REAR WINDOW GLASS REMOVAL

Remove the rear window glass using the same pro-
cedure as for the windshield (Refer to 

P.42-12

).

INSTALLATION SERVICE POINTS
>>A<< GLASS STOPPER/WINDOW 
DAM/REAR WINDOW UPPER MOULD-
ING/REAR WINDOW GLASS INSTALLA-
TION

1. When replacing the rear window glass, 

temporarily set the rear window glass against the 
body, and place a mating mark on the rear 
window glass and body.

CAUTION

Leave the degreased parts for 3 or more minutes 
to dry well, before starting on the next step. Do 
not touch the degreased parts.
2. Use isopropyl alcohol to degrease the inside and 

outside of the rear window glass and the body 
flanges.

CAUTION

• The primer strengthens the adhesive, so be 

sure to apply it evenly around the entire cir-
cumference. However, a too thick application 
will weaken the adhesive.

• Do not touch the coated surface.

3. Soak a sponge in the primer, and apply evenly to 

the rear window glass and the body in the 
specified places.

4. Allow the rear window glass to dry for at least 3 

minutes after applying primer.

<<

B

>> >>

A

<< 7. Rear window glass

>>

A

<< 8. Rear window upper moulding

>>

A

<< 9. Window dam

>>

A

<< 10. Glass stopper

Removal steps (Continued)

Y0630AU

Y0629AU

AC006075

Glass stopper and window dam installation position

Glass stopper

18 mm

Glass end line

Align the glass 
stopper end with 
the ceramic notch.

Ceramic line

Rear window 
glass

A

A

Section A - A

19 mm

Window dam

Align the window
dam end with 
the ceramic notch.

Mark

Seal line

Ceramic
line

Window dam

19 mm

AB

WINDOW GLASS

BODY

42-19

5. Install the glass stopper and window dam to the 

specified positions so that there are no adrift or 
bent surfaces inside the rear window glass.

6. Install the rear window upper moulding.
7. Install the glass in the same manner as the 

windshield. (Refer to 

P.42-12

).

>>B<< REAR WINDOW LOWER 
MOULDING INSTALLATION

Install the clips to the rear window lower moulding, 
and then fix the rear window moulding to the vehicle 
body.

DOOR

BODY

42-20

DOOR

SERVICE SPECIFICATIONS

M1423000300206

Item

Standard value

Power window operation current (Power supply voltage 14.5 

± 0.5 V, at 25 °C)  A

± 1

Door outside handle play  mm

Front door

2.3 

Rear door

0 - 3.3 (target value: 
1.3)

Door inside handle play  mm

Front door

10.4 

± 9.6

Rear door

10 

± 9.6

SEALANT

M1423000500095

Item

Specified sealant

Door waterproof film

3M ATD Part No.8633 or equivalent


Content   ..  362  363  364  365   ..