Mitsubishi Eclipse / Eclipse Spyder (2000-2002). Service and repair manual - part 347
 

  Index      Mitsubishi     Mitsubishi Eclipse / Eclipse Spyder (2000-2002). Service and repair manual


Search            


Content   ..  345  346  347  348   ..


Mitsubishi Eclipse / Eclipse Spyder (2000-2002). Service and repair manual - part 347


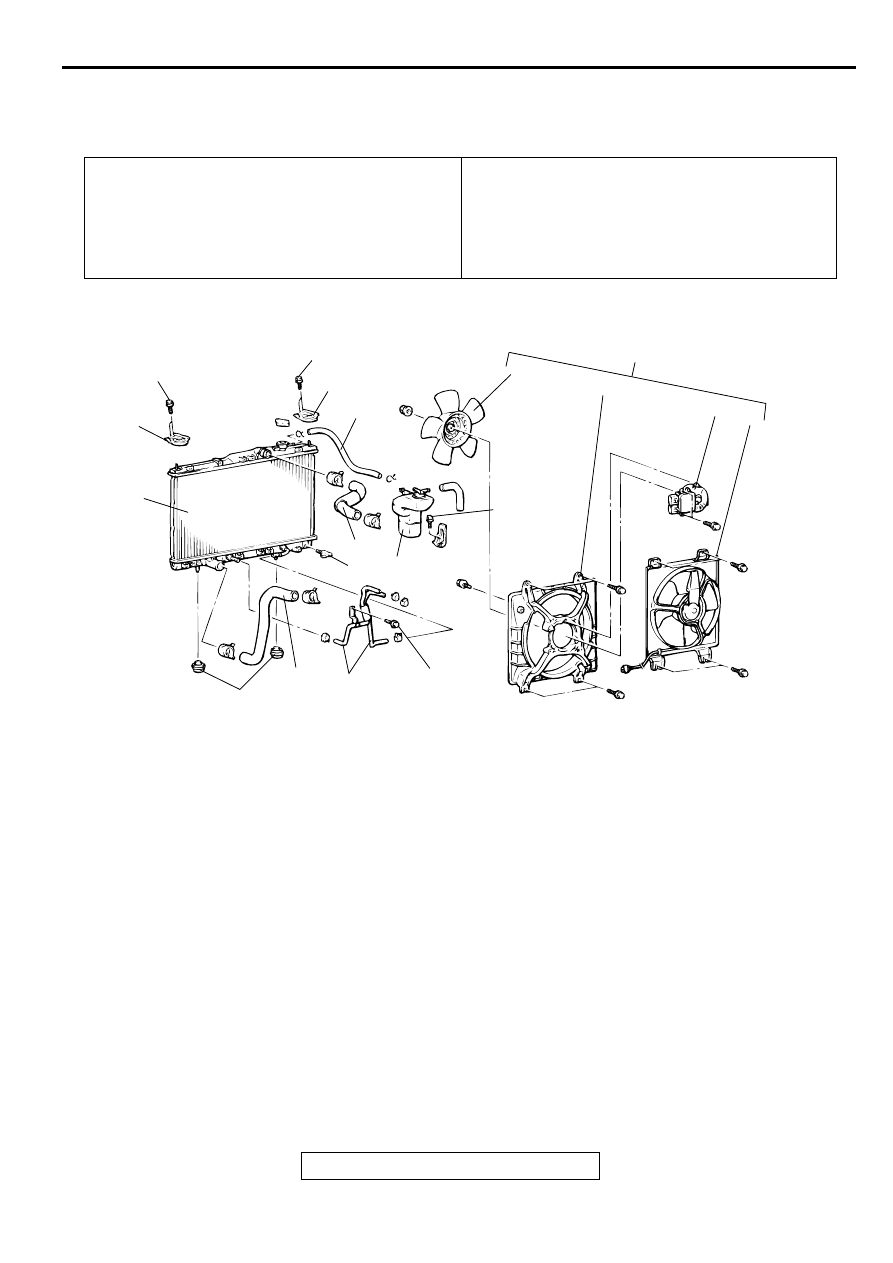
RADIATOR

TSB Revision

COOLING SYSTEM

14-19

R A D IATO R

REMOVAL AND INSTALLATION

M1141001500101

Pre-removal Operation

Engine Coolant Draining [Refer to GROUP 00, 
Maintenance Service 

 Engine Coolant (Change) 

P.00-

52

.]

Post-installation Operation

A/T Fluid Supplying and Checking (Refer to GROUP 00, 
Maintenance Service 

 Automatic Transmission Fluid 

P.00-49

.)

Engine Coolant Supplying [Refer to GROUP 00, 
Maintenance Service 

 Engine Coolant (Change) 

P.00-

52

.]

AC004073

11

12

13

14

15

8

8

3

5

2

4

9

10

6

7

AC

12 ± 2 N·m
100 ± 22 in-lb

12 ± 2 N·m
100 ± 22 in-lb

12 ± 2 N·m
100 ± 22 in-lb

4.9 ± 1.0 N·m
44 ± 8 in-lb

RADIATOR REMOVAL STEPS

1.

RADIATOR CAP

2.

DRAIN PLUG

3.

RUBBER HOSE CONNECTION

4.

RESERVE TANK ASSEMBLY

<<A>>

>>A<<

5.

RADIATOR UPPER HOSE

<<A>>

>>A<<

6.

RADIATOR LOWER HOSE

<<B>>

7.

A/T OIL COOLER HOSE 
CONNECTION 

8.

RADIATOR SUPPORT

9.

RADIATOR

10. LOWER INSULATOR
11. CONDENSER FAN MOTOR 

ASSEMBLY 

12. RADIATOR FAN MOTOR 

ASSEMBLY

13. FAN

14. RADIATOR FAN MOTOR
15. SHROUD

RADIATOR FAN MOTOR 
ASSEMBLY REMOVAL STEPS

1.

RADIATOR CAP

2.

DRAIN PLUG

<<A>>

>>A<<

5.

RADIATOR UPPER HOSE

11. CONDENSER FAN MOTOR 

ASSEMBLY 

12. RADIATOR FAN MOTOR 

ASSEMBLY

13. FAN
14. RADIATOR FAN MOTOR
15. SHROUD

RADIATOR REMOVAL STEPS 

RADIATOR

TSB Revision

COOLING SYSTEM

14-20

REMOVAL SERVICE POINTS

<<A>> RADIATOR UPPER HOSE/RADIATOR LOWER HOSE 
DISCONNECTION
After making mating marks on the radiator hose and the hose 
clamp, disconnect the radiator hose.

<<B>> A/T OIL COOLER HOSE REMOVAL
After removing the hose from the radiator, plug the hose and 
the radiator nipple to prevent dust or foreign particles from 
getting in.

INSTALLATION SERVICE POINT

>>A<< RADIATOR LOWER HOSE/RADIATOR UPPER HOSE 
CONNECTION
1. Insert each hose as far as the projection of the water inlet 

fitting.

2. Align the mating marks on the radiator hose and hose 

clamp, and then connect the radiator hose.

ACX01828

MATING MARKS

AB

ACX01829AB

PROJECTION

WATER OUTLET
FITTING

MATING
MARKS

THERMOSTAT

TSB Revision

COOLING SYSTEM

14-21

TH ER M O STAT

REMOVAL AND INSTALLATION

M1141002400099

REMOVAL SERVICE POINT

<<A>> RADIATOR LOWER HOSE DISCONNECTION
Place mating marks on the radiator lower hose and hose clamp 
before disconnection.

INSTALLATION SERVICE POINTS

>>A<< THERMOSTAT INSTALLATION

CAUTION

Make absolutely sure that no oil adheres to the rubber ring 
of the thermostat. Also be careful not to fold over or 
scratch the rubber ring when inserting.
Install the thermostat so that the jiggle valve is facing straight 
up, while being careful not to fold over or scratch the rubber 
ring.

>>B<< RADIATOR LOWER HOSE CONNECTION
1. Insert each hose as far as the projection of the water inlet 

fitting.

2. Align the mating marks on the radiator hose and hose 

clamp, and then connect the radiator hose.

Pre-removal and Post-installation Operation

Engine Coolant Draining and Supplying [Refer to GROUP 
00, Maintenance Service - Engine Coolant (Change) 

P.00-52

.]

Air Cleaner Removal and Installation (Refer to GROUP 
15, Air Cleaner 

P.15-5

.)

AC000278

2

3

1

19 ± 1 N·m
13 ± 1 ft-lb

13 ± 2 N·m
109 ± 21 in-lb

1

2

3

AD

<2.4L ENGINE>

<3.0L ENGINE>

REMOVAL STEPS

<<A>>

>>B<<

1.

RADIATOR LOWER HOSE 
CONNECTION

2.

WATER INLET FITTING

>>A<<

3.

THERMOSTAT

REMOVAL STEPS (Continued)

AC000279

JIGGLE VALVE

RUBBER RING

AB

THERMOSTAT

TSB Revision

COOLING SYSTEM

14-22

INSPECTION

M1141002500096

THERMOSTAT CHECK

1. Immerse the thermostat in water, and heat the water while 

stirring. Check the thermostat valve opening temperature.

Standard value: 88 

±

 1.5 

°

C (190 

±

 3 

°

F)

2. Check that the amount of valve lift is at the standard value 

when the water is at the full-opening temperature.

NOTE: Measure the valve height when the thermostat is 
fully closed, and use this measurement to calculate the 
valve height when the thermostat is fully open.

Standard value:

ITEMS

2.4L ENGINE

3.0L ENGINE

Full-opening 
temperature 

°

C (

°

F)

100 (212)

100 (212)

Amount of valve lift mm 
(in)

8.5 (0.33) or 
more

9.0 (0.35) or 
more

ACX00400

ACX00401AB

VALVE LIFT


Content   ..  345  346  347  348   ..