Mitsubishi Eclipse / Eclipse Spyder (2000-2002). Service and repair manual - part 29
 

  Index      Mitsubishi     Mitsubishi Eclipse / Eclipse Spyder (2000-2002). Service and repair manual


Search            


Content   ..  27  28  29  30   ..


Mitsubishi Eclipse / Eclipse Spyder (2000-2002). Service and repair manual - part 29


TIMING BELT

TSB Revision

ENGINE MECHANICAL <2.4L ENGINE>

11A-33

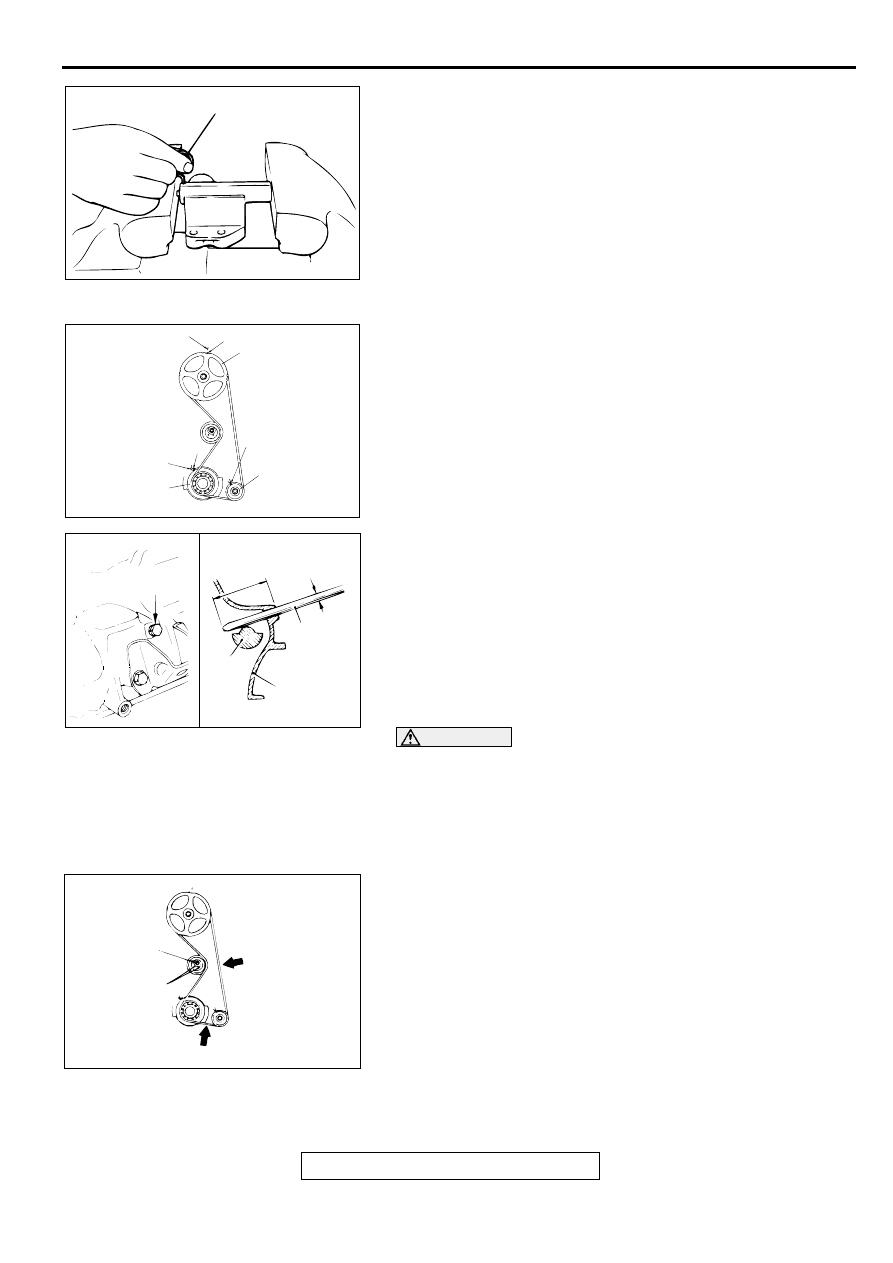
4. When the holes are aligned, insert the set pin.

NOTE: When replacing the auto-tensioner with a new part, 
the pin will be in the auto-tensioner.

5. Install the auto-tensioner to the engine.

>>B<< TIMING BELT INSTALLATION
1. Align the timing marks on the camshaft sprocket, crankshaft 

sprocket and oil pump sprocket.

2. After aligning the timing mark on the oil pump sprocket, 

remove the cylinder block plug and insert a Phillips) head 8 
mm (0.3 inch) screwdriver. Check to be sure that the 
screwdriver goes in 60 mm (2.4 inches) or more. If the 
screwdriver will only go in 20 

 25 mm (0.8 

 1.0 inch) 

before striking the counterbalance shaft, turn the sprocket 
once, realign the timing marks and check that the 
screwdriver goes in 60 mm (2.4 inches) or more.
The screwdriver should not be taken out until the timing belt 
is installed.

CAUTION

If the timing belt is re-used, install so that the arrow 
marked on it at time of removal is pointing in the clockwise 
direction.
3. Install the belt to the crankshaft sprocket, oil pump sprocket 

and camshaft sprocket in that order, so that there is no 
slackness in the belt tension.

4. Set the tension pulley so that the pin holes are at the bottom, 

press the tension pulley lightly against the timing belt, and 
then provisionally tighten the fixing bolt.

5. Adjust the timing belt tension.

AC000149

SET PIN

AB

AC001788

TIMING MARK

TIMING MARK

TIMING MARK

TIMING MARK

TIMING MARK
(TOP OF
CYKINDER
HEAD)

CAMSHAFT
SPROCKET

OIL PUMP
SPROCKET

CRANKSHAFT
SPROCKET

AB

AC000151AB

PLUG

60 mm
(2.4 in)
OR MORE

8 mm
(0.3 in)

SCREW-
DRIVER

CYLINDER
BLOCK

COUNTER
BALANCE
SHAFT

AC000150

FIXING
BOLT

PIN
HOLES

BELT TENSION
SIDE

BELT TENSION SIDE

AB

TIMING BELT

TSB Revision

ENGINE MECHANICAL <2.4L ENGINE>

11A-34

>>C<< TIMING BELT TENSION ADJUSTMENT

CAUTION

Do not use a spanner or the similar tool to turn special tool 
MD998738. Otherwise, the auto-tensioner set pin may be 
broken. Turn special tool MD998738 by hand only.
1. Remove the rubber plug from the rear of the timing belt 

cover assembly. Then screw in special tool MD998738 by 
hand until the tensioner arm is touching the auto-tensioner 
pushrod.

2. After turning the crankshaft 1/4 of a revolution in the 

counterclockwise direction, turn it in the clockwise direction 
until the timing marks are aligned.

CAUTION

When tightening the fixing bolt, make sure that the tension 
pulley does not turn with the bolt.

3. Loosen the tension pulley fixing bolt, and then use special 

tool MD998767 and a torque wrench to tighten the fixing bolt 
to the specified torque while applying tension to the timing 
belt.

Timing belt tension torque: 3.5 N

m (31 in-lb)

Tightening torque:48 

±

 6 N

m (36 

±

 4 ft-lb)

4. Remove the set pin that has been inserted into the auto-

tensioner, and then remove special tool MD998767.

5. Turn the crankshaft two revolutions clockwise so that the 

timing marks are aligned. After leaving it for 15 minutes, 
measure the amount of protrusion of the auto-tensioner.

Standard value (A): 3.8 

 4.5 mm (0.15 

 0.18 inch)

6. If the amount of protrusion is outside the standard value, 

repeat steps (1) through (5).

7. Check again to be sure that the timing marks of each 

sprocket are aligned.

AC000152

MD998738

TENSIONER
ARM

PUSHROD

AB

AUTO-TENSIONER

AC000153

48 ± 6 N·m(36 ± 4 ft-lb)

TENSION
DIRECTION

AB

MD998767

AC000154

A

AUTO-
TENSIONER

AB

TIMING BELT B

TSB Revision

ENGINE MECHANICAL <2.4L ENGINE>

11A-35

TIM IN G  B ELT B

REMOVAL AND INSTALLATION

M1112004600066

Required Special Tool:

MB991367: Special Spanner

REMOVAL SERVICE POINTS

<<A>> CRANKSHAFT SPROCKET REMOVAL
1. Use the crankshaft pulley mounting bolt to hold special tool 

MB991367.

2. Loosen the crankshaft sprocket mounting bolt, and remove 

the sprocket.

AC000155

19 ± 3 N·m
14 ± 2 ft-lb

118 ± 9 N·m
87 ± 7 ft-lb

1

4

5

2

3

(ENGINE OIL)

AB

REMOVAL STEPS

1.

TIMING BELT (REFER TO 

P.11A-31

.)

>>C<<

TIMING BELT B TENSION 
ADJUSTMENT

<<A>>

>>B<<

2.

CRANKSHAFT SPROCKET

>>B<<

3.

CRANKSHAFT SENSING 
BLADE

4.

TIMING BELT B TENSIONER

<<B>>

>>A<<

5.

TIMING BELT B

REMOVAL STEPS (Continued)

AC000135AB

CRANKSHAFT
PULLEY
MOUNTING
BOLT

MB991367

CRANKSHAFT
SPROCKET

TIMING BELT B

TSB Revision

ENGINE MECHANICAL <2.4L ENGINE>

11A-36

<<B>> TIMING BELT B REMOVAL

CAUTION

If the belt is to be re-used, mark an arrow on the belt with 
chalk indicating the clockwise direction of rotation.

INSTALLATION SERVICE POINTS

>>A<< TIMING BELT B INSTALLATION
1. Ensure that crankshaft sprocket B timing marks and the 

counterbalance shaft sprocket timing marks are aligned.

2. Fit timing belt B over crankshaft sprocket B and the 

counterbalance shaft sprocket. Ensure that there is no slack 
in the belt.

>>B<< CRANKSHAFT SENSING BLADE/CRANKSHAFT 
SPROCKET INSTALLATION
1. To prevent the crankshaft bolt from loosening, degrease or 

clean the seating surfaces of the crankshaft, crankshaft 
sprocket B, crankshaft sensing blade and crankshaft at the 
shown positions.

2. Install the crankshaft sensing blade so that they face as 

shown in the illustration.

3. Apply the minimum amount of engine oil to the seat surface 

and thread of the crankshaft bolt.

4. Use the crankshaft pulley mounting bolt to secure special 

tool MB991367.

5. Tighten the crankshaft sprocket bolt to the specified torque.

Tightening torque: 118 

±

 9 N

m (87 

±

 7 ft-lb)

AC000156

AB

AC000157AB

CONTERBALANCE SHAFT SPROCKET

BELT TENSION SIDE

TIMING
MARKS

TIMING
MARKS

CRANKSHAFT
SPROCKET B

AC004794

CRANKSHAFT
SPROCKET

CRANKSHAFT
SPROCKET B

CRANKSHAFT

CRANKSHAFT
SENSING BLADE

SHADED PART: DEGREAS

× PART: 
CLEANING

AB

AC000135AB

CRANKSHAFT
PULLEY
MOUNTING
BOLT

MB991367

CRANKSHAFT
SPROCKET


Content   ..  27  28  29  30   ..