Mazda 6. Manual - part 334
 

  Index      Mazda     Mazda 6 - service repair manual 2002 year


Search            


Content   ..  332  333  334  335   ..


Mazda 6. Manual - part 334


AUDIO AND NAVIGATION SYSTEM 

T–95

T

5. With the code number displayed, press the 

AUTO-M button, then simultaneously press 
channel button 6 for approximately 2 seconds
“CODE” will be displayed for approximately 5 
seconds
. After it disappears, the code number is 
canceled.

6. If “Err” (error) appears on the display, repeat the 

procedure from Step 4.

Canceling Anti-theft Operation
Properly input the selected code number to deactivate the anti-theft system and resume normal audio operation.

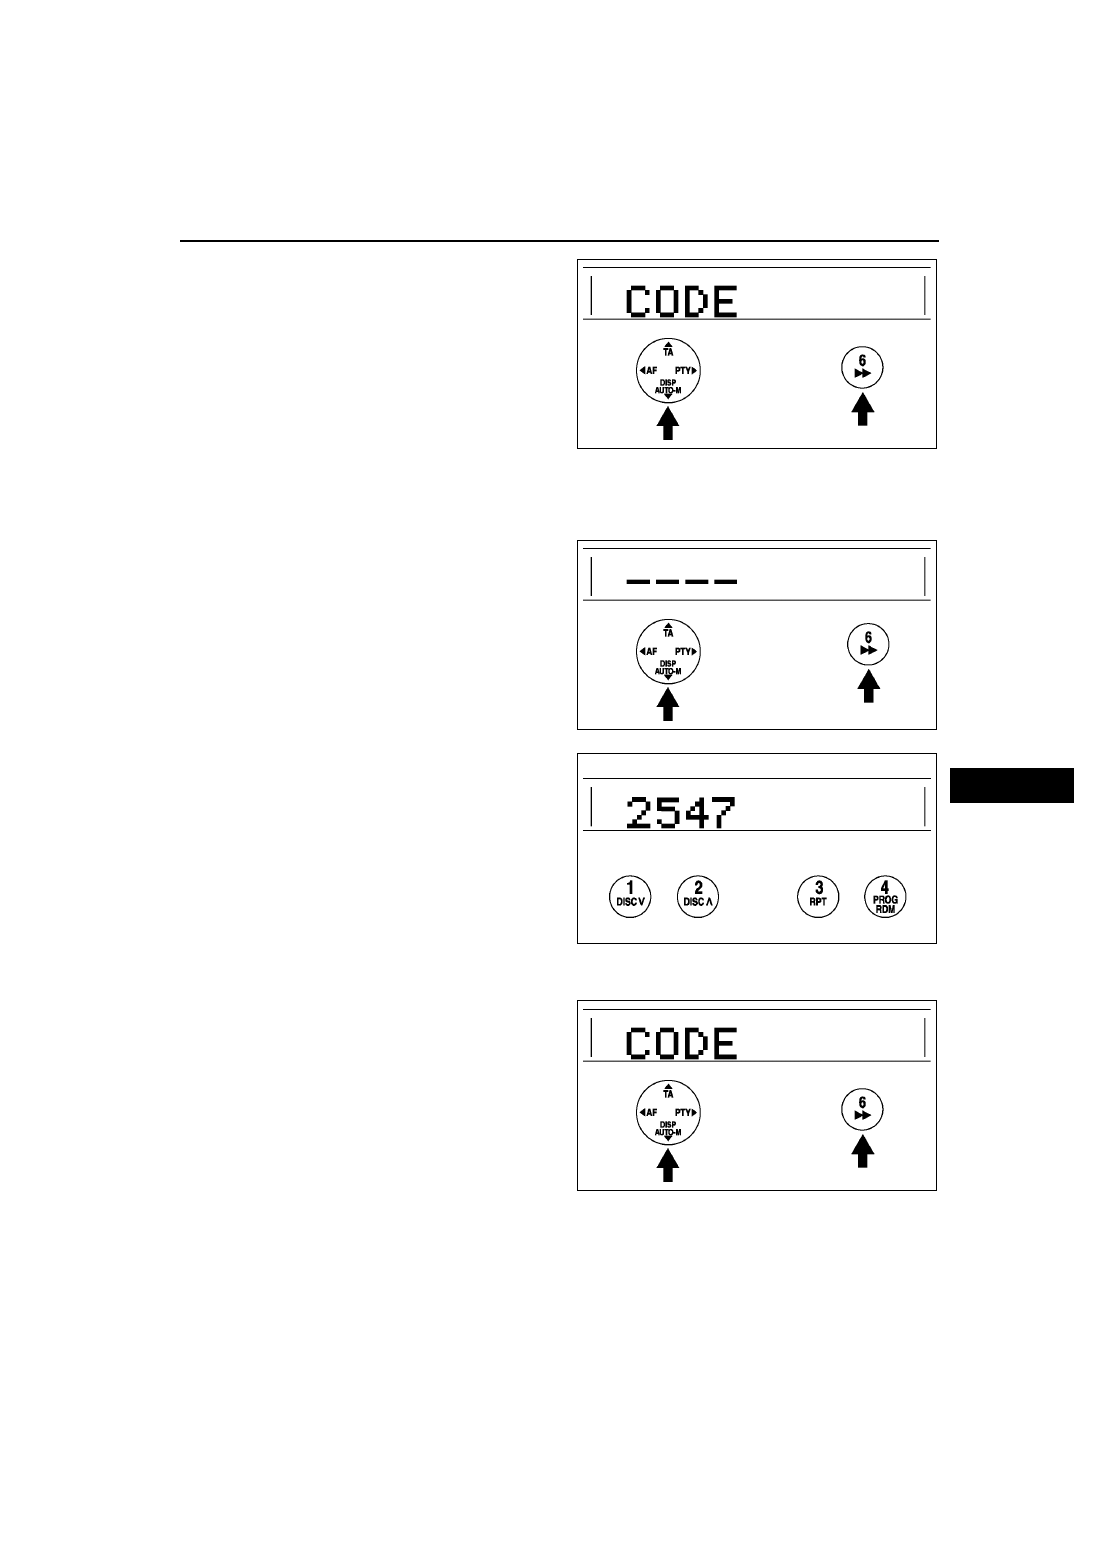
1. Turn the ignition switch to ACC position. (“CODE” will flash on the display.)
2. First press the AUTO-M button, then 

simultaneously press channel button 6 for 
approximately 2 seconds until bars appears on 
the display.

Note

• Perform Step 3 within 10 seconds after 

Step 2.

3. Use channel buttons 1–4 to input the selected 

code number. Press button 1 for the first digit, 2 
for the second, 3 for the third, and 4 for the last 
digit. Input the number within 10 seconds. If the 
display is deleted, repeat the procedure from Step 
1.

Caution

• Three consecutive errors, including 

turning the ignition switch to LOCK 
position and disconnecting the audio 
unit, will activate the anti-theft system 
and render the audio unit completely 
inoperative.

4. With the code number displayed, press the 

AUTO-M button, then simultaneously press 
channel button 6 for approximately 2 seconds
“CODE” will flash for approximately 5 seconds..

5. If “Err” (error) appears on the display, repeat the 

procedure from Step 1.

End Of Sie

A6E8124W025

A6E8124W026

A6E8124W027

A6E8124W025

T–96

AUDIO AND NAVIGATION SYSTEM 

CENTER PANEL MODULE REMOVAL/INSTALLATION

A6E812466900W02

1. Cancel the anti-theft operation. (with anti-theft system) (See 

T–93 ANTI-THEFT SYSTEM

.)

2. Disconnect the negative battery cable.
3. Remove the glove compartment.
4. Remove the rear console.
5. Remove in the order indicated in the table.

6. Install in the reverse order of removal.

Caution

• Make certain that the wiring harness and 

antenna feeder are not caught between 
the unit and dashboard. If the harness or 
the antenna feeder is caught between the 
unit and dashboard, it may cause trouble 
or malfunctions.

7. Operate the anti-theft system by setting the code number. (with anti-theft system) (See 

T–93 ANTI-THEFT 

SYSTEM

.)

Center Panel Module Removal Note

1. Pull the center panel module toward you, then 

disengage clip A from the dashboard, and remove 
the center panel module.

End Of Sie

1

Dial (manual A/C only)

2

Screw (manual A/C only)

3

Screw

4

Bolt

5

Center panel module
(See 

T–96 Center Panel Module Removal Note

)

6

Connector

7

Antenna feeder

A6E8124W020

A6E8124W029

AUDIO AND NAVIGATION SYSTEM 

T–97

T

CENTER PANEL MODULE DISASSEMBLY/ASSEMBLY

A6E812466900W03

Caution

• Before disassembling the center panel module, spread a cloth on the floor to put the 

disassembled parts on. This protects the surface of the panel from scratches or dirt.

1. Remove the center panel module. (See 

T–96 CENTER PANEL MODULE REMOVAL/INSTALLATION

.)

2. Remove in the order indicated in the table.

3. Install in the reverse order of removal.

End Of Sie

AUDIO UNIT DISASSEMBLY/ASSEMBLY

A6E812466900W04

1. Remove the audio unit. (See 

T–97 CENTER PANEL MODULE DISASSEMBLY/ASSEMBLY

.)

2. Disassemble in the order indicated in the table.

3. Assemble in the reverse order of disassembly.

End Of Sie

1

Screw

2

Audio unit

3

Screw

4

Circuit board (manual A/C only)

5

Cover (upper module)

6

Cover (lower module)

7

Passenger-side air bag cut indicator light bulb

8

Socket

9

Screw

10

Bracket

11

Screw

12

Climate control unit (auto A/C only)

13

Screw

14

Ventilator grille

15

Center panel

A6E8124W012

1

Cover (without upper module)

2

Screw

3

Upper module

4

Screw

5

Lower module

6

Screw

7

Wiring harness

8

Base unit

A6E8124W013

T–98

AUDIO AND NAVIGATION SYSTEM 

CAR-NAVIGATION UNIT REMOVAL/INSTALLATION

A6E812466902W01

1. Disconnect the negative battery cable.
2. Remove the glove compartment.
3. Remove in the order indicated in the table.

4. Install in the reverse order of removal.

Car-navigation Unit Installation Note

1. Insert the car-navigation unit bracket into the 

dashboard member hole, and with the car-
navigation unit fixed in place install the bolt.

End Of Sie

LCD UNIT REMOVAL/INSTALLATION

A6E812466902W02

1. Disconnect the negative battery cable.
2. Remove the center panel module. (See 

T–96 CENTER PANEL MODULE REMOVAL/INSTALLATION

.)

3. Remove in the order indicated in the table.

4. Install in the reverse order of removal.

LCD Unit Removal Note

1. Pull up the front part of the LCD unit.

1

Bolt

2

Car-navigation unit
(See 

T–98 Car-navigation Unit Installation Note

)

3

Connector

A6E8124W015

A6E8124W016

1

Cover

2

Bolt

3

Screw

4

LCD unit
(See 

T–98 LCD Unit Removal Note

)

5

Connector

A6E8124W014

A6E8124W017


Content   ..  332  333  334  335   ..