Mazda 6. Manual - part 287
 

  Index      Mazda     Mazda 6 - service repair manual 2002 year


Search            


Content   ..  285  286  287  288   ..


Mazda 6. Manual - part 287


LIFTGATE 

S–43

S

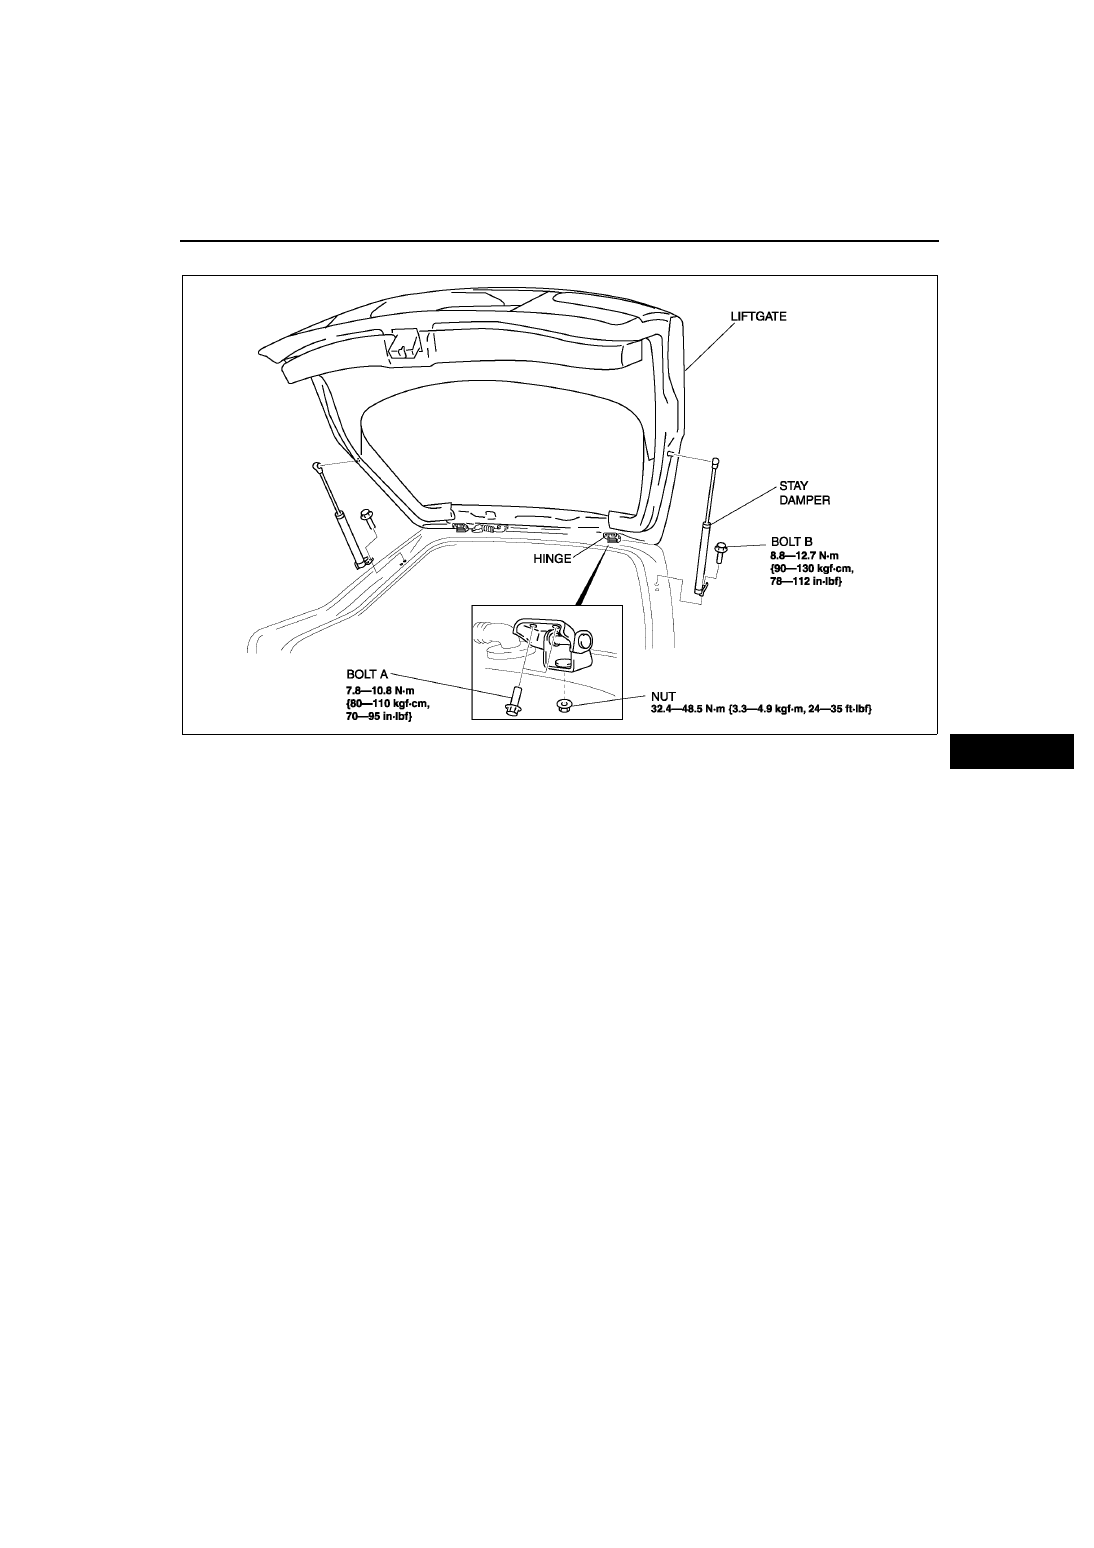
9. To remove the stay damper, remove the bolt B.

10. Install in the reverse order of removal.

End Of Sie

A6E7722W001

S–44

LIFTGATE 

LIFTGATE DISASSEMBLY/ASSEMBLY

A6E772262010W02

1. Disconnect the negative battery cable.
2. Remove the liftgate lower trim.
3. To remove the liftgate outer handle and liftgate key cylinder, remove the rear finisher. 
4. To remove the stud ball, separate the stud ball and the stay damper.
5. Disassemble in the order indicated in the table.
6. Assemble in the reverse order of disassembly.

.

End Of Sie

STAY DAMPER DISPOSAL

A6E772262620W01

1. Referring to procedures for trunk lid stay damper disposal, dispose of the liftgate stay damper.

End Of Sie

A6E7722W007

1

Liftgate latch and lock actuator

2

Liftgate outer handle

3

Liftgate key cylinder

4

Clip

5

Stud ball

6

Liftgate wedge

7

Liftgate dovetail

8

Liftgate

9

Stpper

LIFTGATE 

S–45

S

LIFTGATE ADJUSTMENT

A6E772262010W03

1. Measure the gap and height between the liftgate and the body.
2. If not as specified, loosen the liftgate hinge 

installation bolts or the liftgate striker installation 
screws, and reposition the liftgate.

Clearance

a: 3.0—7.0 mm {0.12—0.28 in}
b: -1.0—3.4 mm {-0.04—013 in}
c: 2.8—5.2 mm {0.11—0.24 in}
d: -1.2—1.2 mm {0.05—0.05 in}
e: 2.8—5.8 mm {0.11—0.22 in}
f:4.0—8.0 mm {0.16—0.31 in}

3. Tighten the bolts or screws.

End Of Sie

A6E7722W004

S–46

FUEL-FILLER LID AND OPENER 

FUEL-FILLER LID AND OPENER REMOVAL/INSTALLATION

A6E772456890W01

1. To remove the fuel-filler lid opener, remove the left side trunk side trim (4SD) or trunk side lower trim (5HB).
2. To remove the fuel-filler lid opener cable, perform the following and turn over the floor covering.

(1) Remove the driver-side front seat.
(2) Remove the driver-side front scuff plate.
(3) Remove the driver-side rear scuff plate.
(4) Remove the driver-side B-pillar lower trim.
(5) Remove the driver-side tire house trim.
(6) Remove the rear seat cushion. (R.H.D., 4SD)
(7) Remove the rear seat installation bolts (front side), then lift the rear seat cushion. (R.H.D., 5HB)

3. Remove in the order indicated in the table.

4. Install in the reverse order of removal.
5. Adjust the fuel-filler lid. (See 

S–46 FUEL-FILLER 

LID ADJUSTMENT

.)

End Of Sie

FUEL-FILLER LID ADJUSTMENT

A6E772442410W01

1. If not as specified, loosen the fuel-filler lid installation bolts, and reposition the fuel-filler lid.
2. Measure the gap and height between the fuel-filler lid and the body.

Clearance

a: 1.7—3.7 mm {0.067—0.145 in}
b: -0.5—1.5 mm {-0.019—0.059 in}

3. Tighten the bolts.

End Of Sie

FUEL-FILLER LID AND OPENER

1

Fuel-filler lid

2

Lift  spring

3

Fuel-filler lid opener

4

Cover

5

Fuel-filler lid opener lever

6

Fuel-filler lid opener cable

A6E7724W001

A6E7724W002


Content   ..  285  286  287  288   ..