Lexus NX450H+ (2022 year). Manual in english - page 38
 

  Index      Manuals     Lexus NX450H+ (2022 year). Manual in english


Search            copyright infringement  


Content      ..     36      37      38      39     ..


Lexus NX450H+ (2022 year). Manual in english - page 38


WARNING

Do not put any part of your body under the vehicle while it is supported by the
jack.

Do not start the hybrid system or drive the vehicle while the vehicle is supported
by the jack.

Do not raise the vehicle while someone is inside.

When raising the vehicle, do not put an object on or under the jack.

Do not raise the vehicle to a height greater than that required to replace the tire.

Use a jack stand if it is necessary to get under the vehicle.

6

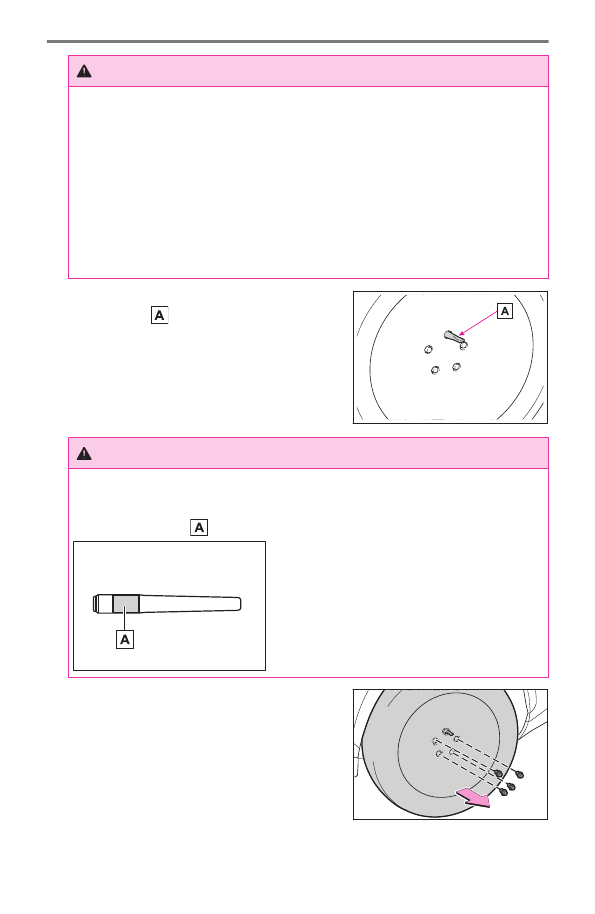
Remove the uppermost wheel bolt and install
the guide pin   by hand.

Turn the guide pin clockwise to tighten it until it
stops.

WARNING

When removing or installing a tire, make sure to use the guide pin.
Also, the guide pin is made of resin. It may be damaged if the wheel is placed
anywhere other than 

 or if a large amount of force is applied to the guide pin.

7

Remove the remaining wheel bolts and the
tire.

When resting the tire on the ground, place the
tire so that the wheel design faces up, to avoid
scratching the wheel surface.

8-5. Tire maintenance

624

Installing the tire

1

Remove any dirt or foreign matter from the
wheel contact surfaces and wheel bolts.

If foreign matter is not removed, the wheel bolts
may loosen while the vehicle is in motion, and the
wheel may come off.

2

Align a wheel bolt hole on the spare tire with
the guide pin, and set the spare tire on the
guide pin.

Align the center hole of the wheel with the center
of the hub and securely set the spare tire so that
the wheel and hub contact surfaces are touching.

WARNING

When removing or installing a tire, make sure to use the guide pin.
Also, the guide pin is made of resin. It may be damaged if the wheel is placed
anywhere other than 

 or if a large amount of force is applied to the guide pin.

3

Loosely tighten each wheel bolt by hand or
using a wheel bolt socket   .

Do not use the wheel bolt socket for anything
other than loosely tightening the wheel bolts by
hand.

8-5. Tire maintenance

625

8

Maintenance and car

e

WARNING

Observe the following precautions. Failure to do so may lead to the wheel bolts
loosening and the tire falling off.

Never apply oil or grease to the wheel bolts or their contact surface on the wheel

 .

Doing so may cause the wheel bolts to be tightened excessively, leading to
damage to the wheel bolts, the threaded portion the wheel bolts install to 

 , or

the wheel.
Also, the wheel bolts may come loose, possibly leading to the wheel coming off,
causing a serious accident. If oil or grease is attached to either of these parts,
remove it.

When installing a wheel, use the same wheel bolts that were removed with the
wheel. Also, do not use any wheel bolts other than Lexus Genuine wheel bolts.

If a wheel bolt hole in a wheel or the threads of a wheel bolt or the wheel hub are
deformed, cracked, rusty or otherwise damaged, have the vehicle inspected by
your Lexus dealer.

Do not install the wheel ornament if it is damaged, as it may fly off the wheel while
the vehicle is being driven.

4

Remove the guide pin and loosely tighten the
wheel bolt as in step 

3

.

8-5. Tire maintenance

626

5

Lower the vehicle.

WARNING

When lowering the vehicle, make sure that no one is near the vehicle. If there are
people nearby, warn them vocally before lowering the vehicle.

6

Firmly tighten each wheel bolt in the order
shown in the illustration two or three times.

Tightening torque: 103 ft•lbf (140 N•m, 14.3
kgf•m)

WARNING

When tightening the wheel bolts, do not tighten them excessively. Doing so may
cause the wheel bolts, the threads of the wheel hub, or the wheel to be damaged.

7

Stow the jack and all tools.

WARNING

After using the tools and jack, before driving, make sure that the tools and jack are
securely stored. Failure to do so may result in injury during a collision or sudden
braking.

After replacing a tire, check the tightening torque as soon as possible.
After replacing a tire, check the tightening torque as soon as possible. Also, after
driving approximately 621 miles (1000 km), be sure to check that the wheel bolts
are still tightened to the specified torque.

NOTICE

When removing or fitting the wheels, tires or the tire pressure warning valves and
transmitters, contact your Lexus dealer as the tire pressure warning valves and
transmitters may be damaged if not handled correctly.

8-5. Tire maintenance

627

8

Maintenance and car

e

Headlight aim

Vertical movement adjusting bolts


▶ 

Type A

A

Adjustment bolt A

B

Adjustment bolt B


▶ 

Type B

A

Adjustment bolt A

B

Adjustment bolt B

Checking the headlight aim

Before checking the headlight aim, confirm the following.

The vehicle has a full tank of gasoline and the area around the headlight is not
deformed.

The vehicle is parked on level ground.

The tire inflation pressure is at the specified level.

Someone is sitting in the driver's seat.

The vehicle has been bounced several times after being parked.

8-5. Tire maintenance

629

8

Maintenance and car

e

Adjusting the headlight aim

1

Using a Phillips-head screwdriver, turn bolt A
in either direction. Remember the turning di-
rection and the number of turns.

2

Turn bolt B the same number of turns and in
the same direction as step 1.

If the headlight cannot be adjusted using this pro-
cedure, take the vehicle to your Lexus dealer to
adjust the headlight aim.

▶ 

Type A

▶ 

Type B

▶ 

Type A

▶ 

Type B

8-5. Tire maintenance

630

9

When trouble arises

9-1. What to do if a problem occurs

while driving

What to do if a problem oc-

curs while driving..................

633

9-2. If a warning light illumi-

nates/flashes or a warning
message is displayed on the
meter

If a warning light turns on/

flashes........................................

636

If a warning message is dis-

played........................................

649

9-3. If the hybrid system will not start

When the hybrid system

cannot be started even
though the correct start-
ing procedure is being fol-
lowed 
.........................................

669

When the interior lights or

headlights are dim and the
hybrid system cannot be
started 
.......................................

672

When the interior lights or

headlights do not illumi-
nate and the hybrid system
cannot be started 
.................

679

When the horn sounds at a

low volume and the hybrid
system cannot be started 
.

680

When the horn does not

sound and the hybrid sys-
tem cannot be started 
........

681

9-4. If a tire is flat

Precautions for when you

have a flat tire ........................

682

9-5. If a door cannot be opened or

locked

If a key has been lost..............

683

When the doors/windows/

moon roof cannot be op-
erated using an electronic
key..............................................

684

If a door cannot be opened

using the door opener
switch
.........................................

692

If the rear doors cannot be

opened from the inside ......

695

If the back door cannot be

opened......................................

696

9-6. If the moon roof or electronic

sunshade does not operate
correctly

If the moon roof does not

operate correctly..................

697

9-7. If refueling cannot be per-

formed

If the fuel filler door cannot

be opened ..............................

698

9-8. If the plug-in hybrid system can-

not be used normally

If the hybrid battery (trac-

tion battery) of the plug-in
hybrid system cannot be
charged 
....................................

699

If the charging connector

cannot be disconnected

631

9

When tr

ouble arises

from the AC charging inlet

......................................................

703

When a malfunction occurs

during charging.....................

705

If the charging schedule

function does not operate
normally
....................................

707

9-9. If an indicator on an interior fea-

ture illuminates or flashes

When the wireless charger

operation indicator light
(on the charging tray)
flashes
........................................

709

9-10. If the vehicle cannot move

When a hybrid system

warning message is dis-
played and the vehicle
does not move 
.........................

711

If the hybrid transmission

makes abnormal sounds.....

712

Towing with a tow truck..........

713

Using a flatbed truck...............

715

Towing with another vehicle

.......................................................

716

Getting unstuck from mud,

sand, or snow...........................

719

9-11. If you think something is wrong

If a vehicle abnormality is

found..........................................

720

If abnormal sounds are

emitted from the vehicle.....

721

If the vehicle behaves ab-

normally....................................

722

9-12. Items to check before contact-

ing a dealership

The steering wheel cannot

be turned after the hybrid
system is stopped 
.................

723

If the windows do not open

or close by operating the
power window switches
.....

724

The power switch is turned

off automatically....................

726

If your vehicle overheats.......

727

If electrical components

cannot be used or do not
operate when a switch is
operated
..................................

730

If a light does not illuminate..

731

632

What to do if a problem occurs while driving

What to do if a problem occurs while driving

Using the emergency flashers to warn other drivers

Use the emergency flashers to inform other drivers of the presence of your vehicle
when it is stopped on the road, such as if the vehicle has broke down.
Press the switch.

All the turn signal lights will flash. To turn them off,
press the switch once again.

INFORMATION

Emergency flashers

If the emergency flashers are used for a long time with the hybrid system stopped
(while the "READY" indicator is not illuminated), the 12-volt battery may become
discharged.

If any of the SRS airbags deploy (inflate) or in the event of a strong rear impact, the
emergency flashers will turn on automatically.
The emergency flashers will turn off automatically after operating for approximately
20 minutes. To manually turn the emergency flashers off, press the switch twice. (The
emergency flashers may not turn on automatically depending on the force of the
impact and conditions of the collision.)

Stopping the vehicle in an emergency

Stop the vehicle using the following procedure only in an emergency, such as if it
becomes impossible to stop the vehicle in the normal way:

WARNING

If the hybrid system has to be stopped while driving

Power assist for the steering wheel will be lost, making the steering wheel heavier to turn.
Decelerate as much as possible before stopping the hybrid system.

1

Steadily step on the brake pedal with both feet and firmly depress it.

Do not pump the brake pedal repeatedly as this will increase the effort required to slow
the vehicle.

9-1. What to do if a problem occurs while driving

633

9

When tr

ouble arises

2

Change the shift position to N.

If the shift position is changed to N:
After slowing down, stop the vehicle in a safe place by the road.
Stop the hybrid system.

If the shift position cannnot be changed to N:
Keep depressing the brake pedal with both feet to reduce vehicle speed as much as
possible.
To stop the hybrid system, press and hold the power switch for 2 consecutive
seconds or more, or press it briefly 3 times or more in succession.

3

Stop the vehicle in a safe place by the road.

WARNING

To restart the hybrid system after performing an emergency shutdown, change the
shift position to N and then press the power switch.

If the vehicle is submerged or water on the road is rising

This vehicle is not designed to be able to drive on roads that are deeply flooded
with water. Do not drive on roads where the roads may be submerged or the water
may be rising. It is dangerous to remain in the vehicle, if it anticipated that the
vehicle will be flooded or set a drift.
Remain calm and follow the following.

If the door can be opened, open the door and exit the vehicle.

If the door cannot be opened, open the window using the power window switch
and ensure an escape route.

If the window can be opened, exit the vehicle through the window.

If the door and window cannot be opened due to the rising water, remain calm,
wait until the water level inside the vehicle rises to the point that the water
pressure inside of the vehicle equals the water pressure outside of the vehicle
and then open the door after waiting for the rising water to enter the vehicle, and
exit the vehicle.

9-1. What to do if a problem occurs while driving

634

When the outside water level exceeds half the height of the door, the door cannot be
opened from the inside due to water pressure.

INFORMATION

Water level exceeds the floor

When the water level exceeds the floor and time has passed, the electrical equipment will
get damaged, the power windows will not operate, the engine and motor stop, and the
vehicle may not be able to get moving.

Using an emergency escape hammer

*1

Laminated glass

*

 is used in the windshield and the windows on this vehicle. Laminated

glass cannot be shattered with an emergency hammer

*1

.

How to distinguish laminated glass

When looking from the cross-sectional view point, laminated glass is two sheets of glass
pasted together.


A

Laminated glass

B

Tempered glass

WARNING

Caution while driving

Do not drive on roads where the roads may be submerged or the water may be rising.
Otherwise the vehicle may be damaged and cannot move, as well as become flooded
and set a drift, which may lead to death.

Operation of emergency shut off system

When a certain level of impact is detected by an impact sensor, the emergency
shut off system blocks the high voltage current and stops the fuel pump to mini-
mize the risk of electrocution and fuel leakage. If the emergency shut off system
activates, your vehicle will not be able to be restarted. To restart the hybrid system,
contact your Lexus dealer.

* : 

If equipped

*1 : 

Contact your Lexus dealer or aftermarket accessory manufacturer for further infor-

mation about an emergency hammer.

9-1. What to do if a problem occurs while driving

635

9

When tr

ouble arises

If a warning light illuminates/flashes or a warning message is displayed on the meter

If a warning light turns on/flashes

Calmly perform the following actions if any of the warning lights comes on or
flashes. If a light comes on or flashes, but then goes off, this does not necessarily
indicate a malfunction in the system. However, if this continues to occur, have the
vehicle inspected by your Lexus dealer.

INFORMATION

Warning buzzer

In some cases, the buzzer may not be heard due to being in a noisy location or audio
sound.

Brake system warning light (warning buzzer)

Condition

Cause / Remedy

 (U.S.A.)

or 

 (red)

(Canada)

Indicates that:

The brake fluid level is low; or

The brake system is malfunctioning

Immediately stop the vehicle and contact your Lexus dealer.
Continuing to drive the vehicle may be dangerous.

WARNING

If both the ABS and the brake system warning lights remain on, stop your vehicle in a safe
place immediately and contact your Lexus dealer.
The vehicle will become extremely unstable during braking, and the ABS system may fail,
which could cause an accident resulting in death or serious injury.

Brake system warning light (warning buzzer)

Condition

Cause / Remedy

 (yellow)

Indicates a malfunction in:

The regenerative braking system;

The electronically controlled brake system; or

The electric parking brake

Have the vehicle checked by your Lexus dealer immediately.

9-2. If a warning light illuminates/flashes or a warning message is displayed on the meter

636

WARNING

If both the ABS and the brake system warning lights remain on, stop your vehicle in a safe
place immediately and contact your Lexus dealer.
The vehicle will become extremely unstable during braking, and the ABS system may fail,
which could cause an accident resulting in death or serious injury.

High coolant temperature warning light (warning buzzer)

Condition

Cause / Remedy

This light illuminates on the

multi-information display.

Indicates that the engine coolant temperature is too
high
Immediately stop the vehicle in a safe take the cor-
rective actions for overheating.

 Related Links 

If your vehicle overheats(P. 727)

Hybrid system overheat warning light (warning buzzer)

Condition

Cause / Remedy

This light illuminates on the

multi-information display.

Indicates the hybrid system has overheated
Stop the vehicle in a safe place and perform the
necessary actions.

 Related Links 

If your vehicle overheats(P. 727)

Charging system warning light (warning buzzer)

Condition

Cause / Remedy

This light illuminates on the

multi-information display.

Indicates a malfunction in the vehicle’s charging
system
Immediately stop the vehicle in a safe place and
contact your Lexus dealer.

9-2. If a warning light illuminates/flashes or a warning message is displayed on the meter

637

9

When tr

ouble arises

Low engine oil pressure warning light (warning buzzer)

Condition

Cause / Remedy

This light illuminates on the

multi-information display.

Indicates that the engine oil pressure is too low
Immediately stop the vehicle in a safe place and
contact your Lexus dealer.

Malfunction indicator lamp

Condition

Cause / Remedy

(U.S.A.) or

 (Can-

ada)

Indicates a malfunction in:

The hybrid system;

The electronic engine control system;

The electronic throttle control system; or

The electronic transmission control system

Immediately stop the vehicle in a safe place and contact your
Lexus dealer.

INFORMATION

If the malfunction indicator lamp comes on while driving

First check the following:

Is the fuel tank empty?
If it is, fill the fuel tank immediately.

Is the fuel tank cap loose?
If it is, tighten it securely.

The light will go off after several driving trips.
If the light does not go off even after several trips, contact your Lexus dealer as soon as
possible.

9-2. If a warning light illuminates/flashes or a warning message is displayed on the meter

638

SRS warning light

Warning light

Details / Actions

The SRS airbag system is malfunctioning

The seat belt pretensioner system is malfunctioning

Have the vehicle checked by your Lexus dealer immediately.

SRS warning light

This warning light indicates problems with the following:

Airbag sensor assembly

Front impact sensors

Side impact sensors (front door)

Side impact sensors (front)

Front passenger occupant classification sensors

Driver’s seat position sensor

Driver’s seat belt buckle switch

Front passenger’s seat belt buckle switch

"AIR BAG ON" indicator light

"AIR BAG OFF" indicator light

Seat belt pretensioners

Air bags

Interconnecting wiring and power sources.

 Related Links 

SRS airbags(P. 535)

ABS warning light (warning buzzer)

Condition

Cause / Remedy

 (U.S.A.) or

 (Canada)

Indicates a malfunction in:

The ABS; or

The brake assist system

Have the vehicle checked by your Lexus dealer immedi-
ately.

9-2. If a warning light illuminates/flashes or a warning message is displayed on the meter

639

9

When tr

ouble arises

WARNING

If both the ABS and the brake system warning lights remain on, stop your vehicle in a safe
place immediately and contact your Lexus dealer.
The vehicle will become extremely unstable during braking, and the ABS system may fail,
which could cause an accident resulting in death or serious injury.

Inappropriate pedal operation warning light (warning buzzer)

Condition

Cause / Remedy

This light illuminates

on the multi-information

display.

When a buzzer sounds:
Indicates a malfunction in:

The Brake Override System

The Drive-Start Control

Have the vehicle checked by your Lexus dealer imme-
diately.

When a buzzer sounds:
Indicates that the shift position was changed and
Drive-Start Control was operated while depressing
the accelerator pedal.
Momentarily release the accelerator pedal.

When a buzzer sounds:
PKSB (Parking Support Brake) has operated
Follow the instructions displayed on the multi-informa-
tion display.

When a buzzer does not sound:
Indicates that the accelerator and brake pedals are be-
ing depressed simultaneously, and the Brake Override
System is operating.
Release the accelerator pedal and depress the brake
pedal.

9-2. If a warning light illuminates/flashes or a warning message is displayed on the meter

640


Content      ..     36      37      38      39     ..