Lexus UX250h (2023 year). Manual in english - page 11
 

  Index      Manuals     Lexus UX250h (2023 year). Manual in english


Search            copyright infringement  


Content      ..     9      10      11      12     ..


Lexus UX250h (2023 year). Manual in english - page 11


186

4-3. Operating the lights and wipers

*

: If equipped

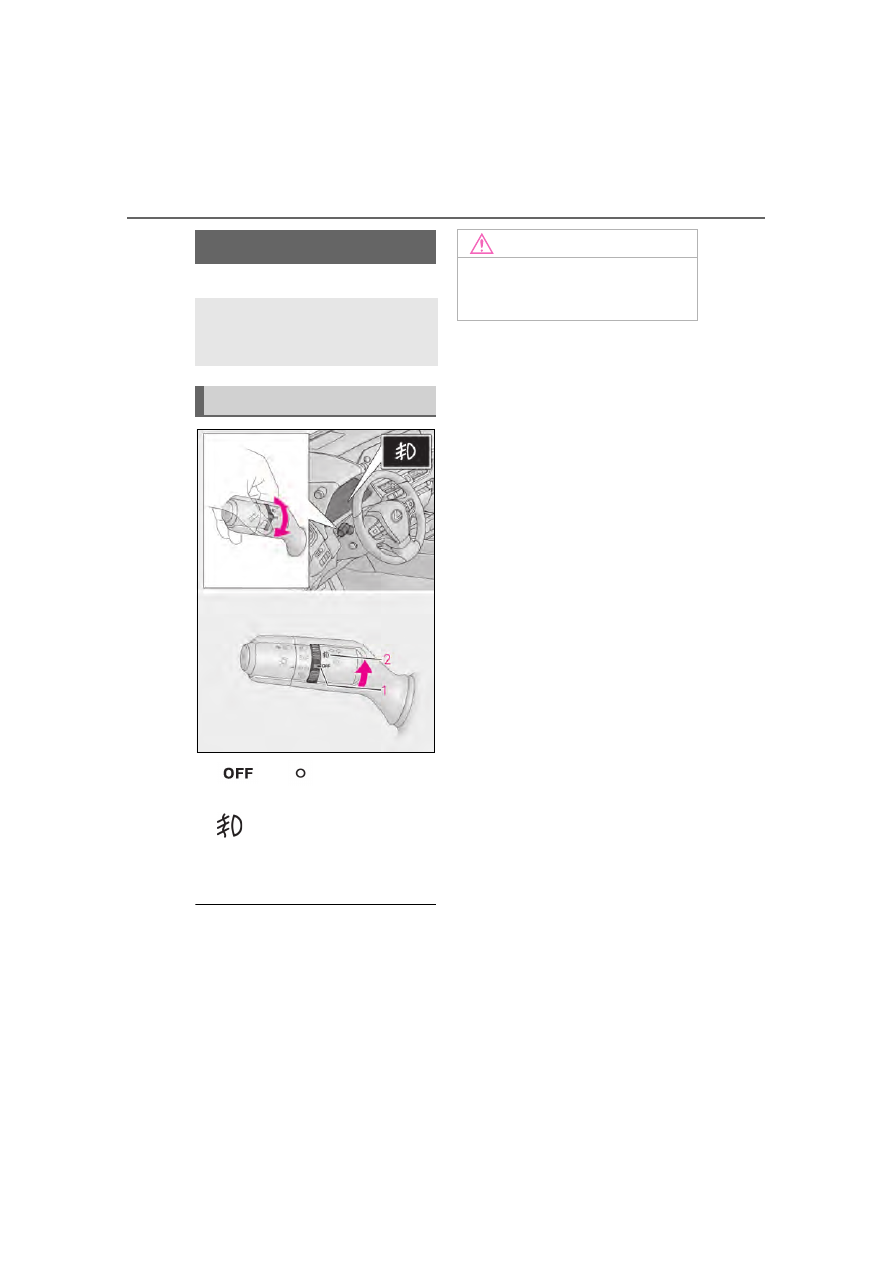
1

*1

 or 

*2

 Turns the fog 

lights off

2

 Turns the fog lights on

*1

: For  the  U.S.A.

*2

: For  Canada

Fog lights can be used when

The headlights are on in low beam.

Fog light switch

*

When in difficult driving conditions, 
such as in rain and fog, turn on the 
fog lights to secure front visibility.

Turning on the fog light

NOTICE

To prevent 12-volt battery discharge

Do not leave the lights on longer than 

necessary when the hybrid system is off.

187

4-3. Operating the lights and wipers

4

Dr

ivi

ng

Operating the 

 lever operates 

the wipers or washer as follows:

Intermittent windshield wipers with 
interval adjuster

1

*1

 or 

*2

 Off

2

*1

 or 

*2

 Intermittent 

operation

3

*1

 or 

*2

 Low speed oper-

ation

4

*1

 or 

*2

 High speed oper-

ation

5

*1

 or 

*2

 Temporary oper-

ation

*1

: For  the  U.S.A.

*2

: For  Canada

Wiper intervals can be adjusted when 
intermittent operation is selected.

6

Increases the intermittent wind-
shield wiper frequency

7

Decreases the intermittent wind-
shield wiper frequency

8

 Washer/wiper dual opera-

tion

Pulling the lever operates the wipers and 
washer.
The wipers will automatically operate a 
couple of times after the washer squirts.

Windshield wipers and 
washer

Operating the lever can change 
wiper operation to automatic/man-
ual or squirt washer fluid.

NOTICE

When the windshield is dry

Do not use the wipers, as they may dam-

age the windshield.

Operating the wiper lever

188

4-3. Operating the lights and wipers

Vehicles with headlight cleaners:
When the power switch is in ON and the 
headlights are on, if the lever is pulled, the 
headlight cleaners will operate once. After 
this, the headlight cleaners will operate 
every 5th time the lever is pulled.

Rain-sensing windshield wipers

When AUTO is selected, the wipers 
will operate automatically when the 
sensor detects falling rain. The system 
automatically adjusts wiper timing in 
accordance with rain volume and vehi-
cle speed.

1

*1

 or 

*2

 Off

2

 Rain-sensing operation

3

*1

 or 

*2

 Low speed oper-

ation

4

*1

 or 

*2

 High speed oper-

ation

5

*1

 or 

*2

 Temporary oper-

ation

*1

: For  the  U.S.A.

*2

: For  Canada

When AUTO is selected, the sensor 
sensitivity can be adjusted by turning 
the switch ring.

6

Increases the sensitivity

7

Decreases the sensitivity

8

 Washer/wiper dual opera-

tion

Pulling the lever operates the wipers and 
washer.
The wipers will automatically operate a 
couple of times after the washer squirts. 
(After operating several times, the wipers 
operate once more time after a short delay 
to prevent dripping. However, the dripping 
prevention does not operate while the 
vehicle is moving.)
Vehicles with headlight cleaners: When 
the power switch is in ON and the head-
lights are on, if the lever is pulled, the head-
light cleaners will operate once. After this, 
the headlight cleaners will operate every 

189

4-3. Operating the lights and wipers

4

Dr

ivi

ng

5th time the lever is pulled.

The windshield wipers and washer can 

be operated when

The power switch is in ON.

Effects of vehicle speed on wiper opera-

tion (vehicles with rain-sensing wind-

shield wipers)

Vehicle speed affects the Intermittent wiper 

interval.

Raindrop sensor (vehicles with rain-

sensing windshield wipers)

The raindrop sensor judges the amount 

of raindrops.

An optical sensor is adopted. It may not 

operate properly when sunlight from the 

rising or setting of the sun intermittently 

strikes the windshield, or if bugs, etc. are 

present on the windshield.

If the wiper switch is turned to the AUTO 

position while the power switch is in ON, 

the wipers will operate once to show that 

AUTO mode is activated.

If the temperature of the raindrop sensor 

is 194°F (90°C) or higher, or 5°F (-

15°C) or lower, automatic operation may 

not occur. In this case, operate the wipers 

in any mode other than AUTO mode.

If no windshield washer fluid sprays

Check that the washer nozzles are not 

blocked, if there is washer fluid in the 

washer fluid tank.

When the windshield wipers are not 
being used, they retract to below the 
hood. To enable the windshield wipers 
to be lifted when parking in cold condi-
tions or when replacing a windshield 
wiper insert, change the rest position of 

WARNING

Caution regarding the use of wind-

shield wipers in AUTO mode (vehi-

cles with rain-sensing windshield 

wipers)

The windshield wipers may operate 

unexpectedly if the sensor is touched or 

the windshield is subject to vibration in 

AUTO mode. Take care that your fin-

gers, etc. do not become caught in the 

windshield wipers.

Caution regarding the use of washer 

fluid

When it is cold, do not use the washer 

fluid until the windshield becomes warm. 

The fluid may freeze on the windshield 

and cause low visibility. This may lead to 

an accident, resulting in death or serious 

injury.

NOTICE

When the washer fluid tank is empty

Do not operate the switch continually as 

the washer fluid pump may overheat.

When a nozzle becomes blocked

In this case, contact your Lexus dealer.

Do not try to clear it with a pin or other 

object. The nozzle will be damaged.

To prevent 12-volt battery discharge

Do not leave the wipers on longer than 

necessary when the hybrid system is off.

Changing the windshield wiper 
rest position/Lifting the wind-
shield wipers

190

4-3. Operating the lights and wipers

the windshield wipers to the service 
position using the wiper lever.

Raising the wipers to the service 
position

Within approximately 45 seconds of 
turning the power switch off, move the 
wiper lever to the 

 (U.S.A.) or 


(Canada) position and hold it for 
approximately 2 seconds or more.

The wipers will move to the service posi-
tion.

Lifting the windshield wipers

While holding the hook portion 

 of 

the wiper arm, lift the windshield wiper 
from the windshield.

Lowering the windshield wipers to the 

retracted position

With the windshield wipers placed on the 

windshield, turn the power switch to ON 

and then move the wiper lever to an operat-

ing position. When the wiper switch is 

turned off, the windshield wipers will stop at 

the retracted position. Even if the wipers 

deviate while the power switch is OFF, the 

wipers will return to the normal position.

A

NOTICE

When lifting the windshield wipers

Do not lift the windshield wipers when 

they are in the retracted position 

below the hood. Otherwise, they may 

contact the hood, possibly resulting in 

damage to a windshield wiper and/or 

the hood.

Do not lift a windshield wiper by the 

wiper blade. Otherwise, the wiper 

blade may be deformed.

Do not operate the wiper lever when 

the windshield wipers are lifted. Oth-

erwise, the windshield wipers may 

contact the hood, possibly resulting in 

damage to the windshield wipers 

and/or hood.

191

4-3. Operating the lights and wipers

4

Dr

ivi

ng

Operating the 

 switch operates 

the rear wiper as follows:

1

*1

 or 

*2

 Off

2

*1

 or 

*2

 Intermittent 

operation

3

*1

 or 

*2

 Normal operation

*1

: For  the  U.S.A.

*2

: For  Canada

4

 Washer/wiper dual opera-

tion

Pushing the lever operates the wiper and 
washer.
The wiper will automatically operate a cou-
ple of times after the washer squirts.

The rear window wiper and washer can 

be operated when

The power switch is in ON.

If no windshield washer fluid sprays

Check that the washer nozzles are not 

blocked, if there is washer fluid in the 

washer fluid tank.

Reverse-linked rear window wiper 

function

When the shift lever is shifted to R when the 

front wipers are operating, the rear window 

wiper will operate once.

Back door opening linked rear window 

wiper stop function

When the rear window wiper is operating, if 

the back door is opened while the vehicle is 

stopped, operation of the rear window 

wiper will be stopped to prevent anyone 

near the vehicle from being sprayed by 

water from the wiper. When the back door 
is closed, wiper operation will resume.

*

*

: The setting must be customized at your 

Lexus dealer.

Customization

Setting of the reverse-linked function can 

be changed. (Customizable fea-

tures:

P.432

Rear window wiper and 
washer

The rear window wiper and washer 
can be used by operating the lever.

NOTICE

When the rear window is dry

Do not use the wiper, as it may damage 

the rear window.

Operating the wiper lever

192

4-3. Operating the lights and wipers

NOTICE

When the washer fluid tank is empty

Do not operate the switch continually as 

the washer fluid pump may overheat.

When a nozzle becomes blocked

In this case, contact your Lexus dealer.

Do not try to clear it with a pin or other 

object. The nozzle will be damaged.

To prevent 12-volt battery discharge

Do not leave the wiper on longer than 

necessary when the hybrid system is off.

193

4-4. Refueling

4

Dr

ivi

ng

4-4.Refueling

Turn the power switch off and 
ensure that all the doors and win-
dows are closed.

Confirm the type of fuel.

Fuel types

P.415

Fuel tank opening for unleaded gasoline

To help prevent incorrect fueling, your vehi-

cle has a fuel tank opening that only accom-

modates the special nozzle on unleaded 

fuel pumps.

Opening the fuel tank cap

The fuel tank of your vehicle has a 
special structure, which requires a 
reduction in fuel tank pressure 
before refueling. After the opener 
switch has been pressed, it will take 
several seconds until the vehicle is 
ready for refueling.

Before refueling the vehicle

WARNING

When refueling the vehicle

Observe the following precautions while 

refueling the vehicle. Failure to do so 

may result in death or serious injury.

After exiting the vehicle and before 

opening the fuel door, touch an 

unpainted metal surface to discharge 

any static electricity. It is important to 

discharge static electricity before refu-

eling because sparks resulting from 

static electricity can cause fuel vapors 

to ignite while refueling.

Always hold the grips on the fuel tank 

cap and turn it slowly to remove it.

A whooshing sound may be heard 

when the fuel tank cap is loosened. 

Wait until the sound cannot be heard 

before fully removing the cap. In hot 

weather, pressurized fuel may spray 

out of the filler neck and cause injury.

Do not allow anyone that has not dis-

charged static electricity from their 

body to come close to an open fuel 

tank.

Do not inhale vaporized fuel.

Fuel contains substances that are 

harmful if inhaled.

Do not smoke while refueling the vehi-

cle.

Doing so may cause the fuel to ignite 

and cause a fire.

Do not return to the vehicle or touch 

any person or object that is statically 

charged. This may cause static elec-

tricity to build up, resulting in a possi-

ble ignition hazard.

When refueling

Observe the following precautions to 

prevent fuel overflowing from the fuel 

tank:

Securely insert the fuel nozzle into the 

fuel filler neck.

Stop filling the tank after the fuel noz-

zle automatically clicks off.

Do not top off the fuel tank.

NOTICE

Refueling

Finish refueling within 30 minutes. If 

more than 30 minutes passes, the 

internal valve closes. In this condition, 

fuel may overflow during the refueling 

process. Press the fuel filler door 

opener switch again.

194

4-4. Refueling

1

Press the opener switch.

The fuel filler door will open within about 

10 seconds of the switch being pressed. 

Before refueling is possible, a message will 

be shown on the multi-information display 

in the instrument cluster to indicate the 

progress of the fuel filler door opener.

2

Turn the fuel tank cap slowly and 
remove it, then put it into the holder 
on the fuel filler door.

When the fuel filler door cannot be 

opened

P.395

After refueling, turn the fuel tank cap 
until you hear a click. Once the cap is 
released, it will turn slightly in the 
opposite direction.

NOTICE

Make sure that the fuel filler door lock 

is not pushed by the fuel nozzle boot, 

etc. If the lock is held, the internal valve 

closes and fuel may overflow. To pre-

vent it, press the fuel filler door opener 

switch again.

Do not spill fuel during refueling.

Doing so may damage the vehicle, 

such as causing the emission control 

system to operate abnormally, damag-

ing fuel system components or the 

vehicle’s painted surface.

Opening the fuel tank cap

Closing the fuel tank cap

WARNING

When replacing the fuel tank cap

Do not use anything but a genuine Lexus 

fuel tank cap designed for your vehicle. 

Doing so may cause a fire or other inci-

dent which may result in death or serious 

injury.

195

4-5. Using the driving support systems

4

Dr

ivi

ng

4-5.Using the driving support systems

PCS (Pre-Collision System)

P.199

LTA (Lane Tracing Assist)

P.209

AHB (Automatic High Beam)

P.183

RSA (Road Sign Assist)

*

P.218

Dynamic radar cruise control with 
full-speed range

P.221

*

: If equipped

Two types of sensors, located behind 
the front grille and windshield, detect 
information necessary to operate the 
drive assist systems.

Radar sensor

Front camera

Lexus Safety System + 2.5

The Lexus Safety System + 2.5 con-
sists of the following drive assist sys-
tems and contributes to a safe and 
comfortable driving experience:

Driving assist system

WARNING

Lexus Safety System + 2.5

The Lexus Safety System + 2.5 is 

designed to operate under the assump-

tion that the driver will drive safely, and is 

designed to help reduce the impact to 

the occupants and the vehicle in the case 

of a collision or assist the driver in normal 

driving conditions.
As there is a limit to the degree of recog-

nition accuracy and control performance 

that this system can provide, do not 

overly rely on this system. The driver is 

always responsible for paying attention 

to the vehicle’s surroundings and driving 

safely.

Sensors

WARNING

To avoid malfunction of the radar sen-

sor

Observe the following precautions.
Otherwise, the radar sensor may not 

operate properly, possibly leading to an 

accident resulting in death or serious 

injury.

A
B

196

4-5. Using the driving support systems

WARNING

Keep the radar sensor and the radar 

sensor cover clean at all times.

Radar sensor

Radar sensor cover

If the front of the radar sensor or the front 
or back of the radar sensor cover is dirty 
or covered with water droplets, snow, 
etc., clean it. 
Clean the radar sensor and radar sensor 
cover with a soft cloth to avoid damaging 
them.

Do not attach accessories, stickers 

(including transparent stickers) or 

other items to the radar sensor, radar 

sensor cover or surrounding area.

Do not subject the radar sensor or its 

surrounding area to a strong impact. 

If the radar sensor, front grille, or front 

bumper has been subjected to a 

strong impact, have the vehicle 

inspected by your Lexus dealer.

Do not disassemble the radar sensor.

Do not modify or paint the radar sen-

sor or radar sensor cover.

In the following cases, the radar sensor 

must be recalibrated. Contact your 

Lexus dealer for details.

• When the radar sensor or front grille 

are removed and installed, or replaced

• When the front bumper is replaced

A

B

To avoid malfunction of the front 

camera

Observe the following precautions.
Otherwise, the front camera may not 

operate properly, possibly leading to an 

accident resulting in death or serious 

injury.

Keep the windshield clean at all times.

• If the windshield is dirty or covered 

with an oily film, water droplets, snow, 

etc., clean the windshield.

• If a glass coating agent is applied to the 

windshield, it will still be necessary to 

use the windshield wipers to remove 

water droplets, etc. from the area of 

the windshield in front of the front 

camera.

• If the inner side of the windshield 

where the front camera is installed is 

dirty, contact your Lexus dealer.

Do not attach objects, such as stickers, 

transparent stickers, etc., to the outer 

side of the windshield in front of the 

front camera (shaded area in the illus-

tration).

From the top of the windshield to 
approximately 0.4 in. (1 cm) below 
the bottom of the front camera

Approximately 7.9 in. (20 cm) 
(Approximately 4.0 in. [10 cm] to the 
right and left from the center of the 
front camera)

A

B

197

4-5. Using the driving support systems

4

Dr

ivi

ng

WARNING

If the part of the windshield in front of 

the front camera is fogged up or cov-

ered with condensation or ice, use the 

windshield defogger to remove the 

fog, condensation or ice. (

P.276)

If water droplets cannot be properly 

removed from the area of the wind-

shield in front of the front camera by 

the windshield wipers, replace the 

wiper insert or wiper blade.

Do not attach window tint to the wind-

shield.

Replace the windshield if it is damaged 

or cracked.

After replacing the windshield, the 

front camera must be recalibrated. 

Contact your Lexus dealer for details.

Do not allow liquids to contact the 

front camera.

Do not allow bright lights to shine into 

the front camera.

Do not dirty or damage the front cam-

era. 

When cleaning the inside of the wind-

shield, do not allow glass cleaner to 

contact the lens of the front camera. 

Also, do not touch the lens. 

If the lens is dirty or damaged, contact 

your Lexus dealer.

Do not subject the front camera to a 

strong impact.

Do not change the installation position 

or direction of the front camera or 

remove it.

Do not disassemble the front camera.

Do not modify any components of the 

vehicle around the front camera 

(inside rear view mirror, etc.) or ceil-

ing.

Do not attach any accessories to the 

hood, front grille or front bumper that 

may obstruct the front camera. Con-

tact your Lexus dealer for details.

If a surfboard or other long object is to 

be mounted on the roof, make sure 

that it will not obstruct the front cam-

era.

Do not modify the headlights or other 

lights.

198

4-5. Using the driving support systems

If a warning message is displayed on the multi-information display

A system may be temporarily unavailable or there may be a malfunction in the system.

In the following situations, perform the actions specified in the table. When the normal 

operating conditions are detected, the message will disappear and the system will 

become operational.

If the message does not disappear, contact your Lexus dealer.

In the following situations, if the situation has changed (or the vehicle has been driven for 

some time) and the normal operating conditions are detected, the message will disap-

pear and the system will become operational.

If the message does not disappear, contact your Lexus dealer.

• When the temperature around the radar sensor is outside of the operational range, such 

as when the vehicle is in the sun or in an extremely cold environment

• When the front camera cannot detect objects in front of the vehicle, such as when driving 

in the dark, snow, or fog, or when bright lights are shining into the front camera

• Depending on the conditions in the vicinity of the vehicle, the radar may judge the sur-

rounding environment can not be properly recognized. In that case, “Pre-Collision Sys-

Situation

Actions

When the area around a camera is covered 
with dirt, moisture (fogged up, covered with 
condensation, ice, etc.), or other foreign 
matter

Using the wiper and A/C function, remove 
the dirt and other attached matter. 
(

P.276)

When the temperature around the front 
camera is outside of the operational range, 
such as when the vehicle is in the sun or in an 
extremely cold environment

If the front camera is hot, such as after the 
vehicle had been parked in the sun, use the 
air conditioning system to decrease the tem-
perature around the front camera.
If a sunshade was used when the vehicle was 
parked, depending on its type, the sunlight 
reflected from the surface of the sunshade 
may cause the temperature of the front cam-
era to become excessively high.

If the front camera is cold, such after the 
vehicle is parked in an extremely cold envi-
ronment, use the air conditioning system to 
increase the temperature around the front 
camera.

The area in front of the front camera is 
obstructed, such as when the hood is open 
or a sticker is attached to the part of the 
windshield in front of the front camera.

Close the hood, remove the sticker, etc. to 
clear the obstruction.

When “Pre-Collision System Radar In Self 
Calibration Unavailable See Owner’s Man-
ual” is displayed.

Check whether there is attached materials 
on the radar sensor and radar sensor cover, 
and if there is, remove it.

199

4-5. Using the driving support systems

4

Dr

ivi

ng

The system can detect the following 
(The detectable objects differs 
depending on the function.):

Vehicles

Bicyclists

Pedestrians

Pre-collision warning

When the system determines that the 
possibility of a frontal collision is high, a 
buzzer will sound and a warning mes-

sage will be displayed on the multi-
information display to urge the driver 
to take evasive action.

Pre-collision brake assist

When the system determines that the 
possibility of a frontal collision is high, 
the system applies greater braking 
force in relation to how strongly the 
brake pedal is depressed.

Pre-collision braking

If the system determines that the possi-
bility of a frontal collision is extremely 
high, the brakes are automatically 
applied to help avoid the collision or 
reduce the impact of the collision.

Emergency steering assist

If the system determines that the possi-
bility of a frontal collision is high and 
that there is sufficient space for the 
vehicle to be steered into within its 
lane, and the driver has begun evasive 
maneuver or steering, emergency 
steering assist will assist the steering 
movements to help enhance the vehi-
cle stability and for lane departure pre-
vention. During operation, the 
indicator will illuminate in green.

PCS (Pre-Collision System)

The pre-collision system uses a 
radar sensor and front camera to 
detect objects (

P.199) in front of 

the vehicle. When the system 
determines that the possibility of a 
frontal collision with an object is 
high, a warning operates to urge 
the driver to take evasive action 
and the potential brake pressure is 
increased to help the driver avoid 
the collision. If the system deter-
mines that the possibility of a frontal 
collision with an object is extremely 
high, the brakes are automatically 
applied to help avoid the collision or 
help reduce the impact of the colli-
sion.

The pre-collision system can be dis-
abled/enabled and the warning tim-
ing can be changed. (

P.202)

Detectable objects

System functions

200

4-5. Using the driving support systems

Intersection right/left turn assis-
tance

If the system determines that there is a 
high possibility of a collision in the fol-
lowing situations, it will assist with Pre-
collision warning and, if necessary Pre-
collision braking.
Depending on the configuration of the 
intersection, it may not be possible to 
support.

When you turn right/left at an inter-
section and cross the path of an 
oncoming vehicle

When you turn right/left, pedestrian 
is detected in the forward direction 
and estimated to enter your vehi-
cle’s path (bicyclists are not 
detected.)

Suspension control (if equipped)

When the system determines that the 
possibility of a frontal collision is high, 
the Adaptive Variable Suspension Sys-
tem (

P.261) will control the damping 

force of the shock absorbers to help 
maintain an appropriate vehicle pos-
ture.

WARNING

Limitations of the pre-collision sys-

tem

The driver is solely responsible for safe 

driving. Always drive safely, taking 

care to observe your surroundings.

Do not use the pre-collision system 

instead of normal braking operations 

under any circumstances. This system 

will not prevent collisions or lessen col-

lision damage or injury in every situa-

tion. Do not overly rely on this system. 

Failure to do so may lead to an acci-

dent, resulting in death or serious 

injury.

201

4-5. Using the driving support systems

4

Dr

ivi

ng

WARNING

Although this system is designed to 

help avoid a collision or help reduce 

the impact of the collision, its effective-

ness may change according to various 

conditions, therefore the system may 

not always be able to achieve the same 

level of performance. Read the follow-

ing conditions carefully. Do not overly 

rely on this system and always drive 

carefully.

• Conditions under which the system 

may operate even if there is no possi-

bility of a collision: 

P.205

• Conditions under which the system 

may not operate properly: 

P.207

Do not attempt to test the operation of 

the pre-collision system yourself.

Depending on the objects used for 

testing (dummies, cardboard objects 

imitating detectable objects, etc.), the 

system may not operate properly, pos-

sibly leading to an accident.

Pre-collision braking

When the pre-collision braking func-

tion is operating, a large amount of 

braking force will be applied.

If the vehicle is stopped by the opera-

tion of the pre-collision braking func-

tion, the pre-collision braking function 

operation will be canceled after 

approximately 2 seconds. Depress the 

brake pedal as necessary.

The pre-collision braking function may 

not operate if certain operations are 

performed by the driver. If the acceler-

ator pedal is being depressed strongly 

or the steering wheel is being turned, 

the system may determine that the 

driver is taking evasive action and pos-

sibly prevent the pre-collision braking 

function from operating.

In some situations, while the pre-colli-

sion braking function is operating, 

operation of the function may be can-

celed if the accelerator pedal is 

depressed strongly or the steering 

wheel is turned and the system deter-

mines that the driver is taking evasive 

action.

If the brake pedal is being depressed, 

the system may determine that the 

driver is taking evasive action and pos-

sibly delay the operation timing of the 

pre-collision braking function.

Emergency steering assist

As emergency steering assist opera-

tion will be canceled when the system 

determines that lane departure pre-

vention function has been completed.

Emergency steering assist may not 

operate or may be cancel in the fol-

lowing cases as the system may deter-

mine the driver is taking actions.

• If the accelerator pedal is being 

depressed strongly, the steering wheel 

is being operated sharply, the brake 

pedal is being depressed or the turn 

signal lever is being operated. In this 

case, the system may determine that 

the driver is taking evasive action and 

the emergency steering assist may not 

operate.

• In some situations, while the emer-

gency steering assist is operating, 

operation of the function may be can-

celed if the accelerator pedal is 

depressed strongly, the steering wheel 

is operated sharply or the brake pedal 

is being depressed and the system 

determines that the driver is taking 

evasive action.

• When the emergency steering assist is 

operating, if the steering wheel is held 

firmly or is operated in the opposite 

direction to that which the system is 

generating torque, the function may 

be canceled.


Content      ..     9      10      11      12     ..