Lexus NX (2022 year). Manual in english - page 10
 

  Index      Manuals     Lexus NX (2022 year). Manual in english


Search            copyright infringement  


Content      ..     8      9      10      11     ..


Lexus NX (2022 year). Manual in english - page 10


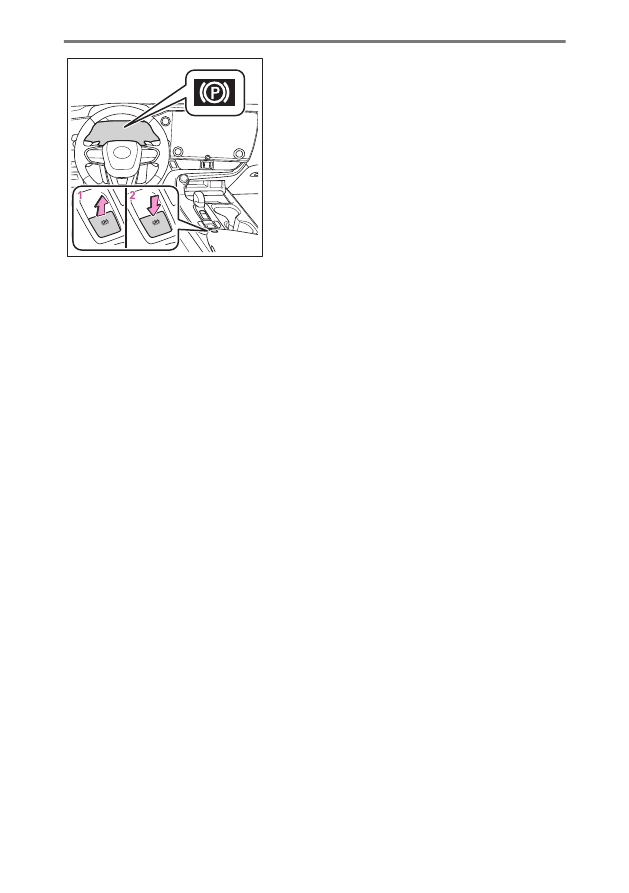
1

Pull the switch to set the parking brake.

The parking brake indicator light will turn on.
Pull and hold the parking brake switch if an emergency occurs and it is necessary to
operate the parking brake while driving.

2

Press the switch to release the parking brake.

Operate the parking brake switch while depressing the brake pedal.

The parking brake can be released by depressing the accelerator pedal,
through the parking brake automatic release function.

Parking brake automatic release function
Make sure that the parking brake indicator light and the parking brake switch
indicator turn off.
If the parking brake indicator light flash, operate the switch again.

2-3. Parking the vehicle

168

Refueling

Refueling

Opening the fuel tank cap

1

Press the opener to open the fuel filler door.

The fuel filler door will open.

2

Turn the fuel tank cap slowly and remove it,
then put it into the holder on the fuel filler
door.

WARNING

Always hold the grips on the fuel tank cap and turn it slowly to remove it. A
whooshing sound may be heard when the fuel tank cap is loosened. Wait until the
sound cannot be heard before fully removing the cap. In hot weather, pressurized
fuel may spray out the filler neck and cause injury.

Precautions for refueling

Make sure to select a compatible type of fuel and refuel safely.

WARNING

Observe the following precautions while refueling the vehicle.

After exiting the vehicle and before opening the fuel door, touch an unpainted metal
surface to discharge any static electricity.
Also, do not allow anyone that has not discharged static electricity from their body to
come close to the fuel filler door.
Sparks resulting from static electricity discharge may cause fuel vapors to ignite while
refueling.

Do not inhale vaporized fuel. Fuel contains substances that are harmful if inhaled.

2-4. Refueling

169

2

Driving the v

ehicle

WARNING

Do not smoke while refueling the vehicle. Doing so may cause the fuel to ignite and
cause a fire.

Do not return to the vehicle or touch any person or object that is statically charged.
This may cause static electricity to build up, resulting in a possible ignition hazard.

Securely insert the fuel nozzle into the fuel filler neck.

Stop filling the tank after the fuel nozzle automatically clicks off.

Do not top off the fuel tank.

NOTICE

Do not spill fuel during refueling. Doing so may damage the vehicle, such as causing the
emission control system to operate abnormally or damaging fuel system components or
the vehicle’s painted surface.

INFORMATION

Fuel tank opening for unleaded gasoline

To help prevent refueling with the incorrect fuel, your vehicle has a fuel tank opening
designed to only accommodate the special nozzle on unleaded fuel pumps.

Close the fuel tank cap

After refueling, turn the fuel tank cap until you
hear a click.

Once the cap is released, it will turn slightly in the
opposite direction.

WARNING

If replacing the fuel tank cap, do not use anything but a genuine Lexus fuel tank cap
designed for your vehicle. Doing so may cause a fire.

2-4. Refueling

170

3

Driving according to the conditions

3-1. Driving when the surrounding area

is dark

Using the headlights.....................

172

Automatically changing be-

tween the low beam head-
lights and high beam head-
lights
.................................................

176

3-2. Driving when the sun or head-

lights of other vehicles are
bright

Using the sun visors.....................

184

Inside rear view mirror anti-

glare function (vehicles with
auto anti-glare inside rear
view mirror)..................................

185

Digital Rearview Mirror anti-

glare function (optical mirror
mode)
.............................................

186

3-3. Driving in the rain

Precautions for driving in the

rain....................................................

187

Ensuring visibility in the rain.....

188

3-4. Driving when the windows or mir-

rors are fogged up

Defog the windshield...................

193

Defog the rear window ...............

195

Defog the outside rear view

mirrors.............................................

196

3-5. Driving when it is cold

Preparing for cold weather .......

197

Cold weather driving tips.........

200

3-6. Driving when in the fog or on a

mountain road and visibility is
poor

Fog light illumination ..................

202

Sounding the horn.......................

204

3-7. Utility vehicle precautions

Utility vehicle precautions .......

205

3-8. Changing the driving characteris-

tics

Driving modes ..............................

208

Changing the driving mode.....

210

Trail Mode (AWD vehicles) ......

212

DAC

Downhill assist control

system

........................................

214

3-9. Brake hold system

Brake hold system.........................

216

171

3

Driving accor

ding to the conditions

Driving when the surrounding area is dark

Using the headlights

The headlights can be operated manually or automatically.

 Related Links 

Customizable features(P. 650)

Turning the headlights on/off

Do not leave the lights on longer than necessary with the engine off. Doing so may
lead to discharge of the battery.

Operating the 

 switch turns on the lights as follows:


1

 The front position, tail, license plate

and instrument panel lights turn on.

2

 The headlights and all lights listed

above turn on.

3

 The headlights, daytime running lights

and all the lights listed above turn on and off
automatically.

INFORMATION

AUTO mode can be used when

The engine switch is in ON.

Daytime running light system

To make your vehicle more visible to other drivers during daytime driving, the daytime
running lights turn on automatically whenever the engine is started and the parking brake

is released with the headlight switch in 

 position. (Illuminate brighter than the front

position lights.) Daytime running lights are not designed for use at night.

Headlight control sensor

The sensor may not function properly if an object is placed on the sensor, or anything
that blocks the sensor is affixed to the windshield. Doing so interferes with the sensor

3-1. Driving when the surrounding area is dark

172

detecting the level of ambient light and may cause the automatic headlight system to
malfunction.

Automatic light off system

When the light switch is in the 

 or 

 position:

The headlights and front fog lights

*

 turn off automatically if the engine switch is turned

to OFF.

When the light switch is in the 

 position:

The headlights and all lights turn off automatically if the engine switch is turned to OFF.

To turn the lights on again, turn the engine switch to ON, or turn the light switch to the

 position once and then back to

 or 

.

Light reminder buzzer

A buzzer sounds when the engine switch is turned off or turned to ACC and the driver’s
door is opened while the lights are turned on.

Battery-saving function

In order to prevent the battery of the vehicle from discharging, if the light switch is in the

 or 

 position when the engine switch is turned off the battery saving function will

operate and automatically turn off all the lights after approximately 20 minutes. When
the engine switch is turned to ON, the battery-saving function will be disabled.
When any of the following are performed, the battery-saving function is canceled once
and then reactivated. All the lights will turn off automatically 20 minutes after the
battery-saving function has been reactivated:

When the headlight switch is operated

When a door or the back door is opened or closed

* : 

If equipped

3-1. Driving when the surrounding area is dark

173

3

Driving accor

ding to the conditions

Turning on the high beam headlights


1

With the headlights on, push the lever for-
ward.

The high beam headlights will turn on.
Pull the lever to its original position to turn the
high beam headlights off.

2

Pull the lever rearward and release it.

The high beams will flash once.
The high beam headlights can be illuminated
this way even with the headlights off.

Extended Headlight Lighting system

The Headlight Lighting system is a system which allows the headlights to be turned
on for 30 seconds with the engine switch off.
After turning the engine switch off, with the light

switch in 

, pull the lever rearward and release

it.

Pull the lever rearward and release it again to turn off
the lights.

Operation of the cornering lights (vehicles with front fog lights)

When any of the following conditions are met, while the headlights (low beam)
are on, the cornering lights will turn on and light up the direction of movement of
the vehicle. The cornering lights are designed to ensure excellent visibility when
turning at intersections or parking at night.

The steering wheel is being operated

The turn signal lever is being operated

The shift position is in R

INFORMATION

Cornering light control

When vehicle speed is approximately 35 km/h (22 mph) or higher, the cornering
lights will not turn on.

The lights will automatically turn off if they remain illuminated for 30 minutes.

3-1. Driving when the surrounding area is dark

174

Operation of the automatic headlight leveling system

The level of the headlights is automatically adjusted according to the number of
passengers and the loading condition of the vehicle to ensure that the headlights
do not interfere with other road users.

3-1. Driving when the surrounding area is dark

175

3

Driving accor

ding to the conditions

Automatically changing between the low beam headlights and high
beam headlights

AHS (Adaptive High-beam System)

The Adaptive High-beam System uses a front camera located on the upper
portion of the windshield to detect the brightness of the lights of vehicles ahead,
streetlights, etc., and automatically controls the light distribution of the headlights.

WARNING

For safe use

Do not overly rely on the Adaptive High-beam System. Always drive safely, taking care to
observe your surroundings and turning the high beams on or off manually if necessary.

To prevent unintentional operation of the Adaptive High-beam System

When it is necessary to disable the system: 

 P.316

System controls

According to the vehicle speed, the brightness and illuminated area of the high
beams are adjusted.

When driving around a curve, the system uses the high beams to brightly
illuminate the direction of travel of the vehicle.

The high beams are illuminated so that the area around a vehicle ahead is
shaded. (Shaded high beam)
The shaded high beam helps ensure forward visibility while reducing the daz-
zling effect on the drivers of vehicles ahead.


A

Area illuminated by the high beams

B

Area illuminated by the low beams

According to the distance to a preceding vehicle, the illuminated area of the low
beams is adjusted.

3-1. Driving when the surrounding area is dark

176

Using the Adaptive High-beam System

1

Press the Adaptive High-beam System
switch.

2

Turn the headlight switch to the [AUTO] or

[

] position.

When the headlight switch lever is in the low
beam position, the AHS system will be enabled
and the AHS indicator will illuminate.

INFORMATION

System operating conditions

When all of the following conditions are met, the high beams will illuminate and the
system will operate:

The vehicle speed is approximately 15 km/h (9 mph) or more*.

*1

The area ahead of the vehicle is dark.

When all of the following conditions are met, the headlights will change to the shaded
high beams according to the position of vehicles ahead:

The vehicle speed is approximately 15 km/h (9 mph) or more.

The area ahead of the vehicle is dark.

There is a vehicle ahead with lights on.

There are few streetlights or other lights on the road ahead.

If any of the following conditions are met, the system will change to the low beams:

The vehicle speed is approximately 12 km/h (7.5 mph) or lower.

The area ahead of the vehicle is not dark.

There are many vehicles ahead.

*1 : 

When driving around a curve at a vehicle speed of approximately 30 km/h (19 mph)

or more, the direction of travel of the vehicle will be brightly illuminated.

3-1. Driving when the surrounding area is dark

177

3

Driving accor

ding to the conditions

There are many streetlights or other lights on the road ahead.

Front camera detection

In the following situations, the high beams may not be automatically changed to the
shaded high beams:

When a vehicle cuts in front of your vehicle

When another vehicle crosses in front of the vehicle

When vehicles ahead are repeatedly detected and then hidden due to repeated
curves, road dividers or roadside trees

When a vehicle ahead approaches from a far lane

When a vehicle ahead is far away

When a vehicle ahead has no lights

When the lights of a vehicle ahead are dim

When a vehicle ahead is reflecting strong light, such as the headlights of your
vehicle

Situations in which the sensors may not operate properly: 

 P.321

The high beams may change to the shaded high beams if a vehicle ahead that is using
fog lights without its headlights turned on is detected.

House lights, street lights, traffic signals, and illuminated billboards or signs and other
reflective objects may cause the high beams to change to the shaded high beams,
cause the high beams not to change to the shaded high beams, or change the area
that is not illuminated.

The following may change the speed at which the shaded areas change or the timing
at which the headlights change to the low beams:

The brightness of lights of vehicles ahead

The movement and direction of vehicles ahead

The distance between the vehicle and a vehicle ahead

When a vehicle ahead only has lights illuminated on one side

When a vehicle ahead is a two-wheeled vehicle

The condition of the road (gradient, curve, condition of the road surface, etc.)

The number of passengers and amount of luggage

The light distribution control of the headlights may not match the driver's expectations

Bicycles and other small vehicles may not be detected.

In the following situations, the system may not be able to correctly detect the bright-
ness of the surroundings. This may cause the low beams to remain on or the high

3-1. Driving when the surrounding area is dark

178

beams to flash or dazzle pedestrians or vehicles ahead. In such a case, it is necessary
to manually change between the high beams and low beams.

When there are lights similar to headlights or tail lights in the surrounding area

When headlights or tail lights of vehicles ahead are turned off, dirty, changing color,
or not aimed properly

When the headlights are repeatedly changing between the high beams and low
beams.

When use of the high beams is inappropriate or when the high beams may be
flashing or dazzling pedestrians or other drivers.

When the vehicle is used in an area in which vehicles travel on the opposite side
of the road of the country for which the vehicle was designed, for example using a
vehicle designed for right-hand traffic in a left-hand traffic area, or vice versa

When it is necessary to disable the system: 

 P.316

Situations in which the sensors may not operate properly: 

 P.321

Customization

The settings of some functions can be changed. 

 P.658

Turning the high beams on/off manually

Changing to the high beams

Push the lever forward.

The AHS indicator will turn off and the high
beam indicator will turn on.
Pull the lever to its original position to enable the
Adaptive High-beam System again.

Changing to the low beams

Press the Adaptive High-beam System switch.

The AHS indicator will turn off.
Press the switch to enable the Adaptive High-
beam System again.

3-1. Driving when the surrounding area is dark

179

3

Driving accor

ding to the conditions

Temporarily changing to the low beams

It is recommended to switch to the low beams when use of the high beams is
inappropriate or when the high beams may cause problems or distress to other
drivers or pedestrians nearby.

Pull the lever rearward and then return it to its
original position.

The high beams will illuminate while the lever is
pulled, however, after the lever is returned to its
original position, the low beams will remain on for
a certain amount of time. After this, the Adaptive
High-beam System will operate.

AHB (Automatic High Beam)

The Automatic High Beam uses a front camera located on the upper portion of the
windshield to detect the brightness of the lights of vehicles ahead, streetlights, etc.,
and automatically changes the head lights between the high beams and low beams.

WARNING

For safe use

Do not overly rely on the Automatic High Beam. Always drive safely, taking care to
observe your surroundings and turning the high beams on or off manually if necessary.

To prevent unintentional operation of the Adaptive High-beam System

When it is necessary to disable the system: 

 P.316

Using the Automatic High Beam system

1

Press the Automatic High Beam switch.

3-1. Driving when the surrounding area is dark

180

2

Turn the headlight switch to the [AUTO] or

[

] position.

When the headlight switch lever is in the low
beam position, the AHS system will be enabled
and the AHB indicator will illuminate.

INFORMATION

Automatic operating conditions of the high beams

When all of the following conditions are met, the high beams will illuminate automati-
cally:

The vehicle speed is approximately 30 km/h (19 mph) or more

The area ahead of the vehicle is dark.

There are no vehicles ahead with lights on.

There are few streetlights or other lights on the road ahead.

If any of the following conditions are met, the headlights will change to the low beams:

Vehicle speed drops below approximately 25 km/h (16 mph).

The area ahead of the vehicle is not dark.

There is a vehicle ahead with lights on.

There are many streetlights or other lights on the road ahead.

Front camera detection

In the following situations, the high beams may not be automatically changed to the
low beams:

When a vehicle cuts in front of your vehicle

When another vehicle crosses in front of the vehicle

When vehicles ahead are repeatedly detected and then hidden due to repeated
curves, road dividers or roadside trees

When a vehicle ahead approaches from a far lane

When a vehicle ahead is far away

When a vehicle ahead has no lights

When the lights of a vehicle ahead are dim

When a vehicle ahead is reflecting strong light, such as own headlights

Situations in which the sensors may not operate properly: 

 P.321

3-1. Driving when the surrounding area is dark

181

3

Driving accor

ding to the conditions

The headlights may change to the low beams if a vehicle ahead that is using fog lights
without its headlights turned on is detected.

House lights, street lights, traffic signals, and illuminated billboards or signs may cause
the high beams to change to the low beams, or the low beams to remain on.

he following may change the the timing at which the headlights change to the low
beams:

The brightness of lights of vehicles ahead

The movement and direction of vehicles ahead

The distance between the vehicle and a vehicle ahead

When a vehicle ahead only has lights illuminated on one side

When a vehicle ahead is a two-wheeled vehicle

The condition of the road (gradient, curve, condition of the road surface, etc.)

The number of passengers and amount of luggage

The headlights may change between the high beams and low beams unexpectedly.

Bicycles and other small vehicles may not be detected.

In the following situations, the system may not be able to correctly detect the bright-
ness of the surroundings. This may cause the low beams to remain on or the high
beams to flash or dazzle pedestrians or vehicles ahead. In such a case, it is necessary
to manually change between the high beams and low beams.

When there are lights similar to headlights or tail lights in the surrounding area

When headlights or tail lights of vehicles ahead are turned off, dirty, changing color,
or not aimed properly

When the headlights are repeatedly changing between the high beams and low
beams.

When use of the high beams is inappropriate or when the high beams may be
flashing or dazzling pedestrians or other drivers.

When the vehicle is used in an area in which vehicles travel on the opposite side
of the road of the country for which the vehicle was designed, for example using a
vehicle designed for right-hand traffic in a left-hand traffic area, or vice versa

When it is necessary to disable the system: 

 P.316

Situations in which the sensors may not operate properly: 

 P.321

3-1. Driving when the surrounding area is dark

182

Turning the high beams on/off manually

Changing to the high beams

Push the lever forward.

The Automatic High Beam indicator will turn off
and the high beam indicator will turn on.
Pull the lever to its original position to enable the
Automatic High Beam system again.

Changing to the low beams

Press the Automatic High Beam switch.

The Automatic High Beam indicator will turn off.
Press the switch to enable the Automatic High
Beam system again.

Temporarily changing to the low beams

It is recommended to switch to the low beams when use of the high beams is
inappropriate or when the high beams may cause problems or distress to other
drivers or pedestrians nearby.

Pull the lever rearward and then return it to its
original position.

The high beams will illuminate while the lever
is pulled, however, after the lever is returned to
its original position, the low beams will remain
on for a certain amount of time. After this, the
Automatic High Beam system will operate.

3-1. Driving when the surrounding area is dark

183

3

Driving accor

ding to the conditions


Content      ..     8      9      10      11     ..