Lexus LS (2022 year). Manual in english - page 11
 

  Index      Manuals     Lexus LS (2022 year). Manual in english


Search            copyright infringement  


Content      ..     9      10      11      12     ..


Lexus LS (2022 year). Manual in english - page 11


186

4-3. Operating the lights and wipers

The lights are turned off in the following 
situations.

The engine switch is turned to IGNI-
TION ON mode.

The light switch is turned on.

The light switch is pulled toward you 
and then released.

When the steering wheel or turn 
signal lever is operated while the 
headlights are on (low beam), a cor-
nering light will turn on and light up 
the direction of movement of the 
vehicle. The cornering lights are 
designed to ensure excellent visibil-
ity when making a turn at an inter-
section.

However, when vehicle speed is more than 
approximately 35 km/h (22 mph), the cor-
nering lights will not turn on.

When the shift position is in R while 
the headlights are on (low beam), 
both cornering lights will turn on. 
This is designed to enhance visibility 
when parking.

Cornering lights

When the cornering lights are on for more 

than 30 minutes, they will turn off automati-

cally.

Cornering lights

187

4

4-3. Operating the lights and wipers

Driving

*

: If  equipped

Adjusts the brightness and illumi-
nated area of the high beams 
according to the vehicle speed.

Adjusts the intensity of the high 
beams, while driving on a curve, so 
that the area in the direction that the 
vehicle is turning will be illuminated 
more brightly than other areas.

Operates the shaded high beams so 
that the area around vehicles ahead 
is partially not illuminated while all 
other areas continue to be illumi-

nated with the high beams.

The shaded high beams help optimize for-
ward visibility while reducing the dazzling 
effect on the drivers of vehicles ahead.

Adjusts the distance that the low 
beams are projected according to 
the distance to a preceding vehicle.

1

Press the Adaptive High-beam Sys-
tem switch.

2

Turn the headlight switch to the 

 or 

 position.

When the headlight switch lever is in the 

low beam position, the AHS system will be 

enabled and the AHS indicator will illumi-

AHS (Adaptive High-beam 
System)

*

The Adaptive High-beam System 
uses a camera sensor located 
behind the upper portion of the 
windshield to assess the brightness 
of the lights of vehicles ahead, 
streetlights, etc., and automatically 
controls the headlight light distribu-
tion as necessary.

WARNING

Limitations of the Adaptive 

High-beam System

Do not overly rely on the Adaptive 

High-beam System. Always drive safely, 

taking care to observe your surroundings 

and turning the high beams on or off 

manually if necessary.

To prevent incorrect operation of the 

Adaptive High-beam System

Do not overload the vehicle.

System functions

Activating the Adaptive 
High-beam System

188

4-3. Operating the lights and wipers

nate.

Operating conditions of the Adaptive 

High-beam System

When all of the following conditions are 

met, the high beams will be turned on 

automatically and the system will operate:

• The vehicle speed is approximately 15 

km/h (10 mph) or more.

*

• The area ahead of the vehicle is dark.

*

: When the vehicle speed is approxi-

mately 30 km/h (19 mph) or more, the 
area in the direction that the vehicle is 
turning will be illuminated more brightly 
than other areas while driving on a 
curve.

When all of the following conditions are 

met, the shaded high beams will turn on 

and the distance that the low beams are 

projected will be adjusted automatically, 

depending on the location of vehicles 

ahead:

• The vehicle speed is approximately 15 

km/h (10 mph) or more.

• The area ahead of the vehicle is dark.

• There are vehicles ahead with headlights 

or tail lights turned on.

If any of the following conditions are met, 

the high beams or shaded high beams will 

be changed to the low beams automati-

cally:

• The vehicle speed is below approxi-

mately 15 km/h (10 mph).

• The area ahead of the vehicle is not dark.

• There are many vehicles ahead.

• Vehicles ahead are moving quickly and 

the high beams may blind the drivers of 

the other vehicles.

When the vehicle speed is between 

approximately 3 and 15 km/h (1.9 and 9.3 

mph), the cornering lights will turn on.

Camera sensor detection information

The high beams may not be automatically 

changed to the shaded high beams in the 

following situations:

• When vehicles ahead suddenly appear 

from a curve

• When the vehicle is cut in front of by 

another vehicle

• When vehicles ahead are hidden from 

sight due to repeated curves, road divid-

ers or roadside trees

• When vehicles ahead appear from the 

faraway lane on wide road

• When vehicles ahead have no lights

The high beams may be changed to the 

shaded high beams if a vehicle ahead that 

is using fog lights without its headlights 

turned on is detected.

House lights, street lights, traffic signals, 

and illuminated billboards or signs and 

other reflective objects may cause the 

high beams to change to the shaded high 

beams, cause the high beams not to 

change to the shaded high beams, or 

change the area that is not illuminated.

The following factors may affect the 

amount of time taken to turn the high 

beam on or off, or the speed by which the 

areas not illuminated change:

• The brightness of headlights, fog lights, 

and tail lights of vehicles ahead

• The movement and direction of vehicles 

ahead

• When a vehicle ahead only has opera-

tional lights on one side

• When a vehicle ahead is a two-wheeled 

vehicle

• The condition of the road (gradient, 

curve, condition of the road surface etc.)

• The number of passengers and amount of 

luggage

The light distribution control of the head-

lights may change unexpectedly.

Bicycles or similar objects may not be 

detected.

In the following situations the system may 

189

4

4-3. Operating the lights and wipers

Driving

not be able to correctly detect the sur-

rounding brightness level. This may cause 

the low beams to remain on or the high 

beams to flash or dazzle pedestrians or 

vehicles ahead. In such a case, it is neces-

sary to manually switch between the high 

and low beams.

• When driving in inclement weather 

(heavy rain, snow, fog, sandstorms, etc.)

• When the windshield is obscured by fog, 

mist, ice, dirt, etc.

• When the windshield is cracked or dam-

aged

• When the camera sensor is deformed or 

dirty

• When the temperature of the camera 

sensor is extremely high

• When the surrounding brightness level is 

equal to that of headlights, tail lights or 

fog lights

• When headlights or tail lights of vehicles 

ahead are turned off, dirty, changing 

color, or not aimed properly

• When the vehicle is hit by water, snow, 

dust, etc. from a preceding vehicle

• When driving through an area of inter-

mittently changing brightness and dark-

ness

• When frequently and repeatedly driving 

ascending/descending roads, or roads 

with rough, bumpy or uneven surfaces 

(such as stone-paved roads, gravel roads, 

etc.)

• When frequently and repeatedly taking 

curves or driving on a winding road

• When there is a highly reflective object 

ahead of the vehicle, such as a sign or 

mirror

• When the back of a preceding vehicle is 

highly reflective, such as a container on a 

truck

• When the vehicle’s headlights are dam-

aged or dirty, or are not aimed properly

• When the vehicle is listing or tilting due to 

a flat tire, a trailer being towed, etc.

• When the headlights are changed 

between the high beams and low beams 

repeatedly in an abnormal manner

• When the driver believes that the high 

beams may be flashing or dazzling 

pedestrians or other drivers

• When the vehicle is used in an area in 

which vehicles travel on the opposite side 

of the road of the country for which the 

vehicle was designed, for example using 

a vehicle designed for right-hand traffic in 

a left-hand traffic area, or vice versa

Customization

Some functions can be customized. 

(

P.476)

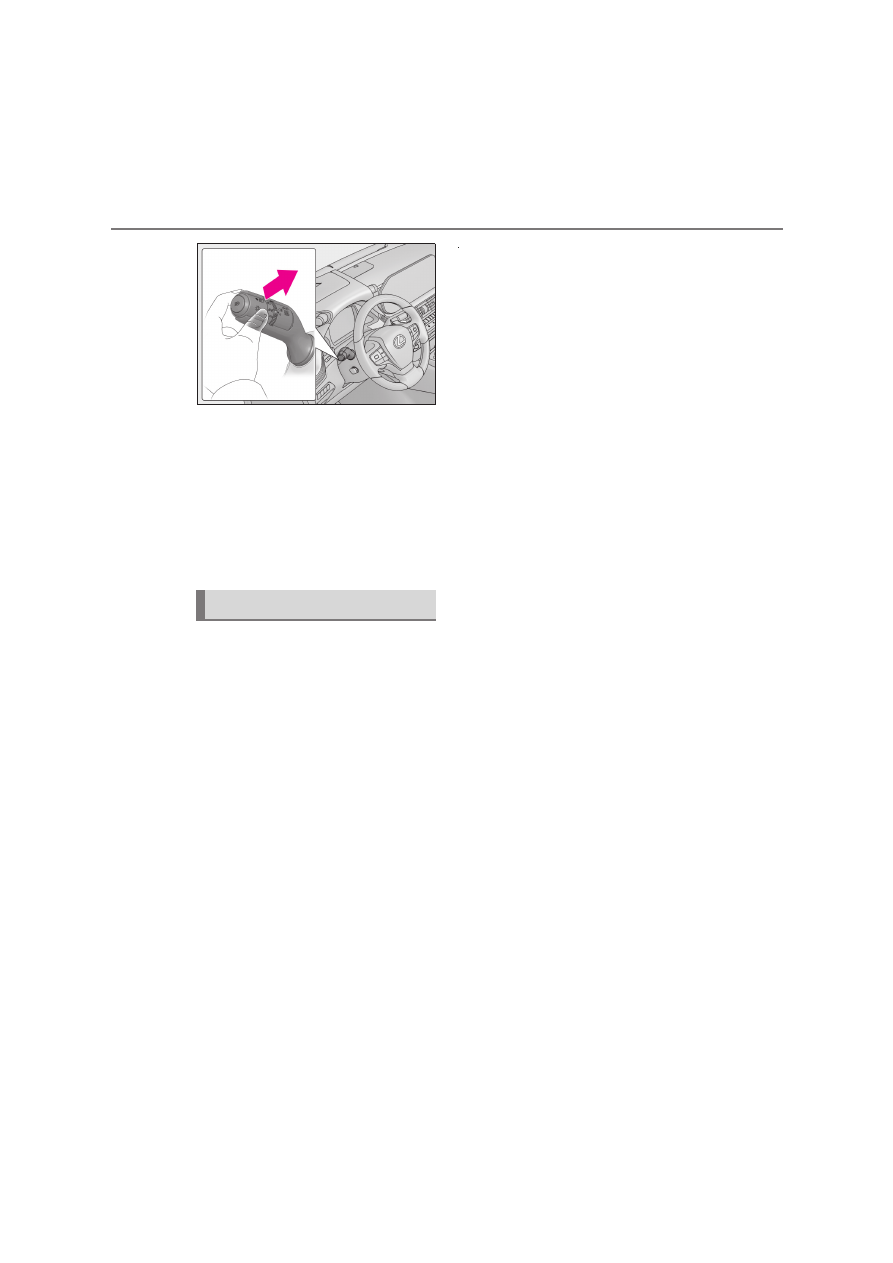
Switching to the high beams

Push the lever away from you.

The AHS indicator will turn off and the high 
beam indicator will turn on.
Pull the lever to its original position to acti-
vate the Adaptive High-beam System 
again.

Switching to the low beams

Press the Adaptive High-beam System 
switch.

The AHS indicator will turn off.
Press the switch to activate the Adaptive 
High-beam System again.

Turning the high beams on/off 
manually

190

4-3. Operating the lights and wipers

Temporarily switching to the low 
beams

Pull the lever toward you and then 
return it to its original position.

The high beams are on while the lever is 
pulled toward you. However, after the lever 
is returned to its original position, the low 
beams remain on for a certain period of 
time. Afterwards, the Adaptive High-beam 
System will be activated again.

Temporarily switching to the low beams

It is recommended to switch to the low 

beams when the high beam may cause 

problems or distress to other drivers or 

pedestrians nearby.

*

: If equipped

1

Press the Automatic High Beam 
switch.

AHB (Automatic High 
Beam)

*

The Automatic High Beam uses a 
camera sensor located behind the 
upper portion of the windshield to 
assess the brightness of the lights of 
vehicles ahead, streetlights, etc., 
and automatically turns the high 
beams on or off as necessary.

WARNING

Limitations of the Automatic High 

Beam

Do not overly rely on the Automatic High 

Beam. Always drive safely, taking care to 

observe your surroundings and turning 

the high beams on or off manually if nec-

essary.

To prevent incorrect operation of the 

Automatic High Beam system

Do not overload the vehicle.

Activating the Automatic High 
Beam

191

4

4-3. Operating the lights and wipers

Driving

2

Turn the headlight switch to the 

 or 

 position.

When the headlight switch lever is in the 

low beam position, the AHB system will be 

enabled and the AHB indicator will illumi-

nate.

Conditions to turn the high beams on/off 

automatically

When all of the following conditions are 

met, the high beams will be turned on 

automatically (after approximately 1 sec-

ond):

• The vehicle speed is approximately 30 

km/h (19 mph) or more.

• The area ahead of the vehicle is dark.

• There are no vehicles ahead with head-

lights or tail lights turned on.

• There are few streetlights on the road 

ahead.

If any of the following conditions are met, 

the high beams will turn off automatically:

• The vehicle speed is below approxi-

mately 25 km/h (16 mph).

• The area ahead of the vehicle is not dark.

• Vehicles ahead have their headlights or 

tail lights turned on.

• There are many streetlights on the road 

ahead.

Camera sensor detection information

The high beams may not be automatically 

turned off in the following situations:

• When a vehicle suddenly appears from 

around a curve

• When the vehicle is cut in front of by 

another vehicle

• When vehicles ahead cannot be 

detected due to repeated curves, road 

dividers or roadside trees

• When vehicles ahead appear in a fara-

way lane on a wide road

• When the lights of vehicles ahead are not 

on

The high beams may be turned off if a 

vehicle ahead that is using fog lights with-

out its headlights turned on is detected.

House lights, street lights, traffic signals, 

and illuminated billboards or signs and 

other reflective objects may cause the 

high beams to change to the low beams, 

or the low beams to remain on.

The following factors may affect the 

amount of time taken for the high beams 

to turn on or off:

• The brightness of the headlights, fog 

lights, and tail lights of vehicles ahead

• The movement and direction of vehicles 

ahead

• When a vehicle ahead only has opera-

tional lights on one side

• When a vehicle ahead is a two-wheeled 

vehicle

• The condition of the road (gradient, 

curve, condition of the road surface, etc.)

• The number of passengers and amount of 

luggage in the vehicle

The high beams may turn on or off unex-

pectedly.

Bicycles or similar vehicles may not be 

detected.

In the following situations the system may 

not be able to correctly detect the sur-

rounding brightness level. This may cause 

the low beams to remain on or the high 

beams to flash or dazzle pedestrians or 

vehicles ahead. In such a case, it is neces-

sary to manually switch between the high 

and low beams.

• When driving in inclement weather 

(heavy rain, snow, fog, sandstorms, etc.)

• When the windshield is obscured by fog, 

mist, ice, dirt, etc.

• When the windshield is cracked or dam-

aged

• When the camera sensor is deformed or 

dirty

• When the temperature of the camera 

192

4-3. Operating the lights and wipers

sensor is extremely high

• When the surrounding brightness level is 

equal to that of headlights, tail lights or 

fog lights

• When headlights or tail lights of vehicles 

ahead are turned off, dirty, changing 

color, or not aimed properly

• When the vehicle is hit by water, snow, 

dust, etc. from a preceding vehicle

• When driving through an area of inter-

mittently changing brightness and dark-

ness

• When frequently and repeatedly driving 

ascending/descending roads, or roads 

with rough, bumpy or uneven surfaces 

(such as stone-paved roads, gravel roads, 

etc.)

• When frequently and repeatedly taking 

curves or driving on a winding road

• When there is a highly reflective object 

ahead of the vehicle, such as a sign or 

mirror

• When the back of a preceding vehicle is 

highly reflective, such as a container on a 

truck

• When the vehicle’s headlights are dam-

aged or dirty, or are not aimed properly

• When the vehicle is listing or titling due to 

a flat tire, a trailer being towed, etc.

• When the headlights are changed 

between the high beams and low beams 

repeatedly in an abnormal manner

• When the driver believes that the high 

beams may be flashing or dazzling 

pedestrians or other drivers

• When the vehicle is used in an area in 

which vehicles travel on the opposite side 

of the road of the country for which the 

vehicle was designed, for example using 

a vehicle designed for right-hand traffic in 

a left-hand traffic area, or vice versa

Switching to the high beams

Push the lever away from you.

The AHB indicator will turn off and the 
high beam indicator will turn on.

Pull the lever to its original position to acti-
vate the Automatic High Beam system.

Switching to the low beams

Press the Automatic High Beam 
switch.

The AHB indicator will turn off.
Press the switch to activate the Automatic 
High Beam system again.

Temporarily switching to the low 
beams

Pull the lever toward you and then 
return it to its original position.

The high beams are on while the lever is 
pulled toward you. However, after the lever 
is returned to its original position, the low 
beams remain on for a certain period of 
time. Afterwards, the Automatic High 
Beam will be activated again.

Turning the high beams on/off 
manually

193

4

4-3. Operating the lights and wipers

Driving

Temporarily switching to the low beams

It is recommended to switch to the low 

beams when the high beam may cause 

problems or distress to other drivers or 

pedestrians nearby.

1

Turn the headlight switch to the 

 or 

 position.

2

Turn the switch ring to the 


position.

When the switch is released, it returns to 

.

When the Multi Weather Lights system is 

enabled, the Multi Weather Lights indica-

tor on the meter will illuminate.

Turn the switch ring to the 

 position 

again to disable the system.

Operating conditions

The cornering lights will illuminate when the 

Multi Weather Lights are enabled and both 

of the following conditions are met:

The headlights are on

Multi Weather Lights

The Multi Weather Lights is a sys-
tem that illuminates the cornering 
lights to ensure visibility when driv-
ing in inclement weather, such as 
rain or fog.

Enabling/disabling the Multi 
Weather Lights

194

4-3. Operating the lights and wipers

The vehicle speed is lower than approxi-

mately 45 km/h (28 mph).

When the vehicle speed increases to 
approximately 45 km/h (28 mph) or 
higher, the lights will be temporarily turned 
off. The lights will turn on again when the 
vehicle speed becomes lower than 
approximately 35 km/h (22 mph).

Rear fog lights

When the Multi Weather Lights system is 

enabled, the rear fog lights may also be illu-

minated. (

P.194)

Customization

Enabling of the Multi Weather Lights sys-

tem when the rear fog lights are enabled 

can be turned on/off. (

P.476)

1

Turn the headlight switch to the 

 or 

 position.

2

Turn the switch ring to the 


position.

When the switch is released, it returns to 

.

When the rear fog lights are enabled, the 

rear fog light indicator on the meter will 

illuminate.

Turn the switch ring to the 

 position 

again to disable the rear fog lights.

Illumination conditions

When enabled, the rear fog lights oper-

ate when the headlights are illuminated.

When illuminated, the rear fog lights will 

remain on until the tail lights are turned 

off.

Rear fog lights

When driving in inclement weather, 
such as rain or fog, the rear fog 
lights can be used to make your 
vehicle more visible to following 
vehicles.

Operating instructions

195

4

4-3. Operating the lights and wipers

Driving

Using the rear fog lights

Use the rear fog lights only when necessary. 

If the rear fog lights are used when visibility 

is not poor, they may impede the visibility of 

drivers in following vehicles.

Multi Weather Lights system-linked 

operation

When the rear fog lights are illuminated, the 

Multi Weather Lights system may also 

operate. (

P.193)

Customization

Enabling of the Multi Weather Lights sys-

tem when the rear fog lights are enabled 

can be turned on/off. (

P.476)

Operating the 

 lever operates 

the wipers or washer as follows. When 

 is selected, the wipers will operate 

automatically when the sensor detects 
falling rain. The system automatically 
adjusts wiper timing in accordance 
with rain volume and vehicle speed.

Windshield wipers and 
washer

Operating the lever can switch 
between automatic operation and 
manual operation, or can use the 
washer.

NOTICE

When the windshield is dry

Do not use the wipers, as they may dam-

age the windshield.

Operating the wiper lever

196

4-3. Operating the lights and wipers

1

 Off

2

 Rain-sensing operation

The wipers will operate automatically when 
the sensor detects falling rain. The system 
automatically adjusts wiper timing in 
accordance with rain volume and vehicle 
speed.

3

 Low speed operation

4

 High speed operation

5

 Temporary operation

When 

 is selected, the sensor sen-

sitivity can be adjusted by turning the 
switch ring.

6

Increases the sensitivity

7

Decreases the sensitivity

8

 Windshield washer/wiper 

dual operation

Pulling the lever operates the windshield 
wipers and washer.
(After operating several times, the wipers 
operate once more time after a short delay 
to prevent dripping. However, the dripping 
prevention does not operate while the 
vehicle is moving.)
When the engine switch is in IGNITION 
ON mode and the headlights are on, if the 
lever is pulled, the headlight cleaners will 
operate once. After this, the headlight 
cleaners will operate every 5th time the 
lever is pulled.

9

*

 Rear camera washer opera-

tion

Pushing the lever operates the rear cam-
era washer and cleans the rear camera and 
the camera for the Digital Rearview Mirror.

197

4

4-3. Operating the lights and wipers

Driving

*

: Vehicles with Digital Rearview Mirror

The windshield wiper and washer can be 

operated when

The engine switch is in IGNITION ON 

mode.

Effects of vehicle speed on wiper opera-

tion

Even when the wipers are not in AUTO 

mode, vehicle speed affects the time until 

the drip prevention wiper sweep occurs.
With low speed windshield wiper operation 

selected, wiper operation will be switched 

from low speed to intermittent wiper opera-

tion only when the vehicle is stationary.

(However, when the sensor sensitivity is 

adjusted to the highest level, the mode can-

not be switched.)

Raindrop sensor

The raindrop sensor judges the amount 

of raindrops.

An optical sensor is adopted. It may not 

operate properly when sunlight from the 

rising or setting of the sun intermittently 

strikes the windshield, or if bugs etc. are 

present on the windshield.

If the wiper is turned to AUTO mode 

while the engine switch is in IGNITION 

ON mode, the wipers will operate once 

to show that AUTO mode is activated.

If the temperature of the raindrop sensor 

is 85°C (185°F) or higher, or -15°C 

(5°F) or lower, automatic operation may 

not occur. In this case, operate the wipers 

in any mode other than AUTO mode.

If no washer fluid sprays

Check that the washer nozzles are not 

blocked if there is washer fluid in the washer 

fluid reservoir.

Front door opening linked windshield 

wiper stop function

When 

 is selected and the windshield 

wipers are operating, if a front door is 

opened while the vehicle is stopped and the 

P shift position is selected, operation of the 

windshield wipers will be stopped to pre-

vent anyone near the vehicle from being 

sprayed by water from the wipers. When 

the front door is closed, wiper operation will 

resume.

When stopping the engine in an emer-

gency while driving

If the windshield wipers are operating when 

the engine is stopped, the windshield wipers 

will operate in high speed operation. After 

the vehicle is stopped, operation will return 

to normal when the engine switch is turned 

to IGNITION ON mode, or operation will 

stop when the driver’s door is opened.

Outside rear view mirror defogger acti-

vation linked to windshield wiper opera-

tion

The outside rear view mirror defoggers 

automatically turn on when you operate the 

windshield wipers.

The outside rear view mirror defoggers 

automatically turn off approximately 15 

minutes after the wipers stop.

For details about the outside rear view mir-

ror defoggers: 

P.342

198

4-3. Operating the lights and wipers

When the windshield wipers are not 
being used, they retract to below the 
hood. To enable the windshield wipers 
to be lifted when parking in cold condi-
tions or when replacing a windshield 
wiper insert, change the rest position of 
the windshield wipers to the service 

position using the wiper lever.

Raising the wipers to the service 
position

Within approximately 45 seconds of 
turning the engine switch off, move the 

wiper lever to the 

 position and 

hold it for approximately 2 seconds or 
more.

The wipers will move to the service posi-
tion.

Lifting the windshield wipers

While holding the hook portion   of 
the wiper arm, lift the windshield wiper 
from the windshield.

WARNING

Caution regarding the use of wind-

shield wipers in AUTO mode

The windshield wipers may operate 

unexpectedly if the sensor is touched or 

the windshield is subject to vibration in 

AUTO mode. Take care that your fingers 

or anything else do not become caught 

in the windshield wipers.

Caution regarding the use of washer 

fluid

When it is cold, do not use the washer 

fluid until the windshield becomes warm. 

The fluid may freeze on the windshield 

and cause low visibility. This may lead to 

an accident, resulting in death or serious 

injury.

NOTICE

When there is no washer fluid spray 

from the nozzle

Damage to the washer fluid pump may 

be caused if the lever is pulled toward 

you and held continually.

When a nozzle becomes blocked

In this case, contact any authorized 

Lexus retailer or Lexus authorized 

repairer, or any reliable repairer.

Do not try to clear it with a pin or other 

object. The nozzle will be damaged.

Changing the windshield wiper 
rest position/Lifting the wind-
shield wipers

A

199

4

4-3. Operating the lights and wipers

Driving

Lowering the windshield wipers to the 

retracted position

With the windshield wipers placed on the 

windshield, turn the engine switch to IGNI-

TION ON mode and then move the wiper 

lever to an operating position. When the 

wiper switch is turned off, the windshield 

wipers will stop at the retracted position. 

Even if the wipers deviate while the engine 

switch is off, the wipers will return to the 

normal position.

NOTICE

When lifting the windshield wipers

Do not lift the windshield wipers when 

they are in the retracted position 

below the hood. Otherwise, they may 

contact the hood, possibly resulting in 

damage to a windshield wiper and/or 

the hood.

Do not lift a windshield wiper by the 

wiper blade. Otherwise, the wiper 

blade may be deformed.

Do not operate the wiper lever when 

the windshield wipers are lifted. Oth-

erwise, the windshield wipers may 

contact the hood, possibly resulting in 

damage to the windshield wipers 

and/or hood.

200

4-4. Refueling

4-4.Refueling

Close all the doors and windows, 
and turn the engine switch off.

Confirm the type of fuel.

Fuel types

P.475

Fuel tank opening for unleaded gasoline

To help prevent incorrect fueling, your vehi-

cle has a fuel tank opening that only accom-

modates the special nozzle on unleaded 

fuel pumps.

Opening the fuel tank cap

Perform the following steps to open 
the fuel tank cap:

Before refueling the vehicle

WARNING

When refueling the vehicle

Observe the following precautions while 

refueling the vehicle. Failure to do so may 

result in death or serious injury.

After exiting the vehicle and before 

opening the fuel door, touch an 

unpainted metal surface to discharge 

any static electricity. It is important to 

discharge static electricity before 

refueling because sparks resulting 

from static electricity can cause fuel 

vapors to ignite while refueling.

Always hold the grips on the fuel tank 

cap and turn it slowly to remove it.

A whooshing sound may be heard 

when the fuel tank cap is loosened. 

Wait until the sound cannot be heard 

before fully removing the cap. In hot 

weather, pressurized fuel may spray 

out the filler neck and cause injury.

Do not allow anyone that has not dis-

charged static electricity from their 

body to come close to an open fuel 

tank.

Do not inhale vaporized fuel.

Fuel contains substances that are 

harmful if inhaled.

Do not smoke while refueling the vehi-

cle.

Doing so may cause the fuel to ignite 

and cause a fire.

Do not return to the vehicle or touch 

any person or object that is statically 

charged.

This may cause static electricity to 

build up, resulting in a possible ignition 

hazard.

When refueling

Observe the following precautions to 

prevent fuel overflowing from the fuel 

tank:

Securely insert the fuel nozzle into the 

fuel filler neck.

Stop filling the tank after the fuel noz-

zle automatically clicks off.

Do not top off the fuel tank.

NOTICE

Refueling

Do not spill fuel during refueling.

Doing so may damage the vehicle, such 

as causing the emission control system to 

operate abnormally or damaging fuel 

system components or the vehicle’s 

painted surface.

201

4

4-4. Refueling

Driving

1

Press the opener switch.

2

Turn the fuel tank cap slowly and 
remove it, then put it into the holder 
on the fuel filler door.

If the fuel filler door cannot be opened

P.449

After refueling, turn the fuel tank cap 
until you hear a click. Once the cap is 
released, it will turn slightly in the oppo-
site direction.

Opening the fuel tank cap

Closing the fuel tank cap

WARNING

When replacing the fuel tank cap

Do not use anything but a genuine Lexus 

fuel tank cap designed for your vehicle. 

Doing so may cause a fire or other inci-

dent which may result in death or serious 

injury.


Content      ..     9      10      11      12     ..