Lexus CT (2021 year). Manual in english - page 8
 

  Index      Manuals     Lexus CT (2021 year). Manual in english


Search            copyright infringement  


Content      ..     6      7      8      9     ..


Lexus CT (2021 year). Manual in english - page 8


242

3-4. Adjusting the steering wheel and mirrors

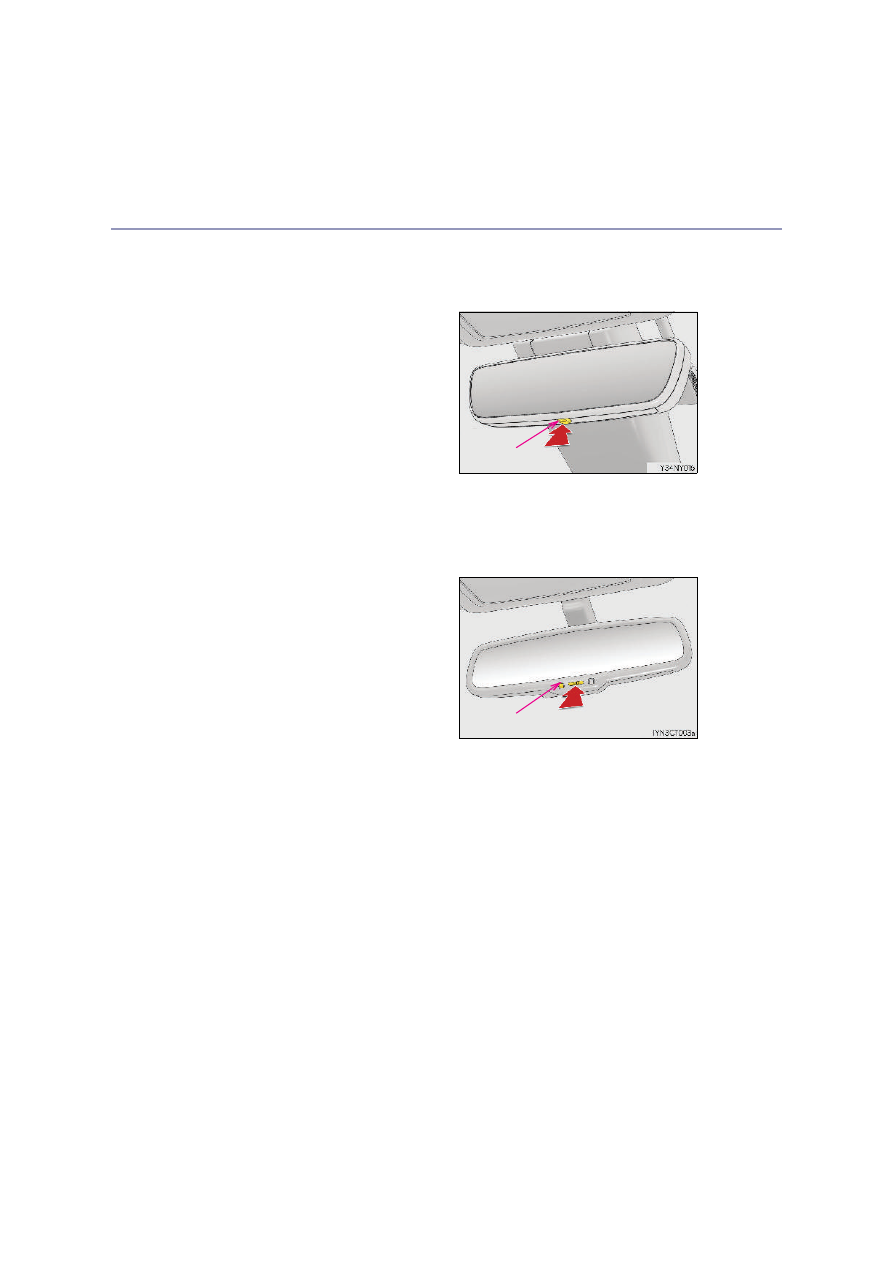
Auto anti-glare inside rear view mirror (type A)

Responding to the level of brightness of the headlights of vehicles behind, the
reflected light is automatically reduced.
Changing automatic anti-glare func-
tion mode
On/off

When the automatic anti-glare function

is in ON mode, the indicator illuminates.

The function will set to ON mode each

time the power switch is turned to ON

mode.

Pressing the button turns the function to

OFF mode. (The indicator also turns

off.)

Auto anti-glare inside rear view mirror (type B)

Responding to the level of brightness of the headlights of vehicles behind, the
reflected light is automatically reduced.
Changing automatic anti-glare func-
tion mode
On/off

When the automatic anti-glare function

is in ON mode, the indicator illuminates.

The function will set to ON mode each

time the power switch is turned to ON

mode.

Pressing the button turns the function to

OFF mode. (The indicator also turns

off.)

Indicator

Indicator

243

3-4. Adjusting the steering wheel and mirrors

3

O

per

at

io

n o

f ea

ch

 co

m

po

nen

t

To prevent sensor error (vehicles with auto anti-glare inside rear view mirror)

To ensure that the sensors operate properly, do

not touch or cover them.

Type A

Type B

WARNING

Do not adjust the position of the mirror while driving.

Doing so may lead to mishandling of the vehicle and cause an accident, resulting in

death or serious injury.

244

3-4. Adjusting the steering wheel and mirrors

Outside rear view mirrors

Type A
To select a mirror to adjust, press the
switch.

Left
Right

To adjust the mirror, press the switch.

Up
Right
Down
Left

Type B
To select a mirror to adjust, slide the
switch.

Left
Right

Adjustment procedure

1

1

2

2

1

2
3
4

1

1

2

245

3-4. Adjusting the steering wheel and mirrors

3

O

per

at

io

n o

f ea

ch

 co

m

po

nen

t

To adjust the mirror, press the switch.

Up
Right
Down
Left

Type A

Press the switch to fold the mirrors.

Press it again to extend them to the orig-

inal position.

Type B
Extends the mirrors
Folds the mirrors

Putting the outside rear view mirror

folding switch in the neutral position sets

the mirrors to automatic mode. Auto-

matic mode allows the folding or

extending of the mirrors to be linked to

locking/unlocking of the doors.

2

1

2
3
4

Folding and extending the mirrors

1

2

246

3-4. Adjusting the steering wheel and mirrors

When the mirror select switch is in the “L” or “R” position, the outside rear view
mirrors will automatically angle downwards when the vehicle is reversing in
order to give a better view of the ground.
To disable this function, move the mirror select switch to the neutral position
(between “L” and “R”).

Mirror angle can be adjusted when

The power switch is in ACCESSORY or ON mode.

When the mirrors are fogged up

The outside rear view mirrors can be cleared using the mirror defoggers. Turn on the

rear window defogger to turn on the outside rear view mirror defoggers. 

(

P. 552, 559)

Automatic adjustment of the mirror angle (vehicles with driving position memory)

A desired mirror face angle can be entered to memory and recalled automatically by the

driving position memory. (

P. 233)

Auto anti-glare function (type B only)

When the anti-glare inside rear view mirror is set to automatic mode, the outside rear

view mirrors will activate in conjunction with the anti-glare inside rear view mirror to

reduce reflected light. (

P. 241)

Using automatic mode in cold weather (type B only)

When automatic mode is used in cold weather, the door mirror could freeze up and

automatic stowing and return may not be possible. In this event, remove any ice and snow

from the door mirror, then either operate the mirror using manual mode or move the mir-

ror by hand.

Customization

The automatic mirror folding and extending operation can be changed. 

(Customizable features: 

P. 742)

Linked mirror function when reversing (type B only)

247

3-4. Adjusting the steering wheel and mirrors

3

O

per

at

io

n o

f ea

ch

 co

m

po

nen

t

WARNING

Important points while driving

Observe the following precautions while driving.

Failing to do so may result in loss of control of the vehicle and cause an accident, result-

ing in death or serious injury.

Do not adjust the mirrors while driving.

Do not drive with the mirrors folded.

Both the driver and passenger side mirrors must be extended and properly adjusted

before driving.

When a mirror is moving

To avoid personal injury and mirror malfunction, be careful not to get your hand caught

by the moving mirror.

When the mirror defoggers are operating

Do not touch the rear view mirror surfaces, as they can become very hot and burn you.

NOTICE

Handling the rain clearing mirror (type B only)

The rain clearing effect is finite. Observe the Following precautions in order to retain

the rain-clearing properties of the mirrors:

When using water repellent, oil film remover, wax, or any other car maintenance

product that contains silicone, pay full attention not to adhere it to the mirror surface.

Do not wipe the mirror surface by using any cloth smeared with sand, oil film remover,

abrasive agent, or any other thing that may scratch the mirror surface.

When the mirrors become iced up, remove the ice by applying warm water, or oper-

ating the outside rear view mirror defoggers, etc. But, do not attempt to scrape the

ice off by using the plastic plate, etc.

When washing your vehicle using car shampoo with water repellent effect, rinse the

mirror surface with a lot of water, and remove the water drops by using a clean and

soft cloth.

248

3-5. Opening, closing the windows and moon roof

Power windows

The power windows can be opened and closed using the switches.
Operating the switch moves the windows as follows:

Closing
One-touch closing

*

Opening
One-touch opening

*

*

: To stop the window partway, operate the

switch in the opposite direction.

Press the switch down to lock the pas-
senger window.

Use this switch to prevent children from

accidentally opening or closing a pas-

senger window.

Opening and closing procedures

1

2
3
4

Window lock switch

249

3-5. Opening, closing the windows and moon roof

3

O

per

at

io

n o

f ea

ch

 co

m

po

nen

t

The power windows can be operated when

The power switch is in ON mode.

Operating the power windows after turning the hybrid system off

The power windows can be operated for approximately 45 seconds even after the

power switch is turned to ACCESSORY mode or turned off. They cannot, however, be

operated once either front door is opened. 

Jam protection function

If an object becomes jammed between the window and the window frame while the win-

dow is closing, window movement is stopped and the window is opened slightly.

Catch protection function

If an object becomes caught between the door and window while the window is opening,

window movement is stopped.

When the window cannot be opened or closed

When the jam protection function or catch protection function operates unusually and

the door window cannot be opened or closed, perform the following operations with the

power window switch of that door.

Stop the vehicle. With the power switch in ON mode, within 4 seconds of the jam pro-

tection function or catch protection function activating, continuously operate the

power window switch in the one-touch closing direction or one-touch opening direc-

tion so that the door window can be opened and closed.

If the door window cannot be opened and closed even when performing the above

operations, perform the following procedure for function initialization.
Turn the power switch to ON mode.
Pull and hold the power window switch in the one-touch closing direction and com-

pletely close the door window.
Release the power window switch for a moment, resume pulling the switch in the one-

touch closing direction, and hold it there for approximately 6 seconds or more.
Press and hold the power window switch in the one-touch opening direction. After the

door window is completely opened, continue holding the switch for an additional 1 sec-

ond or more.
Release the power window switch for a moment, resume pushing the switch in the

one-touch opening direction, and hold it there for approximately 4 seconds or more.
Pull and hold the power window switch in the one-touch closing direction again. After

the door window is completely closed, continue holding the switch for a further 1 sec-

ond or more.

If you release the switch while the window is moving, start again from the beginning. 

If the window reverses and cannot be fully closed or opened, have the vehicle inspected

by any authorized Lexus retailer or Lexus authorized repairer, or any reliable repairer. 

1

2

3

4

5

6

250

3-5. Opening, closing the windows and moon roof

Door lock linked window operation

The power windows can be opened and closed using the mechanical key.

*

 (

P. 716)

The power windows can be opened and closed using the wireless remote control.

*

(

P. 123)

*

: These settings must be customized at any authorized Lexus retailer or Lexus autho-

rized repairer, or any reliable repairer.

Customization

Setting (e.g. linked door lock operation) can be changed.

(Customizable features: 

P. 742)

WARNING

Observe the following precautions. 

Failing to do so may result in death or serious injury.

Closing the windows

The driver is responsible for all the power window operations, including the operation

for the passengers. In order to prevent accidental operation, especially by a child, do

not let a child operate the power windows. It is possible for children and other passen-

gers to have body parts caught in the power window. Also, when riding with a child, it

is recommended to use the window lock switch. (

P. 248)

Check to make sure that all passengers do not have any part of their body in a posi-

tion where it could be caught when a window is being operated.

When using the wireless remote control or mechanical key and operating the power

windows, operate the power window after checking to make sure that there is no pos-

sibility of any passenger having any of their body parts caught in the window. Also do

not let a child operate window by the wireless remote control or mechanical key. It is

possible for children and other passengers to get caught in the power window.

When exiting the vehicle, turn the power switch off, and take the key with you. Do not

leave children unattended in the vehicle. There may be accidental operation, due to

mischief, etc., that may possibly lead to an accident.

Jam protection function

Never use any part of your body to intentionally activate the jam protection function.

The jam protection function may not work if something gets jammed just before the

window is fully closed. Be careful not to get any part of your body jammed in the win-

dow.

Catch protection function

Never use any part of your body or clothing to intentionally activate the catch protec-

tion function.

The catch protection function may not work if something gets caught just before the

window is fully opened. Be careful not to get any part of your body or clothing caught

in the window.

251

3

3-5. Opening, closing the windows and moon roof

O

per

at

io

n o

f ea

ch

 co

m

po

nen

t

Moon roof

Opens the moon roof

*

Push and hold “OPEN” for more than 1

second. The moon roof tilts up and then

opens automatically.

Closes the moon roof

*

Push and hold “CLOSE” for more than 1

second. The moon roof closes automati-

cally to the tilt up position. Push and hold

“CLOSE” again to fully close the moon

roof.

*

: Lightly press either end of the moon roof switch to stop the moon roof partway.

Tilts the moon roof up

*

Tilts the moon roof down

*

*

: Lightly press either end of the moon roof

switch to stop the moon roof partway.

: If equipped

Use the overhead switches to open and close the moon roof and tilt it up and
down.

Opening and closing

1

2

Tilting up and down

1

2

252

3-5. Opening, closing the windows and moon roof

The moon roof can be operated when

The power switch is in ON mode. 

Operating the moon roof after turning the hybrid system off

The moon roof can be operated for approximately 45 seconds even after the power

switch is turned to ACCESSORY mode or turned off. It cannot, however, be operated

once either front door is opened. 

Jam protection function

If an object is detected between the moon roof and the frame while the moon roof is clos-

ing or tilting down, travel is stopped and the moon roof opens slightly.

Sunshade

The sunshade can be opened and closed manually. However, the sunshade will open

automatically to slightly before the fully open position when the moon roof is opened. 

When the moon roof does not close normally

Perform the following procedure:

If the moon roof closes but then re-opens slightly

Stop the vehicle.
Press and hold the “CLOSE” switch.

*

1

The moon roof will close, reopen and pause for approximately 10 seconds.

*

2

 Then it

will close again and tilt down. Finally it will be adjusted slightly and then stop.
Check to make sure that the moon roof completely stops and then release the

switch.

If the moon roof tilts down but then tilts back up

Stop the vehicle.
Press and hold the “DOWN” switch.

*

1

The moon roof will close, reopen and pause for approximately 10 seconds in the tilt
up position.

*

2

 Then it will close again and tilt down. Finally it will be adjusted slightly

and then stop.
Check to make sure that the moon roof has completely stopped and then release

the switch.

*

1

: If the switch is released at the incorrect time, the procedure will have to be per-

formed again from the beginning.

*

2

: If the switch is released after the above mentioned 10 second pause, automatic

operation will be disabled. In that case, press and hold the “CLOSE” or “DOWN”
switch, and the moon roof will close, be adjusted slightly and then stop. Check to
make sure that the moon roof has completely stopped and then release the switch.

If the moon roof does not fully close even after performing the above procedure cor-

rectly, have the vehicle inspected by any authorized Lexus retailer or Lexus authorized

repairer, or any reliable repairer.

Moon roof open warning buzzer

The buzzer sounds and a message is shown on the multi-information display in the instru-

ment cluster when the power switch is turned off and the driver’s door is opened with the

moon roof open.

1

2

3

1

2

3

253

3-5. Opening, closing the windows and moon roof

3

O

per

at

io

n o

f ea

ch

 co

m

po

nen

t

WARNING

Observe the following precautions.

Failing to do so may cause death or serious injury.

Opening the moon roof

Do not allow any passengers to put their hands or heads outside the vehicle while it is

moving.

Do not sit on top of the moon roof.

Closing the moon roof

The driver is responsible for moon roof opening and closing operations. In order to

prevent accidental operation, especially by a child, do not let a child operate the

moon roof. It is possible for children and other passengers to have body parts caught

in the moon roof.

Check to make sure that all passengers do not have any part of their body in a posi-

tion where it could be caught when the moon roof is being operated. 

When exiting the vehicle, turn the power switch off, carry the key and exit the vehicle

along with the child. There may be accidental operation, due to mischief, etc., that

may possibly lead to an accident.

Jam protection function

Never use any part of your body to intentionally activate the jam protection function.

The jam protection function may not work if something gets caught just before the

moon roof fully closes.

255

4

Driving

4-1. Before driving

Driving the vehicle.....................256
Cargo and luggage...................263
Trailer towing...............................264

4-2. Driving procedures

Power (ignition) switch............265
EV drive mode ............................269
Hybrid transmission ....................271
Turn signal lever .........................276
Parking brake .............................. 277

4-3. Operating the lights 

and wipers

Headlight switch.........................278
Automatic High Beam.............282
Fog light switch ...........................286
Windshield wipers and 

washer ........................................ 288

Rear window wiper and 

washer .........................................292

Headlight cleaner switch ........293

4-4. Refueling

Opening the fuel tank cap .....294

4-5. Using the driving support 

systems

Lexus Safety System+.............. 297
PCS (Pre-Collision 

System) .......................................309

LDA (Lane Departure Alert 

with steering control) ............320

RSA (Road Sign Assist) ..........329
Dynamic radar cruise 

control ........................................334

Cruise control .............................346
Lexus parking 

assist-sensor..............................349

Rear view monitor system......358
Driving mode select 

switch ...........................................368

Driving assist systems ..............369

4-6. Driving tips

Hybrid vehicle driving tips ..... 374
Winter driving tips..................... 377

256

4-1. Before driving

Driving the vehicle

P. 265

With the brake pedal depressed, shift the shift position to D. (

P. 271) 

Check that the shift position indicator shows D.
Release the parking brake. (

P. 277)

Gradually release the brake pedal and gently depress the accelerator pedal
to accelerate the vehicle. 

With the shift position in D, depress the brake pedal. 
If necessary, set the parking brake. 

If the vehicle is to be stopped for an extended period of time, shift the shift position to

P. (

P. 272)

Stop the vehicle completely.
Set the parking brake. (

P. 277)

Shift the shift position to P. (

P. 272)

Check that the shift position indicator shows P.

Press the power switch to stop the hybrid system.
Slowly release the brake pedal.
Lock the door, making sure that you have the electronic key on your person.

If parking on a hill, block the wheels as needed.

The following procedures should be observed to ensure safe driving: 

Starting the hybrid system 

Driving

Stopping

Parking the vehicle

1

2
3

1

2

1

2
3

4
5
6

257

4-1. Before driving

4

Dr

ivi

ng

Firmly set the parking brake with the brake pedal depressed, and then shift the
shift position to D.
Release the brake pedal and gently depress the accelerator pedal. 
Release the parking brake.

When starting off on a uphill

The hill-start assist control will activate. (

P. 369)

For fuel-efficient driving

Keep in mind that hybrid vehicles are similar to conventional vehicles, and it is necessary

to refrain from activities such as sudden acceleration, etc. Refer to “Hybrid vehicle

driving tips”. (

P. 374)

Driving in the rain or adverse weather conditions

Drive carefully, because visibility may be reduced, the windows may become fogged-

up, and the road will be slippery.

Drive carefully when it starts to rain, because the road surface will be especially slip-

pery.

Slow down when water is present on the roadway, because there may be a layer of

water between the tires and the road surface, preventing the steering and brakes from

operating properly.

Breaking in your new  Lexus

To extend the life of the vehicle, observing the following precautions is recommended:

For the first 300 km (200 miles): 

Avoid sudden stops.

For the first 2000 km (1200 miles):
• Do not drive at extremely high speeds.

• Avoid sudden acceleration.

• Do not drive at a constant speed for extended periods.

Operating your vehicle in a foreign country

Comply with the relevant vehicle registration laws and confirm the availability of the cor-

rect fuel. (

P. 732)

Starting off on a uphill

1

2
3

258

4-1. Before driving

WARNING

Observe the following precautions.

Failure to do so may result in death or serious injury.

When starting the vehicle

Always keep your foot on the brake pedal while stopped with the “READY” indicator is

illuminated. This prevents the vehicle from creeping.

When driving the vehicle

Do not drive if you are unfamiliar with the location of the brake and accelerator ped-

als to avoid depressing the wrong pedal. 
• Accidentally depressing the accelerator pedal instead of the brake pedal will

result in sudden acceleration that may lead to an accident.

• When backing up, you may twist your body around, leading to a difficulty in oper-

ating the pedals. Make sure to operate the pedals properly.

• Make sure to keep a correct driving posture even when moving the vehicle only

slightly. This allows you to depress the brake and accelerator pedals properly.

• Depress the brake pedal using your right foot. Depressing the brake pedal using

your left foot may delay response in an emergency, resulting in an accident.

The driver should pay extra attention to pedestrians when the vehicle is powered only

by the electric motor (traction motor). As there is no engine noise, the pedestrians

may misjudge the vehicle’s movement.

Do not drive the vehicle over or stop the vehicle near flammable materials. 

The exhaust system and exhaust gases can be extremely hot. These hot parts may

cause a fire if there is any flammable material nearby.

During normal driving, do not turn off the hybrid system. Turning the hybrid system off

while driving will not cause loss of steering or braking control, however, power assist

to the steering will be lost. This will make it more difficult to steer smoothly, so you

should pull over and stop the vehicle as soon as it is safe to do so. In the event of an

emergency, such as if it becomes impossible to stop the vehicle in the normal way:

P. 657

Use engine braking (shift position B instead of shift position D) to maintain a safe

speed when driving down a steep hill. 

Using the brakes continuously may cause the brakes to overheat and lose effective-

ness. (

P. 272)

Do not adjust the positions of the steering wheel, the seat, or the inside or outside rear

view mirrors while driving. 

Doing so may result in a loss of vehicle control.

Always check that all passengers’ arms, heads or other parts of their body are not

outside the vehicle.


Content      ..     6      7      8      9     ..