LEXUS GX 460 (2019 year). Instruction - part 20
 

  Index      Lexus     LEXUS GX 460 - instruction 2019 year in english


Search            


Content   ..  18  19  20  21   ..


LEXUS GX 460 (2019 year). Instruction - part 20


312

4-5. Using the driving support systems

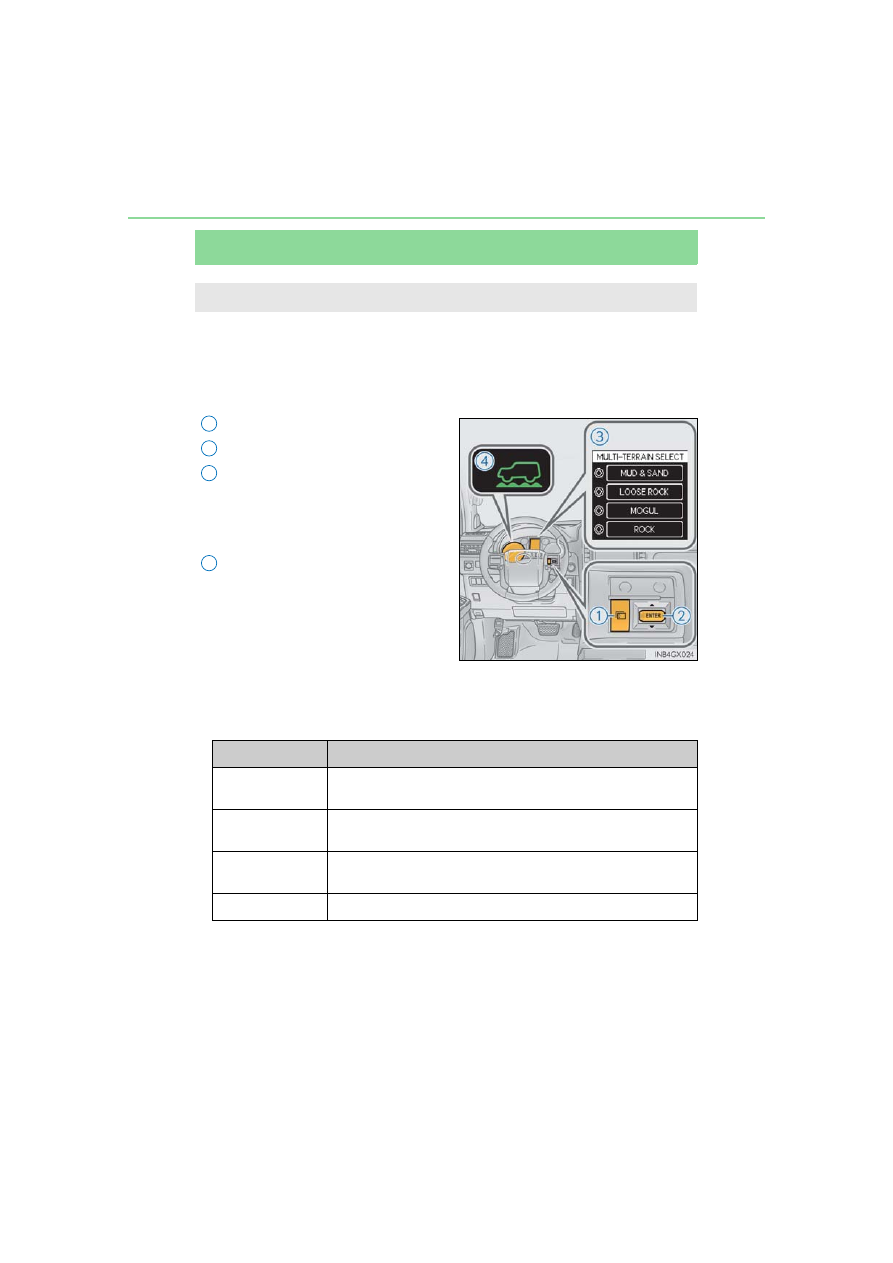
Multi-terrain Select

Select a mode that most closely matches the type of terrain on which you are
driving from among 4 modes. 
Engine control and brake control can be optimized in accordance with the
selected mode.

Menu switch
“ENTER” switch
Multi-information display
Displays status information including
operating status and road type
selection.
Multi-terrain Select indicator

Selectable modes
A mode which matches the road conditions can be selected from among the
following 4 modes.

: If equipped

Multi-terrain Select is a system that helps drivability in off-road situations.

1

2
3

4

Mode

Road Conditions

MUD & SAND

Suitable for muddy roads, sandy roads, snow-covered roads, dirt

trails and other slippery or dirty conditions

LOOSE ROCK Suitable for slippery conditions consisting of mixtures of earth

and loose rock

MOGUL

Suitable for a wide range of off-road conditions, particularly very

bumpy conditions

ROCK

Suitable for rocky terrain

313

4-5. Using the driving support systems

4

Dr

iving

Switching modes

Push the menu switch.

The multi-information display will

change to electronic features control

mode.

Press the “ENTER” switch
upwards or downwards until
“MULTI-TERRAIN SELECT”
appears and then press the
“ENTER” switch.

The mode selection screen is dis-

played.

Press the “ENTER” switch
upwards or downwards to select
a desired mode and then press
the “ENTER” switch.

The system switches to the selected

mode, and the multi-terrain select

indicator will turn on.

Once the mode has been set, the
mode name will be displayed and
operation will commence.

1

2

3

4

314

4-5. Using the driving support systems

After mode selection

OFF
Turn the system off
MODE SELECTION
Change the mode (

P. 313)

DISP. GUIDANCE
Explain other necessary opera-
tions when selecting a mode
Status
Display the status of the system

The displayed content may differ in accordance with the system status.

Operation guidance
Operation guidance is shown on the multi-information display when you can-
not set a mode. 
When the operation guidance is shown on the multi-information display, fol-
low the instructions in the table.

Statement on the multi-information display

1

2

3

4

315

4-5. Using the driving support systems

4

Dr

iving

The Multi-terrain Select can be operated when
The Crawl Control is off.

When using Multi-terrain Select
The following functions cannot be switched on or off.

VSC

Active TRAC

Second start mode

A message will be shown on the multi-information display stating that these functions

cannot be switched using the VSC OFF switch or the menu and “ENTER” switches.

When selecting a terrain mode
If you are unsure which mode is appropriate, select MOGUL when the four-wheel drive

control switch is in L4 or select MUD & SAND when it is in H4.

Guidance Display

Vehicle Status

Procedure

SHIFT TO L4

LOOSE ROCK, MOGUL or ROCK

mode is selected when the four-wheel

drive control switch is in H4

Set the four-wheel

drive control switch to

L4

STOP THE VEHI-

CLE AND SHIFT

THE AUTO-

MATIC TRANS-

MISSION TO N

The four-wheel drive control switch

has been shifted to H4 or L4 and

LOOSE ROCK, MOGUL or ROCK

mode is selected, but the automatic

transmission is not in N position or the

vehicle is not stopped

Stop the vehicle com-

pletely and shift the

shift lever into N

ACCELERATE OR

DECELERATE

The center differential lock/unlock

switch is pressed when Multi-terrain

Select is operating, but the center dif-

ferential cannot be switched between

lock and unlock

Drive straight ahead

while accelerating or

decelerating, or drive

in reverse

RETURN THE

FOUR-WHEEL

DRIVE CON-

TROL SWITCH

The four-wheel drive control switch is

shifted when Multi-terrain Select is

operating, but the transfer cannot be

shifted to H4 or L4 position

Return the four-wheel

drive control switch to

L4 or H4

MULTI-TERRAIN

SELECT NOT

AVAILABLE

The VSC, EFI, 4WD and/or Multi-ter-

rain Select system may be malfunc-

tioning

Contact your Lexus

dealer

316

4-5. Using the driving support systems

When it is difficult to generate traction
MUD & SAND mode provides the largest amount of tire slippage, followed by LOOSE

ROCK, MOGUL and ROCK mode. 

Drivability can be improved by selecting a mode which provides a smaller amount of tire

slippage than the current mode when the amount of tire slippage is large, or conversely

selecting a mode which provides a larger amount of tire slippage than the current mode

when the amount of tire slippage is small.

When the vehicle is stuck
Switching the transfer and differential 

For the operation of the following functions, refer to the following pages.

Four-wheel drive system (

P. 346)

Center differential lock (

P. 347)

When the TRAC or Active TRAC operates continuously
P. 358

When the four-wheel drive control switch is in L4 position
If the Multi-terrain Select system is not operating and the four-wheel drive control switch

is in L4, “TRAC OFF” will be shown on the multi-information display.

When there is a malfunction in the system
The slip indicator light will come on. Have the vehicle inspected by your Lexus dealer

immediately.

CAUTION

When using the Multi-terrain Select
Observe the following precautions to avoid an accident that could result in death or

serious injuries:

There is a chance that the selected mode may not be the most appropriate in terms of

road conditions such as pitch, slipperiness, undulation, etc. (

P. 312)

Multi-terrain Select is not intended to expand the limits of the vehicle. Check the road

conditions thoroughly beforehand, and drive safely and carefully.

NOTICE

Precaution for use
The Multi-terrain Select is intended for use during off-road driving. Do not use the sys-

tem at any other time.

317

4-5. Using the driving support systems

4

Dr

iving

Multi-terrain Monitor

By pressing the Multi-terrain Monitor switch, the display can be shown, or the
display image can be changed between the front screen, wide view front &
side monitor screen, side-front simultaneous display monitor screen, side-
rear simultaneous display monitor screen or rear screen. (The screens that
can be selected differ depending on the shift position and the transfer mode.)

By referring to the guidelines shown on the front monitor screen, you can
decide a driving line while assessing the distance to obstacles ahead of the
vehicle and confirm the projected path, and by using the wide view front &
side monitors, the side-front simultaneous display monitor and the side-rear
simultaneous display monitor to identify objects in the vicinity or course of the
tires, you can drive while preventing the vehicle from becoming stuck unex-
pectedly.

Multi-terrain Monitor switch
Multimedia screen (if equipped)
or navigation system screen (if
equipped)

: If equipped

The Multi-terrain Monitor displays the vehicle surroundings when driving at
low speeds, thus assisting off-road driving and helping the driver to check the
vehicle surroundings.

Display of the Multi-terrain Monitor

1

2

318

4-5. Using the driving support systems

Switching the image

When the shift lever is in D, S or N

Normal display mode: Press the Multi-terrain Monitor switch to display the screen. 

Automatic display mode: The screen is displayed automatically. 

The screen will switch each time the Multi-terrain Monitor switch is pressed. (The

switching screen differs in accordance with the transfer range.)

When the shift lever is in R

If the shift lever is shifted to R, the rear monitor (Lexus parking assist monitor) will

be displayed, and the screen will switch every time the Multi-terrain Monitor

switch is pressed.

Using the Multi-terrain Monitor

Four-wheel drive 

control switch position

Display

H4

L4

Wide view front & side monitor display

Side-front simultaneous display monitor

Side-rear simultaneous display monitor

Front monitor

Side-front simultaneous display monitor

Side-rear simultaneous display monitor

Rear monitor (Lexus parking assist monitor)

Side-front simultaneous display monitor

Side-rear simultaneous display monitor

319

4-5. Using the driving support systems

4

Dr

iving

Automatic display mode
In this mode, the screen is switched automatically in response to vehicle speed
and shift lever operation, in addition to screen switching by operating the
Multi-terrain Monitor switch.
Select “AUTO” on the front or wide
view front & side monitor screen.

The “AUTO” indicator will come on.
Select “AUTO” again to return to

normal display mode.

320

4-5. Using the driving support systems

Front monitor

*

Side-front simultaneous display
monitor

*

Side-rear simultaneous display mon-
itor

*

Rear monitor

*

: Range of wide view front & side monitor

display (The monitor for side displays
passenger’s side only.)

The illustration shown here is an example. As such, the actual visible area may be
different. See P. 330 for information about the visual range of each camera.

Range covered by each camera

1

2

3

4

321

4-5. Using the driving support systems

4

Dr

iving

Front monitor
The image from the front camera is
displayed. Use this monitor to help
check the area in front of the vehicle
for safety. Guidelines are shown to
help determine the course.

Wide view front & side monitor display
Images from the front and the sides
of the vehicle are displayed.

This display is used to verify the situa-

tion at crossings with poor visibility,

and to assist with safety confirmation

when turning right.
Guidelines can also be displayed as a

steering guide when turning right.

Display

322

4-5. Using the driving support systems

Side-front simultaneous display monitor
The image from both side cameras is
displayed. Use this monitor to help
check the area on both sides of the
vehicle at the same time, and to
check for objects near the tires or
the sides of the vehicle. Guidelines
showing an image of the vehicle
width and the position of the front
tires are displayed.

Side-rear simultaneous display monitor
The image from both side cameras is
displayed. Use this monitor to help
check the area on both sides of the
vehicle at the same time, and to
check for objects near the tires or
the sides of the vehicle. Guidelines
showing an image of the vehicle
width and the position of the rear
tires are displayed.

Rear monitor (Lexus parking assist monitor)
The image from the rear camera is
displayed. (

P. 268)

323

4-5. Using the driving support systems

4

Dr

iving

Front monitor

Vehicle icon

Displays the image being shown by

the front monitor.

Trajectory line

*

 (outside)

Indicates the outer path of the tire.

Trajectory line

*

 (inside)

Indicates the inner path of the tire.

Distance guideline (yellow)

Shows the position about 3.3 ft. (1 m) away from the front edge of the vehicle.

Distance guideline (red)

Shows the position about 1.6 ft. (0.5 m) away from the front edge of the vehicle.

Automatic display mode

Switches the projected course mode

*

: The trajectory lines move according to the steering wheel position.

Using the monitor

1

2

3

4

5

6

324

4-5. Using the driving support systems

Wide view front & side monitor display

Projected course line switching
button

*

The course line display mode will

change as follows each time the

switch is selected.

Vehicle icon

Displays the image being shown by

the front monitor.

Front wheel contact point

Shows the position of the vehicle’s front tire.

Vehicle front edge line

Shows the position of the vehicle’s leading edge.

Projected course line

*

 (yellow)

Displays a rough guide of the vehicle path that moves according to the steering

wheel position. Displayed along with the minimum projected turning circle.

Minimum projected turning circle

*

 (blue)

Displays the smallest turning circle projected by the system if the steering wheel is

turned to full lock. Displayed when the steering wheel is turned to the right (further

than 90

 from straight ahead).

Rear wheel contact point

Shows the position of the vehicle’s rear tire.

Vehicle width line (blue)

Indicates the width of the vehicle including the outside rear view mirror.

Automatic display mode

*

Switches the projected course mode

*

: When the shift lever is in R, it will not be displayed.

1

2

3

4

5

6

7

8

9

325

4-5. Using the driving support systems

4

Dr

iving

Side-front simultaneous display monitor

Vehicle icon

Displays the image being shown by

the side-front simultaneous display

monitor.

Vehicle front edge line

Shows the position of the vehicle’s

front edge.

Vehicle width line

Indicates the width of the vehicle

including the outside rear view mir-

ror.

Front wheel contact point

Shows the position of the vehicle’s front tire. 

Side-rear simultaneous display monitor

Vehicle icon

Displays the image being shown by

the side-rear simultaneous display

monitor.

Rear wheel contact point

Shows the position of the vehicle’s

rear tire.

Vehicle width line

Indicates the width of the vehicle

including the outside rear view mir-

ror.

Vehicle rear edge line

Shows the position of the vehicle’s rear edge.

Rear monitor (Lexus parking assist monitor)
P. 268

1

2

3

4

1

2

3

4

326

4-5. Using the driving support systems

Turning course line display mode
The projected course line is added
to the minimum projected turning
circle mode.

Minimum projected turning circle display mode
The minimum projected turning cir-
cle line is added to the no course
lines mode.

No course lines mode
Vehicle width line displayed.

Projected course line display mode (Wide view front & side monitor dis-
play)

327

4-5. Using the driving support systems

4

Dr

iving

Switching projected course line display mode
Select .

The display mode switches in the fol-

lowing order:

Using the vehicle width line & course line

Vehicle width line

Turning course line display

mode

Minimum projected turning

circle display mode

No course lines mode

Use the vehicle width line to
check the vehicle’s distance from
objects such as curbstones etc. 
As shown in the illustration, be
sure that the vehicle width line
does not overlap the object. If you
also move the vehicle so that the
vehicle width line and the object
are parallel, you can park parallel
to the object.


Content   ..  18  19  20  21   ..