Lexus SC300 / Lexus SC400. Manual - part 319
 

  Index      Lexus     Lexus SC300 / Lexus SC400 - service repair manual


Search            


Content   ..  317  318  319  320   ..


Lexus SC300 / Lexus SC400. Manual - part 319


THERMOSTAT

HINT: Removal of the thermostat would have an adverse ef-
fect, causing a lowering of cooling efficiency. Do not remove
the thermostat, even if the tends to overheat.

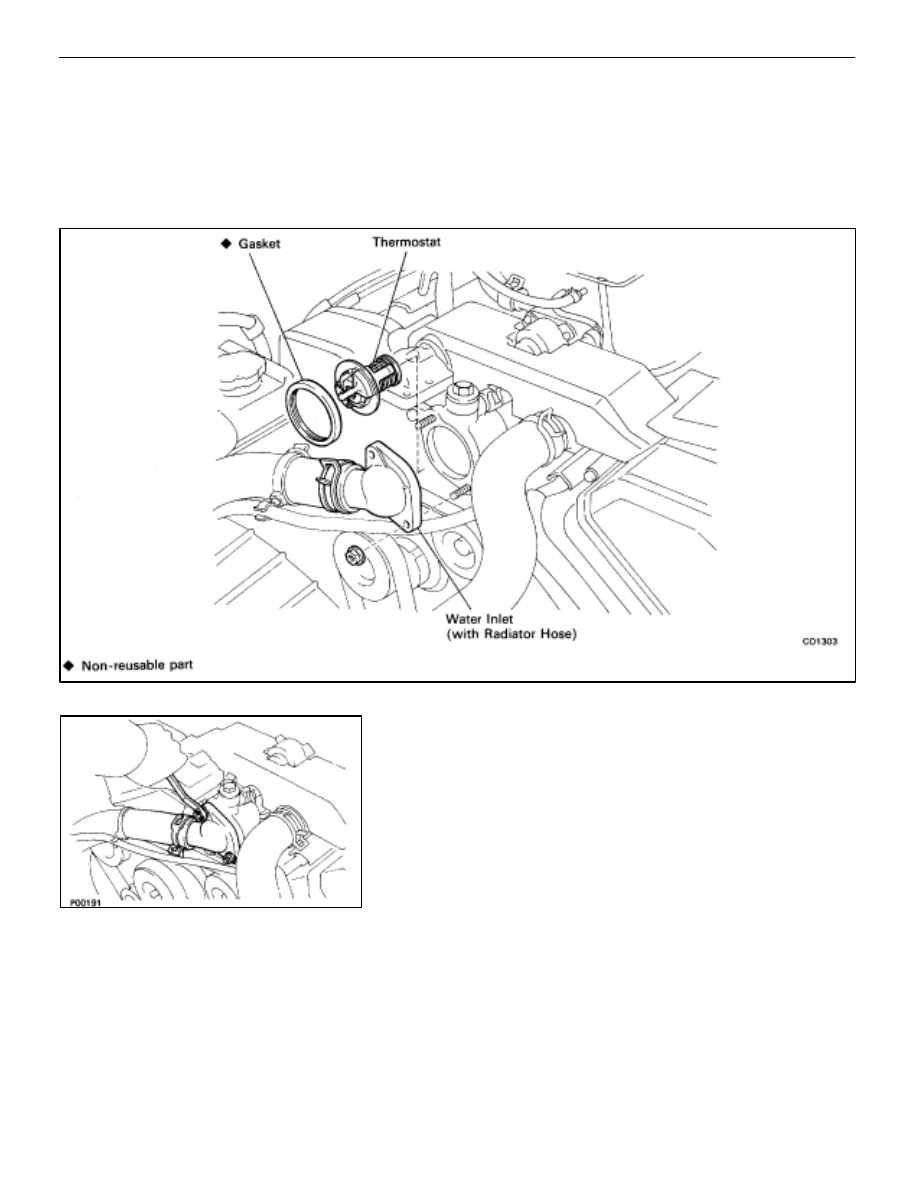
COMPONENTS FOR REMOVAL AND
INSTALLATION

REMOVAL OF THERMOSTAT

1. 

DRAIN ENGINE COOLANT (See page 

CO–6

)

2. REMOVE 

THERMOSTAT

(a)  Remove the two nuts holding the water inlet to the inlet

housing, and disconnect the water inlet from the inlet
housing.

(b)  Remove the thermostat.
(c)  Remove the gasket from the thermostat.

CO–12

COOLIING SYSTEM

Thermostat

INSPECTION OF THERMOSTAT

INSPECT THERMOSTAT

HINT: The thermostat is numbered with the valve opening
temperature.
(a)  Immerse the thermostat in water and gradually heat the

water.

(b)  Check the valve opening temperature.

Valve opening temperature:

80–84

°

C (176–183

°

F)

If the valve opening temperature is not as specified, replace
the thermostat.
(c)  Check the valve lift.

Valve lift:

10 mm (0.39 in.) or more at 95

°

C (203

°

F)

If the valve lift is less than specification, replace the thermo-
stat.
(d)  Check that the valve spring is tight when the thermostat

is fully closed.

If necessary, replace the thermostat.

INSTALLATION OF THERMOSTAT

(See Components on page 

CO–12

)

1. 

PLACE THERMOSTAT IN WATER INLET HOUSING
(a)  Install a new gasket to the thermostat.
(b)  Insert the thermostat into the water inlet housing with

the jiggle valve facing straight upward.

HINT: The jiggle valve may be set within 30

°

 of either side of

the prescribed position.

2. INSTALL 

WATER 

INLET

Install the water inlet with the two nuts.

Torque: 18 N

m (185 kgf

cm, 13 ft

lbf)

3. 

FILL WITH ENGINE COOLANT (See page 

CO–7

)

4. 

START ENGINE AND CHECK FOR LEAKS

COOLIING SYSTEM

Thermostat

CO–13

RADIATOR

CLEANING OF RADIATOR

Using water or a steam cleaner, remove any mud and dirt
from the radiator core.
NOTICE: If using a high pressure type cleaner, be careful
not to deform the fins of the radiator core. If the cleaner
nozzle pressure is 2,942–3,432 kPa (30–35 kgf/cm2,
427–498 psi), keep a distance  at least 40–50 cm
(15.75–19.69  in.) between the radiator core and cleaner
nozzle.

INSPECTION OF RADIATOR

1. 

REMOVE RADIATOR CAP FROM RESERVOIR TANK

2. INSPECT 

RADIATOR 

CAP

Using a radiator cap tester, pump the tester and measure the
relief valve opening pressure.

Standard opening pressure:

74–103 kPa

(0.75–1.05 kgf/cm, 10.7–14.9 psi)

Minimum opening pressure:

59 kPa (0.6 kgf/cm, 8.5 psi)

If the opening pressure is less than minimum, replace the ra-
diator cap.

3. 

INSPECT COOLING SYSTEM FOR LEAKS
(a)  Fill the radiator with coolant and attach a radiator cap

tester to the reservoir tank.

(b)  Warm up the engine.
(c)  Pump it to 118 kPa (1.2 kgf/cm2, 17.1 psi), check that

pressure does not drop.

If the pressure drops, check for leaks as the hoses, radiator
or water pump. If no external leaks are found, check the heat-
er core, cylinder block and head.

4. REINSTALL 

RADIATOR 

CAP

CO–14

COOLIING SYSTEM

Radiator

COMPONENTS FOR REMOVAL AND
INSTALLATION

COOLIING SYSTEM

Radiator

CO–15


Content   ..  317  318  319  320   ..