Range Rover Body Repair Manual - part 23


  Index      Land Rover     Range Rover - Body Repair Manual 1996 year


Search            


Content   ..  21  22  23  24   ..


Range Rover Body Repair Manual - part 23


CHASSIS AND BODY

17

REPAIR

28. Disconnect multiplug from SRS control module,

route harness into fascia to prevent fouling as
fascia is removed.

29. Remove both front wheel arch liners.

See this

section.

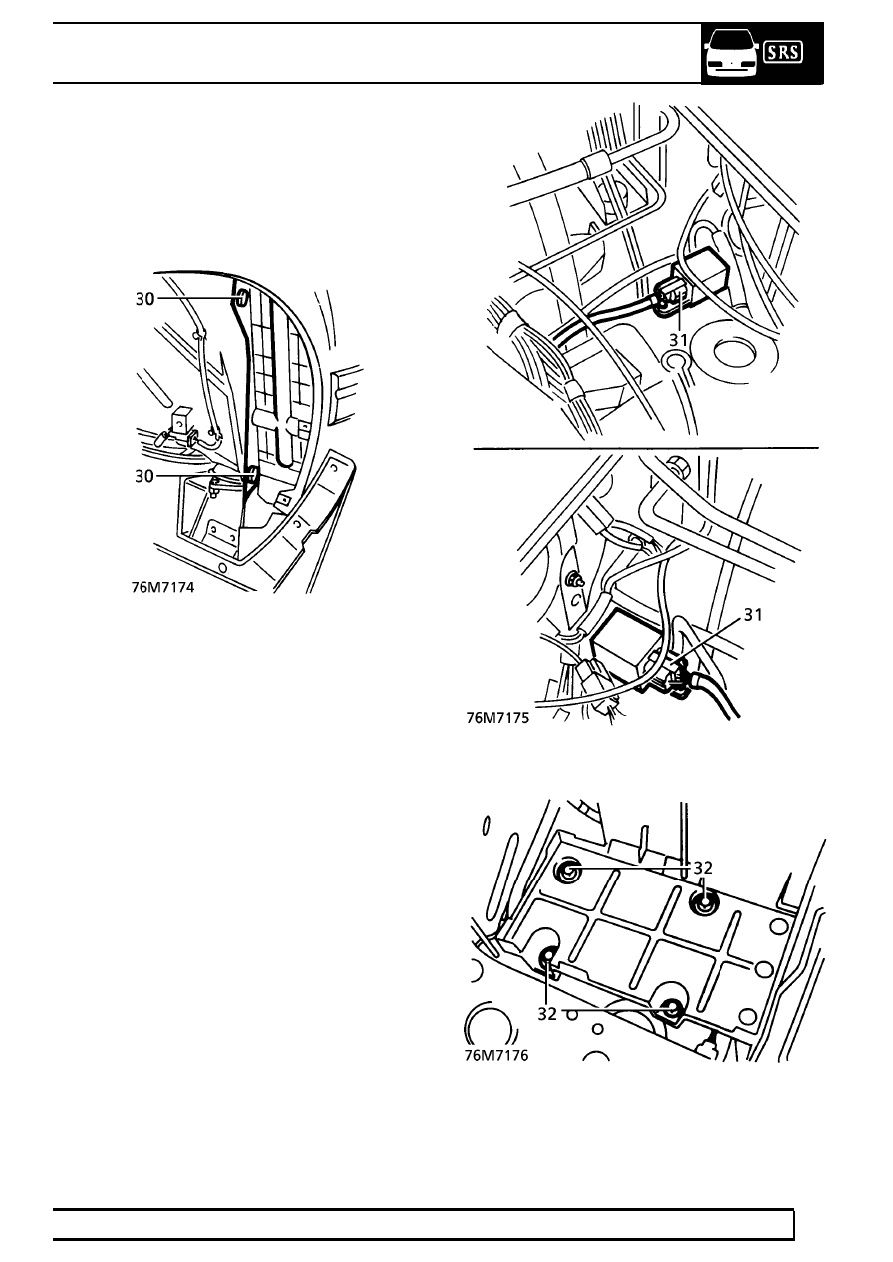
30. Remove 2 scrivet fasteners securing air cleaner

baffle beneath LH wheel arch. Remove baffle.

31. Disconnect both SRS crash sensor multiplugs.

32. Remove 4 bolts securing battery tray and 2 bolts

securing air cleaner to valance.

76

CHASSIS AND BODY

NEW RANGE ROVER

18

REPAIR

33. Raise air cleaner and battery tray for access to

crash sensor harness clips.

34. Release clips securing each crash sensor

harness to valance. Release harness grommets
and feed both harnesses through valance into
wheel arches.

35. Release 3 clips securing each crash sensor

harness to underside of wheel arches.

36. Release harness grommets, feed harnesses

through bulkhead and route into fascia to
prevent fouling as fascia is removed.

37. Vehicles with air conditioning only: Discharge

air conditioning system.

See AIR

CONDITIONING, Adjustment.

38. Remove bolt securing pipe clamp to

Thermostatic Expansion Valve (TXV).

39. Release pipes from TXV and remove ’O’ rings.

Seal pipes and ports of TXV.

40. All models: Remove 4 tube bolts securing

fascia to scuttle panel.

CHASSIS AND BODY

19

REPAIR

41. Remove nuts and washers securing fascia to

base of ’A’ posts.

42. Remove bolt securing fascia to pedal box.
43. Using assistance, carefully manoeuvre the

fascia through the driver’s door aperture. Place
fascia on a soft covered work surface, supported
on suitable wooden blocks.

44. Remove rubber seals from air intake ducts.
45. Collect rear heater duct connecting tubes.

Refit

46. Fit intake seals to blower motor ducts. Tape

rubbers inside blower ducts to aid fitment.

NOTE: Tape the rubbers at this stage, as
they are almost impossible to locate after
dash fitment.

47. Fit guide pins LRT-76-001 to outer fascia studs.
48. With assistance, manoeuvre fascia into position

through driver’s front door aperture. Locate
guide pins.

NOTE: Assistance from a third person may
be necessary when guiding heater pipes
through bulkead.

49. Loosely fit 1 tube bolt, fascia to scuttle.

50. Fit bolt securing fascia to pedal box. Tighten to

25 Nm. (18 lbf.ft)

51. Fit nuts and washers at base of A posts. Tighten

to

25 Nm. (18 lbf.ft)

52. Remove guide pins.
53. Fit remaining tube bolts. Tighten to

25 Nm. (18

lbf.ft)

54. Fit rear heater duct connecting pipes.
55. Remove tape from intake seals.
56. Engage lips of sealing rubbers around scuttle

apertures.

57. Fit pollen filter housings, tighten bolts.
58. Fit scuttle side panel to passenger side of

vehicle, tighten bolts.

59. Connect heated screen multiplug, fit to side

panel clip.

60. Connect hoses to heater pipes. Tighten clips.
61. Air conditioning vehicles: Remove seals from

air conditioning pipes and TXV ports.

62. Lubricate new O rings with clean compressor oil,

fit to pipes.

63. Locate pipes in TXV ports, position clamp and fit

clamp bolt.

64. Engage evaporator drain tubes over pipes in

transmission tunnel.

65. Vehicles with SRS only: Route SRS crash

sensor harnesses through bulkhead into wheel
arches, locate harness grommets.

66. Secure harness clips beneath wheel arches,

route harnesses through valances into engine
bay, locate harness grommets.

67. Raise battery tray and air cleaner for access.

Route crash sensor harnesses, secure harness
clips, connect multiplugs to crash sensors.

68. Tighten battery tray and air cleaner bolts.
69. Connect multiplug to SRS control module.
70. Connect SRS harness multiplug to main

harness.

71. Fit air cleaner baffle beneath LH wheel arch,

secure with scrivet fasteners.

72. Fit wheel arch liners.

See this section.

73. All models:Route harness along sill, connect

multiplugs to BeCM.

74. Connect multiplugs at base of ’A’ posts and

secure plugs to brackets.

75. Fit earth wires to stud, tighten captive nut.
76. Connect vacuum hose and multiplugs to brake

and clutch pedal switches.

77. Position closing panel beneath passenger side

of fascia. Secure dianostic plug, connect footwell
lamp. Align closing panel, secure with scrivet
fasteners.

78. Fit carpet retainer, engage sprag clips.
79. Fit seat base trim panel, secure trim studs,

tighten screw.

80. Fit fuse cover to seat base trim.
81. Fit both ’A’ post lower trim panels, secure sprag

clips. Engage door aperture seals.

76

CHASSIS AND BODY

NEW RANGE ROVER

20

REPAIR

82. LHD automatic vehicles only: Fit foot rest,

secure with bolts.

83. Fit radio.

See ELECTRICAL, Repair.

84. Fit wiper motor and linkage.

See WIPERS AND

WASHERS, Repair.

85. Fit steering column.

See STEERING, Repair.

86. Fit centre console.

See this section.

87. Refill cooling system.

See COOLING SYSTEM,

Repair.

88. Vehicles with SRS only: Fit battery.

See

ELECTRICAL, Repair.

89. Reconnect battery negative lead.
90. Evacuate and recharge air conditioning.

See

AIR CONDITIONING, Adjustment.

FASCIA ASSEMBLY - VEHICLES WITH SINGLE
POINT SENSED SRS

Service repair no - 76.46.23/99

WARNING: Refer to SRS safety
precautions before commencing repair.

WARNING: The fascia assembly houses
the heater distribution unit, blower
assemblies and air conditioning

evaporator and is therefore heavy. Assistance is
essential during removal and refit procedures.

CAUTION: When removed from the
vehicle, the fascia should be placed on a
work surface with a soft covering and

supported on suitable wooden blocks.

Remove

1. Remove key from starter switch and wait 10

minutes for SRS back up power circuit to
discharge.

2. Disconnect both battery terminals, earth lead

first.

3. Drain cooling system.

See COOLING SYSTEM,

Repair.

4. Release 2 clips securing heater hoses to heater

matrix and disconnect hoses.

5. Cap both heater matrix pipes to prevent coolant

spillage inside vehicle during fascia removal.

6. Recover refrigerant from air conditioning system.

See AIR CONDITIONING, Adjustment.


Content   ..  21  22  23  24   ..