Range Rover. Manual - part 164


  Index      Land Rover     Range Rover P38 - service manual 1995 year


Search            


Content   ..  162  163  164  165   ..


Range Rover. Manual - part 164


ZF AUTO

25

REPAIR

Refit

7. Clean intermediate plate and mating face on

gearbox casing.

8. Apply Petroleum Jelly to new gasket and

position on gearbox casing.

9. Apply Petroleum Jelly to thrust washer and

torrington race.

10. Correctly position torrington race and thrust

washer to forward clutch hub.

11. Position converter housing and intermediate

plate assembly to gearbox casing.

12. Clean bolts and plain washers and old sealant

from 4 bolt threads.

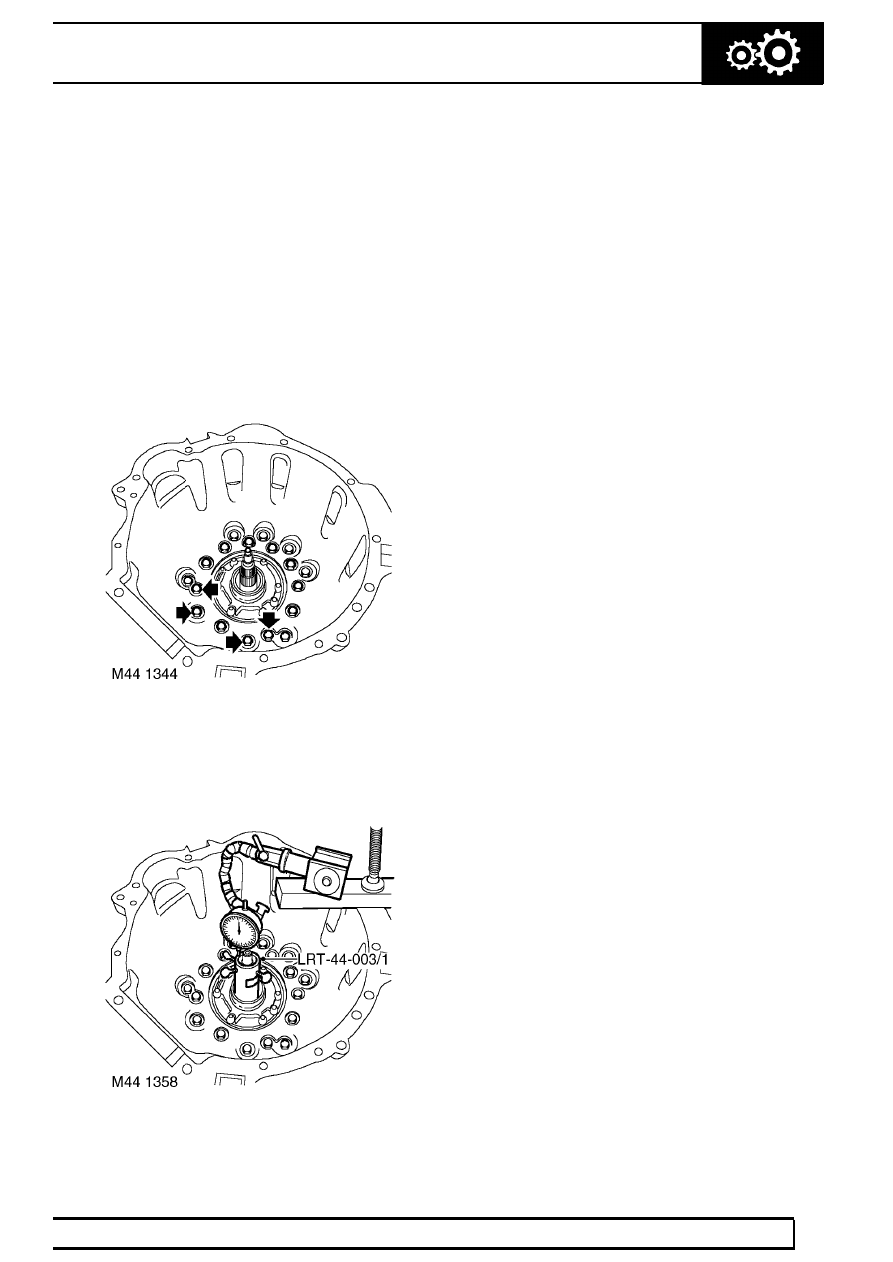
13. Apply High Formular Hylomar sealant to 4 longer

bolt threads and fit bolts in position shown.

14. Fit remaining bolts and tighten progressively in a

diagonal sequence to

45 Nm (33 lbf. ft).

15. Place LRT-44-003/1 into pump housing, tighten

screws to secure LRT-44-003/1 to input shaft.

16. Clamp a suitable steel base to converter housing

flange.

17. Mount DTI gauge and position gauge probe onto

LRT-44-003/1 and zero gauge.

18. Check that the axial end-float is between 0.2 to

0.4 mm. If end-float in not within limits, replace
existing thrust washer, positioned at rear of
intermediate plate, with a suitable thickness
thrust washer to give the required end-float.

19. Remove DTI gauge and base plate.
20. Fit torque converter oil seal.

See this section.

44

AUTOMATIC GEARBOX

NEW RANGE ROVER

26

REPAIR

INTERMEDIATE PLATE

Service repair no - 44.17.20

Remove

1. Remove intermediate plate gasket.

See this

section.

2. Remove selective thrust washer from

intermediate plate.

3. Remove 2 M14 Allen plugs from intermediate

plate, remove and discard sealing washers.

4. Remove 2 M20 plugs from intermediate plate,

remove and discard sealing washers.

5. Remove 2 oil cooler pipe adaptors from

intermediate plate.

6. Remove 8 bolts securing fluid pump to

intermediate plate and carefully remove pump
from intermediate plate.

7. Note position and remove pump locating dowel.
8. Remove and discard ’O’ ring from pump

housing.

9. Remove 6 bolts securing converter housing to

intermediate plate, and release intermediate
plate from converter housing.

ZF AUTO

27

REPAIR

Refit

10. Clean intermediate plate and mating faces with a

lint free cloth.

11. Position intermediate plate to converter housing,

fit bolts and tighten evenly to

50 Nm (37 lbf.ft)

12. Fit new sealing washers to M14 allen plugs, fit

plugs and tighten to

40 Nm (30lbf. ft).

13. Fit new sealing washers to M20 plugs, fit plugs

and tighten to

50 Nm (37lbf. ft).

14. Fit oil cooler adaptors and tighten to

42 Nm

(30lbf.ft).

15. Clean pump housing and mating face on

intermediate plate with lint free cloth.

16. Lubricate new ’O’ ring with transmission fluid and

fit to pump housing.

17. Position pump locating dowel into intermediate

plate.

18. Align pump to dowel and position in intermediate

plate.

19. Fit bolts and tighten in a diagonal sequence to

10 Nm (7lbf.ft).

20. Position LRT-44-003/1 into pump and check that

the pump rotors turn freely.

21. Fit intermediate plate gasket.

See this section.

PUMP - FLUID

Service repair no - 44.32.01

Remove

1. Remove intermediate plate gasket.

See this

section.

2. Remove 8 bolts securing fluid pump to

intermediate plate and carefully remove pump
from intermediate plate.

3. Note position and remove pump locating dowel.
4. Remove and discard ’O’ ring from pump

housing.

44

AUTOMATIC GEARBOX

NEW RANGE ROVER

28

REPAIR

Refit

5. Clean pump housing and mating face on

intermediate plate with lint free cloth.

6. Lubricate new ’O’ ring with transmission fluid and

fit to pump housing.

7. Position pump locating dowel into intermediate

plate.

8. Align fluid pump to dowel and position in

intermediate plate.

9. Fit bolts and tighten in a diagonal sequence to

10 Nm (7lbf.ft).

10. Position LRT-44-003/1 into pump and check that

the pump rotors turn freely.

11. Fit intermediate plate gasket.

See this section.

OUTPUT SHAFT SEAL

Service repair no - 44.20.18

Remove

1. Disconnect battery negative lead.
2. Remove transfer box.

See TRANSFER BOX,

Repair.

3. Drain fluid from gearbox.

See SECTION 10,

Maintenance.

4. Remove seal from gearbox casing using a

suitable lever.

CAUTION: Ensure location does not
become damaged as seal is levered from
casing.

Refit

5. Clean seal location and running surface on

transfer gearbox input shaft.

6. Lubricate seal lip with clean transmission fluid.
7. Fit seal to gearbox casing using LRT-44-001
8. Fit transfer box.

See TRANSFER BOX, Repair.

9. Reconnect battery negative lead.

10. Replenish transmission fluids.

See

LUBRICANTS, FLUIDS AND CAPACITIES,
Information.


Content   ..  162  163  164  165   ..